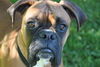
Green tinged Boxer C&C Edit help
Dec 15, 2011 20:37:27 #
RockinRobinG wrote:
quote=maxamillion I just posted this picture to a... (show quote)
Thank you so much. This is great. Especially thank you for giving me details. I didn't think about feathering. I'm learning so much about some of the PP tools. I'm really glad he behaved for you. Being a Boxer, he isn't still for long, even when he is sleeping! This is really the only way I can get ol' wiggle butt to stay still!
Dec 15, 2011 21:09:48 #

Dec 15, 2011 21:28:08 #
maxamillion wrote:
If you would like to take a stab at turning my Max into dog color, please do. Please, tell me what you did to achieve your look in edit. I tried a couple of things but nothing looked right. I'd like to learn from your efforts.
Tried a couple of things (levels, curves), and didn't get what I was looking for. Ended up converting to LAB color (not really necessary), and applying a Color Balance layer. I shifted the green a little towards the magenta, and the blue towards the yellow in the midtones. I also did a little sharpening. Not knowing what color your dog actually is, this may not be the right shade of brown for the dog.

Dec 15, 2011 21:29:06 #
wolfman wrote:
Here's mine. Clone stamp tool & spot healing brush in PSE 10.
Thank you for taking the time to make my Max look dog colored.
Dec 15, 2011 21:37:32 #
RMM wrote:
quote=maxamillion If you would like to take a sta... (show quote)
Thank you so much. I'm glad you mentioned the couple things you did try and didn't seem to work out because I tried those too and thought I just wasn't doing it right. May I ask, after you applied the Color Balance layer and did the other tweaking, what did you do with the layer?
You got his color pretty close--he is more red than brown. His dad was a real mahogany color and Max has some of that coloring.
Dec 15, 2011 21:52:25 #
same thing using layers. Isolate using the lasso at 30ish px what I want to change, then I do an adjustment layer, I did hue & saturation (desaturated) did the change and brushed out the excess delicately with the brush tool

Dec 15, 2011 21:57:37 #
maxamillion wrote:
Thank you so much. I'm glad you mentioned the couple things you did try and didn't seem to work out because I tried those too and thought I just wasn't doing it right. May I ask, after you applied the Color Balance layer and did the other tweaking, what did you do with the layer?
You got his color pretty close--he is more red than brown. His dad was a real mahogany color and Max has some of that coloring.
Under the Layer menu, I told it to flatten the image. I then converted back from LAB to RGB, and saved the image as a JPEG at the highest resolution. All this was in Photoshop CS2, though I'm sure you could do the same in PSE and perhaps some of the other programs like Picasa. I'm not really familiar with them, as I've been using PS for a long time, and feel comfortable with it, so I don't have much incentive to play with the others. i do fool around a bit with GIMP because I have Linux on a couple of machines, and GIMP is now cross-platform (Mac OS X, Windows and Linux).
I'd add that usually, I can get what I want with the Curves adjustments. I think in this case, Color Balance worked better because it is selective in adjusting highlights, midtones or shadows.
Dec 15, 2011 22:08:23 #
Wheezie wrote:
same thing using layers. Isolate using the lasso at 30ish px what I want to change, then I do an adjustment layer, I did hue & saturation (desaturated) did the change and brushed out the excess delicately with the brush tool
Thank you taking the time to work on Max's photo.
Dec 15, 2011 22:13:12 #
RMM wrote:
quote=maxamillion br Thank you so much. I'm glad... (show quote)
Thank you again RMM. I guess the step I have been missing is the flattening layer. I really appreciate the detail you have gone into in order to explain your procedure. I am taking this all in and will practice them in hopes that I can duplicate them in my work.
Dec 15, 2011 22:28:17 #
Layers are great. You can duplicate your image to a new layer and work on it, preserving your original out of sight. It won't be altered unless you crop the image. You can create adjustment layers (curves, color balance, levels, etc.), and you can use different modes (Normal, overlay, screen, etc.) to modify the effects. You can vary opacity to blend one layer with another. You can turn layer visibility on and off to quickly see the result of changes. There's so much you can do, and that's just the tip of the iceberg. If you save in Photoshop or TIFF format, you can preserve all your layers, though you'll lose the actual sequence of your actions once you close the file. When you're satisfied, you can flatten and save, or Save as if you want the best of both worlds. Just buy a big disk to hold it all! Or burn lots of DVDs.
Dec 15, 2011 23:06:27 #
RMM wrote:
Layers are great. You can duplicate your image to ... (show quote)
I'm really excited about this. You have opened up infinite possibilities for working with my pictures. As soon as I recover my pictures from my old computer, I will have some to work with. I haven't done much shooting lately so will depend on them for now. Thank you for your kindness.
Dec 15, 2011 23:21:24 #
You're welcome. I didn't invent this stuff. There are many websites that demo these techniques with sreeen shots and videos. I love
http://russellbrown.com/tips_tech.html
Brown's tips and techniques are helpful, and he's funny as well as informative. Others on this site undoubtedly have their favorites, too.
http://russellbrown.com/tips_tech.html
Brown's tips and techniques are helpful, and he's funny as well as informative. Others on this site undoubtedly have their favorites, too.
If you want to reply, then register here. Registration is free and your account is created instantly, so you can post right away.