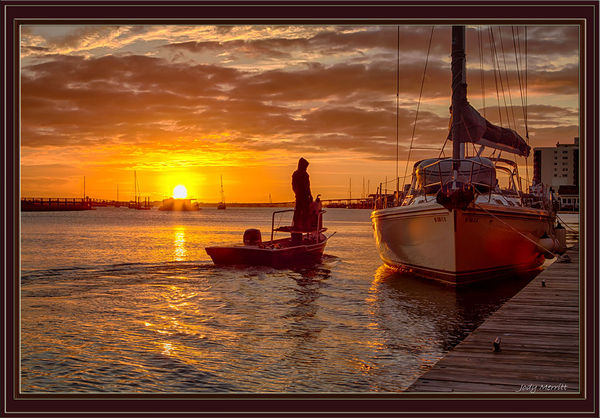
Home town Sunset
Nov 6, 2013 16:50:02 #

Dandee wrote:
I hate sound soooo dumb but what is HDR Toning? Is it part of Photoshop Elememts ?...I'm still learning Photoshop and very curious about how CajunPhotog did that to the shot...Thanks...BTW, all of the shots look terrific...Wish I had been there...
Dandee, I have Photoshop CS-5. The HDR toning window is an adjustment that lives in a group with Shadows/Highlights, and Variations. It is not an "adjustment layer", you get to by going "Image" < "Adjustments" < "HDR Toning". High HDR adjusting can turn a decent picture into a hideous mess, so you need to be gentle with it.
Nov 7, 2013 09:33:07 #
Red sky at night; sailor's delight. A delightful photo, thanks. :thumbup:
Nov 7, 2013 14:41:18 #
RichieC
Loc: Adirondacks
jam wrote:
Thanks to everyone. Love this forum. keep the comments coming. That is how we improve. I did make some changes
Half way between this vers and the first... You are getting the blue in there, contrast in the clouds, but with the increased contrast- I am able to "tell". For me, the too solid black boat driver is now where my eye travels. I don;t feel the sun's glare "wrap" around him like in the original . I suppose the effect of the sun means some glow needs to remain- softening the edges.
;0)
Good Job!
Nov 13, 2013 22:54:50 #
Nov 13, 2013 23:41:57 #

I do most of my photo editing with CS6 and NIK Software. I used Viveza2, with several control points to do the following. For the sun, I increased saturation, but made it bit darker, reduced contrast. There was a hot spot in the water from the sun reflection which I desaturated then darkened. In the blue of the clouds I lighted them up just a bit and increased their structure and saturation. I then switched to Color Efex Pro 4, and stacked 3 presets: in the first, I used a White Neutralizer to set automatic light balance. I then used Pro Contrast and used the Dynamic Contrast slider to separate the contrast out just a bit. I ended up with Darken/Lighten center to place an artificial light source in the sun's reflection in the water. It was already bright, but this served to darken the edges just a bit in a very feathered fashion, to give the photo almost a 3D effect. I then returned to CS6 and used the Layer Opacity slider to "dial back" the effects I had just produced, blending it in with original photo. Finally, I added a matte.
I must admit that I found the original photo quite satisfying as presented.
I must admit that I found the original photo quite satisfying as presented.
Variation 1 on Home town Sunset
If you want to reply, then register here. Registration is free and your account is created instantly, so you can post right away.