Posts for: rfcoakley
Aug 23, 2017 15:59:47 #
Gene51 wrote:
My guess is that you could probably use the -1EV i... (show quote)
Thanks for the feedback Gene (I also responded with PM).
The exposure compensation was done because my histogram for a base shot indicated a large right sided gap. I was hoping that the EC would let me uncover more in post than I could otherwise. You certainly are correct that the scene may not be a good one for application of HDR techniques. However, I also was hoping that bracketing the shot would help overcome the poor lighting conditions that were present. Of course, "you can't make a silk purse from a sow's ear..." Also, in hindsight, since I wasn't using a tripod, I should have made sure that I'd achieve an adequate shutter speed for each shot in the sequence by using a higher ISO for the set (alternately, I could have employed auto ISO, but I also didn't want a varying ISO between bracket images).
Aug 23, 2017 15:48:37 #
Rongnongno wrote:
img http://static.uglyhedgehog.com/upload/2017/8/... (show quote)
OK, we're getting a little closer to actually communicating. Alignment has no bearing on the single image that I posted, but camera shake was clearly an issue. The bracket set that I shot were all taken at ISO 250 - not shutter speed 1/250 second. I shot in aperture priority for a different shutter speed on each of the five shots. I bracketed set was done hand held in continuous shooting mode. The one with the highest exposure (the +2.67EV one that you are commenting on) ended up at 1/10 sec shutter speed. Clearly, too slow for achieving a good image result. So, I'll leave the results of that image with that conclusion.
I'll admit that I'm not an expert on the various HDR processing techniques, but your assertion that I "don't have a clue to the software that I already own" seems a bit over the top. Your assertion that I don't even know how to merge multiple files in photoshop/lightroom (via ACR or otherwise) makes little sense given the original post that included examples that did just that.
Aug 23, 2017 13:12:05 #
Rongnongno wrote:
Errr...
The images are not even aligned correctly!!!!!
The whites are completely washed out too.
The images are not even aligned correctly!!!!!
The whites are completely washed out too.
Perhaps you're, in fact, attempting to provide reasonable feedback. If so, its not working. You do have me confused. You referenced my post regarding post-processing of a single image (+2.67EV exposure) and comment about image alignment being improper. How do I align layers with only one layer? If you're, instead, referring to the HDR processed images, the alignment for each of those was done by the HDR host application. Do you have some trick for improving how those applications align layers before combining to HDR image?
Aug 23, 2017 12:25:18 #
rmalarz wrote:
With proper exposure techniques, you could achieve those results without having to purchase software to do so.
--Bob
--Bob
That wasn't the point of the experiment. Not sure what you mean by proper exposure techniques, but the five shots were matrix metered with a +0.67 exposure compensation. From the bracket set, I had a bunch of different exposures available with the highest exposure at +2.67EV (raw histogram well to the right, but still within limits). Results of my post-processing of that image are shown below.
Aug 23, 2017 11:52:59 #
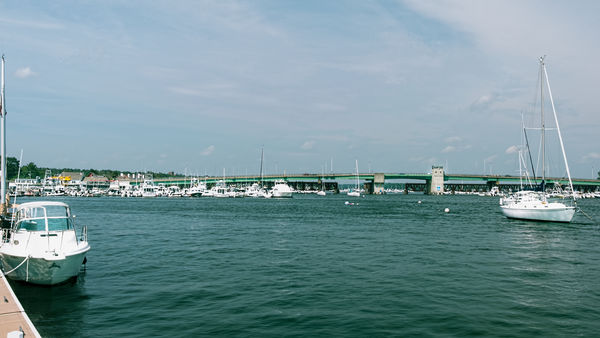
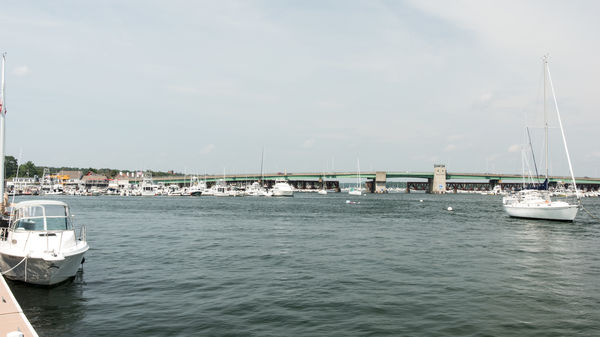
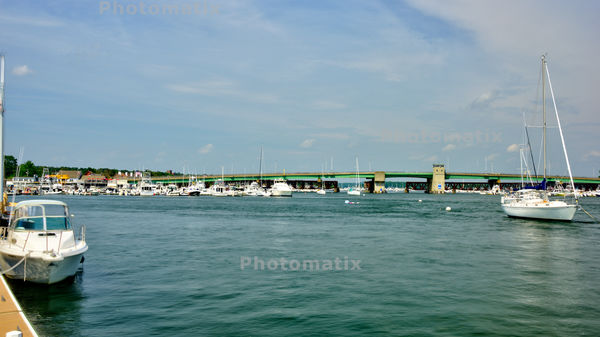
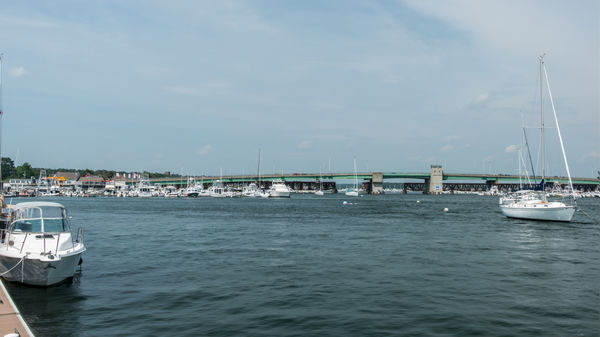
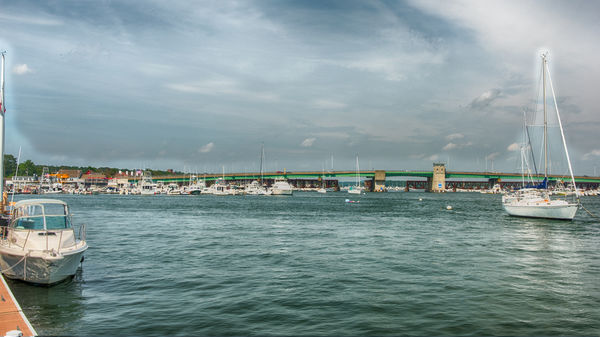
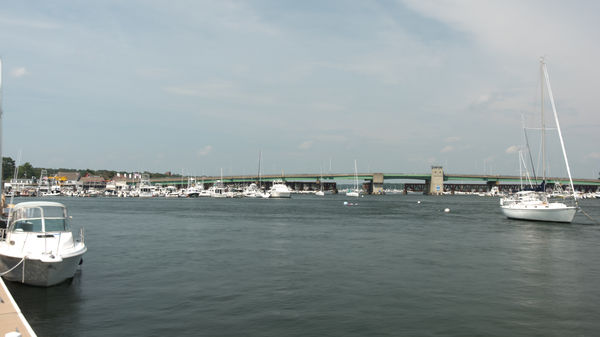
I did some shooting in Newburyport, MA yesterday afternoon during some pretty lousy (bright yet hazy, late morning/early afternoon) lighting conditions. I knew that I wouldn't have very good results. For one sequence, I did a five shot bracket set with EV range 0,-1,+1,-2,+2. The shots were handheld at ISO 250, F/22.0 (aperture priority) with varying shutter speeds and with a polarizer filter. I post-processed the five shots using four different HDR processing applications. In each case, I tweaked the HDR settings in an attempt to get the most pleasing result (in my view). Of note, I very likely could have gotten better results from some of them with more tweaking of their various controls. My unscientific results: Photomatix was a clear winner - it did far better than I expected to get from the very harsh lighting over the scene. Next best was Lightroom - better than the others, but still dull when compared to Photomatix. Results from Photoshop and NIK were not good at all. The NIK result had significant ghosting that might have been reduced/eliminated if I selected the optional deghosting option, but it was otherwise so inferior that I didn't bother to try that.
Below are five images in following order:
(1) the (0 EV) source image.
(2) the Photomatix HDR (its a trial version with watermark)
(3) the Lightroom HDR
(4) the NIK HDR
(5) the Photoshop HDR
...I guess it may be time to purchase Photomatix license.
Below are five images in following order:
(1) the (0 EV) source image.
(2) the Photomatix HDR (its a trial version with watermark)
(3) the Lightroom HDR
(4) the NIK HDR
(5) the Photoshop HDR
...I guess it may be time to purchase Photomatix license.
Aug 22, 2017 09:16:34 #
As others have stated, changing perspective in post can result in adding distortions in parts of the image that make it appear unnatural. In the case of the image of the arch, simply applying an adjustment to straighten the buildings on both sides, can result in distorting the main subject (the arch) such that it appears squished and too narrow at the bottom. I played with the source image using combinations of perspective warp and content aware scaling to try and eliminate that. However, it most cases, I think that its probably best to minimize the application of perspective changes in post.

Aug 15, 2017 23:29:12 #
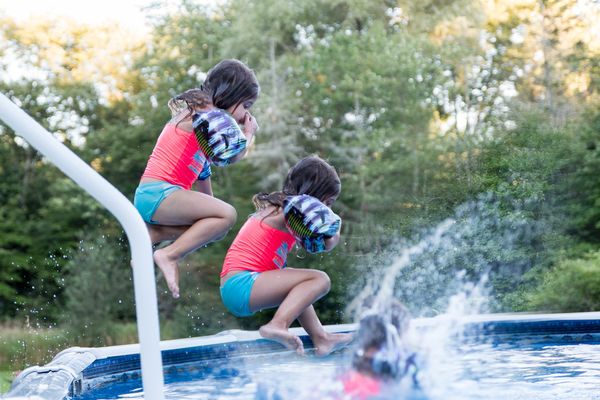
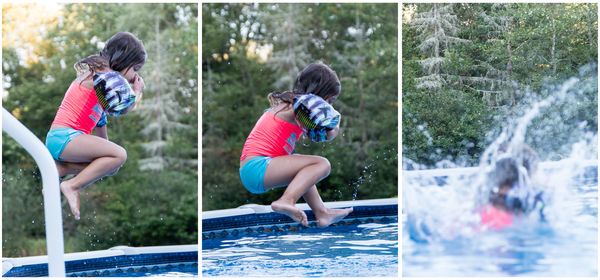
Here's another attempt. In the three source images, the background is the same and there is no overlap in between the jumping child between any of the images. So, I was able to put align the backgrounds of all three images in separate layers and created a mask for the two top layers. Then, I simply painted on the masks with black over the background and white over the jumper. I also cropped it for improved composition. I like it better than the other versions. However, wish I took shots from a slightly different position to keep the ladder from being in the heart of the scene. It overlaps the jumper's first position making it fairly difficult to remove. A lesson for future shoots.
Aug 15, 2017 22:53:18 #
thanks to all for the feedback. Clearly, the added effort to create the second version made for a much better image. Still wondering what post processing techniques that others might use to illustrate a motion sequence. Maybe I'll experiment with image overlays and post results.
Aug 15, 2017 22:47:58 #
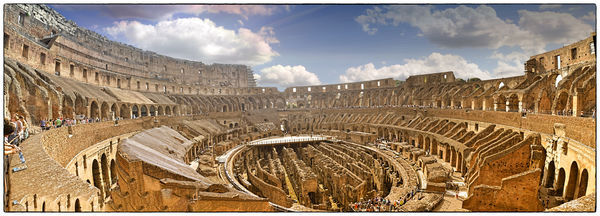
thanks to all for the feedback. On the sky, I did think that a choice of something with less deeper blues and with fewer clouds might work better. I'm not sure, however, what was meant by it being "perspectively wrong." The sky overlay in my composite was positioned horizontally very close to where it was it the scene that I "borrowed" it from. The sun is probably of most concern. In the composite, I placed the sun behind the coleseum wall about 20-30 degrees left with respect to the orientation of the camera. There were no obvious shadows that would indicate a different position for the sun. However, a review of the composite does seem to show greater light on the left side of the image suggesting that the sun may have been low in the sky shining from the right side. I checked this via the photographer's ephemeris for the specific date and time of day (about 11am in Sept) that I was there. It does, in fact, show that the sun was roughly 20 30 degrees to the right of the camera's orientation. So, it would have been better to position the sun in that area or, perhaps, to not include any sun representation in the composite.
Aug 14, 2017 23:09:02 #
hotel Z'Intonio, Scala, Italy...beautiful location off of the Amalfi Coast


Aug 14, 2017 17:51:50 #
Here's a version that took a little more work. I setup a template with three rectangle shape layers aligned to cover the 3 source images in the contact sheet. I then added the original three shots as additional layers i photoshop and used the 3 rectangle shape layers as clipping masks for the corresponding source image. Then, transposed/resized each of the three shots. In this version, I was better able to align the images (e.g., the pool edges match horizontally across the three images)
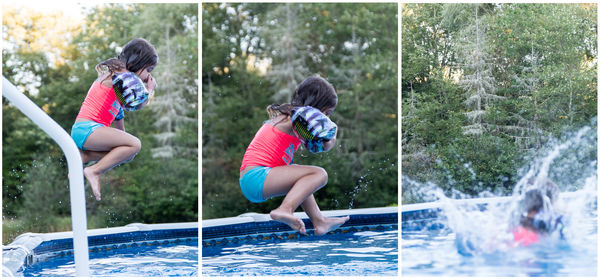
Aug 14, 2017 17:20:20 #
I often will use photoshop contact sheet tool to combine multiple snapshots into a single image. An example is attached. I make sure that the source images get common exposure settings and common post processing before the merge including identical image sizes after any cropping. I also size the contact sheet at the exact total pixel size of the combined source photo dimensions (per number of rows and columns selected). Is this something that others use as well?
Aug 12, 2017 13:31:47 #
rfcoakley wrote:
there were a few obvious problems with the two sou... (show quote)
one point of clarification: source images were taken at min zoom of 18.0mm...27mm is the 35mm equivalent
Aug 12, 2017 13:28:38 #
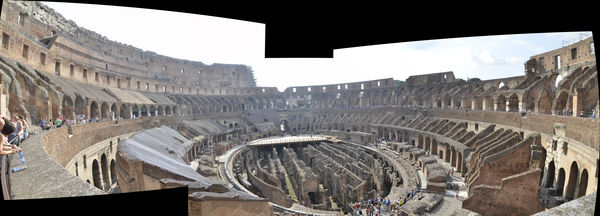
there were a few obvious problems with the two source images. They were taken at 27mm with 18-105 kit lens on D7000. I discovered after the fact that I had erroneously left bracketing mode on in error from prior shots so left image had 0.33 exposure comp set resulting in F8.0; 1/160; ISO 100 while right image was F8.0; 1/200; ISO 100. I tried to equalize the raw images before merger. Also, the sky is clearly blown out - should have used a polarizer and been more diligent in checking histogram/blinkies after shots. The blown out sky was pretty easy to select for replacement via post processing - I simple used photoshop magic wand. I used a couple of overlay layers for the sky. One is blue sky/clouds from another image during the trip; other is a stock sun image. I ended up using hard light blend mode to add the sun image to the sky image at about 60% opacity. I also appiied a black/transparent gradient to mask of the blended sun. The coliseum portion was edited with NIK Color EFEX Pro 4 and with Topaz detail 3. Besides adding a lot of detail, I wanted to show greater color depth on the right side of the image.
Aug 12, 2017 12:58:17 #
fooling around with some post processing techniques. Did a stitch of two photos (result of merge is first image below). Result after various post processing steps is second image. Any comments?