Posts for: Rick36203
Feb 25, 2017 00:16:15 #
I don't know if the combo you list is right for you.
I own several Yongnuo products but not the 685. However, after reading the user manual I see it still does not function as a Nikon optical command flash, but will function as a Nikon optical remote. This is not really important because your D7100 pop-up will work as a Commander. The 685 will work in TTL, manual and slave modes, and it will give you High Speed sync capability both on and off-camera.
The 560IV works on-camera in 'manual' mode, or as a 'manual' radio controller for any other off-camera 560IV, 560III, and probably the 685. The 560IV is not HSS capable. When it is used as a radio commander for an off-camera 685, the 685 will not be able to use HSS. The 560IV also does not use TTL. It does have basic optical slave functions S1 and S2, but does not function as a Nikon optical remote (meaning power and Zoom cannot be adjusted from the camera's pop-up).
I purchase from vendors that have a good reputation and easy return policy (in case something arrives DOA, etc.). I get Yongnuo products from B&H and Amazon. All Yongnuo products originate in China, but I make no attempt to order 'directly' from any vendor located there.
Feb 24, 2017 22:02:50 #
In Lightroom you have to Click on the small curve Icon in the lower right section of the Tone Curve Panel in order to access 'Point' instead of 'Parametric' adjustments. Then you can move the blacks to white and whites to black as you were instructed. You can save that as a new Tone Curve Preset and call it 'Inverse'.
Feb 12, 2017 03:37:55 #
PAR4DCR wrote:
... A 16 X 20 canvas print for $22.00... Need to know how to set up image for this size... I use Lightroom 5.7 for processing. Don
Since you are limiting your file prep to LR you will need final dimensions for the 16 x 20 wrap (which is a 4:5 ratio crop) to be 19 x 23 (which is not a 4:5 ratio crop).
If I had unimportant parts on all edges of my image I might just export the un-cropped image at its original resolution. I would then use Sam's software and template to position and crop the photo after uploading.
If I already had a 4:5 ratio crop with no available waste, and only LR to process, I would take the processed photo to the print module. From there I would use the settings indicated for a JPEG print. When printed it would give you a 16x20 image plus a 1.5" border on each side and should fit perfectly in Sam's template.
.

Feb 9, 2017 16:33:27 #
tradio wrote:
Vignetting has a time and place, but I don't think it enhanced you images. I feel it took away from them. Great shots otherwise.
I'm afraid I must agree with tradio.
I use a lot of vignettes to help gently guide the eye to the main subject. But, I normally want them so subtle that the viewer doesn't even know that one was used. And, I never want one to cover an area where I want the viewer's eyes to look.
Feb 9, 2017 16:10:01 #
loosecanon wrote:
Assuming I have a really sharp and well-processed original file of a Canon crop sensor photo, what is the realistically maximum sized print I can have made by a pro lab? Is the answer inherently different for metal or premium glossy or other paper?
I believe the maximum size is more dependent on number of pixels available and the minimum viewing distance, than does the material or finish used for a print.
Read these (there are plenty of others available on same subject) :
http://www.photokaboom.com/photography/learn/printing/resolution/1_which_resolution_print_size_viewing_distance.htm
http://www.pointsinfocus.com/tools/minimum-resolution-calculator/
Feb 7, 2017 22:53:41 #
I agree with SS and Jim.
I usually use the Avenger A2030D kit with the turtle base for my Buff strobes. Matthews also makes good line of C stands. For that matter, probably most brands of C stands will be adequate for your needs if used properly. I chose the turtle base for easy breakdown and storage(or transport). The sliding leg models are good for setting up on uneven terrain.
http://www.bhphotovideo.com/c/product/243966-REG/Avenger_A2030DKIT_A2030D_Turtle_Base_Century.html
Be sure not to go too lightweight when you choose a stand, or you may be repairing or replacing broken strobes. And, even with a C stand, sand bags are often needed.
Finally, if you plan on using the arm to mount your light it's best to pick up a pin like this with your initial order.
http://www.bhphotovideo.com/c/product/243787-REG/Avenger_E650_E650_Baby_5_8_Pin.html
The above model is not air-cushioned as Capt C mentioned. I do have to make sure that I have a firm grip when I make height adjustments.
Jan 29, 2017 18:33:58 #
tainkc wrote:
Something is off...
The White Balance appears a bit too warm for me. The crop may also be somewhat non-traditional, missing a little more on camera right than I might have done. And, although I've captured the same many times myself, I usually prefer it when the subject's eyes are not cut quite so far to one side.
Still a nice photo.
Jan 29, 2017 15:27:32 #
Rongnongno wrote:
Wow, it the first time in years that I see someone writing a CMD file.... 

You are aware that free programs exist to that too and with more flexibility?
You are aware that free programs exist to that too and with more flexibility?
I'm sure there are plenty of free apps with nice GUIs. I didn't look for one. I started with Command line prompts in the early 1980's before Windows. I gave up most user coding over 8 years ago, but I still routinely use simple batch files for certain tasks. Old is not necessarily useless (I hope).

Edit: And, as others have said it can be done with Lightroom, and I just noticed 2 fairly quick ways to do batch renaming in Bridge... either during or after import from camera.
Jan 29, 2017 14:17:35 #
susie-q-tip wrote:
...they said it is no way to change the prefix. How can I identify the 2 cameras from each other when processing images?" ... don't want to have to manually rename every file ...don't have that kind of free time.
I don't know if this will help you or not. If you are working with a Windows OS you do not have to rename each file ONE at a time.
If you don't have the time to learn the command line 'rename' options, you can copy all your new images in a temporary 'renaming' folder.
Place the batch file that I am attaching in the renaming folder(it only looks for files in the folder where it is placed).
Create a shortcut to that batch file on your desktop so you don't have to navigate to it in order to run it.
After you run it move the images to their final storage folder. You can modify the workflow or batch file to meet your needs.
.
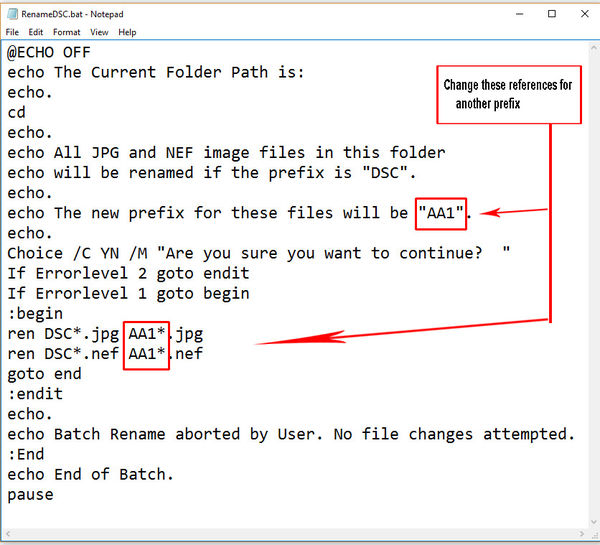
This is the executable batch file
Attached file:
(Download)
This is the Content of the batch file. Can be changed with any text editor.
Jan 29, 2017 13:25:33 #
I would check to be sure that I had not pressed the 'Qual' button and rotated the command dial to the 'Raw' only setting (usually while attempting to adjust iso and pressing the wrong button). And, I would also make sure that I had not accidentally changed 'Role played by card 2 ' to 'Backup' in the 'Shooting Menu'.
Jan 26, 2017 13:21:09 #
Geegee wrote:
If I want to reduce the images to 1024 pixels on the long side will it do that to a mixture of horizontal and vertical pictures? Will it know which is the long side?
I forgot to mention that Image Processor will create a sub-folder called 'JPEG' in your destination folder to store the re-sized 'copies' (in case you have trouble finding them).
Jan 26, 2017 12:50:48 #
Geegee wrote:
If I want to reduce the images to 1024 pixels on the long side will it do that to a mixture of horizontal and vertical pictures? Will it know which is the long side?
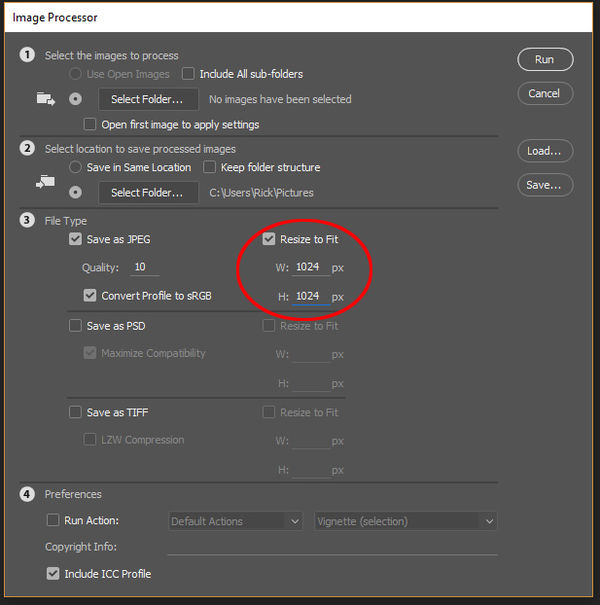
Using image processor set both width and height to 1024. Landscape images will be 1024 pixels in width and height will be smaller. Portrait images will be 1024 in height and width will be smaller. Square images will be 1024 pixels on both width and height.
Jan 25, 2017 16:33:49 #
Geegee wrote:
I see that you are familiar with Photoshop. Do you know how I can reduce the size of a batch of pictures in Photoshop without having to do them one at a time?
The sample on page 1 is from the 'Save file' interface that appears after editing an image or group of images in ACR and pressing the save button. It is NOT my preferred method for simply resizing a large group of images. For that I use Photoshop's 'Image Processor'.
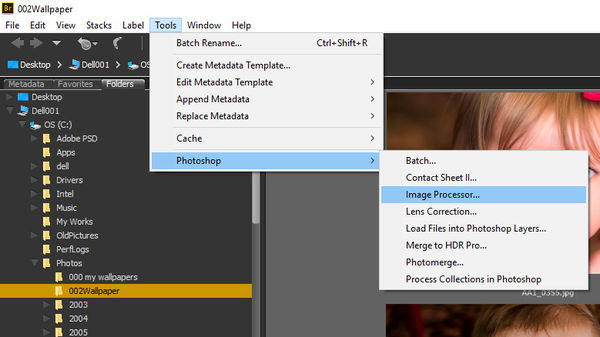
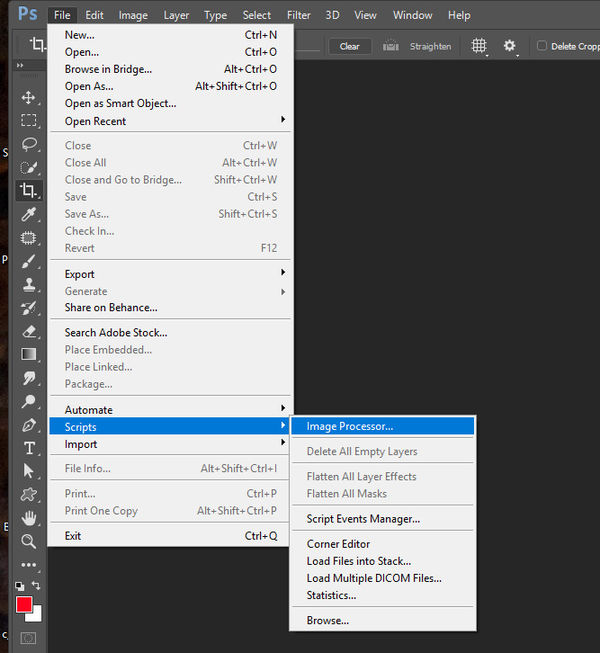
You can access the 'Image Processor' from Bridge by selecting Tools>Photoshop>Image Processor, or directly from Photoshop by selecting File>Scripts>Image Processor.
You can re-size, and/or add other batch processing, to the files you selected from Bridge, or all open files from Photoshop, or entire folders at once.
.
Accessing Image Processor from Bridge
Accessing Image Processor from Photoshop
Jan 24, 2017 15:21:59 #
As Sharpshooter said, it may be your focus assist. They may also fire pre-maturely if they have only a simple slave function, and you are using TTL with the on-camera flash. If I want to trigger my studio strobes via the optical slave function I use manual (at lowest setting) on-camera. Otherwise, the TTL pre-flash will interfere.
Jan 24, 2017 15:00:34 #
GoofyNewfie wrote:
Thanks, Rick! I forgot that option was there.
You're welcome. The method in the sample above retains the original number of image pixels, and it changes the compression (and quality) until the final storage size of the file size is met.
The "select megabyte size option" in the "Image Sizing" section (below in sample) changes the number of pixels in the image to the correct "Megabyte" setting, but it does not adjust, or take into account the quality setting. Since it ignores jpeg compression (which is "image content" dependent) the final file storage size will not necessarily be what you want, but there will be "x" MBs of "pixels" in the file.
I personally prefer to keep at least 9 or 10 quality for most purposes, and I would adjust the # of pixels to meet my uploading needs.