Posts for: kskarma
Jun 23, 2018 08:04:26 #
Longshadow wrote:
I have a waterproof card wallet that also fits in my pocket. I put the used one in the open space, and use the next in line. No problem keeping track of them at all. (They are numbered also.)
Numbering your cards..AND batteries.. should be one of the first things we do nearly as soon as they are unwrapped..!! Unless you have very good organizational skills, it's WAAAY too easy to forget which is which. Now, I know you can re-insert them into your camera and ID them, but that's just one extra step and a waste of time..
Remember to use a Sharpie, or something similar...and NOT a pencil or anything that might contaminate the card slot.
Jun 22, 2018 18:22:32 #
The size of SD card I use is 7/8" X 1 1/4"...these fit just perfectly...!
Wait....maybe I did not understand the question.....sorry..!
Wait....maybe I did not understand the question.....sorry..!
Jun 22, 2018 18:15:00 #
If you were with a friend, and you saw something that made you say..."Hey, look at THAT!!", chances are you are looking at an interesting photo subject. I've found that other people are not the least bit interested in what f-stop, ISO, lens, or camera setting you used, but they DO like shots that tell them something about another place or person. (If that person is THEM or a member of their family, then your shot is twice as good.....[G].!)
Jun 18, 2018 14:09:52 #
Kozan wrote:
Also, I almost always use a flash outdoors as well as indoors. Some will disagree with me, but that little pop of flash, even at -3EV will make the image look better. Unless you are doing a landscape. But for portraits, it's a must. Trust me on this one.
Agree with you completely...it seems counter to 'common sense' but many times the best photos are taken by using flash-fill outside....and NO..or very little flash indoors!! With modern digital cameras with high ISO ability, your indoor shots will not have that harsh flash tell-tale look...and your outdoor pix with look a lot more professional.
And with digital cameras, try taking a few photos using each method and see which you...and your subjects...like best..
Jun 17, 2018 18:23:02 #
The suggestions to acquire and use Photoshop Elements...(along with Premiere Elements, if you plan on doing any video)...are right on target. Oftentimes you can get a package deal of both of these programs for around $60-70. The "Elements" versions of "Full Blown" Photoshop have about 80% of the capabilities of the complete version for about 20% of the cost...a great deal. One of the BIG advantages of spending the time learning some of the basics of Photoshop, is that it is pretty much the Gold Standard of photo editing, publishing, graphic arts, etc. Learning to do the simple things such as cropping, adjusting saturation, contrast, curves, sharpness, etc...is not difficult at all, and can add so much to your photos. "Mastering Photoshop" is a different story as it has tons of options, tools, etc....most of those are not going to be used by a beginner...but ALL of the 'entry level' techniques can serve as stepping stones to more advanced options, if so needed later on...
Another tip....most all of the major software houses will let you download any of their programs for a free 30-day trial. This can give you a chance to see if the program will do what you want?...worth the $$$?...works with your gear, etc?..!!
I also agree with the advice to refrain from spending the big bucks for the D-810...unless you know specifically WHY you might need that body. I've been at this for many years and currently have a pair of D-750's...which meet...and surpass, all of my widely varied photo needs. And...if you need to save some $$$...and most of us do....check out refurbished cameras (also lenses and other gear) from Nikon. I've bought one of my D-750s and a D-700 from them with nary a bit of trouble... (I should say, too...that in my 50+ years of shooting a wide range of Nikons, I have yet to have a single one of the couple of dozen bodies I've owned, fail...!!)
Jun 16, 2018 16:49:07 #
MrBob wrote:
As Blaster24 stated, the little Ultrapod is the handiest and most versatile piece of equipment I own... throw it in your suitcase, use it as a small tabletop tripod or use the velcro straps to attach it to vertical or horizontal posts . One stays in my camera bag.
Totally agree...these compact devices really give a lot of "bang for the buck"...they are small, light, fairly sturdy and best of all, pretty inexpensive. Be aware that there are two sizes...the Ultrapod I and the Ultrapod II. The smaller one...(I) is about 5 inches long folded and the (II) model is around 7" in length. Prices are from $12-$25...depending on your source.
Jun 16, 2018 16:42:17 #
While I have sort of a 'love' affair with tripods....I own and use close to a dozen, different sizes, styles, etc....I have a great 'work-around' for those times when it's not real feasible to lug around a standard tripod...even a monopod can be a bother at times. Now, this 'tip' pretty much applies to those of us who use soft-sided camera bags...in my case, I've been a long time user of Domke models. They are made of a heavy duty canvas, but still pretty flexible. SO...when I need some stable camera support for a time exposure or a longer lens, what I do is to employ my camera bag as a super sized BeanBag…! I can nearly always find a flat surface such as a car fender or hood, a wooden fence, a tree stump, a nice rock...and, of course, the ground is nearly always available...! After placing my bag in the approximate position, I form a bend...or 'valley' in the top flap and cradle my camera there... It takes but a few seconds to get it aimed correctly...shooting a frame or two can verify that it is positioned accurately...and then, I'm in business..!!
If you don't use a softer camera bag, a rolled up jacket, hat or towel can work just as well. And NO, I did not get permission from Manfrotto, Giottos, etc. to suggest this FREE hint...! Depending on how stable your 'rigging' ends up, you might want to use the 'self-timer' to get a smooth release....
If you don't use a softer camera bag, a rolled up jacket, hat or towel can work just as well. And NO, I did not get permission from Manfrotto, Giottos, etc. to suggest this FREE hint...! Depending on how stable your 'rigging' ends up, you might want to use the 'self-timer' to get a smooth release....
Jun 16, 2018 16:17:57 #
(Panorama)
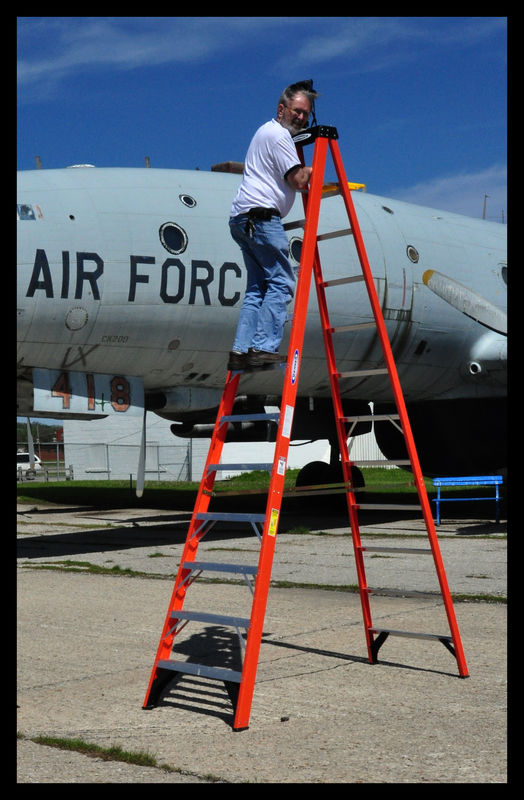
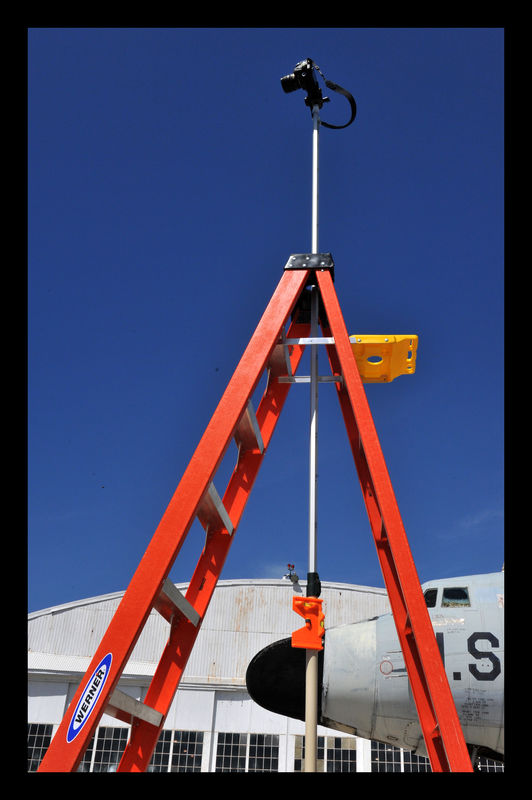
Thanks to those 'hogs' who have viewed and commented on this Panoramic photo. I've added a few more 'action shots' that illustrate my gear...and MY graceful techniques in doing the photo. The first two photos show the 12 foot ladder I used for this...it's a high quality ladder with a wide and stable base. When I'm a dozen feet in the air and concentrating on my camera work, I don't want to have to be concerned about my support... The first of these photos shows the ladder with my camera mounted at the top...the second one shows how I can achieve an additional 4 feet of height. To do this, I use a 'painters pole' that is 16' long and slip it through the 'paint bucket holder' at the top surface of the ladder. I can view the photo I am taking with a Wi-Fi link to my iPhone or iPad and 'pan' the camera by rotating the painters pole... The second of these shots shows a common "fence level" that is used to get the pole in a truly vertical position...
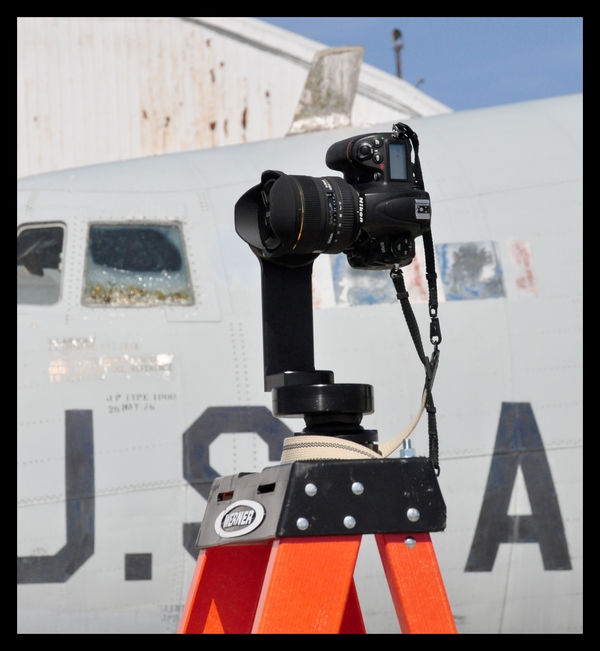
The next two shots are of my 360Precision pano head. This is an 'over-engineered' head made in England...don't think they still make this model BTW. When I was first starting to do pano work, I had read a lot of 'warnings' about making absolutely certain that the camera and mount were exactly level and..even more critically, that the "nodal point" ….more accurately called the "Entrance Pupil"..or the "No Parallax Point", had been determined. This point being the location IN the lens about which the lens should be pivoted in order to achieve images that are accurately registered so that they can be correctly 'stitched' together. As can be observed in this pair of photos, the pano mount I used DID do this....the company offered many mounting options, each of them calculated for a specific lens/camera combination. You will note that this mount has the ability to not only rotate 360 degrees in the horizontal plane, but also to be rotated in a full circle in the vertical plane. Different mounts for different lenses offer the correct detents to match the field of view of each lens...! It's an impressive piece of hardware and does exactly what it is designed to do...
Now...that being said....since I have used this mount...(and it works perfectly...!)...on several projects, I have come to the conclusion that with the amazing ability of PhotoMerge to align and stitch images that...to be charitable....are 'less than perfect'....I feel totally comfortable now, doing most of my panos hand-held! I do try to maintain a level 'sweep'...and make sure that I have adequate 'overlap' from image to image. But I know that current software can blend, align, mask and merge anything that is even close to being correct. I DO make two passes on any of the panos I do, just to make sure that I have one good series. This means that I don't have to tote around a bit of heavy gear, but can shoot a pano series anytime the subject calls for one....
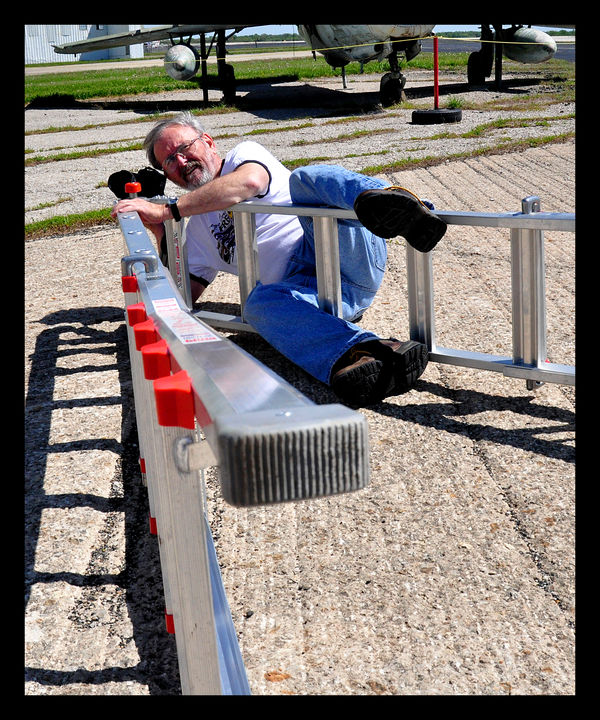
Finally.....pay attention to the last image......when doing ANYTHING on a ladder...even just using a kitchen step stool....use utmost caution....a fall of even a few feet can cause serious injury...or even be fatal..!
SO...gotta 'fess up now...the last shot was staged just to illustrate what CAN happen....NEITHER the photographer nor his gear was injured making this photo....!!!

The next two shots are of my 360Precision pano head. This is an 'over-engineered' head made in England...don't think they still make this model BTW. When I was first starting to do pano work, I had read a lot of 'warnings' about making absolutely certain that the camera and mount were exactly level and..even more critically, that the "nodal point" ….more accurately called the "Entrance Pupil"..or the "No Parallax Point", had been determined. This point being the location IN the lens about which the lens should be pivoted in order to achieve images that are accurately registered so that they can be correctly 'stitched' together. As can be observed in this pair of photos, the pano mount I used DID do this....the company offered many mounting options, each of them calculated for a specific lens/camera combination. You will note that this mount has the ability to not only rotate 360 degrees in the horizontal plane, but also to be rotated in a full circle in the vertical plane. Different mounts for different lenses offer the correct detents to match the field of view of each lens...! It's an impressive piece of hardware and does exactly what it is designed to do...
Now...that being said....since I have used this mount...(and it works perfectly...!)...on several projects, I have come to the conclusion that with the amazing ability of PhotoMerge to align and stitch images that...to be charitable....are 'less than perfect'....I feel totally comfortable now, doing most of my panos hand-held! I do try to maintain a level 'sweep'...and make sure that I have adequate 'overlap' from image to image. But I know that current software can blend, align, mask and merge anything that is even close to being correct. I DO make two passes on any of the panos I do, just to make sure that I have one good series. This means that I don't have to tote around a bit of heavy gear, but can shoot a pano series anytime the subject calls for one....
Finally.....pay attention to the last image......when doing ANYTHING on a ladder...even just using a kitchen step stool....use utmost caution....a fall of even a few feet can cause serious injury...or even be fatal..!
SO...gotta 'fess up now...the last shot was staged just to illustrate what CAN happen....NEITHER the photographer nor his gear was injured making this photo....!!!

Jun 15, 2018 23:53:05 #
Some years ago, I was backpacking in the Rocky Mountain National Park...in Colorado. I had just finished setting up my tent and gear at a "back-country" site and was the only camper there...solo trip, by the way. As soon as it got dark, since there was nothing else to do, I got in my tent and slipped into my sleeping bag. It did not take long before the day's exertion took its toll and I went to sleep. I had only just drifted into light slumber when I heard a noise, like a cough. My first thought was that it was the person who had reserved the one other campsite and had arrived late due to the rain that day. I rolled over to look out the front of the tent...only to see across the clearing...some 40' or so feet....a black bear...!! I had my camera fairly close by...at the foot of my sleeping bag....and my first thought was to get it and take a few photos of this visitor....but then, I had this mental image of the rangers finding my chewed up body the next morning with my camera by my side....I thought of them taking it to a One Hour...and looking at a series of my very Last Photos.....grim thoughts....
So....putting my safety first, I remembered that I had heard that black bears are not aggressive and often times, just shouting at them will drive them away. So that....is exactly what I did....HEY BEAR....HEY....HEY....!!! With one quick look, the bear turned and ran into the woods...probably to do what bears do in the woods....! This is a true story.....
So....putting my safety first, I remembered that I had heard that black bears are not aggressive and often times, just shouting at them will drive them away. So that....is exactly what I did....HEY BEAR....HEY....HEY....!!! With one quick look, the bear turned and ran into the woods...probably to do what bears do in the woods....! This is a true story.....
Jun 15, 2018 23:39:38 #
(Panorama)
Low Lids wrote:
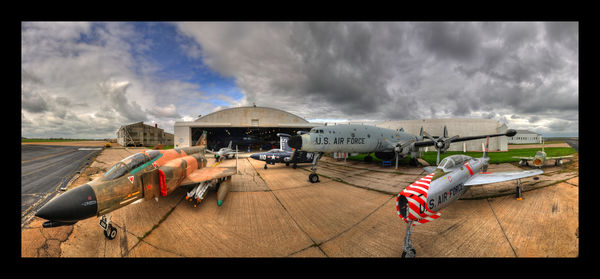
Great shot of a historical bunch of planes! Brought back memories of working on some of them. You went through lots of work for the picture but your results were worth it!!! The download was beautiful!!!
Thanks for your comment...and, when I am at the Museum, I hear a lot of people with similar remarks...how they at one time, worked on, flew, admired, etc. one of the planes on display. Many people have some strong connection with these aircraft.
And...I had fun setting up, shooting and processing the photo...glad you liked the download...the original image is 22 meg...too large for here...!
Jun 15, 2018 17:59:59 #
(Panorama)
Every spring, our local Combat Air Museum in Topeka, KS, sponsors a Celebrity Pancake Feed to raise funds for the operation of this entirely volunteer-operated air museum. In order to create enough room inside the hangar for the preparation of the 'cakes as well as seating for all of the guests, some of the planes in the collection are moved to the outside apron. A few years ago, when this event was about to take place, I decided to try to use this once-in-a-year opportunity to see if I could put together a nice pano.
The day before the event, after the planes had been moved to the tarmac, I erected my 12 foot ladder and moved it around a bit to select what I hoped would be a good vantage point that would show-off the museum and a few of the planes. I knew that light during the Magic Hour would showcase the scene, even though it meant getting up before the crack of dawn.
The next morning, I arrived early, just at daybreak and set up my gear. On the top of the ladder, I mounted my Nikon D-700 using a 360Precision panoramic mount and my 17-35mm f2.8 Sigma lens. (EXIF....f 16, 1/1000th sec. ISO 1100) This mount holds the camera in 'portrait' mode, which is what I use nearly all the time for this work. I selected a bracketing sequence of 7 frames with full stop increments and I made 8 overlapping images while rotating the mount through about 200 degrees. My camera position was close to the edge of the apron as you can see from this photo. Barely visible on the right side of the photo is the same edge of the runway that can be seen on the left edge. The wind was blowing briskly...maybe 20 MPH...(feel free to translate that into knots if you insist..!), the early spring temps were 'bracing' and my position atop the ladder was not exactly the most comfortable I had ever been in. To expose each of the 8 segments, took a minute or so...and I ALWAYS do a second pass as insurance. So the whole shoot took about 20 or so minutes....my fingers were crossed that it all would turn out fine when I did the HDR and PhotoMerge operations. I certainly hoped that putting together these 56 frames would go smoothly...
When I was initially involved in setting up the ladder, affixing my camera, etc., I was disappointed to see that the sky was a uniform gray...it could have been used for that legendary 18% gray card..! But...since I have lived a charmed life, by the time I started the series of actual exposures, the clouds had started to break up, some patches of blue sky were visible, and there was a nice white accent near the horizon!!!..truly the Photographic Powers were smiling on me then....!!
Later that day, I offloaded the files to my PC and then started the incremental process of loading 7 frames into the PhotoMatix HDR program, saving the outputs, repeating this 8 times....then loading those 8 images into PhotoMerge...(Photoshop's Pano program), pressing "Enter" and then sitting back with my fingers crossed, hoping that Murphy's Law would not bite me in some unknown way.
To say that I was amazed and delighted with the resulting output would be an understatement...!! The dramatic clouds would make ANY photo look good and the vintage planes added a nice splash of color. The curvature of the seams in the apron are a result of the stitching in PhotoMerge. In some earlier versions of Photoshop pano programs, the intersection of those joints would have been pretty random and very distracting. I generally print this as a 13" X 28" panoramic print, using an Epson 1403 and feeding roll paper into it manually. This makes a very striking photo with a lot of history...
Jun 14, 2018 19:49:15 #
(Trains)
DJ Mills wrote:
Don't anybody think I know what I'm talking about. This entire article is a copy & paste from "Atlas Obscura." DJM
Thanks for the update as well as the "cut and paste" info. I've followed the progress of this Big Boy from shortly before it was moved from its display location and since then, some periodic articles about the progress of this incredibly difficult restoration. You just can't run on down to your local Napa parts store for some exotic replacement item for one of these monsters. A few years ago, I did drive through Cheyenne and considered going to the UP facility to see some of the work on this engine, but decided that I had been away from home too long, so had to skip it...
I am old enough..(don't ask) to have been around when steam engines were still in service and can remember the sounds and smoke when one of them rolled into the depot....
Jun 7, 2018 16:20:42 #
Kmgw9v wrote:
What lens are you referring to? Nikon makes a 58mm 1.4 G; but it is not Macro.
Thanks for that correction...I'm afraid I was stuck in the past, when they (and I...) did have a 55mm macro.... The current lens is a 60mm....close but no cigar, I guess?? I just updated my posting... Where was my mind.....!!! Obviously the 60mm lens is MUCH sharper than my memory....

Jun 7, 2018 15:53:34 #
le boecere wrote:
https://www.picturecorrect.com/tips/why-a-standard-lens-is-perfect-for-street-and-travel-photography/
Let me add my few cents worth.....for those who might be considering adding a 50mm lens to their 'arsenal'. My suggestion....if you are a Nikon shooter, especially (I don't know if other makers have anything similar..!)...is to think about the purchase of the Nikkor 60mm "macro" lens in place of the usual option of the 50mm.... My reasoning....bear with me...the 60mm Macro lens is one of the VERY sharpest lenses made...AND....because you can continuously focus VERY close to your subject, this means that your focus range is from a few inches to infinity...with the added bonus of true Macro ability. Think how many times you have wanted/needed to get a real close up of some subject, but don't want to change lenses or add a close up filter. The fact that it is slightly 'longer' than the "nifty-fifty" means that you have a very slight amount of 'tele' from this lens as well. It's an f2.8, so not quite as fast as the f1.8 or f1.4, but with today's super sensitive sensors, that is rarely a limitation at all.
Did I mention that this lens is SHARP...!!!

Jun 7, 2018 09:53:07 #
Frapha wrote:
I'm planning a trip to Niagara Falls area later this month. Looking for any advice or insight as to any unusual vantage points, etc. Also, whether better to stay on US side or Canadian side? Appreciate any advice.
First of all, make sure you have a current passport...that is, IF you want to get back into the U.S.
I've been there several times (both summer AND winter when lots of it are frozen...amazing sight..)... and really you can't go wrong...it's an overwhelming sight...so much natural power and beauty. Most of the better access and views are from the Canadian side...and if you have kids, they will get a kick out of being in another country...different money, road signs, prices in English and French, etc...our kids loved their visit to Canada...(Toronto) as well as the falls.
There are a lot of different vantage points to view the falls...all the way from a ride on the "Maid of the Mist"...(there are several boats that bears this iconic name...all the same ride and thrill...!)...to taking an elevator to the lower river level and being able to go "behind" the Falls, to just watching from the overlook and being stunned by the sheer volume and ground vibrations of the jillions of tons of water...! There's also a tall observation tower...not sure, but I think a dozen stories or more....from where you can get a wider view of some of the lake, the river, the Falls and downstream. I've never gone up in that tower, but it might give you some new perspective.
The Canadian side has a TON of other activities...like a Ripley's Believe it or Not....a lot of curio and souvenir shops, places to eat and drink...so IF you have lots of extra cash, you can find places to spend it there.
Hope this helps....have fun....

