Posts for: rfcoakley
Aug 27, 2017 11:02:27 #
lurker wrote:
Street and sports photographers, especially those ... (show quote)
I checked out your link - thanks for the info. While it does limit aperture and focal length options, its worth considering as an option. I'll have to give it a try. I'll do some continuous release shots with my young granddaughter running towards the camera and across the camera using this technique vs various autofocus control options.
Aug 27, 2017 10:56:28 #
thanks for looking and commenting!...its an annual event at the beach...lots of talented sand artists
Aug 26, 2017 15:47:03 #
...from June at Hampton Beach, NH


Aug 26, 2017 09:15:40 #
rfcoakley wrote:
Agree that Group AF would help. Even so, not panning could still result in focus failure. Had I chosen the middle AF point, the active focus point would have been C6 (1 position to the right of of the highlighted focus point in my attached image sequence). Group AF would add helper focus points to left and right and top and bottom of the center. In the last shot of my sequence, there may be some splash within the region, but the subject is well below it.
correction - center point (C6) is one position to the left of the active focus point displayed in the shot sequence.
Aug 26, 2017 09:09:14 #
billnikon wrote:
For moving subjects I use GROUP AUTO FOCUS and use the center spot. Then Nikon puts four spots around that one. As long as one of the five spots are ON YOUR SUBJECT the image will be in perfect focus. I use this system for birds in flight and my keep rate is almost 98%. Good luck and keep on shooting until the end.
Agree that Group AF would help. Even so, not panning could still result in focus failure. Had I chosen the middle AF point, the active focus point would have been C6 (1 position to the right of of the highlighted focus point in my attached image sequence). Group AF would add helper focus points to left and right and top and bottom of the center. In the last shot of my sequence, there may be some splash within the region, but the subject is well below it.
Aug 25, 2017 23:15:54 #
CO wrote:
I think you would have been better off using 3D tr... (show quote)
Thanks for the tip on Nikon ViewNX - I checked it out - it does allow you to selectively show the "AF points used" - including for the photos on the filmstrip - a nice feature. It doesn't display the "Primary AF Point," however, for images that did not achieve focus. I also have a D7000 - my first DSLR.
I've not done very much shooting of moving subjects. Its an area that I need to work on. I have been through the Steve Perry ebook - "Secrets of the Nikon Autofocus System." - I echo recommendations that it has widely received on this forum. From what I've read about 3D tracking mode (including from Steve Perry's book), I think it is better suited to more dynamic and erratic subject movement than the very slow moving "jump in the pool sequence" that I shot. Other available options (e.g., one of the dynamic area modes or group mode) would probably help, but working on improving my focusing technique (e.g., actually panning with a moving subject) is probably what's most needed. Its also worth noting that, from the camera's vantage point, the the focus distance did not significantly vary during the shot sequence.
Aug 25, 2017 18:00:37 #
tradio wrote:
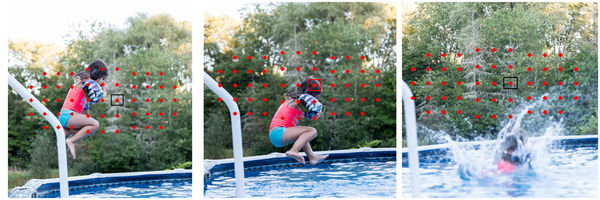
So, if you're shooting single point, why does the the images have all of the red dots?
The 51 red dots are the available focus points. They were not used in the single point focus - I just displayed them as an overlay to the images for context.
Aug 25, 2017 17:38:42 #
Got some feedback on prior photo sequence that I posted regarding obvious focus capture by the background and decided to investigate. As these shots were from one of my first outings using my first full frame camera (a D810), I thought a deeper look would be a benefit to future use. Image preview on the D810 shows the position of the active focus point in use. However, two of the 3 shots had no focus point displayed in image preview (I was shooting in continuous servo, single point AF using BBAF). Using Exiftool, I was able to get two data items related to the focus: the "active AF point" and the "AF point used." For all three shots, "active focus point" was C7. C7 was also the "AF point used" for the second shot in the sequence. However, the other two shots had this value set to "none." I would have liked to also retrieve focal distance from the EXIF data, but, though one EXIF parameter is called "focus distance," I didn't find that to be accurate. I also wanted to visually see the focus points during LR/PS post processing. I located a LR plugin (focuspointlrplugin) but didn't get it to work. So, I created a PS set of layers to use as overlays for the 51 point focus grid and the individual focus point. (This was a bit of work, but I now have it available for any future focus deep dives). I used red to indicate that the position of the primary focus point when it was used and black to indicate the primary focus point when it was not used.
Anyway, the image below of the three shot sequence clearly shows that I missed the target in the first and third shots. The sequence was shot at 58mm; F/2.8 resulting in a fairly shallow DOF. In the first shot, the subject seems acceptable even though EXIF data indicated focus was not successful. The camera setting for "focus tracking with lock on" was "3(normal)." So, actively focusing prior to shutter release probably kept the first shot in focus. Although focus was regained in the second shot, the subject area for the third shot is not in focus. My assumption, therefore, is that the camera projected the subject position beyond the lock on tolerance.
One lesson learned is to pay more attention to the focus point display via post shot image review.
Aug 25, 2017 12:24:00 #
Aug 24, 2017 14:18:17 #
favorite of shots taken yesterday in Newburyport, MA.

Aug 24, 2017 09:25:37 #
Thanks for all the comments and discussion. From the discussion and feedback, one clear conclusion that I reached is that this bracketed image set did not provide a good sample for experimenting with HDR apps based primarily on the lack on widely varying contrast in the scene. Some have suggested that a tripod is essential for any application of HDR. While clearly preferable, I believe that steady hand held shots at adequate shutter speeds can provide acceptable results. That was not the case here - some of the shutter speeds in the set were far too slow. In fact, since it was a static scene, the ghosting that came up in the NIK HDR version was unquestionably related to camera shake. For context, while seated in an outdoor restaurant, I noticed a scene that I liked from a nearby table overlooking the water. When customers left that table, I went over to shoot the scene. A tripod was clearly not viable and, in my rush to take the shot, I bracketed for 5 exposures thinking that that combination would surely give me a good combination to work with in post processing. In hindsight, I should have selected a larger aperture (I didn't need F/22.0 with its corresponding potential for added distortion to get sharp focus - F/8.0 or F/11.0 would have been better). I also could have spent more time trying for a single, correct exposure than depending on the bracketed set to get it right. So, maybe Aperture Priority @ F/11.0 with a lower ISO (e.g., 100), metered against brightest area of scene, and then shooting with EC to keep the histogram close to the right edge.
Aug 24, 2017 08:46:52 #
dieseldave wrote:
Question,a little off topic, but I noticed that one of the examples is using NIK HDR .I recently got NIK and when I select HDR it just uses the shot that is currently selected.No option for bracketed shots. It produces HDR pictures, probably by altering exposure behind the scene. Or am I missing something by using it with Affinity??
I'm not familiar with Affinity, but in Photoshop, I get to the HDR Pro 2 interface of the NIK plugin from the file menu/"automate"/"merge to HDR Efex Pro 2..." This brings up the NIK interface below.

Aug 23, 2017 16:11:59 #
TheDman wrote:
You seem to be missing the point of HDR software. HDR is for blending multiple shots of a scene that had extreme contrast. This scene had almost no contrast. Using HDR just to add some zip to dull scenes is less effective than if you just used your normal PP software on the scene.
thanks - for this scene, you appears that you are right.
Aug 23, 2017 16:09:42 #
Fotoartist wrote:
You haven't taken full advantage of the settings.
agree - I'm sure that better results could be achieved with any of these HDR applications. The ability to tweak settings should also be considered. Of note (at least from what I see), Photomatix also has a lot more options for tweaking than the alternatives.
Aug 23, 2017 16:03:13 #
Linary wrote:
I think the LR version is the best - with a little clarity and Dehaze added. If you zoom in on the boat that Ron picked out, the LR version is relatively sharper or better aligned and there are more tones and detail showing.
thanks - I did like the lightroom HDR result, but not as much as Photomatix. Additional LR post processing such as the ones that you provided can clearly help.