Posts for: SalvageDiver
Oct 20, 2023 14:33:41 #
Fstop12 wrote:
Yes, the motion blur gives you some good effects but the Path Blur allows you to bend and shape your blurs.
That is true. I've played with this technique and have fun with it. In Linda's case, she can experiment in PSE without needing to go to PS. Yes PS provides additional additional functionality, but there are a lot of very interesting photos using just motion blur.
Oct 20, 2023 10:33:54 #
Linda From Maine wrote:
Intriguging result! Thanks very much for the information too. Maybe 2024 will be the year I switch to Photoshop 
You can also use the Motion Blur tool in lieu of the Path blur, which PSE includes. This is a really nice effect.
Oct 20, 2023 10:09:32 #
PTNicholas wrote:
A still night on Yaquina Bay in Newport Oregon with the moon just behind the clouds.
Absolutely stunning image. Well done!
Oct 17, 2023 13:21:27 #
I've read about the quarter in the freezer trick. The purpose is that if the ice melts, the freezer could have been warm for quite a while and the freezer contents, primarily the meats, could spoil. So if you come back from your trip and you find the quarter on the bottom of your cup, it's time do discard the meats and anything else that could spoil.
Oct 16, 2023 11:56:23 #
DirtFarmer wrote:
I had an old copy of Topaz Sharpen AI (2021) and j... (show quote)
I've been using the Topaz products for many years, going back to the early Topaz Denoise days. PhotoAI includes Face Recovery as one of the tools, which the older apps do not. If you just use the default settings, PhotoAI will reconstruct the face and sharpen it more than the surrounding scene. I've found that, in many cases, you need to manually reduce the Face Recovery strength to better match the overall scene. Both, SharpenAI and DenoiseAI are no longer being actively supported. While I still have SharpenAI and DenoiseAI active in PS along with PhotoAI, I find that I no longer revert back to the older versions. I now use PhotoAI exclusively, but I rarely rely on just the default settings. Each image is unique and the amount of correction is also unique.
Oct 15, 2023 11:54:20 #
gvarner wrote:
Is there any use for burst mode while shooting landscapes? Or is it done just because it can be done?
I’m with RG on this subject. When I’m taking pictures that are important to me and/or would be very difficult or impossible to retake, such as while hiking or traveling, I always set my camera up for a burst of 3 or 5 exposure bracketed exposures. I’ll do this for every shot.
It’s real easy to do and provides a huge safety net for getting all the details of a scene in a single group of images. During review, I’ll check the middle exposure to see if it has all the correct exposures. If so, the under/over exposed images can be discarded. If not, the additional exposures save the day. I find it’s always better to have too much information than not enough. After all, a digital image is cheap..cheap..cheap.
There are two types of clipping that occurs when the camera’s DR is exceeded. The first, which is obvious, is when all three colors channels are clipped. This creates just a single white or black blob with no information or details in it. The second, which is not nearly as obvious, is when only one or two color channels are clipped. You’re losing some detail but not all. This results in unwanted color shifts and muted detail. If you’re looking at a luminosity histogram, this won’t be evident at the time of shooting. A histogram showing the 3 color channels would, though. In almost all cases exposure bracketing eliminates these problems.
If you don’t need the under/over exposed images, then end of discussion. However, if that middle exposure has clipped highlights or blocked up shadows, then the other exposures provide the additional info to complete your image. There are different ways of processing multiple images. First, would be tone mapping/compression using a HDR processing program, such as Photomatix or Aurora. However, if you overdo it, you’re left with the garish images that HDR developed a bad reputation for. But better methods involve exposure blending where you take just portions of the under/over exposed images and blend into your primary image, usually the middle exposure. This is very common in RE and architectural photography. Tools for this include ‘luminosity masks’ and the ‘blendif’ tool in PS.
Some might argue that bracketing is problematic when motion is present, such a people walking or trees moving during a breezy day. Tools and techniques abound that solve those problems. Movement is not, generally, a limitation, unless to an extreme.
And then there's a whole discussion that could be had about multiple images for increasing image resolution (dithering) or noise reduction (averaging) in poor lighting situations.
YMMV, but I burst a series of exposure bracketed images as a regular part of my photography.
Oct 14, 2023 10:48:09 #
13 wrote:
Fall falls
Now, that is a beautiful image. Well done!
Oct 13, 2023 15:41:24 #
home brewer wrote:
It has been very hazy sine we got to Northern Italy. Attached are before and after. All I did was adjust Haze in Lightroom classic. As I said in the past I find photo editing difficult on the small screen on the MacBook Pro. I have not attempted to adjust shadows or make that dish and pole disappear. For some reason the adjusted shot is not level on the post but is level on the MacBook screen. Bienno is a very beautiful city
Is this over processed?
Is this over processed?
This is a very interesting scene and you captured the home/villa very well. There are nice colors and a lot of beautiful textures in the wall structures. The layered background scenery provides a very nice sense of place.
Without saying, the image is tilted and there is a little bit of keystoning, meaning that you had a little tilt to the camera causing lines to converge. But it is very light. You can easily straighten the image using the crop and correct the slight keystoning with the tools found in the Geometry panel of LR. I also use a MacBook to do all my editing, but I haven’t had a problem with the screen being too small. Obviously, you mileage varies.
To answer your original question, “Is this over processed?”. You will only get opinions because each observer has different preferences and likes/dislikes. So I can only give you my opinion.
In my opinion and based on my own preferences for this image, I think it’s over-processed.
Here are the over-processing issues I see with your edit:
1) The sky is significantly oversaturated. In the histogram, you can see that the blue channel is clipped so as you change exposure, you also introduce a hue change.
2) The red channel is clipped in the light areas of the yellow/orange wall colors. Besides being slightly oversaturated, this causes a hue change as you change exposure. Unless one was there to actually see it, they wouldn’t recognize it, since it’s not a natural occurrence, like the sky.
3) Overly contrasty, losing details in the shadows. The dehaze slider affects a lot if different characteristics of the image and it should be used sparingly. Increasing blue tones and contrast is just a couple of effects that can be easily overdone with this slider.
4) Another consideration is the layering of the background mountains. The farther objects should be lighter and exhibit less texture and clarity than the near objects. By overly using the dehaze slider, the distant mountains now have more detail and clarity than the nearer mountains. Also using dehaze exclusively, there is a huge halo around the mountain edges and the house on the right; another effect of over-processing.
5). There are a lot of little distracting details, such as the antenna, dish, bright green pot on the railing, clothes hanging behind the front gate, bright house in the hills, etc. I know you said that you didn’t get to this items yet. But I tried using Photoshop’s new ‘AI Remove’ tool to remove those distractions. That tool makes it extremely easy to remove elements from an image and leave a natural looking result behind. Beats all the other methods by far.
Hope this helps.
Mike
Oct 7, 2023 17:53:26 #
CamB wrote:
Wow! You lost me at 2), and i'm good at this stuff.
...Cam
...Cam
My apologies. In providing a reasonable thorough answer to the OP, I needed to define how such a large amount of data in compressed into such a small file without just saying “it’s compressed”. Nor did I want to get into any of the data processing behind the process.
The implication of 2) is that the RGB data representing the image is rearranged into something much more efficient for processing. The DCT is just the vehicle used for that purpose.
Steps 2, 3 and 4 are just methods of data reduction and compression.
Oct 6, 2023 20:49:56 #
Markag wrote:
My neighbor... When downloaded and saved to my desktop/opened in PS it still says 212mb ! ! !
Can anyone explain this.
Can anyone explain this.
Yes, but the explanation is IS NOT simple.
CHG_CANON is correct when he says that there is no direct correlation between file size and image size, with the caveat of saving files using compression, lossy or lossless. JPEG is a lossy compression file format.
Now a bit of a technical discussion
The very basic process for saving a JPEG is:
1) Original image is broken into image blocks (8x8 blocks)
2) Via the Discrete Cosine Transform, transform the image from the spacial domain to the frequency domain and quantize the DCT coefficients. The level of quantization determines the amount of compression.
3) Strip the high frequency content (luminance and hue) from the image. The content removed is, generally, not noticeable by most viewers.
4) data compression (Huffman encoding)
So the image loses information and is highly compressed in the frequency domain resulting in much smaller files for a given image size. Both, the frequency content and the amount of compression (user selectable) determines the file size (not image size). For example, if you were to save a pure white image with the same image dimensions and same compression factor as your flower image was stored as, the white image would be smaller because there is no high frequency content in it.
When the image is viewed, the software decodes the remaining info in the jpeg file and displays the lossy image. In most cases, the information lost is not perceptible to the viewer.
So, why work in the frequency domain? Representing an image in the frequency domain requires MUCH less data than in the spacial domain. If you have a technical background, you’ll know that time series such as a sine wave can be described with much less data in the frequency domain (via the FFT) than in the time domain. JPEG’s use this same advantage.
This is why JPEG file size and image size DO NOT correlate!
Now back to the practical discussion.
There is 110MB of image data compressed into your 1.6MB JPEG file.
When you load your JPEG into Photoshop, Photoshop decodes the compressed image and stores it internally as 24-bit pixels, uncompressed (8 bits of R, 8 bits of G and 8 bits of B). In your case, your 1.6MB file is expanded to an uncompressed 110MB file internally. That allows PS to manipulate each individual pixel in the image. So here is a basic calculation on what the image size in bytes should be.
(7379 x 5021pxl) x (24 bits/pxl) / (8 bits/byte) = 111MB
Which corresponds to PS’s doc size.
AND, if you save your file as an uncompressed TIFF file, the resulting file size is 111 MB.
If you convert your image bit depth from 8-bit to 16-bit, the resulting TIFF is 222MB.
Hope this helps,
Mike
PS: Feel free to PM me if you have any specific questions about my response.
Oct 6, 2023 11:00:17 #
I agree with most of the suggestions posted here. A simple fix to the lack of contrast would be to fix the black point and using a curves adjustment increase contrast. That makes a world of difference.
If you want to go further, I would suggest looking at a traditional fade to white vignette rather than the harsh diamond frame.
If your concerned with the background clutter, you can blur the background slightly prior to the vignette. This still allows one to recognize the setting but better isolates the subject in the scene and helps reduce the impact of the harsh backlighting. The fade to white vignette will help blend that harsh lighting out of the scene.
Oct 6, 2023 10:11:06 #
It was a toss-up between #2 and #4. The sky swap in #2 was excellently done especially the reflections in the water. Image #4 was brighter but still accomplished a similar mood. I also liked the addition of the geese in the sky. My only nit with #4 is the geese should also have been in the water reflection.
#4
#4
Oct 5, 2023 15:01:21 #
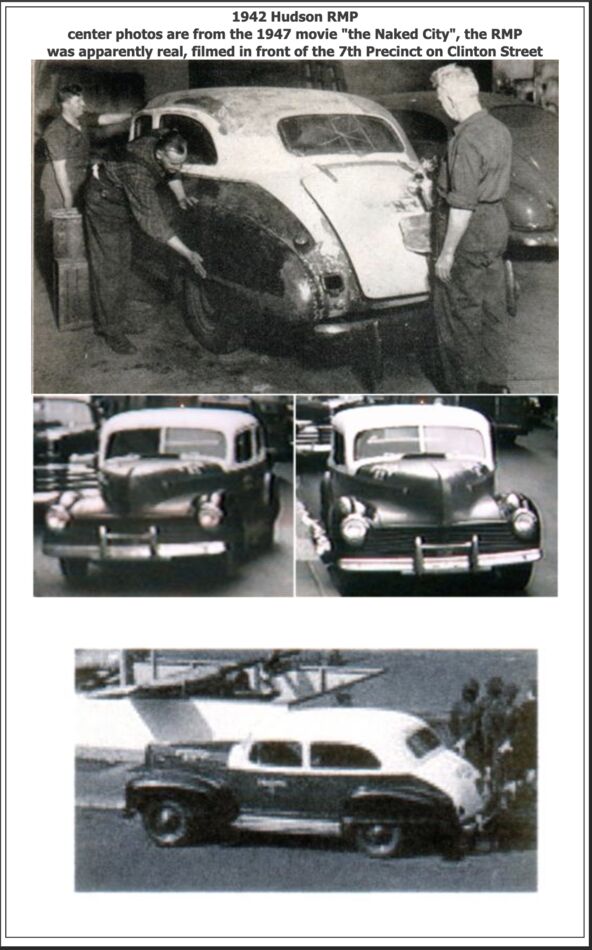
AviRoad wrote:
So, I just came across this photo that I will fram... (show quote)
See if this is what your looking for. Further targeted search might confirm one way or another.
Oct 5, 2023 11:03:24 #
bdk wrote:
Its sad but I agree with the people that called. If they think you have a rifle they should call.
its always better to be safe than sorry.
On the other hand, someone that thinks a camera on a tri pod is a weapon, those might be the people we should watch out for.
its always better to be safe than sorry.
On the other hand, someone that thinks a camera on a tri pod is a weapon, those might be the people we should watch out for.
..deleted
Oct 5, 2023 10:34:17 #
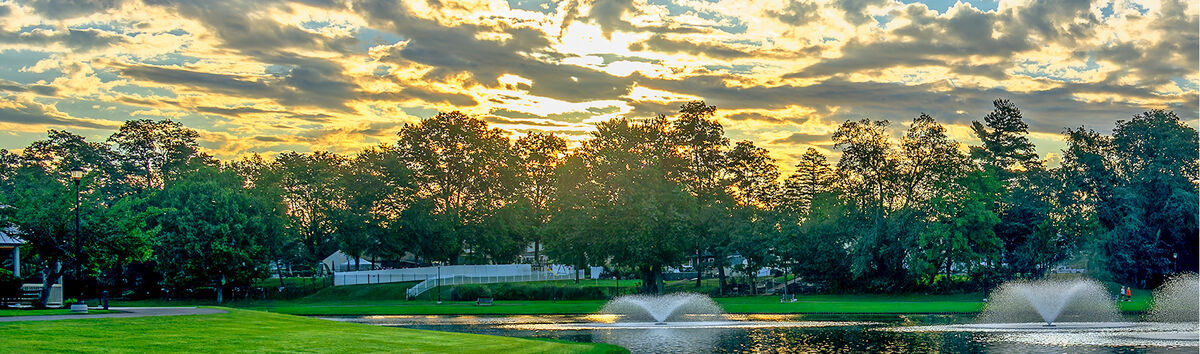
Jim-Pops wrote:
I like the brighter edits I'm seeing. One thing that troubles me is that while making the image brighter, the tops of the trees become light so much that they look lit from the wrong side. Can the top of the trees be darkened or could the tops have darker green added? Also, can this be done without affecting the brighter sky coming through the leaves and branches?
Just wanted to add some friendly conversation.
Just wanted to add some friendly conversation.
Here is a simple way of darkening just the branches any color you want leaving the sky between the branches untouched. It is destructive, meaning you’re altering the image, not a mask or an adjustment. There are non-destructive means but I would use luminosity masks for that.
1) Make a copy of the image layer. You will make the edits on the copy if you need to redo, the underlying original is untouched.
2) Select the brush tool. In the upper toolbar, select Mode = Overlay and Flow = 5% (or a low value)
3) Toggle the foreground layer to black.
4) Press the Option key (Macs) and using the eyedropper, select the color you want to paint the trees. Select a black or a dark green if you want a good silhouette.
5) Carefully paint over the tree branches you want to darken. Using the overlay mode, only the pixels with luminosity lower that 127 (50% gray) will be effected. The bright areas will remain unchanged.
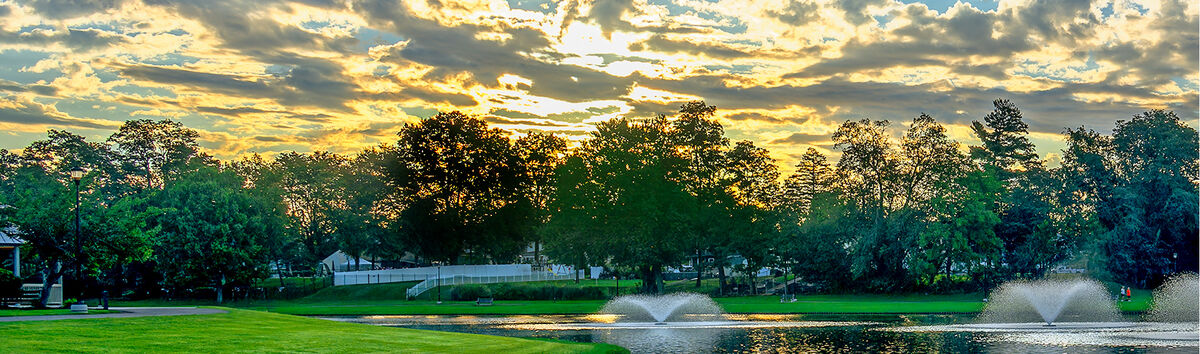
In the attached example, I darkened the tree above the center fountain dark green and the tree just to the left black using the method I just described.
Note that if you select the white foreground, only the bright areas will be effected leaving the dark areas unaffected.
Also note that when you’re done, set Mode back to normal. This used to cause me a lot of frustration when my brushes didn’t work right and I kept finding that the brush mode was set to something other than normal.
Hope this helps