Posts for: SalvageDiver
Oct 30, 2023 23:54:27 #
BebuLamar wrote:
In previous versions of Windows when you right click on the filename in Windows Explorer it shows the option to Copy or Paste. But with Windows 11 I have to click on the "show more options" to get the copy or paste. Is there a way to not having to do that?
use keyboard shortcuts. much faster than using the mouse and menus.
ctrl-a = select all
ctrl-c = copy
ctrl-v = paste
Oct 30, 2023 22:25:39 #
NJFrank wrote:
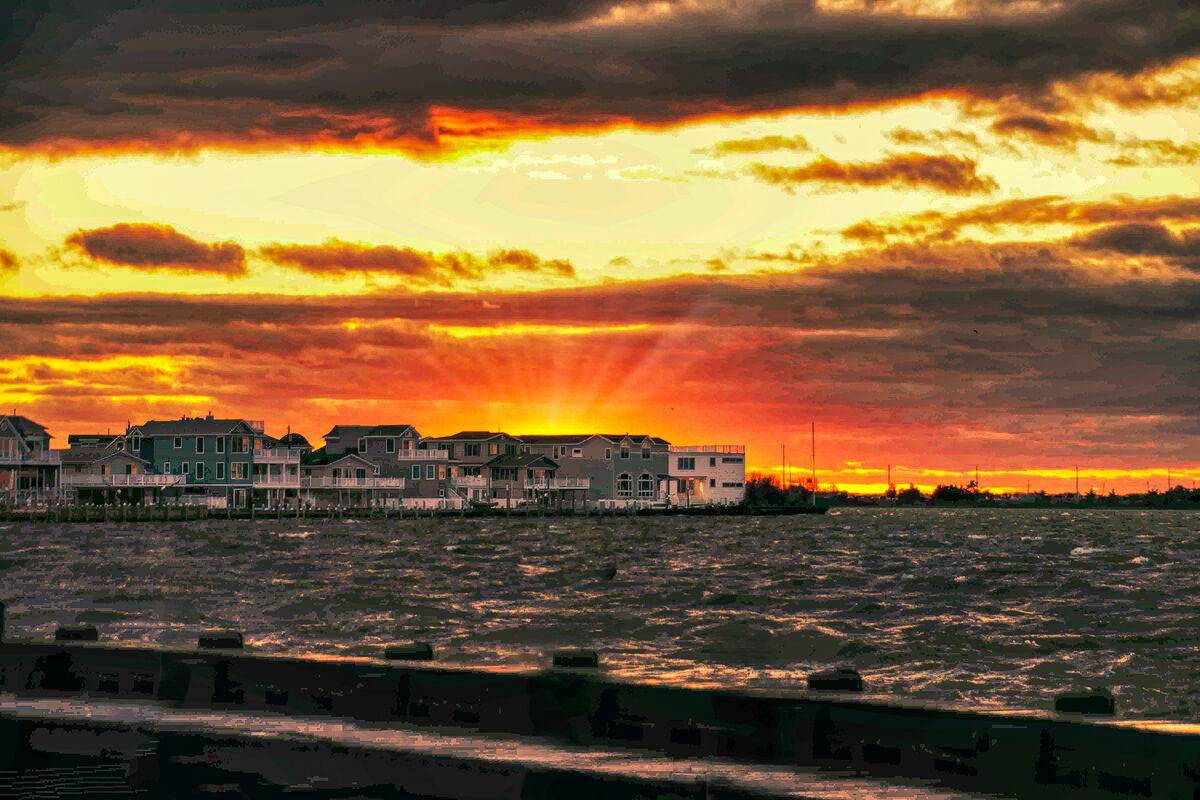
This was taken a couple of years ago at Long Beach... (show quote)
It's all about the red sunset colors in the sky.
Oct 28, 2023 19:52:59 #
Jim-Pops wrote:
KTJohnson is on the road this week so I will step ... (show quote)
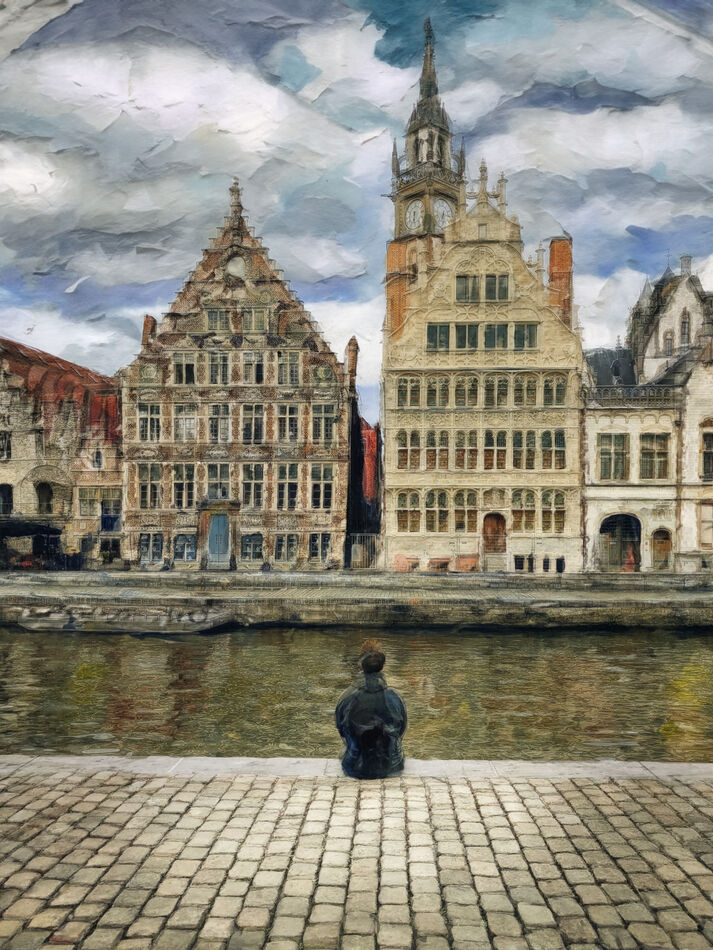
Too late to the party to submit for vote, but played with generative AI. Removed all clutter of modern days stuff from the street and then converted to an oil painting using generative fill. Thought I'd share here.
Oct 28, 2023 14:49:11 #

Oct 28, 2023 14:08:12 #
toxdoc42 wrote:
Thanks for the advice, interesting that you were a... (show quote)
Not being there to see the scene myself, I cannot duplicate what you saw. However, the intent was to show that there is a lot of information in you file that can be recovered. A raw file would give you even more recovery latitude.
From an exposure perspective, an HDR would give you more latitude to push the image, but it appears that's not totally necessary, especially if you had the raw file available. But this only addresses exposure.
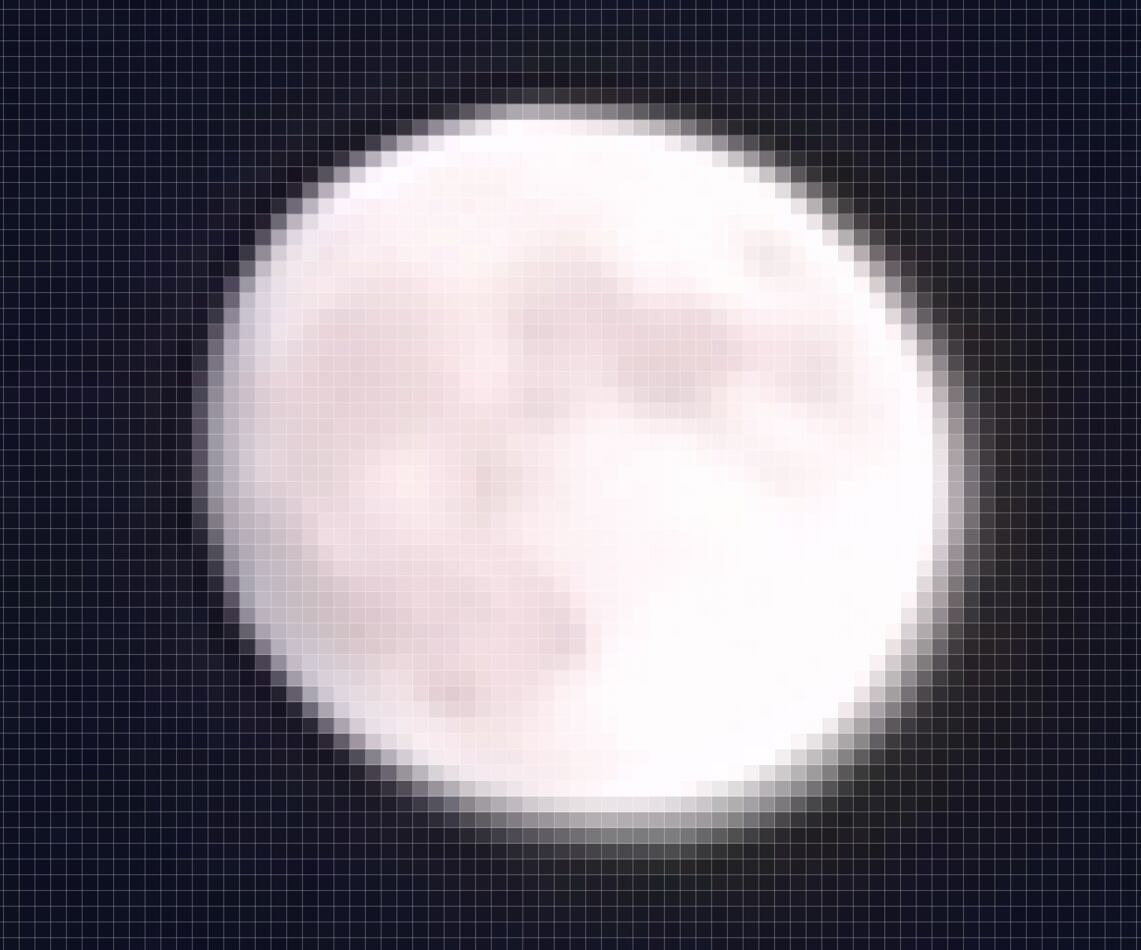
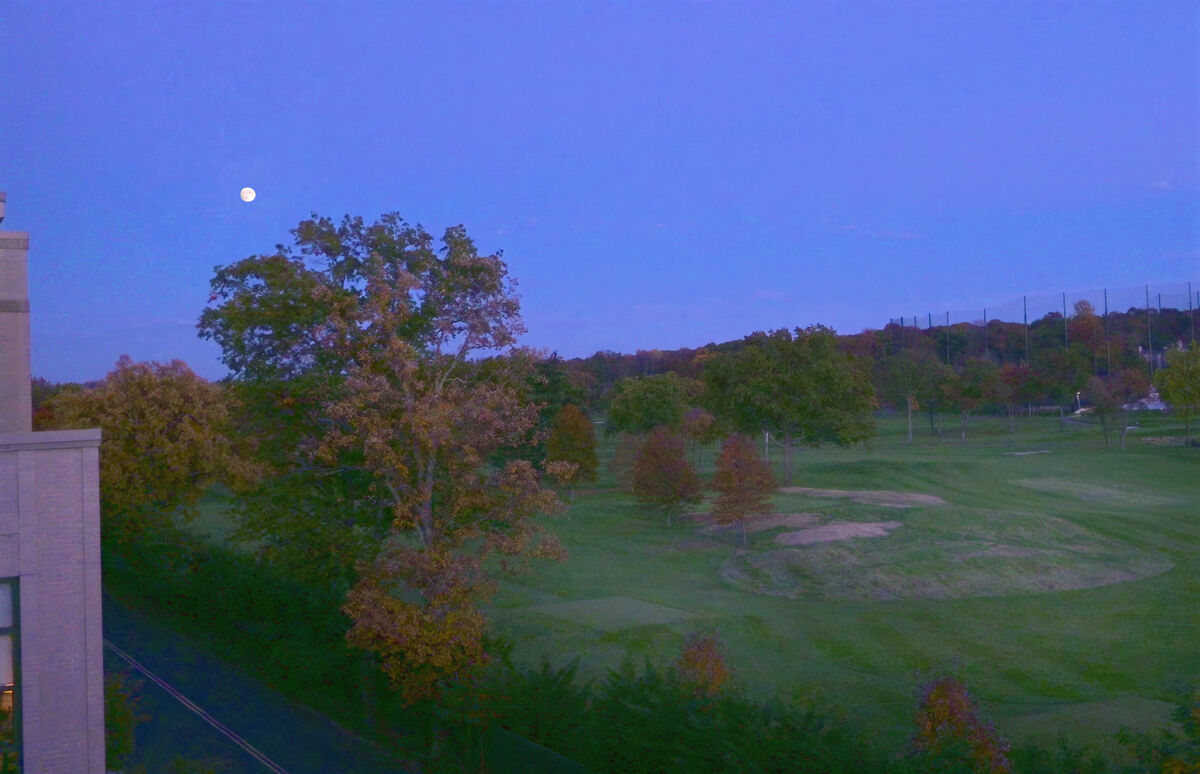
Regarding this particular image, the problem with the moon, however, isn't just exposure. The moon is, even in the darkest image, not only overexposed, but also out-of-focus. Out-of-focus is unrecoverable. If moon details are your objective (i.e., your going to make a large print) then this image is a throwaway.
So what went wrong? Checking your exif data, you had manual exposure set, but autofocus ON. The camera focus distance was 10m. That is your sharpest focus point. If your lens is sharp (an assumption), your focus point should have been on the moon at infinity to get the most possible details. While your DOF was 2.6m to inf, that only defines acceptable focus, not best focus (not necessary to get into lengthy discussion about DOF, COC and Lens MTF). However, setting focus on the moon at infinity, could make the foreground focus problematic.
Regarding whether your camera/lens combination is capable of resolving the details in the moon in your image, the entire moon is only about 50 pixels wide with an overall image size of 5600x3728 pixels. The entire moon occupies about 0.009% of your entire image. Not a lot of information available to work with even if your focus was spot on.
Oct 28, 2023 11:59:52 #
toxdoc42 wrote:
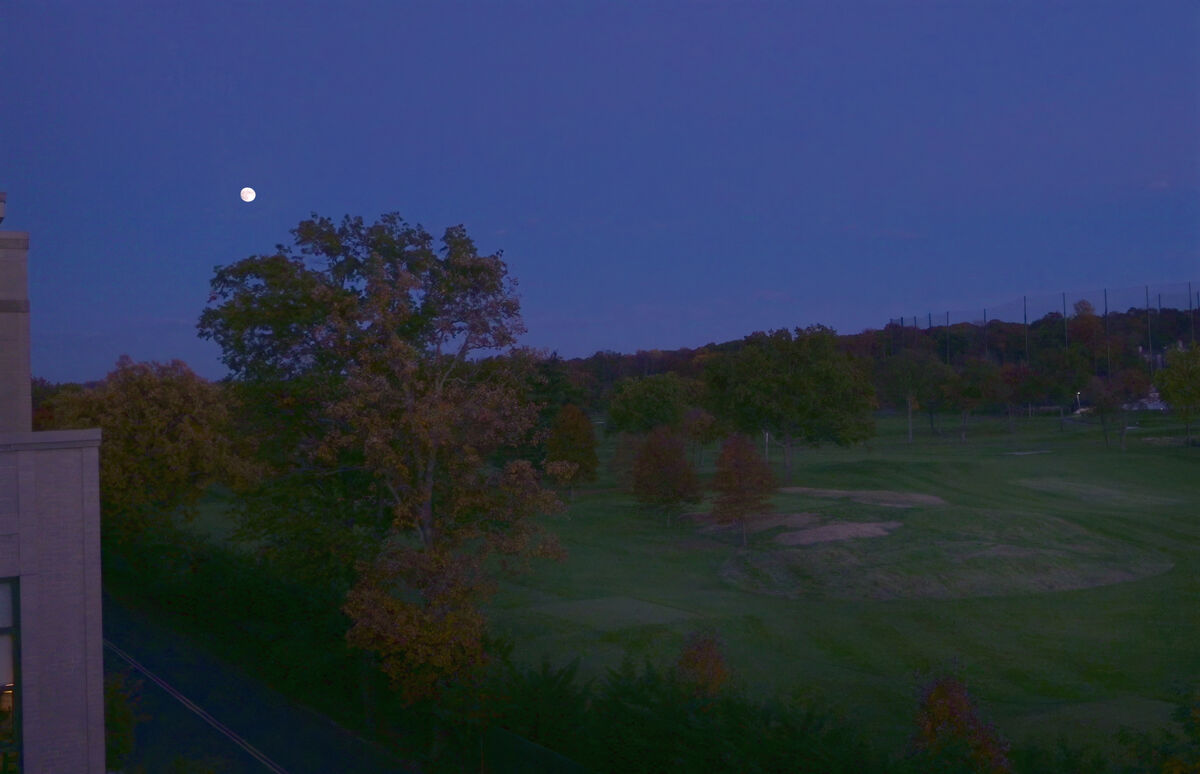
I tried so hard to take this image to show details in the moon as well as show the foliage and the beautiful dark blue sky, but either the moon was blown out, or the tress were not visible. Any suggestions would be appreciated.
I had a similar situation once on a ship's deck, but was able to use the flash to show the ship's details. But there was no way to light up the tees and the golf course.
I had a similar situation once on a ship's deck, but was able to use the flash to show the ship's details. But there was no way to light up the tees and the golf course.
Listen to Ysarex, he has the right idea. But his (and all the other solutions) require some amount of post-processing.
What your asking for is not likely to happen with a SOOC image. The moon is too bright (about the same as bright daylight) and the foreground too dark, as you've experienced. However with just a simple mask (blocking changes to the moon) and a little post-processing (brightening and NR to the balance of the image), even your darkest image may yield acceptable results for you. Here are a couple of quick lightening examples, using only your darkest image, even though it's just a jpeg.
Oct 27, 2023 11:32:03 #
Oct 26, 2023 15:54:41 #
daninr8 wrote:
I tried to clean my Sony A77v sensor without a cleaning kit, so I am wondering if I should get a professional cleaning done next time, so I can check to make sure I didn't mess my sensor up. I think the spots seem to be greatly reduced, and shouldn't affect my landscape photos, but haven't gone out yet. Test shots from before and after the cleaning.
The real question that needs to be answered is: "are the cleaning chemicals in the Zeiss lens cleaners long-term compatible with the sensor coatings." Will the wipes do any damage with repeated use over the long term?
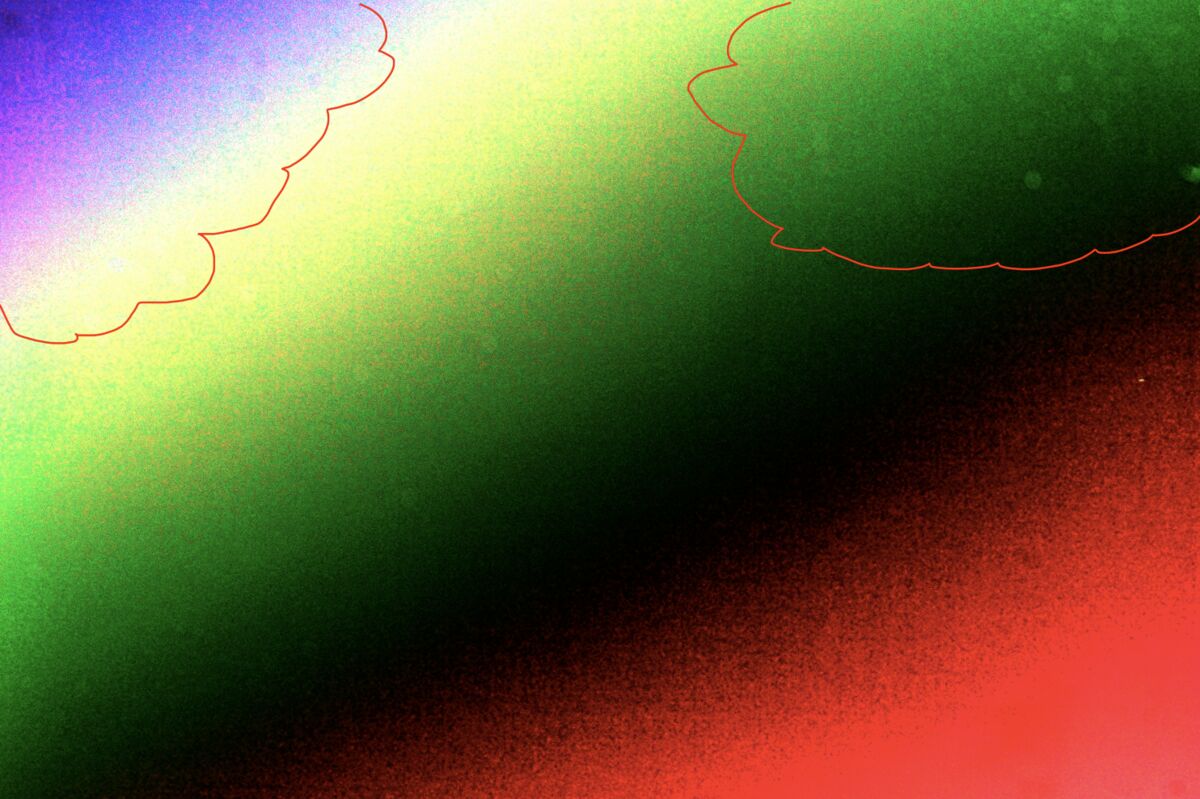
Aside from that, it appears that you got most of the spots. However, there are light spots remaining in the upper corners of your sensor. Does that warrant having a professional clean your sensor? NO. In most cases it won't be noticeable, especially if you use a large aperture.
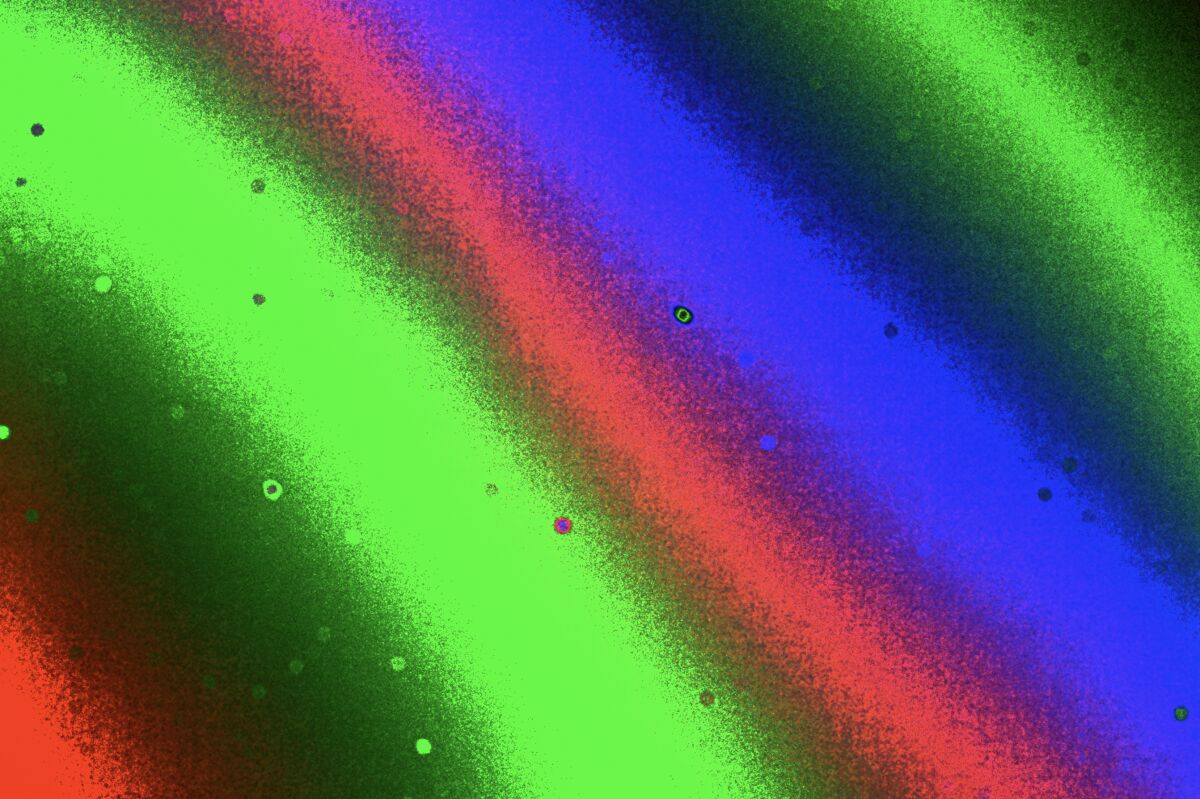
While a loupe is a good first pass, the real test is to test using a real image. When I test for sensor spots, I use a white background, (i.e. my monitor), set it to be out of focus and set my aperture to the smallest value (f/16 or f/22). I then look at the image using LR or PS. LR has a spot detection feature while PS is manual but more sensitive. In PS, I create a curve adjustment layer and create a solarization curve which brings shows any spots even if their not visible in the normal image. I create a brightness contrast layer above that, setting contrast to 100 and vary the brightness. This shows all the spots on the sensor.
While Sony Edge software doesn't support curves, there are quite a few free editing applications that do.
Layers________________________Solarization Curve___________________Brightness/Contrast
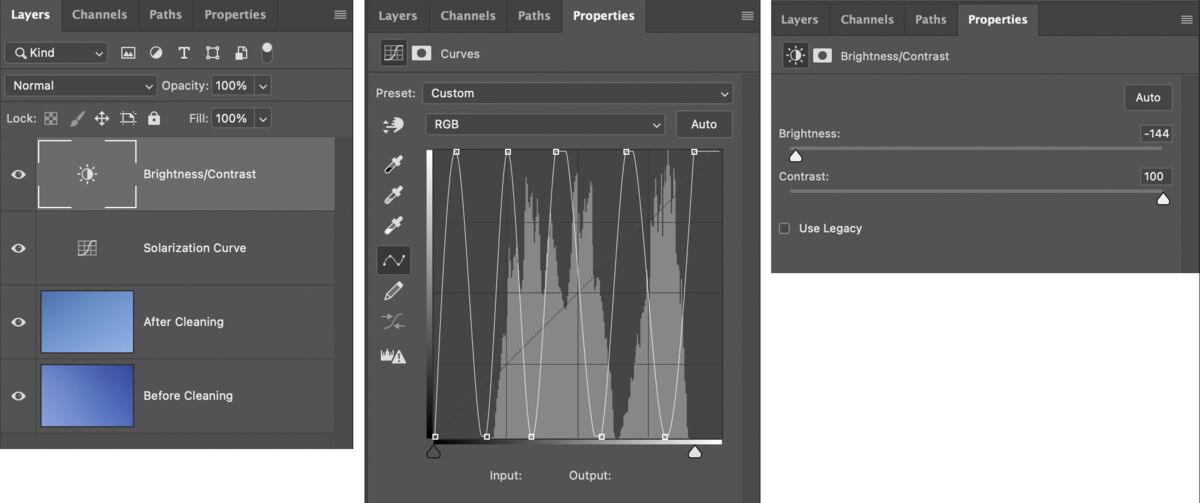
OP's sensor before cleaning
OP's sensor after cleaning
Oct 26, 2023 14:29:47 #
lydiabpinkham wrote:
i am shooting nikon D5200, used a 50mm 1:8 and 1:4, i can't get a sharp image, F16 160ss studio strobes
i am not sure if it's the lens or the camera, or combo, it's works well most of the time but for this transfer bench,it
's not
so if i decide it's the camera, any not too expensive, still use nikon either as is lens or adapters , i can't afford to start from scratch, but i'm feeling like i'm not advancing this way
any suggestions are always appreciated..
I don't think there is anything wrong with the camera or lens. The basic settings from your exif data is f/16, 1/160s, iso100, EC=-5. Another setting that could reduce sharpness is you have your high_iso_noise_reduction = high. Any kind of noise reduction will affect sharpness. I don't know where this parameter starts having an effect, but it can't help sharpness. I would suggest turning this OFF or at least down to a lower level.
In general, I didn't see any real unacceptable out-of-focus areas in your image. The raw file, unlike the jpeg, has no sharpening applied to it in-camera. Therefore, when using the raw images, some level of input sharpening is warranted. For input sharpening, I typically use PS or Topaz for my raw files and they both do a very good job. For jpegs, the camera usually applies some level of sharpening in-camera and usually that's all that's needed.
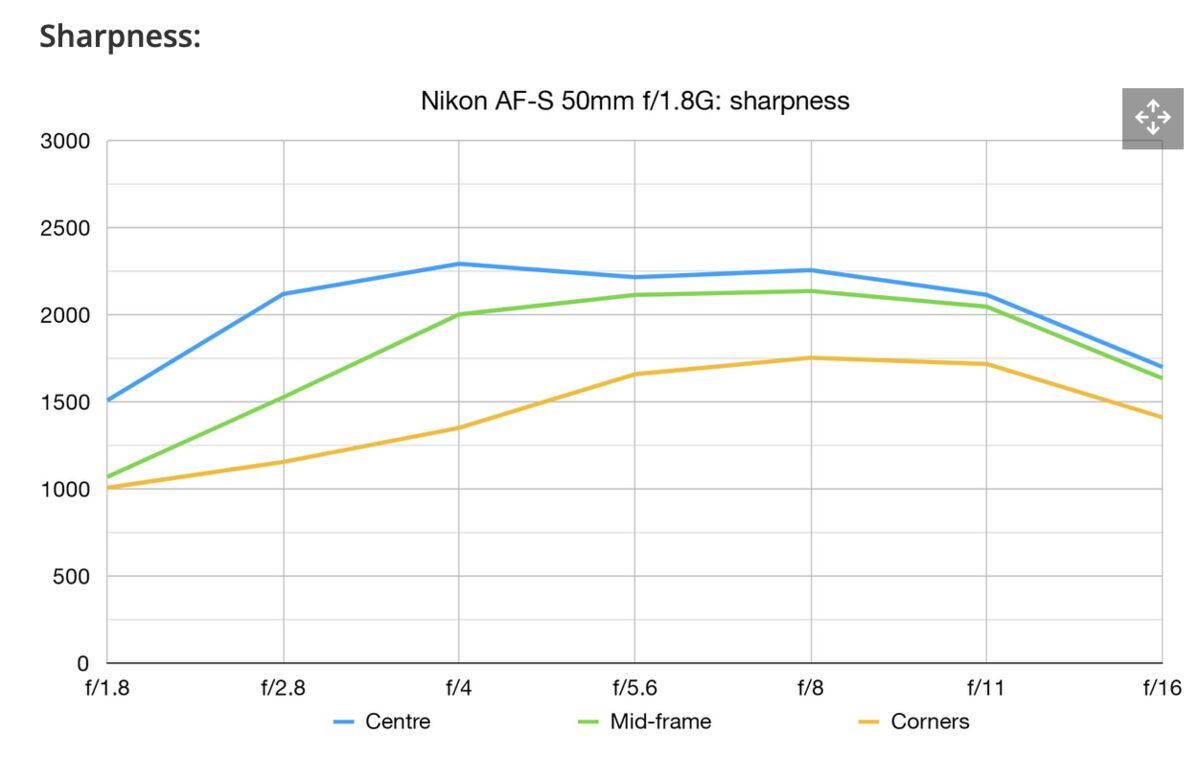
At f/16, you are now experiencing an increase in diffraction due to the small aperture. Your focus distance was recorded as 3.35m. This gives you a DOF of ~7m, which is extremely high for this particular shot. Reducing your aperture to f/8 would have given you a DOF of ~2.4m which would still have your entire subject in acceptable focus, while moving towards the sweet spot of the lens. An Imatest plot of the Nikon 50mm f1.8 lens is attached. You can see that at f/16 sharpness is dropping off fairly rapidly compared to the sweet spots between f/4 and f/8.
Hope this helps
Mike
Oct 23, 2023 12:53:12 #
kmpankopf wrote:
One of the issues I run into on clear days are sun... (show quote)


Good use of AI.
For this image, I would only blend in the corrected sunspot on the pilots faces and leave the rest of the original in place. The AI image overall is less detailed and loaded with halos. The quality of the original, less the sunspots, is much better than the AI generated image.
Oct 23, 2023 11:01:13 #
WDCash wrote:
A Yellow Rump Warbler, or is it Yellow Rumped Warbler
Nice catch. But I think your incorrect on both your guesses. Actually I think it's a Yellow Rump Warbler. So, there you have it!

Oct 23, 2023 10:36:37 #
philo wrote:
just returned from Yosemite. had a great trip with a photo group
Beautiful capture of this magnificent rock. Love the place. Yosemite is a target rich environment.
Oct 22, 2023 11:52:31 #
JRD3 wrote:
These two shots were taken among about 400 last ni... (show quote)
In summary, there is nothing wrong with your camera.
For camera silent mode/electronic shutter,
“Banding occurs when your shutter speed is not synced up with the refresh rate/frequency of light. It happens when sensors that read an image line by line can't keep up with the refresh rate of the artificial lights.”
This is simply a phenomena associated with how CMOS camera sensors operate. It is called readout speed. sensors do not capture and readout all pixels simultaneously, but do so in a serial manner. When you have fast moving elements in a scene, the slow readout speed is responsible for what’s called “rolling shutter distortion”. It’s caused by the fact that most sensors fill each pixel serially, i.e. one at a time, so it takes a while to acquire a complete exposure. This is also the cause of banding under artificial lighting. Independent of shutter speed, typical times it takes to fully fill a sensor is longer than 1/30s.
The readout speed for the Nikon Z6 is 1/20s (14-bit) and 1/38s (12-bit). In silent mode, this is the time it takes to fill your sensor with data, independent of your shutter speed. Anything happening faster than that will resort in distortion or banding in the final image.
For incandescent or fluorescent lighting, fundamental operating frequencies are 60Hz or 120Hz. However, LED’s are integrated circuits and can operate from DC to well into gigahertz frequencies. Typical means for varying the perceived brightness of an LED is to drive it with a constant intensity pulse but vary the ON time for each cycle. The shorter the ON time, the lower the perceived brightness of the LED. This is called “Pulse Width Modulation” abbreviated as PWM. So operating frequencies for LED lighting isn’t constrained to just the lower 60/120Hz frequencies.
Many cameras have built in flicker compensation for 60Hz and some level of higher harmonics (120Hx, 180 Hz, 240Hz, …) but lighting operating at higher frequencies and not associated with 60Hz (or 50Hz in the EU) are unlikely to be compensated for. However, newer high-end sensors have higher readout speeds reducing, but not eliminating, the severity of the problem. The problem is finally eliminated with sensors with global shutters, i.e. sensors that fill all pixels simultaneously, but they are extremely expensive.
This effect that you are experiencing is a well known problem with many articles discussing this exact issue. Here are a couple of references to articles you might be interested in.
https://www.digitalcameraworld.com/news/i-found-out-about-banding-due-to-shooting-in-silent-mode-the-hard-way
https://enthusiastphotoblog.com/silent-shutter-banding/
And for the geeks out there (like me), here is a technical article describing it in more engineering terms:
https://hamamatsu.magnet.fsu.edu/articles/readoutandframerates.html
Hope this helps
Mike
Oct 21, 2023 12:08:03 #
ggttc wrote:
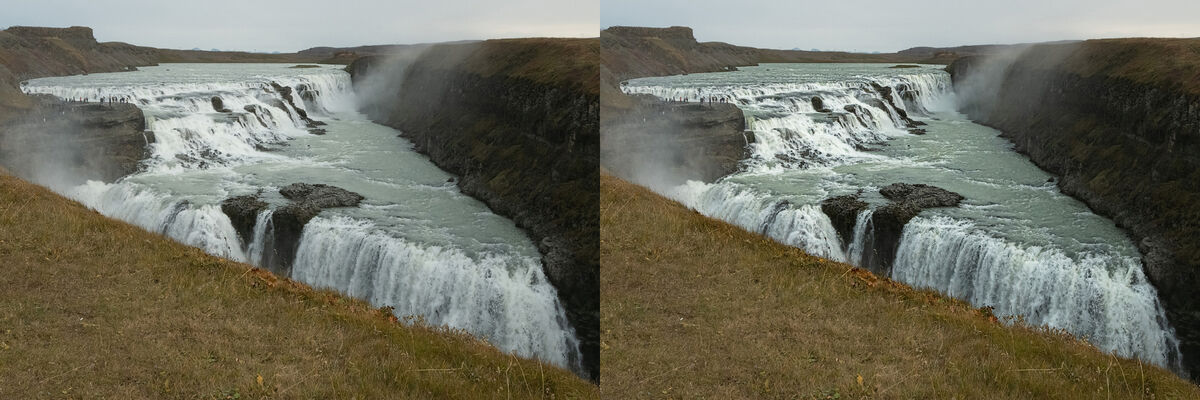
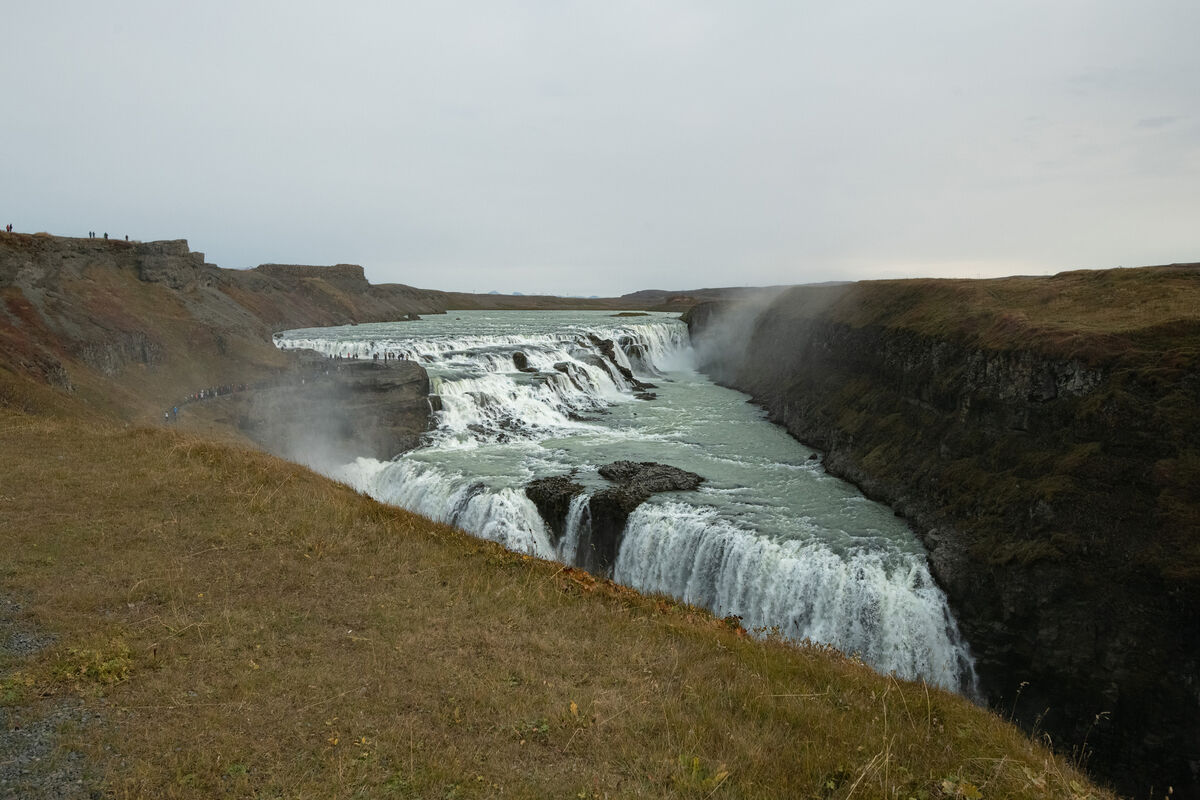
This is Gullfoss in the "Golden Circle" Iceland. Nikon D850 with Tamron 15-30 f/8 1/4000 ISO 2500. It was a cloudy day and very windy, I had to hang onto the rail and take the pic with one hand. To me the water looks blown out. Any suggestions?
First, it would have been helpful to have posted the unedited jpeg. The exif indicates that this image has already been edited with PSE and LR.
Rather than flattening the whole lake, the idea was to still have contrast between the smooth water and the falls. However, bringing more details into the falls reduces the overall whiteness. Part of the problem is that there is detail in the water but if viewed in a small format, it appears white, just due to compression. With that said, here’s what I recommed:
1) denoising the image.
2) in LR (or ACR) make the following adjustments
Exposure: -0.5
Highlights: -100
White: -25
Texture: +50
Dehaze: +10
3) Mask the changes only to the water
4) Straighten the horizon using the distant lake edge.
Hope this helps
Mike
Oct 20, 2023 15:30:22 #
R.G. wrote:
Don't worry about staying true to the original. Where sky changes are concerned, one of the tricks is to give the whole image an overall colour cast that echoes what the sky looks like. (Don't bother trying to pick my brains for any more info than that. It would be slim pickings  ).
).
).While I didn’t get to submitting an entry, I’ll respond to RG’s comment about sky replacements and the subsequent change to ambient lighting. Remember that the sky is what is illuminating the scene and the scene must have the color cast of the sky.
The most obvious signs that a sky has been replaced and replaced poorly is, among others, when 1) the ambient light on the scene doesn’t match the hue of the sky and 2) when a high contrast sky is inserted into a low contrast scene, i.e. harsh sunlight but the scene has no shadows (diffuse lighting).
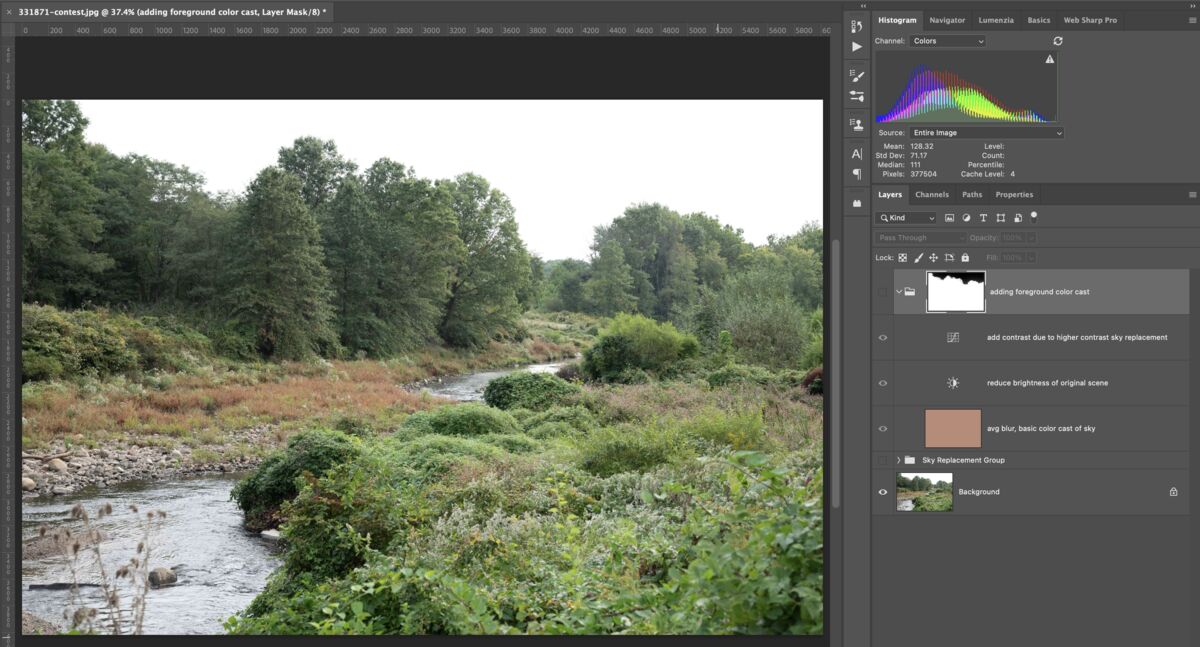
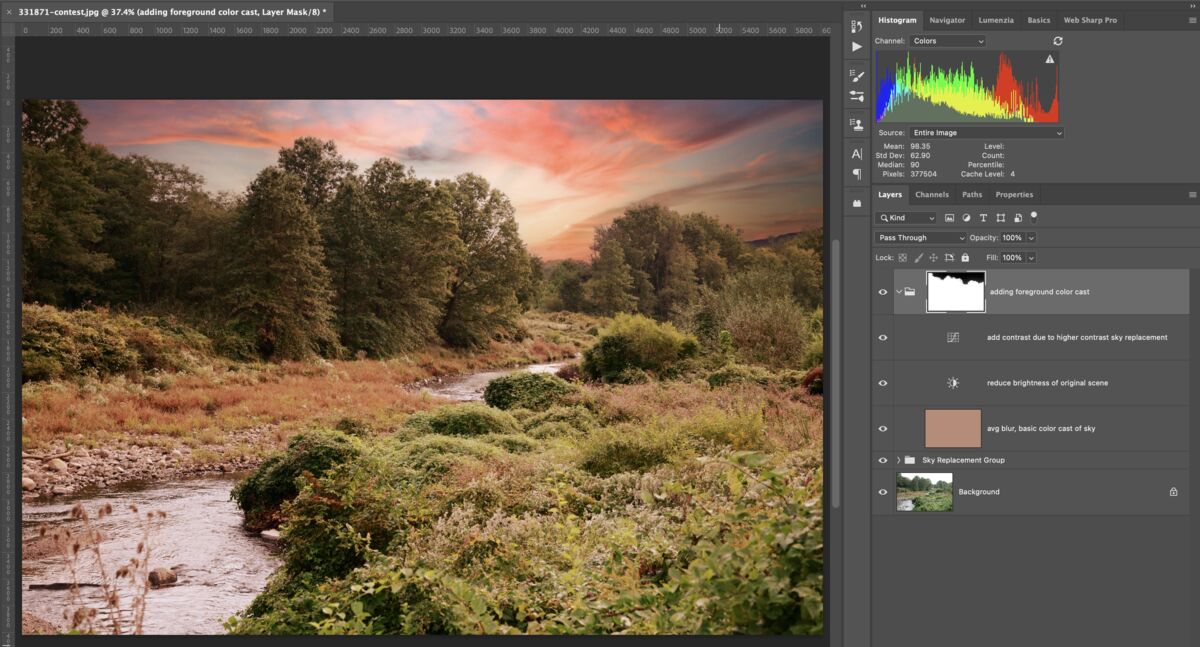
There are many ways to do this but, here’s a very easy but slightly modified version of a technique I learned from Serge Ramelli.
1) Add the desired sky
2) copy the sky onto a blank layer and expand it to it’s canvas size
3) blur using Average blur. This solid color contains all the sky colors blended together.
4) Set blend mode to Overlay or Softlight.
5) Adjust Opacity to achieve desired results.
For this image, I use overlay and left opacity at 100% just to show the extreme effect.. Reducing opacity will give a more pleasing effect.
This image had a low contrast sky and the scene lighting was obviously diffuse. I replaced the diffuse sky with a higher contrast sky and an early morning/evening sky using one of PS’s skies. So I lowered the scene brightness and increased the scene contrast. I placed the blurred sky, brightness and curve layer in a group and used the sky mask that PS generated in the sky replacement group to isolate the hue changes just to the scene without altering the sky. I set the blend modes of the brightness and curves layer to luminosity to prevent color changes as I handed the brightness and contrast of the scene.
Hope this helps
Mike