studio lighting: experience and advice
Aug 17, 2017 17:59:21 #

HELLO DOCTOR!
Much of this discussion, thus far, has to do with photographic lighting equipment brands, styles and models. All of this factor in to you eventual purchase but there is a number of other considerations that you should be aware of. I am a profession /commercial and portrait photograph and have had some experience in clinical photography as well. I have done work for a number of dental clinics in my city and advised on designing a number of in-office photographic sets up in three clinics that specialize in aesthetics and maxillofacia oral surgery- lots of before and after comparisons for sure.
One important consideration is the space the available in you office suite. Creating a setup with light stands can be cumbersome and require some time consuming set up and take-down routines. You will need a room with enough space to accommodate the lighting gear and just as importantly, enough backup distance to place the camera at the proper distance, along with the advisable focal length, for proper perspective and distortion free portrait type images. Depending on you camera body (sensor) type, a focal length (or zoom setting) of 50 to 105mm is recommended- you will need a back up distance of approximately 5 to 8 feet. Your main light source will be about 3 to 5 feet from you subjects and depending on whether you are shooting full face, 2/3 face or profile view points, you main light can be placed anywhere form 20 to 135 degrees off the camera/subject axis. You will need space to accommodate that kind of movement. If that main light source is equipped with a parabolic umbrella or soft-box type of modifier, theses important accessories also take up space and factor into handling the equipment smoothly.
i don't know how much lighting manipulation you are interested in doing. You can set up a totally flexible system whereby you can move the lights, create various lighting styles and patterns to accommodate each subject's facial structure. This kind of system requires some knowledge of portrait lighting methodologies such as positions, angles of incidence, lighting ratio, feathering techniques and more. At the other end of the possibilities, you can set up an (excuse the expression) "idiot" system- you don't need to be an idiot- just a practical person who wants a fixed system that can be used quickly and easily and yield somewhat decent results. A system like this can be constructed whereby you or any of you staff can make good record photographs of you patients with little fuss. My favorite system to advise on, is half way in between. This consists of a fixed fill light, background light and perhaps a hair light and a mobile main light. On one light needs to be moved to accommodate various facial structures and camera angles. The fixed lights can be permanently and safely mounted on the ceiling where they will be out of the way. Even the mobile light can be mounted on a rail/pentagram type mechanism so that no floor space is taken up. A existing wall can be paint a solid, mottled or variegated color and serve as a background, thus negating the need for any kind of backdrop material or supporting stands.
The last instillation I advised on, was set up in an anti-room which also housed a panoramic x-ray unit and some lab equipment. Much of you decision should be based on how much time you have with each patient and whether or not you are going to do this on an ongoing basis that will justify a built in system. The dentists I serviced, at first used display prints, projected slides and albums but recently they are incorporating digital media on small and large screens for in-office and public presentations.
Equipment wise, the brands and models of equipment mentioned thus far in this thread are all decent enough. The brands such as Pro-Photo, Buff, Photogenic, Speedotron and many others will certainly do the job. For any kind of clinical or portrait photography, I do not recommend speed-lights. When aesthetics are an important factor, you need to see exactly what each of you lights are doing in relation to the subject- you want to see how each light, especially your main light source, is striking the subject, how it effect the rendition of the facial features and how to address certain issues such as reflections in eyeglasses. Mono-lights are self contained and feature modeling lamps so that you can see your lighting, have ample light to focus and compose with and make certain corrections as you go along. The modeling light is usually a quartz type of incandescent lamp which is mounted concentrically to the flash tube. The actual exposure is made with electronic flash but the continuous light shows you the resulting lighting pattern that you can expect.
You need good reliable equipment but you needn't pay premium costs for certain features that you may not need.
Most kinds of portrait work does not usually require extremely high powered flash units. Units with variable power between 100 to 300 watt-seconds are usually sufficient. You don't need enormous degrees of depth of field, and in fact, most backgrounds are best rendered out of focus. For you situation, I do recommend the use of either umbrella or soft-box type modifiers. Theses provide nicely diffused even light that is less critical than direct light from a small parabolic reflectors- small errors in lighting placement won't be as critical.
A working aperture of around f/8 will yield enough depth of field to make certain that all facial features are in focus- if you focus on the eyes, the ears and of course the SMILE will all be nice and sharp!
One of my favorite easy portrait set ups is as follows: A fixed fill light of about 200-to 300 watt-seconds is bounced of a white back wall- where the wall meets the ceiling. This can be a raw unmodified light- the juncture of the wall and the ceiling will act as a troth of soft light and become, in effect, the modifier. It will be high enough to negate any unwanted reflections, from the fill light, in eyeglasses. This will provide ample detail in the shadows. The main light is a mono-light equipped with a soft box on a white umbrella- between 24- and 30 inches is sufficient. A background light is mounted on the ceiling and aimed downward at the background. The subject should be placed 3 or 4 feet from the background and the light should be about at least 2 feed form the background and downward. downward at about 45 degrees. This light can also be place on the floor, in a small stand, and aimed upward fro a similar effect. A modifier is not required for this light but a diffusion panel or a grid will help. The function if this light is to lend separation and color or tonal mass to the background- this creates the illusion of dimension. A hair light adds a glamorization touch- it extends the glow of the main light into the hair. The placement of this light is somewhat critical in that it has to be prevented form washing down the mask of the face or striking the lens and causing flare. It can be supported on a boom stand or permanently mounted above and behind the subject. if it is equipped with a small soft box and a grid, it can be managed as a fixed light source as long as the subject is always seated in the same place. Of course, this is an optional light.
Once the basic instillation is made, a series of tests will determine the exposures, the ratios, the differential of power between the light which determines contrast, key and factors into staying within the dynamic range of you camera system.
Those Buff lights are fine and their service on delivery and repairs is top-notch! Their prices are fair and reasonable.
I hope this serve as a basic set of helpful guide lines. Best of luck and have fun shopping. Kindest regards, Ed
Aug 17, 2017 19:20:27 #
E.L.. Shapiro wrote:
HELLO DOCTOR! br br Much of this discussion, thu... (show quote)
Read carefully what Ed has said! When you get past the cheaper methods that you then "HATE", your target for a "higher quality" setup will be exactly what he describes.
I see no real point in purchasing anything that will not in the end be an integral part of what Ed has described. You may want to start with only a portion of that, but make it equipment that does fit into the target system and does not need to be replaced or discarded.
Aug 17, 2017 20:30:47 #

View Robert Harrington's One Speedlight, Multiple Looks video on Youtube. You can do a lot with speedlites, even one. I think that is a way to start and see if it meets your needs. If not you will have other uses for it and can move on to monolights. If you want to just spend a few thousand and be done by some Profoto B1 or B2s and a few modifiers...
Best,
Todd Ferguson
Best,
Todd Ferguson
Aug 17, 2017 21:12:03 #
Floyd- Thanks for your remarks.
Todd- True enough, one can get some pretty decent results with the savvy use of speed-lights.I use speed lights and similar portable flash systems for wedding photography and other assignments where I need to travel light. Since I have many years of studio experience, I can instinctively place my lights and SIMULATE or kinda REPLICATE some forms of portrait-like lighting. Truthfully, it's close but not the real McCoy. I recommended mono-lights because the kind of aesthetics that the OP wishes to illustrate, record and interpret requires a more precise lighting methodology. Also, someone who is in the process of learning or experimenting with new lighting methods will find the modeling lamps almost indispensable. Of course, the mono-light rout is more costly but if the OP can immediately begin to produce fine imagery that will assist him in promoting his practice and create good public relations among his patients, the equipment will soon pay for itself. Up here in Canada, most of the name-brand dedicated speed-lights are in the $500+ range so unless one has a specific use for them, I usually advise them to put that kind of money toward the mono-lights.
I have seen the tutorial you have recommended- the guy knows his stuff and has very good control considering all he is using is one speed light and a reflector in most of his examples. Very applicable to glamour portraiture, fashion work and wedding photography.
Regards, Ed
Aug 17, 2017 21:41:49 #
Thanks for all of your input guys! I will keep you up to date with my choices and results. The videos recommended were very good. Thanks for taking the time!
Aug 17, 2017 21:51:32 #
Ed,
I concur with what you are saying. I have 3 Canon 600s, camera top controller, battery packs and a bunch of MagMod stuff. I use some of this stuff shooting drag racing and some playing with Portraits. I also have the umbrellas, reflectors, soft boxes, stands and such. I can do some nice stuff with these components. But I have some decent money invested too. If they had been available when I started down the Speedlite path I might have gone Profoto B2 instead. I still may go there in the future, but it is some money. If money was not a factor that is where I might go sooner rather than later. I think Harrington does some nice stuff with his highly portable minimalist approach. But if you have a permanent studio space and don't need to drag your lights around and a good budget then the monolights may be the better place to start.
Best,
Todd Ferguson
Aug 17, 2017 23:52:06 #

The instruction of Neil Van Niekirk gave me the breakthrough at last to understand the use of flash lighting.
He has mastered the use of flash lighting under a variety of conditions with speedlights. I always recommend him to anybody wishing to learn flash lighting.
He has mastered the use of flash lighting under a variety of conditions with speedlights. I always recommend him to anybody wishing to learn flash lighting.
sirlensalot wrote:
Assuming you are setting up in a small room? Way t... (show quote)
Aug 18, 2017 08:27:11 #

anotherview wrote:
The instruction of Neil Van Niekirk gave me the breakthrough at last to understand the use of flash lighting.
He has mastered the use of flash lighting under a variety of conditions with speedlights. I always recommend him to anybody wishing to learn flash lighting.
He has mastered the use of flash lighting under a variety of conditions with speedlights. I always recommend him to anybody wishing to learn flash lighting.
Totally agree.
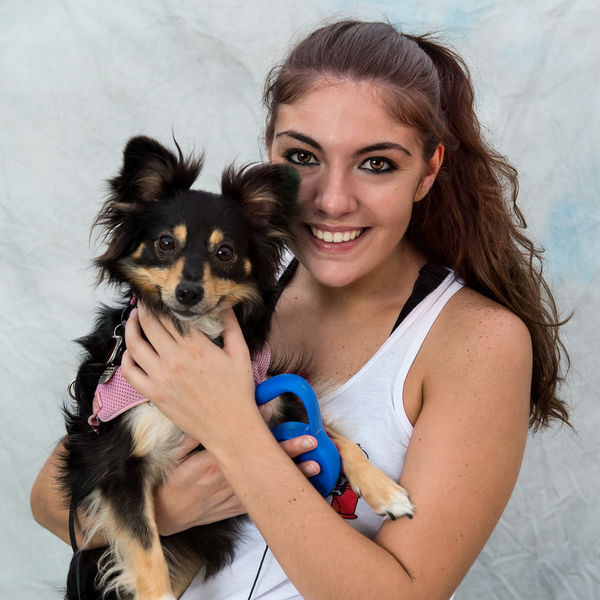
I took this image with a single Sunpak Auto 383 manual flash that I purchased on eBay for $10, firing into a 60" reflective umbrella for a key light, with a 42x72 collapsible reflector for fill. I used a muslin background. This was for a benefit where I donated the profits from sale of the images to a local animal rescue group. I set up a portable studio under a 10' x 10' canopy outdoors. I used Yongnuo RF 602 dumb triggers. Total value of the gear I used was about $400, including the background, supports, light stands clamps to hold the reflector, triggers, etc - less than a decent mono light. Assembling the lights, placing them and running a test shot or two took about 15 mins. I put a placemark on the muslin where other subjects were to stand, and made minor adjustments in the placement of the lighting throughout the 3 hours I was doing animal and animal with owner portraits.
An extra snooted speedlight could have been used as a hair light, but these were 15 min sessions, in order to deal with the line of people waiting to get their picture taken. I did a total of 10 sessions for this group, and everyone bought sets of images, and I was able to hand the rescue group a nice donation.
Aug 18, 2017 10:58:31 #
Aug 18, 2017 11:10:07 #
Notorious T.O.D. wrote:
Nice Gene!!!
Best,
Todd Ferguson
Best,
Todd Ferguson
Thanks, Todd!
Discussions are great, but I think images speak to credibility, which is why I posted this.
Aug 19, 2017 23:26:08 #
Aug 20, 2017 04:57:38 #
4OX wrote:
I do intend to use the strobes outdoors. I don't know which lights art "strong enough"?
The most powerful speedlights put out about 80 W/s at full power. Full power for strobes start at maybe 100 W/s and goes up to at least 2400 W/s.
Speedlights can be adjusted to lower power usually in 1/3 or 1/4 stop incrememts and become cooler (more blue) as the power is reduced. Strobes are adjustable in steps of 1/10 stop and become warmer (red) in color as the power is reduced.
The Buff E640 strobe is the single exception for color temperature change. In Action Mode it is like a speedlight and gets cooler as the power is reduced. In Constant Color Mode the color temperature remains at 5600K for all power levels. When using multiple lights (including sunlight) having only one color temperature is significant.
Aug 20, 2017 06:21:28 #
4OX wrote:
I do intend to use the strobes outdoors. I don't know which lights art "strong enough"?
LensRental.com rents a variety of studio strobes - Profoto strobes and all of the Paul C Buff strobes - Einstein, White Lightning, AlienBees and DigiBees. They also rent light modifiers, radio triggers, and light stands. I've rented from them numerous times. They're very good. They include a pre-paid return shipping label to make returns easy. You might want to rent first to try out different models.
Aug 20, 2017 09:31:30 #
Helpful suggestion:
CO wrote:
LensRental.com rents a variety of studio strobes - Profoto strobes and all of the Paul C Buff strobes - Einstein, White Lightning, AlienBees and DigiBees. They also rent light modifiers, radio triggers, and light stands. I've rented from them numerous times. They're very good. They include a pre-paid return shipping label to make returns easy. You might want to rent first to try out different models.
Aug 20, 2017 14:13:58 #
If you want to reply, then register here. Registration is free and your account is created instantly, so you can post right away.