GIMP: Quick and Easy Tutorials
Nov 7, 2012 10:47:12 #
PhotoGator
Loc: Florida
kit_kit wrote:
quote=PhotoGator quote=Shakey Fake HDR Plugin Tu... (show quote)
My apology, my misunderstanding. You are absolutely correct.
Nov 7, 2012 10:47:12 #
PhotoGator
Loc: Florida
kit_kit wrote:
quote=PhotoGator quote=Shakey Fake HDR Plugin Tu... (show quote)
My apology, my misunderstanding. You are absolutely correct.
Nov 7, 2012 11:18:21 #
PhotoGator
Loc: Florida
GIMP Tutorials by Shakey and his GGS Kevin.
http://www.uglyhedgehog.com/t-69708-1.html#1165232
Chapter 1: Crop Tool
http://www.uglyhedgehog.com/t-69708-1.html#1165331
Chapter 2: Zoom Tool
http://www.uglyhedgehog.com/t-69708-1.html#1165682
Chapter 3: Eraser Tool
http://www.uglyhedgehog.com/t-69708-1.html#1165859
Chapter 4: Perspective Tool
http://www.uglyhedgehog.com/t-69708-1.html#1166285
Download: Two Castle Images to Work on it
http://www.uglyhedgehog.com/t-69708-1.html#1166545
Chapter 5: Understanding Save Options
http://www.uglyhedgehog.com/t-69708-1.html#1168165
Chapter 6: How To Get Rid of Purple/Blue Fringing
http://www.uglyhedgehog.com/t-69708-2.html#1168719
Ep 6-a: Removing Purple/Blue with a Selection Tool
http://www.uglyhedgehog.com/t-69708-2.html#1169048
Important Resources
http://www.uglyhedgehog.com/t-69708-3.html#1169911
Chapter 7: Clone Tool
http://www.uglyhedgehog.com/t-69708-5.html#1172481
Chapter 7-a: Clone Tool in Use
Download: Image to work n it
http://www.uglyhedgehog.com/t-69708-5.html#1172567
Chapter 8: The Heal Tool
http://www.uglyhedgehog.com/t-69708-5.html#1174255
Chapter 8-a: Heal Tool: Practice photos
Download: Girl Bath and Baby to Heal
http://www.uglyhedgehog.com/t-69708-5.html#1174300
Chapter 9: The Fuzzy Tool
http://www.uglyhedgehog.com/t-69708-6.html#1175685
Chapter 9-a: The Fuzzy Tool in Practice
Downloads: Towers for Fuzzy Tool - Sky for Fuzzy Tool Work
http://www.uglyhedgehog.com/t-69708-6.html#1176153
Chapter 10: Select By Color Tool
http://www.uglyhedgehog.com/t-69708-6.html#1176960
Chapter 10-a: Select by Color Tool (continued)
http://www.uglyhedgehog.com/t-69708-6.html#1177258
Chapter 10-b: Select by Color Tool Download Photo
http://www.uglyhedgehog.com/t-69708-6.html#1177543
Note: To save work as JPEG
http://www.uglyhedgehog.com/t-69708-6.html#1178284
File Menu
Click 'Export'
Write name of file and format (picture.jpg) in the top (Name) slot.
Click Export button.
Select degree of quality. Click Export button
Chapter 11: The Quick Mask
Download: Cat to work with it
http://www.uglyhedgehog.com/t-69708-6.html#1180172
Chapter 11-a: The Quick Mask (continued.)
Download Image
http://www.uglyhedgehog.com/t-69708-7.html#1180374
Chapter 11-b: The Quick Mask (continued.)
http://www.uglyhedgehog.com/t-69708-7.html#1180398
Q&A:
Q: can you tell us where this "content aware" / resynthisiser feature is hiding in GIMP? Not being 'negative' but can you or your 11 year old tutor tell us if it actually is in GIMP or has to be downloaded seperately from yet another site and then installed?
A: Yes, this is a free plugin for GIMP. It is updated regularly. The resynthesize plugin for Gimp 2.8.2 has not yet been announced. We are all waiting and hope to see it soon. The previous version was 2.6 which works in 2.8 after a fashion (not good). I'll keep the forum posted when the update becomes available.
In the mean time, try the heal tool or the Clone tool. Manual operation but excellent tools.
Chapter 12: The Scissors Select Tool
http://www.uglyhedgehog.com/t-69708-7.html#1185069
Chapter 12-a: The Scissors Selection Tool (continued)
Download: Fish photo to work with
http://www.uglyhedgehog.com/t-69708-7.html#1185087
Chapter 13: Blend Tool (aka Gradient Tool)
Download Image
http://www.uglyhedgehog.com/t-69708-8.html#1188372
Chapter 14: The Rotate Tool: To Level the Horizon
Download Image
http://www.uglyhedgehog.com/t-69708-8.html#1189921
Chapter 15: What is Noise and How to Eliminate it with GIMP
Download Image
http://www.uglyhedgehog.com/t-69708-8.html#1192596
Download Practice Image: Remove hair from girls face
http://www.uglyhedgehog.com/t-69708-8.html#1193395
After Image, hair removed
http://www.uglyhedgehog.com/t-69708-9.html#1193813
Chapter 16: How to Install Plugins and Scripts
Download Image: Sequence to Install Plugins in Gimp
http://www.uglyhedgehog.com/t-69708-9.html#1199566
Chapter 16-a: How to Install Plugins and Scripts (Continued )
http://www.uglyhedgehog.com/t-69708-9.html#1199601
Chapter 16-b: How To Make GIMP Work With Photoshop Plugins
http://www.uglyhedgehog.com/t-69708-9.html#1201936
Chapter 16-c: Photoshop Plugin Settings (continued):
http://www.uglyhedgehog.com/t-69708-9.html#1201950
Chapter 16-d: Recommended Plugins for GIMP
http://www.uglyhedgehog.com/t-69708-9.html#1203996
Chapter 17: How To Make Your Photos 'Pop' with GIMP
Download Image
http://www.uglyhedgehog.com/t-69708-9.html#1208254
Chapter 17-a: Make your Photos 'Pop' (continued)
Download Image
http://www.uglyhedgehog.com/t-69708-9.html#1208270
Chapter 17-b: Make your Photos 'Pop' (continued)
Download Image
http://www.uglyhedgehog.com/t-69708-9.html#1208282
Chapter 17-c: Make your Photos 'Pop' (continued)
Download Image
http://www.uglyhedgehog.com/t-69708-9.html#1208297
Chapter 17-d: Make your Photos 'Pop' (continued)
Download Image
http://www.uglyhedgehog.com/t-69708-10.html#1208309
Chapter 17-d: Make your Photos 'Pop' (end)
http://www.uglyhedgehog.com/t-69708-10.html#1208331
Practice image to use the Heal Tool (opacity 30)
Objective: Remove shine from front head, chin and nose
http://www.uglyhedgehog.com/t-69708-10.html#1211811
Out of Order:
Chapter 18-h: Images to work with
Download Images: Background,Tower, Eagle
http://www.uglyhedgehog.com/t-69708-12.html#1216151
Chapter 18: Let's Get Started with Layers:
2 Download Screen Images
http://www.uglyhedgehog.com/t-69708-11.html#1215993
Chapter 18-a: Let's Get Started with Layers (continued):
Download Image
http://www.uglyhedgehog.com/t-69708-11.html#1216010
Chapter 18-b: Let's Get Started with Layers (continued):
http://www.uglyhedgehog.com/t-69708-11.html#1216032
Chapter 18-c: Let's Get Started with Layers (continued):
Download Image
http://www.uglyhedgehog.com/t-69708-11.html#1216047
Chapter 18-d: Let's Get Started with Layers (continued):
Download Image
http://www.uglyhedgehog.com/t-69708-11.html#1216065
Chapter 18-e: Let's Get Started with Layers (continued):
Download Image
http://www.uglyhedgehog.com/t-69708-11.html#1216090
Chapter 18-f: Let's Get Started with Layers (continued):
Download Image
http://www.uglyhedgehog.com/t-69708-12.html#1216108
Chapter 18-g: Let's Get Started with Layers (continued):
2 Download Images
http://www.uglyhedgehog.com/t-69708-12.html#1216114
Chapter 18-h: Images to work with
Download Images: Background,Tower, Eagle
http://www.uglyhedgehog.com/t-69708-12.html#1216151
Chapter 18-i: Let's Get Started with Layers (continued)
http://www.uglyhedgehog.com/t-69708-12.html#1216479
Chapter 19: Layers 2: Brushes and Other Magic Stuff.
Download: Clouds and Scissors Tool Setup
http://www.uglyhedgehog.com/t-69708-13.html#1225857
Chapter 19-a: Layers 2: Brushes and Other Magic Stuff (Continued)
http://www.uglyhedgehog.com/t-69708-13.html#1225894
Chapter 20: Out of Bound Tiger Tutorial
http://www.uglyhedgehog.com/t-69708-13.html#1228696
Chapter 20-a: Out of Bound Tiger Tutorial (Continued)
http://www.uglyhedgehog.com/t-69708-13.html#1228710
Chapter 20-b: Out of Bound Tiger Tutorial (Continued)
http://www.uglyhedgehog.com/t-69708-13.html#1228719
Chapter 20-c: Out of Bound Tiger Tutorial (Continued)
http://www.uglyhedgehog.com/t-69708-13.html#1228737
Chapter 20-d: Out of Bound Tiger Tutorial (Continued)
http://www.uglyhedgehog.com/t-69708-13.html#1228751
Chapter 20-e: Out of Bound Tiger Tutorial (Continued)
http://www.uglyhedgehog.com/t-69708-13.html#1228763
Chapter 21: Out of Bound 2
Download Work Photo
http://www.uglyhedgehog.com/t-69708-14.html#1236372
Chapter 21-a: Out of Bound 2 (Continued)
Download Work on her Eyes
http://www.uglyhedgehog.com/t-69708-14.html#1236387
Chapter 21-b: Out of Bound 2 (Continued)
Download Work on her Eyes 2
http://www.uglyhedgehog.com/t-69708-14.html#1236393
Chapter 21-c: Out of Bound 2 (Continued)
Download Little Girl Work Photo 3
http://www.uglyhedgehog.com/t-69708-14.html#1236404
 
Chapter 21-d: Out of Bound 2 (Continued)
Download Little Girl Work Photo 4
http://www.uglyhedgehog.com/t-69708-14.html#1236410
Chapter 21-e: Out of Bound 2 (Continued)
Download Little Girl Work Photo 5
http://www.uglyhedgehog.com/t-69708-14.html#1236421
Chapter 21-f: Out of Bound 2 (Continued)
Download Little Girl Work Photo 6
http://www.uglyhedgehog.com/t-69708-14.html#1236433
Chapter 21-g: Out of Bound 2 (Continued)
Download Little Girl Work Photo 7
http://www.uglyhedgehog.com/t-69708-14.html#1236439
Chapter 22: Under Exposed Rescue Using Layers Plus
Download Work Photo
http://www.uglyhedgehog.com/t-69708-16.html#1243531
Chapter 22-a: Under Exposed Rescue Using Layers Plus (Continued)
Download Screen Image 1
http://www.uglyhedgehog.com/t-69708-16.html#1243540
Chapter 22-b: Under Exposed Rescue Using Layers Plus (Continued)
Download Screen Image 2
http://www.uglyhedgehog.com/t-69708-16.html#1243548
Chapter 22-c: Under Exposed Rescue Using Layers Plus (Continued)
Download Screen Image 3
http://www.uglyhedgehog.com/t-69708-16.html#1243555
Chapter 22-d: Under Exposed Rescue Using Layers Plus (Continued)
Download Screen Image 4
http://www.uglyhedgehog.com/t-69708-16.html#1243564
Chapter 22-e: Under Exposed Rescue Using Layers Plus (Continued)
Download Screen Image 5
http://www.uglyhedgehog.com/t-69708-16.html#1243571
Chapter 23: Quick Under Exposed Rescue
http://www.uglyhedgehog.com/t-69708-16.html#1244900
Chapter 24: Layers Command: 'Merge Visible Layers'.
http://www.uglyhedgehog.com/t-69708-17.html#1246375
Chapter 24-a: Layers Command: 'Merge Down'.
http://www.uglyhedgehog.com/t-69708-17.html#1246405
Chapter 25: Over Exposed Photo Rescue Using Layers Plus
http://www.uglyhedgehog.com/t-69708-17.html#1251102
Chapter 25-a: Over Exposed Photo Rescue Using Layers Plus
http://www.uglyhedgehog.com/t-69708-17.html#1251112
Chapter 25-b: Over Exposed Photo Rescue Using Layers Plus
http://www.uglyhedgehog.com/t-69708-17.html#1251119
Chapter 25-c: Over Exposed Photo Rescue Using Layers Plus
http://www.uglyhedgehog.com/t-69708-18.html#1251126
Chapter 25-d: Over Exposed Photo Rescue Using Layers Plus
http://www.uglyhedgehog.com/t-69708-18.html#1251136
Chapter 26: Quick Over Exposed Photo Rescue
http://www.uglyhedgehog.com/t-69708-18.html#1253911
Chapter 27: Fill-Flash Effect Using Layers for Best Result.
http://www.uglyhedgehog.com/t-69708-19.html#1257251
Chapter 28: Fill Flash Effect
Download Work Photo
http://www.uglyhedgehog.com/t-69708-19.html#1254915
Chapter 28-a: Fill Flash Effect (Continued)
http://www.uglyhedgehog.com/t-69708-19.html#1254927
Chapter 28-b: Fill Flash Effect (Continued)
http://www.uglyhedgehog.com/t-69708-19.html#1254946
Chapter 28-c: Fill Flash Effect (Continued)
http://www.uglyhedgehog.com/t-69708-19.html#1254956
Chapter 28-d: Fill Flash Effect (Continued)
http://www.uglyhedgehog.com/t-69708-19.html#1254964
Chapter 29: Fake HDR Plugin Tutorial
http://www.uglyhedgehog.com/t-69708-20.html#1263105
Chapter 29-a: Fake HDR Plugin Tutorial (Continued)
http://www.uglyhedgehog.com/t-69708-20.html#1263124
Chapter 29-b: Fake HDR Plugin Tutorial (Continued)
http://www.uglyhedgehog.com/t-69708-20.html#1263142
Chapter 29-c: Fake HDR Plugin Tutorial (Continued)
http://www.uglyhedgehog.com/t-69708-20.html#1263158
Nov 9, 2012 07:32:39 #
The GIMP 'Curves Dialog' Tutorial.
The GIMP 'Curves Dialog' is probably one of the most innovative tools available in any photo editing software, and that include Photoshop. It enable you to change the brightness, darkness, saturation, shadows, contrast, colors, and transparency of most of your photographs.
It will also process, as above, any layer you activate or any selection you choose to make with any GIMP selection tool. The Curves tool even enables you to adjust the tonal range of your image. It processes all RGB images saved in almost any format.
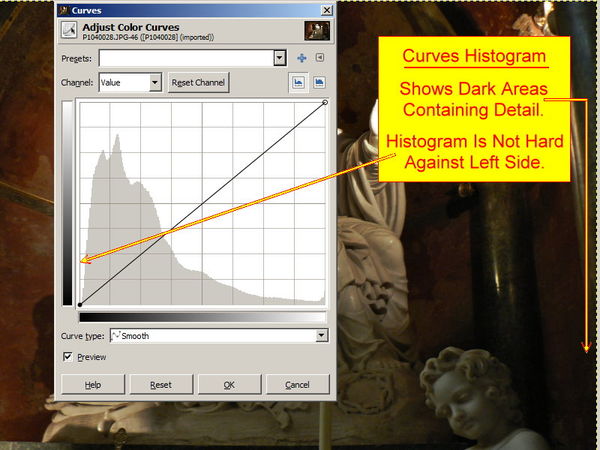
To make the most of the 'Curves' tool we need to see how it performs its various functions. Here's a quick and easy run down on how to make the most of Curves. First, we'll take a look at the Histogram.
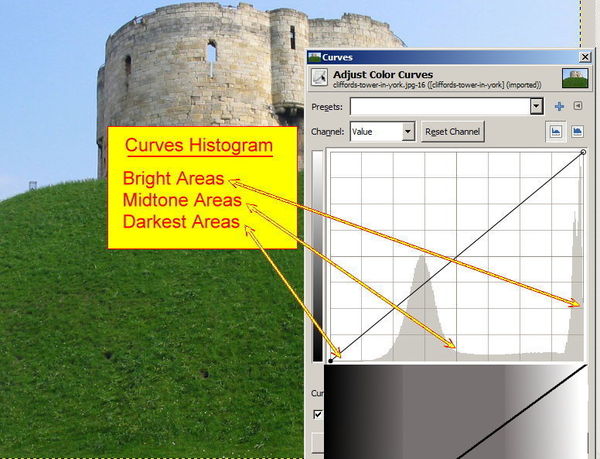
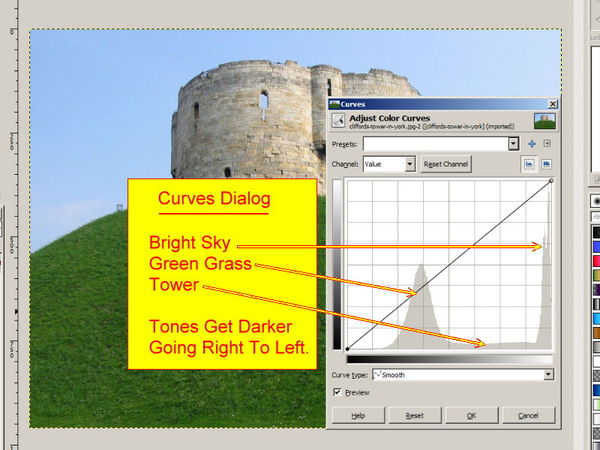
1. The 'Histogram' within the Curves tool is shown in pale grey, maybe this is the reason why it is often overlooked as an aid to producing a great photo. In the images below the Histogram is showing you that the photo is comprised of mostly midtones with some brightness.
2. The bright areas show up on the right of the Histogram irrespective of where they are in the photograph. The black, or heavily shadowed, areas show up on the left of the histogram irrespective of where they are in the photograph. Midtones, obviously, show up around the middle of the Histogram.
3. The image of the Tower has no black or heavily shadowed areas. This is displayed in the Histogram as a white area. This means there are no black or dark grey pixels in the photograph.
The GIMP 'Curves Dialog' is probably one of the most innovative tools available in any photo editing software, and that include Photoshop. It enable you to change the brightness, darkness, saturation, shadows, contrast, colors, and transparency of most of your photographs.
It will also process, as above, any layer you activate or any selection you choose to make with any GIMP selection tool. The Curves tool even enables you to adjust the tonal range of your image. It processes all RGB images saved in almost any format.
To make the most of the 'Curves' tool we need to see how it performs its various functions. Here's a quick and easy run down on how to make the most of Curves. First, we'll take a look at the Histogram.
1. The 'Histogram' within the Curves tool is shown in pale grey, maybe this is the reason why it is often overlooked as an aid to producing a great photo. In the images below the Histogram is showing you that the photo is comprised of mostly midtones with some brightness.
2. The bright areas show up on the right of the Histogram irrespective of where they are in the photograph. The black, or heavily shadowed, areas show up on the left of the histogram irrespective of where they are in the photograph. Midtones, obviously, show up around the middle of the Histogram.
3. The image of the Tower has no black or heavily shadowed areas. This is displayed in the Histogram as a white area. This means there are no black or dark grey pixels in the photograph.
Nov 9, 2012 07:45:59 #
The GIMP 'Curves Dialog' Tutorial (Continued).
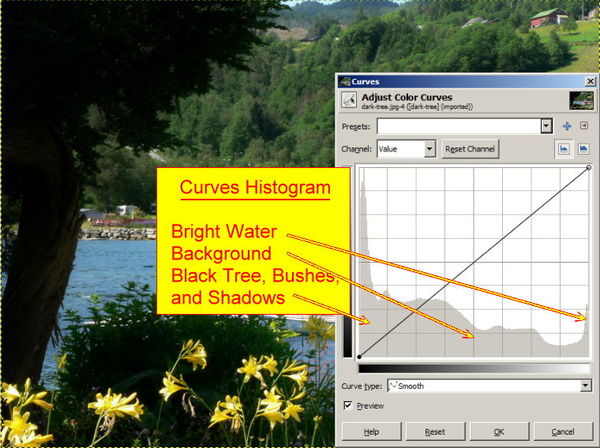
4. When the Histogram does not butt up against the left or right edge of the Curves Dialog it shows that the darkest and/or brightest areas contain some details. This means there is white between the Histogram and the edge of the Dialog. This is desireable as it means no blocked up black shadows or blown out highlights.
4. When the Histogram does not butt up against the left or right edge of the Curves Dialog it shows that the darkest and/or brightest areas contain some details. This means there is white between the Histogram and the edge of the Dialog. This is desireable as it means no blocked up black shadows or blown out highlights.
Nov 9, 2012 08:00:16 #
The GIMP 'Curves Dialog' Tutorial (Continued).
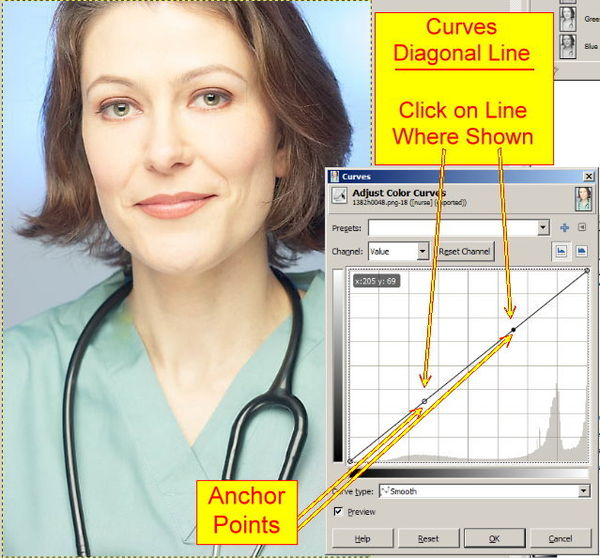
5. The Curves 'Diagonal Line' enables you to make adjustments. To any Photograph of your choice.
6. (Your work photo is supplied here) Open GIMP. Load the 'Nurse' photo. Go to 'Colors' menu and select 'Curves'. Click on the diagonal line, in two places, as shown. These selected points are known as 'Anchor Points'. There is no limit to the number of 'Anchors' you may select. However, two or three anchors are usually sufficient when you are using the 'Values' channel.
Curves Dialog Work Photo

Nov 9, 2012 08:20:11 #
The GIMP 'Curves Dialog' Tutorial (Continued).
Nov 9, 2012 08:30:52 #
The GIMP 'Curves Dialog' Tutorial (Continued)
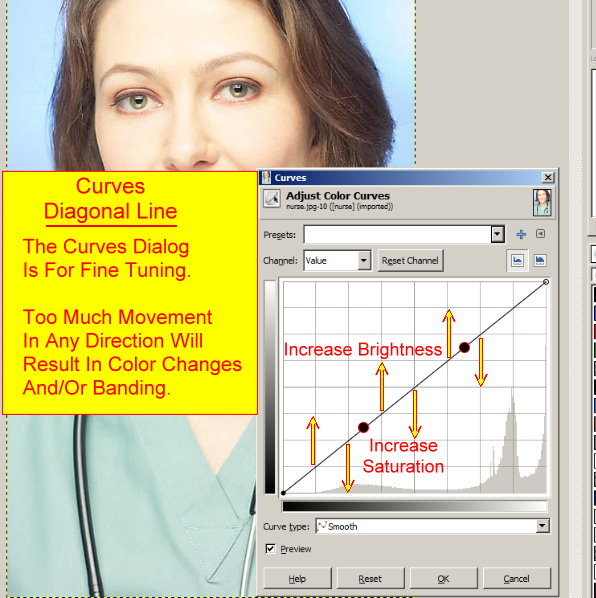
7. Let's assume that you know this nurse and you wish to bring out her true looks and character:
She has auburn hair, hazel eyes and a good complexion. She is an experienced medic with a strong personality. The work photo does not do her justice. Here's the quick and easy way to bring out her character. Study the example below give the nurse a better image.
Nov 9, 2012 08:38:57 #
The GIMP 'Curves Dialog' Tutorial (Continued).
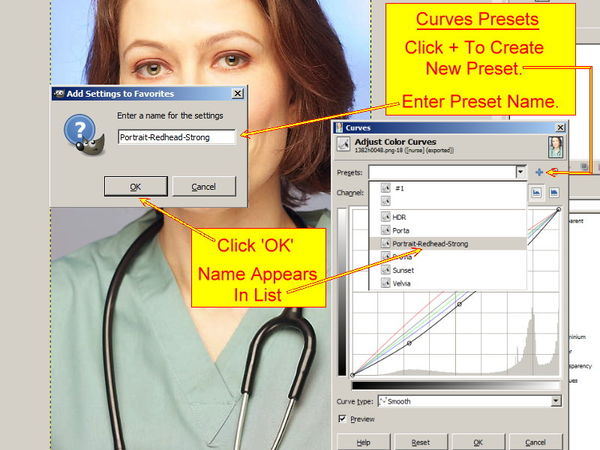
8. When you find a good 'Curves' setup you may wish to repeat it with a different photo. You can save the setup in 'Presets' and give your setup a name. This means you can always go beck to that 'Preset' as a starting point and make any adjustments you require without losing the original preset. Here's how:
8. When you find a good 'Curves' setup you may wish to repeat it with a different photo. You can save the setup in 'Presets' and give your setup a name. This means you can always go beck to that 'Preset' as a starting point and make any adjustments you require without losing the original preset. Here's how:
Nov 9, 2012 08:47:37 #
The GIMP 'Curves Dialog' Tutorial (Continued).
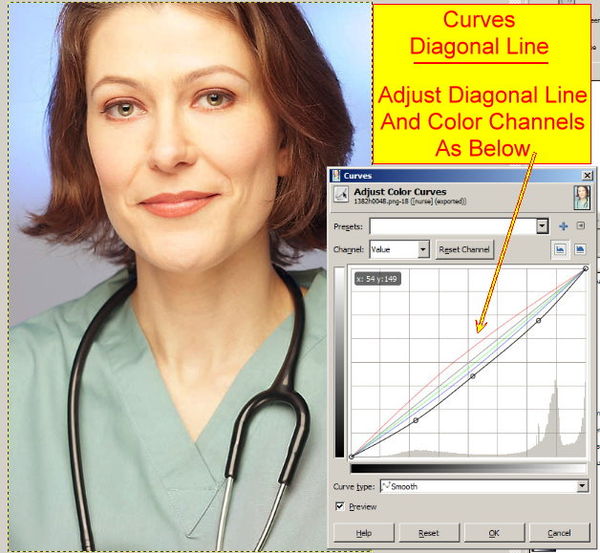
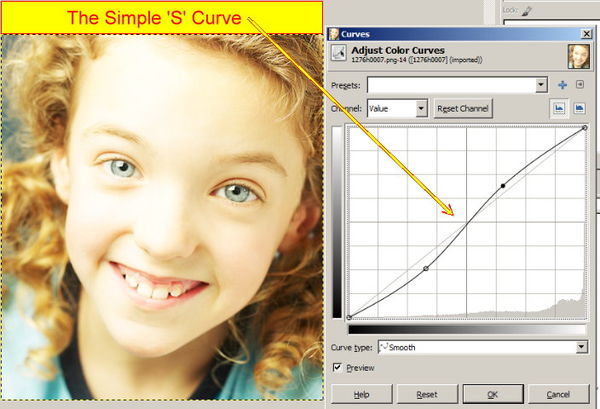
9. Many online tutorials talk about the 'S' curve as the ideal method of improving many images. This means that you increase the contrast and saturation of an image, plus add a little brightness. (As below.) You can also have an 'Inverted S curve', which means the anchor points are reversed. You may wish to setup a Preset for 'S' curves, too.
9. Many online tutorials talk about the 'S' curve as the ideal method of improving many images. This means that you increase the contrast and saturation of an image, plus add a little brightness. (As below.) You can also have an 'Inverted S curve', which means the anchor points are reversed. You may wish to setup a Preset for 'S' curves, too.
Nov 9, 2012 15:06:23 #
The GIMP 'Curves Dialog' Tutorial (Continued).
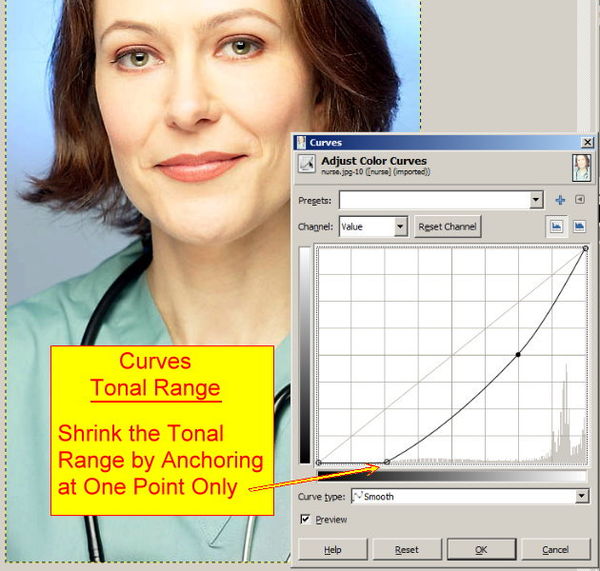
10. In the Curves Dialog 'Histogram' your photograph is shown to have a tonal range. The 'Tonal Range' represents the diverse shades of color between absolute black and absolute white in your image.
The Tonal Range of an image is wide when it stretches from edge to edge of the Curves Dialog. If the Tonal Range represented by the Histogram ends before the edge is reached it is possible to 'Crush' the pixels down, with the diagonal line, and improve the picture. See below.
Nov 9, 2012 16:09:08 #
The GIMP 'Curves Dialog' Tutorial (Continued).
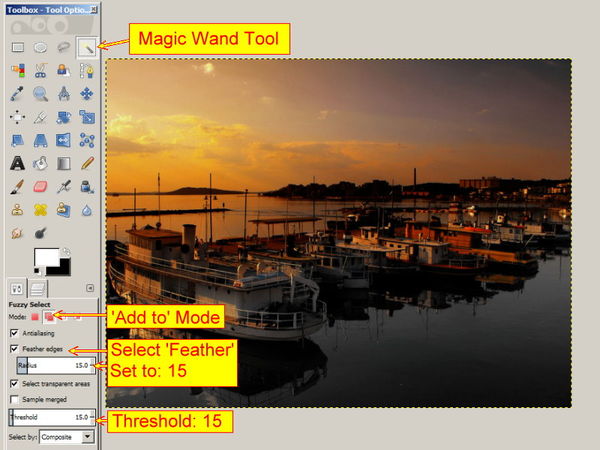
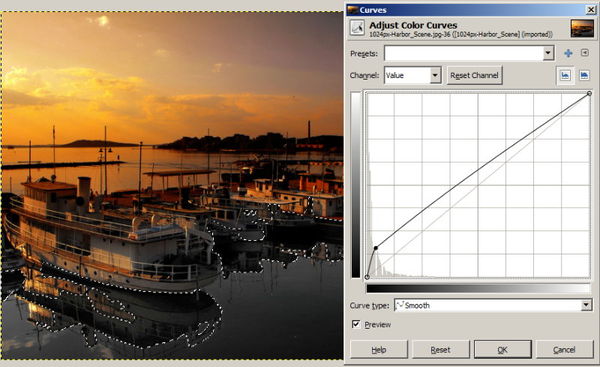
11. Here's a harbor scene, in your work photo, where the reflection of the boats in the water could make this photo great if they where brighter. Here's how we do that with the Curves Dialog.
Select the 'Magic Wand' tool and setup the wand as shown below. Click on the shadows under the boats. Because you selected the 'Add to' option most shadows will be captured in one or two clicks. You'll see the marching ants of your selections.
Work Photo

Magic Wand Setup
Nov 9, 2012 16:12:55 #
The GIMP 'Curves Dialog' Tutorial.
12. Go to the 'Colors' menu and click 'Curves'. Adjust the curve to match the one shown below.
Do not make the reflections in the water too bright, they will be unrealistic. Just enough brighness to add interest.
Go to the 'Select' menu and click 'None'. Ctrl+Z will take you back if you wish to try again.
Reflections
Nov 9, 2012 16:26:02 #
Harbor Photo was supplied free by members of: http://commons.wikimedia.org/wiki/Main_Page
Photographer: Miguel Virkkunen Carvalho from Lahti, Finland.
Wikimedia is a good site to find free work photos.
Nurse photo and child photo were supplied by Serif.com with one of their programs
Photographer: Miguel Virkkunen Carvalho from Lahti, Finland.
Wikimedia is a good site to find free work photos.
Nurse photo and child photo were supplied by Serif.com with one of their programs
Nov 10, 2012 13:23:54 #
Curves Dialog - Color Channels Tutorial.
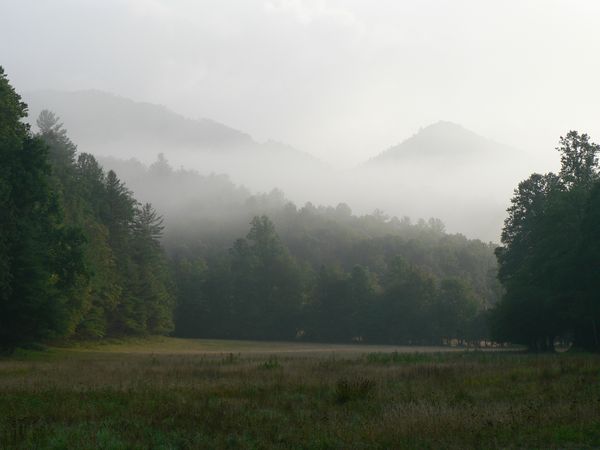
Here's your work photo, the Cataloochee Valley, NC, at dawn. It's a pretty mundane photo and we'll see if we can make the forest more attractive.
Here's your work photo, the Cataloochee Valley, NC, at dawn. It's a pretty mundane photo and we'll see if we can make the forest more attractive.
Work Photo
If you want to reply, then register here. Registration is free and your account is created instantly, so you can post right away.