The Zone System, ETTR/EBTR, and a Bit of Luck
Mar 31, 2020 10:35:45 #

Charles, I started my digital adventure in 2010. There were quite a few disappointments at the start, as well. However, one can learn a lot from their missteps. The biggest help I received was right here on UHH.
Thanks for stopping by and leaving a comment.
--Bob
Thanks for stopping by and leaving a comment.
--Bob
cedymock wrote:
Bob on 06/10/2013 @ 3:35 pm with my first DSLR I took a photo from almost the same location, and all I can say is I bow to the Master. The only thing I got right was pointing the camera in the correct direction.
Charles
Charles
Mar 31, 2020 11:12:19 #
PGHphoto
Loc: Pittsburgh, PA
rmalarz wrote:
Hi, PGH. First off, thank you for the compliment. ... (show quote)
OK - thanks for the info. Was thinking the ACR screenshot was un-manipulated (SOOC) but realize thats really not possible when looking at RAW. Absolutely not questioning your skills or your results just trying to duplicate them ! Wouldn't mind having some of those result attached to my name !
Keep posting - always enjoy your photos and info.
-- Ken --
Apr 1, 2020 09:23:59 #

Amazing job Bob - thanks for the tutorial! I've bookmarked this post, and I'm going to try this and see if I can get my head wrapped around it.
Apr 1, 2020 09:31:15 #
Great to have a window into your process - it certainly delivers great images!
Apr 1, 2020 09:34:52 #
Thanks for looking and taking an interest.
--Bob
--Bob
yssirk123 wrote:
Amazing job Bob - thanks for the tutorial! I've bookmarked this post, and I'm going to try this and see if I can get my head wrapped around it.
Apr 1, 2020 09:36:01 #
Rineal, thank you for checking this out and commenting. it certainly does work well. Thanks again.
--Bob
--Bob
Rineal wrote:
Great to have a window into your process - it certainly delivers great images!
Apr 1, 2020 10:45:38 #

rmalarz wrote:
I'm not sure that this is the best place to post t... (show quote)
The final result is gorgeous, Bob!
Apr 1, 2020 10:49:01 #

rmalarz wrote:
I'm not sure that this is the best place to post t... (show quote)
Great set and examples Bob....I like the end result.

Apr 1, 2020 11:00:08 #
Thank you very much, rmm0605.
--Bob
--Bob
rmm0605 wrote:
The final result is gorgeous, Bob!
Apr 1, 2020 11:00:48 #
Frank, thank you for stopping by and commenting. I always appreciate that.
--Bob
--Bob
frankraney wrote:
Great set and examples Bob....I like the end result.
Apr 1, 2020 11:15:59 #

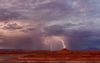
The result is certainly a beautiful B&W, Bob. Was there d-hazing done between the Intermediate and the B&W?
Apr 1, 2020 12:07:24 #
rmalarz wrote:
I'm not sure that this is the best place to post t... (show quote)
Great lesson and explanation. Thanks, Bob. The final B&W looks fantastic! A wall hanger for sure!
Apr 1, 2020 12:08:05 #
Hi, John. Thanks for the kind compliment. No, I generally don't use any dehaze software or steps in my landscapes. I do a hue correction, which removes a good bit of haze.
--Bob
--Bob
John from gpwmi wrote:
The result is certainly a beautiful B&W, Bob. Was there d-hazing done between the Intermediate and the B&W?
Apr 1, 2020 12:11:02 #
Thank you very much, drobvit. I just might frame this one because it was the first serious one from this equipment combination.
--Bob
--Bob
drobvit wrote:
Great lesson and explanation. Thanks, Bob. The final B&W looks fantastic! A wall hanger for sure!
Apr 1, 2020 15:45:31 #
CSI Dave
Loc: Arizona
Bob, which back did you end up getting? I've considered one for my 500c, but it's hard for me to justify the expense of newer ones because it's just for fun. The older options are more affordable, but seem to be rather clunky to use and may not offer benefits over new FX sensors. I've only gotten as far as an F-to-V mount adapter to use the Zeiss glass on my Nikons. Curious as to that part of your experience.
If you want to reply, then register here. Registration is free and your account is created instantly, so you can post right away.