How to reduce shine on portrait
Aug 30, 2012 08:50:51 #

The Portraiture plug in by Imagenomic can be very useful for smoothing out skin tones and removing blemishes.
Aug 30, 2012 09:49:32 #

PalePictures wrote:
One other point. Her right eye looks sunken almost like it is cloned. Was that a post correction attempt or just a hard light issue?
Just hard light I guess as there was no cloning. I used a strobe reflected into a silver umbrella (model right) and a soft box for fill on the left. Is the umbrella light what is too hard? Was it just too close to her maybe?
Aug 30, 2012 10:51:04 #

Dr Rae wrote:
Just hard light I guess as there was no cloning. I used a strobe reflected into a silver umbrella (model right) and a soft box for fill on the left. Is the umbrella light what is too hard? Was it just too close to her maybe?
PalePictures wrote:
One other point. Her right eye looks sunken almost like it is cloned. Was that a post correction attempt or just a hard light issue?
Just hard light I guess as there was no cloning. I used a strobe reflected into a silver umbrella (model right) and a soft box for fill on the left. Is the umbrella light what is too hard? Was it just too close to her maybe?
No - closer makes the light softer. You usually want the light as close to her as you can get it without it being in the image!
If the fill is on camera right, it is way to bright. Fill light should
make no shadows, just fill in the dark shadows made by the main. Since I see no nose shadow at all, your lighting is too flat - the main light is the only light that is allowed to make shadows.
You use the term "model right" but the correct usage is "Camera Right" so I don't know for sure if you mean to the right of the model as we look at her or to her right as she sees it. Either way, the lighting is too flat as neither one causes a nose shadow.
Aug 30, 2012 10:51:36 #
Dr Rae wrote:
Just hard light I guess as there was no cloning. I used a strobe reflected into a silver umbrella (model right) and a soft box for fill on the left. Is the umbrella light what is too hard? Was it just too close to her maybe?
PalePictures wrote:
One other point. Her right eye looks sunken almost like it is cloned. Was that a post correction attempt or just a hard light issue?
Just hard light I guess as there was no cloning. I used a strobe reflected into a silver umbrella (model right) and a soft box for fill on the left. Is the umbrella light what is too hard? Was it just too close to her maybe?
The light was pretty even except for her right eye and nose. Never to,close for lights. The closer the better. The catchlight in her eyes just looked like,a point coming from her left. All in all it's workable. When light transitions are hard it's almost impossible to correct.(at least for me) even your hotspot was not that large and the transition was smooth. What gave me the impression of hard light was the specular skin tone. Here's a tip. Drop the umbrella in your next shoot. Use the soft box as the one light source. Place it high like you had the umbrella. Move the soft box so that it is more in front of her but just out of view of the lens. It's almost counter intuitive but still logical. More of the light will wrap,around her face. The more you move the center of the soft box toward her face the more light falloff on the face your going to get. Big light falloff across the face works pretty good for guys. It works for lady's to create more drama. The shot I took and the one you took seem to be for the same purpose. That's why I posted. It was shot with one soft box...nothing else. This photo is really not that bad except for the red which is easily removed. If it was my photo I would work on the eye. When I do edits like this I almost never get it right the first time. I make changes and then come back to it and look at it again. I ask myself did I overcook it? Do I have hard transitions of light. Light transitions that are hard can be small or large. The more you correct that the more pleasing the photo will be. Another way to look at things like wrinkles are just transitions of light. By lightening a wrinkle you can effectively remove it. I try to be careful here. It's nice to make a lady look five or ten years younger. I used to use a plugin for skin softening and most people here do. I just don't need one anymore. I created an action using a high pass filter that gives me complete control of softening. I can put it where I want with a brush. In this case the skin was pretty good. As far as makeup is concerned I don't really care if a model wears it or not. It can be more of a problem for me if she cakes it on than if she has none at all. Everyone has and developed their on style/edits... Best thing to do is look for the person who creates the types of shots your doing. I specifically like headshots. That's why I commented. Your doing great. It's not just a snapshot. I wouldn't have commented.
I am curious about the red tone. It's almost like your AWB got fooled from a mixed light source. I wouldn't have expected it to be red. I've never seen that much red introduced from AWB.
I like looking at photos like yours. It's a great learning source for me. Thanks for posting it.
Follow the rules but don't get imprisoned by them. The more rules you follow the less creative you will be. I try to break one rule in every shot.
Sorry about writing so much. I got carried away on this one. Opinions are like .....
Russ
Aug 30, 2012 10:53:15 #
Well looks like I ws commenting when the captain was.
Yes closer light just outta frame!
Captain is right light is to flat as well. Hence just use the soft box. Drop the reflective umbrella. I' m not a fan of a non diffused type of umbrella for head shots. A diffused westcott orb is my preferred method for out of studio stuff.
It's an umbrella hybrid.
Yes closer light just outta frame!
Captain is right light is to flat as well. Hence just use the soft box. Drop the reflective umbrella. I' m not a fan of a non diffused type of umbrella for head shots. A diffused westcott orb is my preferred method for out of studio stuff.
It's an umbrella hybrid.
Aug 30, 2012 11:23:40 #
And Captian don't you dare comment on my softbox being to low in my example!
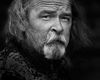
I know. The shot was for my daughters MCAT Submission. I needed to add a little horror. You know I break rules. I wouldn't want her looks to override her intellect.
I know. The shot was for my daughters MCAT Submission. I needed to add a little horror. You know I break rules. I wouldn't want her looks to override her intellect.
Aug 30, 2012 11:23:41 #
Aug 30, 2012 11:46:48 #

Dr Rae wrote:
I'm having a hard time with this image. It's just too shiny and nothing I do seems to help. Any suggestions? If I dodge it gives a grey look to her face. (I have CS3)
Portrait Professional 10 - reduce shine, change lighting.
PP10 version - 5 minutes spent

Original you posted

Aug 30, 2012 12:04:46 #
marcomarks wrote:
Portrait Professional 10 - reduce shine, change lighting.
Dr Rae wrote:
I'm having a hard time with this image. It's just too shiny and nothing I do seems to help. Any suggestions? If I dodge it gives a grey look to her face. (I have CS3)
Portrait Professional 10 - reduce shine, change lighting.
Nope - the shine is still there - now it is a softer shine. And it is still too red. You need to remove the shine and correct the color BEFORE running the plug-in. Those plug-ins are OK, and I use them, but you need to learn real retouching skills as well.
If you really want to do portrait work, you cannot rely on Portraiture, or Portrait Professional, or Perfect Portrait, etc. You need to learn how to use Photoshop tools to make targeted corrections to specific areas and specific problems, not just blur over them which is mostly what the plug-ins do.
Aug 30, 2012 12:09:00 #

CaptainC wrote:
It is too red, but I will address your question ab... (show quote)
I'll have to thank you for this as well. I never heard it explained this clearly.
Aug 30, 2012 12:12:58 #
Aug 30, 2012 12:50:33 #

When Captain C speaks, I listen. Thanks for sharing your knowledge here. You have helped the OP and many others, myself included with your replies. I am just an old dog that learned some new tricks!
Aug 30, 2012 12:55:39 #
Lucian
Loc: From Wales, living in Ohio
One further point regarding what you use, I rarely use a silver umbrella because it gives too strong of a specular highlight, as is shown with your portrait. You'd be better off using a white umbrella. In fact if you get a shoot through umbrella that would be even better to soften the subject's light source.
If I were you though I would re-shoot and use the softbox as close as possible to camera right, but raise it up about 45 degrees to your subject. Use a reflector at camera left for fill, but not too much, that way you give the face shape. Then use the umbrella over her shoulder and higher up at camera left to pop her from the background some. And never use the centre of your softbox light source on your subject, always use the edge of the light.
You'll get a more flattering portrait.
Aug 30, 2012 13:11:09 #
Boy - talk about getting more than you may have bargained for! :-)
Lucian is 100% correct.
One MORE thing - your camera appears to be too low. For headshots, the proper camera level is slightly above the subject's eye-level. If you err, err higher, not lower. For a waist-up shot, the camera at about neck level is fine and that looks about where yours is- a bit low though for just head and shoulders.
Aug 30, 2012 13:30:13 #
Thank you so much PalePictures and CaptainC - I'm always happy to get your feedback. Right now I am trying to learn all the 'rules' so that when I break them I'll know it and it will be for desired affect.
Ok....now I have lots to work on. It's all good though.
Ok....now I have lots to work on. It's all good though.
If you want to reply, then register here. Registration is free and your account is created instantly, so you can post right away.