How to reduce shine on portrait
Aug 29, 2012 22:32:28 #
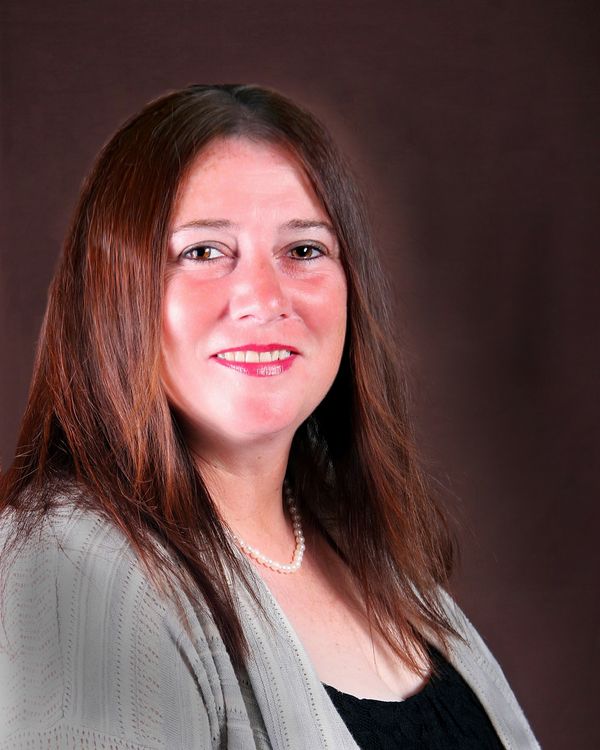
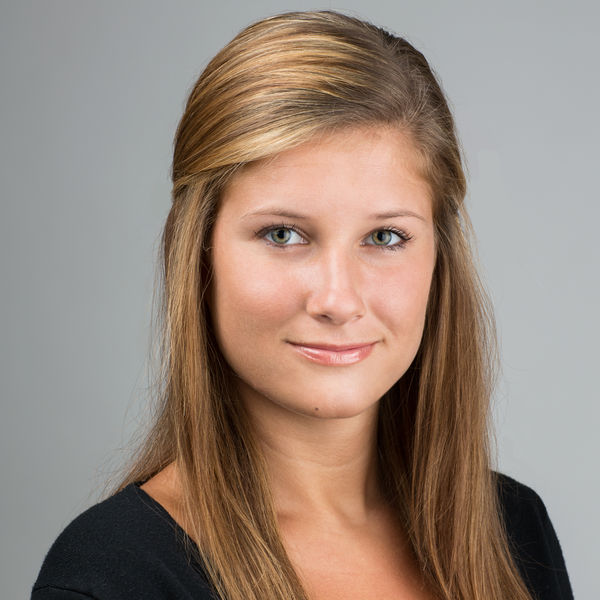
I'm having a hard time with this image. It's just too shiny and nothing I do seems to help. Any suggestions? If I dodge it gives a grey look to her face. (I have CS3)
Aug 29, 2012 23:31:06 #

The shiny spots look to be completly blown.
Try adding another layer and then use the eye dropper to capture the skin tone just outside of the bright spot. Then do a little painting on the new layer. Ajust the opacity of the new layer. I've had mixed results doing that.
Try adding another layer and then use the eye dropper to capture the skin tone just outside of the bright spot. Then do a little painting on the new layer. Ajust the opacity of the new layer. I've had mixed results doing that.
Aug 29, 2012 23:43:52 #
You have way to much Red in the photo. Highlights are blown out. Her right cheek.
Do a Hue Saturation Adjustment layer and pull back your reds and brightness.
You can improve the image but without reconstruction the left cheek, which is blown out, you will get grey in a dodge and burn. If you shot in Raw and the details were't blown out you can reimport with a lower exposure. The lighting on the womens face is quite hard light. Its much easier to work with a portrait where the lighting is diffused.
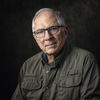
You have a Nice simple pose. Here's an example of just reducing the Reds with a Hue saturation layer. (You could also do this with a levels, curves, channel mixer.....)
Soften the light and reduce your exposer a tad and your on your way.
Looks like a speedlight to models right with a reflector to left.
Note in example(Similar style to yours) highlights are not blown out anywhere.
Russ
Do a Hue Saturation Adjustment layer and pull back your reds and brightness.
You can improve the image but without reconstruction the left cheek, which is blown out, you will get grey in a dodge and burn. If you shot in Raw and the details were't blown out you can reimport with a lower exposure. The lighting on the womens face is quite hard light. Its much easier to work with a portrait where the lighting is diffused.
You have a Nice simple pose. Here's an example of just reducing the Reds with a Hue saturation layer. (You could also do this with a levels, curves, channel mixer.....)
Soften the light and reduce your exposer a tad and your on your way.
Looks like a speedlight to models right with a reflector to left.
Note in example(Similar style to yours) highlights are not blown out anywhere.
Russ
Remove the Red.
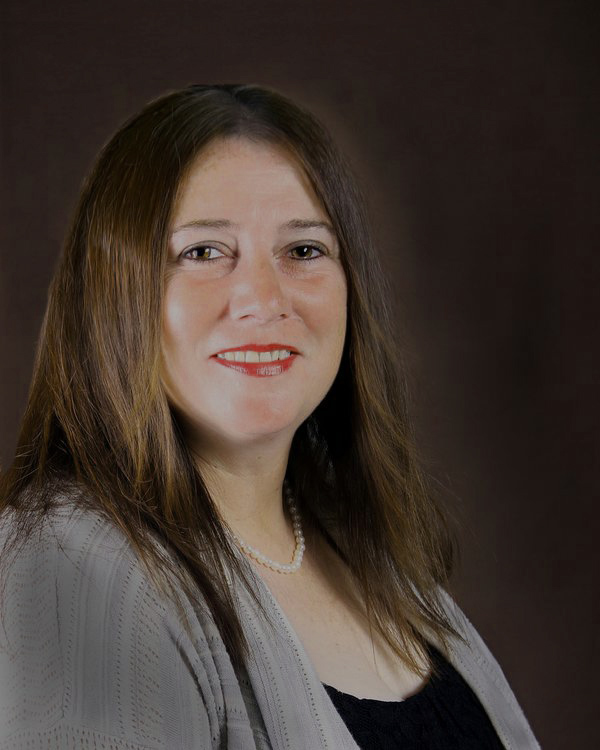
Simple diffused light example in same style
Aug 29, 2012 23:46:07 #
Dr Rae wrote:
I'm having a hard time with this image. It's just too shiny and nothing I do seems to help. Any suggestions? If I dodge it gives a grey look to her face. (I have CS3)
I would try the healing brush and the clone stamp.
Aug 30, 2012 00:10:47 #
It is too red, but I will address your question about the shine. It is perfectly fixable.
Here is how: Use the clone stamp. Set opacity to around 35% or so. Mode to darken. Clone from nearby darker skin onto the light areas. At 35%, you will build up the area slowly, so it takes multiple painting strokes to even the tones.
You MUST use the Darken mode.
By using darken mode the tool only affects pixels in the target area that are lighter than the source area. This will not result in a gray result, but will be moving those reddish skin tones onto the shine area.
I can fix the red too: Hue and Saturation adjustment layer - choose REDS - Move Hue slider to right to about +10
Move Saturation Slider to left about -10
Click OK
The amount of movement is purely subjective, so movement could be a bit more or less, but the direction of movement is what I just told you.
Aug 30, 2012 00:19:34 #
Thank you all! I will try these suggestions and see what I get. Thank so much for taking the time to help me!
Aug 30, 2012 00:29:20 #
Aug 30, 2012 00:31:27 #
CaptainC wrote:
It is too red, but I will address your question ab... (show quote)
Good tip Captain on the clone stamp Darken. I didn't know that.
The area tends to flatten out to much for me(under my methods) and I have to correct with a curves adjustment.
Captain is always spot on. Edits become very subjective at a point. The Red in the photo is not a subjective call.
I'll give that Clone darken a try as well on a few of my problem photos.
Aug 30, 2012 00:37:11 #
PalePictures wrote:
quote=CaptainC It is too red, but I will address ... (show quote)
As you might expect, it works both ways - if you need to lighten an area, use the Lighten mode. To clean up the dark area under eyes, use 33% and sample from light areas on the cheek below the eye. I have Clone Stamp Tool Presets for both the darken and lighten modes as I use them ALL the time.
Aug 30, 2012 01:39:49 #
CaptainC wrote:
quote=PalePictures quote=CaptainC It is too red,... (show quote)
I'll give the eyes a try. I usually do the healing brush on a separate layer for the eyes. Its non destructive like the clone stamp when done on a separate layer(Be sure and sample current and below or all layers!) Kelby's book recommends this method except I don't recall him telling you to create a separate layer. One other note about lightening and darkening with dodge and burn. This is from memory because I don't dodge and burn anymore on portraits. I typically use curves. To dodge and burn nondestructively on a separate layer you have to create a %50 grey layer. If you do that your dodge and burn will be non destructive to the underlying image and will work. Dodge and burn gives you nothing on a blank layer.
Captain I know you probably know this. This for anyone else working with hot spots and touchups on portraits.
By the way just tried your method of clone with darken. Worked like a charm! Thanks for the info.
One final note I sometime use curves to reduce wrinkles and lighten under the eyes. There are quite a few ways to accomplish the same ends. Using Curves with a mask and the brush opacity(I use flow now) very low allows you to gradually lighten or darken under the eyes, reduce wrinkles, even skin tone.....
Aug 30, 2012 02:59:45 #

Thanks CaptainC for reminding me about darken mode, could have used that the other day.
Aug 30, 2012 06:39:51 #

Aug 30, 2012 06:42:39 #

For future reference try to use a softer light source, a brolly or a softbox will help greatly. Also consider using some form of foundation powder makeup (even on a man), particularly on the forehead, nose, cheeks and chin.
Aug 30, 2012 06:50:09 #
donrent
Loc: Punta Gorda , Fl
Instead of having to go thru all that pp, why not just use a little make-up before shooting to eliminate the high shine spots...
Aug 30, 2012 08:09:16 #
One other point. Her right eye looks sunken almost like it is cloned. Was that a post correction attempt or just a hard light issue?
If you want to reply, then register here. Registration is free and your account is created instantly, so you can post right away.