White Balance Fix PP
Mar 19, 2012 01:10:57 #
senad55verizon.net wrote:
quote=pfredd This whole issue seems to have becom... (show quote)
You are right, sir. We can't determine the light temperature in the room. The entire garage might have been bathed in red light so the camera capture was dead on. The OP did noi see that. He asked for corrections. The first offered was in deed pushing a scrubber to show the problem he saw was called
temperature, and easily altered.
The 10 second manouver is an easily applied to correct what you may see as a 'somewhat difficult photographic situation.' Some might opt for far more difficult corrections
using coloir substitution, channel torquing and other esoteric approaches. My approach assumed whites should be white and blacks black within the capture. If you would like puce sidewalls and deep purple shadows O,K., we can do it, but that degree was not captured so may take 30 seconds.
Since correcting the pic elicited so much ink but was fast and easy it seemed a tempest in a teapot (a very old English ezpression),
Mar 19, 2012 07:42:47 #
Mar 19, 2012 08:33:48 #
There are a number of things like that if you are into getting the white balance right indeed. You can also use them to set exposure.
The standard is an 18% grey card.
A lot of people like the Expodisc...but kind of expensive.
At the other extreme many swear by coffee filters.
A guy from B&H was in town doing an Expo at a class thing I attended and he had a little cube thing that seemed kind of cool. It said it was about half the price of the Expodisc; kind of like the thing below.
If I were doing a lot of indoor stuff like the car shows or perhaps even outdoor portraits I might consider such solutions.
vislp wrote:
Mar 19, 2012 11:59:30 #
senad55verizon.net
Loc: Milford, NJ
vislp wrote:
This is a good approach, but after having spent 40 bucks and taken a picture of this thing, you will still need to know what to do next. That means you're going to have to learn to do WB correction in post processing software.
Fact is, it's usually a simple matter of one or two mouse clicks at the right time, in the right place. It's one of the many, many wonders of digital photography.
Honestly, it's not anywhere nearly so complex as the posts above suggest. But it really helps to have a clear understanding about how color is expressed with numbers in digital imaging. If necessary, hit the books!
Regards...
Mar 19, 2012 15:32:21 #
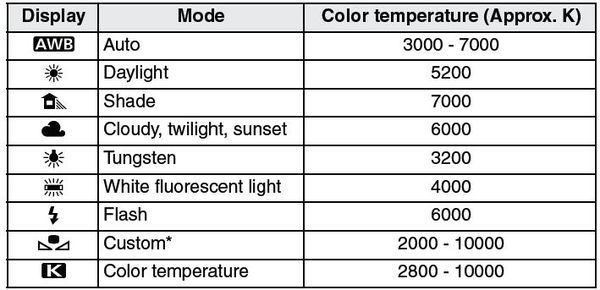
[quote=Meives] My white balance was set by accident on "manual". I looked up my pdf file on my Canon 20D and below is the chart. It has small icons and I accidently changed it. A 18% chart would have been the best, but I knew it was mercury. The auto white balance gets it close enough. I took the re-shoot with "raw" in case it needed tweeking. I am not new to photography...but I am new to doing photography right. Thanks for the help. I think I am OK now. David in Florida
Mar 19, 2012 15:51:38 #
senad55verizon.net
Loc: Milford, NJ
[quote=Meives]
An 18% grey card ("chart") is not what you want for setting white balance.
You want a 50% grey card. Take its picture and call up the mid-point white balance tool in the Curves Panel of Photoshop or PE. Just click the tool on the image of the 50% grey card, and white balance is done.
What's it done for? It's done for the ambient light that was falling on the card when you took its picture. Good for all photos taken in that light.
Different light source? 'Nother white balance. Good for all photos taken in the different light.
Meives wrote:
My white balance was set by accident on "manual". I looked up my pdf file on my Canon 20D and below is the chart. It has small icons and I accidently changed it. A 18% chart would have been the best, but I knew it was mercury. The auto white balance gets it close enough. I took the re-shoot with "raw" in case it needed tweeking. I am not new to photography...but I am new to doing photography right. Thanks for the help. I think I am OK now. David in Florida
An 18% grey card ("chart") is not what you want for setting white balance.
You want a 50% grey card. Take its picture and call up the mid-point white balance tool in the Curves Panel of Photoshop or PE. Just click the tool on the image of the 50% grey card, and white balance is done.
What's it done for? It's done for the ambient light that was falling on the card when you took its picture. Good for all photos taken in that light.
Different light source? 'Nother white balance. Good for all photos taken in the different light.
Mar 19, 2012 19:08:50 #
vislp
Loc: Level Pebble
senad55verizon.net wrote:
br This is a good approach, but after having spen... (show quote)
Thanks for posting the explanation senad55verizon.net! I ran out of time this morning and couldn't finish everything on all the posts I was answering before I had to leave.
VisLP
If you want to reply, then register here. Registration is free and your account is created instantly, so you can post right away.