White Balance Fix PP
Mar 18, 2012 12:49:34 #
Yes, but...the RAW files won't be what you want for output. They have no white balance or other corrections. As you know when you take a RAW image from Organizer to the Editor Elements will first put you into Adobe Camera RAW. You can then easily try different white balance settings till you get what you want. You'll probably want to make some other adjustments as well such as saturation. When using jpegs your camera makes those adjustments to the RAW data before doing the jpeg compression.
I suspect that there is then a way to apply that white balance fix, and maybe the whole set of fixes, to your whole bunch of photos taken under the same conditions. I know you can do that in L ightroom. But I do not know how to do it in Elements. I'm still learning it.
[quote=Meives]
I suspect that there is then a way to apply that white balance fix, and maybe the whole set of fixes, to your whole bunch of photos taken under the same conditions. I know you can do that in L ightroom. But I do not know how to do it in Elements. I'm still learning it.
[quote=Meives]
MtnMan wrote:
Assuming Elements 9 has these features the same as... (show quote)
Mar 18, 2012 13:33:19 #

Fix: straight export to JPG, DNG or PNG w/o withe balance correction. Simple, no fuss no muss. The KISS system. no need to make things more complicated.
The magic of RAW.
The magic of RAW.
Mar 18, 2012 14:57:57 #
Maybe simple but most pictures look terrible in RAW: washed out.
English_Wolf wrote:
Fix: straight export to JPG, DNG or PNG w/o withe balance correction. Simple, no fuss no muss. The KISS system. no need to make things more complicated.
The magic of RAW.
The magic of RAW.
Mar 18, 2012 15:06:54 #
That is because you do not know how to use raw. Leave at that, it could become a long off topic conversation. Just look at the first picture to see what was extracted from a RAW.
Mar 18, 2012 16:01:59 #
Probably true.
Others handicapped like me might like a different view on the topic:
http://www.connectedphotographer.com/issues/issue200505/00001529001.html
Others handicapped like me might like a different view on the topic:
http://www.connectedphotographer.com/issues/issue200505/00001529001.html
English_Wolf wrote:
That is because you do not know how to use raw. Leave at that, it could become a long off topic conversation. Just look at the first picture to see what was extracted from a RAW.
Mar 18, 2012 16:11:18 #
http://www.uglyhedgehog.com/t-27189-1.html
http://www.uglyhedgehog.com/t-28800-1.html
UHH Cutting room... Mostly tutorials that I write.
http://www.uglyhedgehog.com/t-28800-1.html
UHH Cutting room... Mostly tutorials that I write.
Mar 18, 2012 16:41:28 #
senad55verizon.net
Loc: Milford, NJ
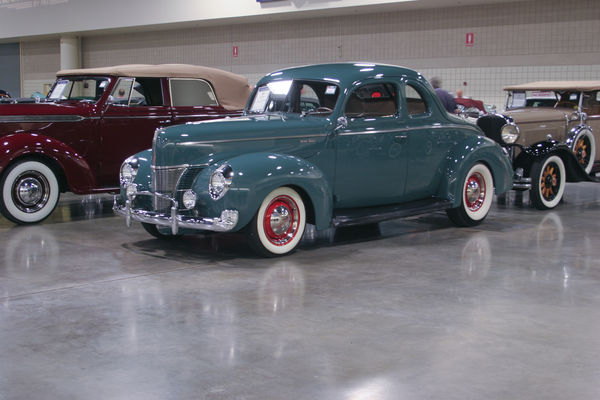
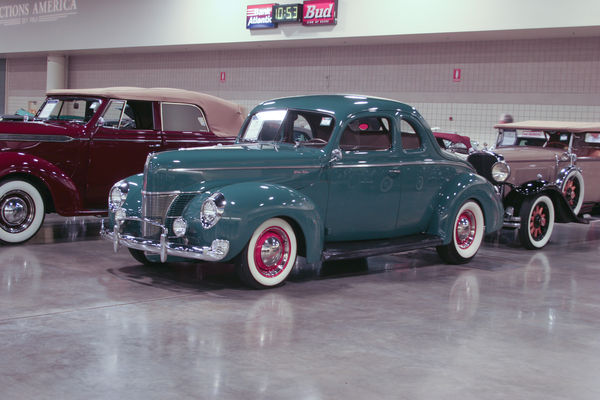
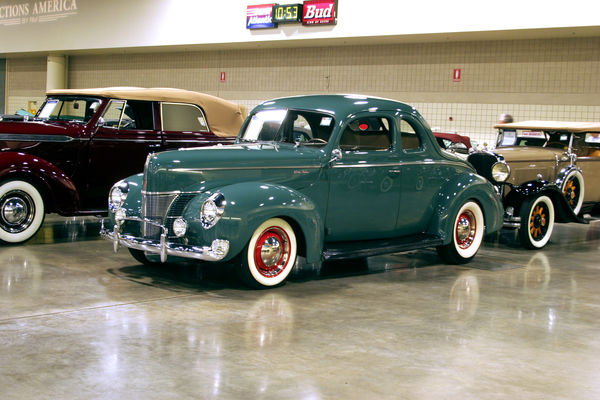
Photoshop's Camera Raw has a white balance sampler that focuses on the near pure white highlights. Maybe LE has the same thing.
Here are two 1-click white balance corrections done with that sampler.
Here are two 1-click white balance corrections done with that sampler.
RAW Ford
jpeg Ford
Mar 18, 2012 16:51:37 #
senad55verizon.net
Loc: Milford, NJ
English_Wolf wrote:
A quick level adjustment using only the red channel in the tone turn curve can show you what you can do if you want to use the JPEGs.
In that case do it in Lightroom or something similar that allows you to fix the picture before going HDR and use the first corrected picture as a template. Select all the HDR in that series and use 'applies to all under SYNC.
A bit of tone level would be needed but I would be careful with that as the final product is HDR....
By the way, the image that you show here is not from the original post.
Mar 18, 2012 17:08:30 #
senad55verizon.net wrote:
Uh?.../... the image that you show here is not from the original post.
Mar 18, 2012 17:50:16 #
senad55verizon.net
Loc: Milford, NJ
English_Wolf wrote:
senad55verizon.net wrote:
Uh?.../... the image that you show here is not from the original post.
A quick level adjustment using only the red channel in the tone turn curve can show you what you can do if you want to use the JPEGs.
"In that case do it in Lightroom or something similar that allows you to fix the picture before going HDR and use the first corrected picture as a template. Select all the HDR in that series and use 'applies to all under SYNC.
A bit of tone level would be needed but I would be careful with that as the final product is HDR....
Note you would need to adjust the blue chanel too."
The screen image that you show with this post includes a photo that's similar to but not the same as the two given in the original post. For one, your screen image has a big blue sign in the right background, not seen in the originals.
More, doing a color balance for the either of the originally posted images isn't nearly as complex as you have suggested. (see above)
Mar 18, 2012 18:00:15 #
If you had paid attention the program I used is ACDSEE. The picture is the same. Since ACDSee is relatively rare I refereed to light-room as it is widely used. Pay attention. How could I have access to any other picture anyway?
If you had paid further attention, you would have figured out that it is a histogram but never mind all that.
Before making false assumptions, do me a favor, download the original as I placed it there, to show both the level correction and the histogram.
Complex? I suggested playing with one channel then adjust with the tone level, which is the best way as color levels offers greater adjustments possibilities than a straight level but never mind that.
Next time, please pay attention and do not bother making statements like that w/o verifying.
Incidentally, your colors are off.
So, now, apologies?
Mar 18, 2012 22:22:18 #
This whole issue seems to have become a tempest in a tea pot.
First - you aren't after white balance. Your problem and solution lies in temperature (°K). drop that by about 50° in whatever simple program you using OR, adjust levels using white wall tyre for lightest ( the other whites are spectral or tan, thus no good).
Second - choose darkest area (under the ford) as the true black. There it is in 2 clicks, took maybe 10 seconds including proving the whites and blacks. No colour replacement, no need for RAW conversion, no stoop, no squint, no squat.
P.S. those red marks on the wall mark location of fire extinguishers.
Mar 18, 2012 22:37:40 #
senad55verizon.net
Loc: Milford, NJ
English_Wolf wrote:
If you had paid attention the program I used is AC... (show quote)
The OP's images are jpgs takin at a car show. Yours is a screen shot from your computer system with who knows what kind of settings. You're claiming that the images are the same? Who could miss the difference? What's to apologize for?
As to colors, what evidence do you have that your colors are correct and that mine are "off"?
Here are three sets of RGB values taken from samples of the white sidewalls on the green Ford in your screenshot:
(215, 201,198), (210,199,184), (211,196,186). The red-blue differences are 17, 26 and 25. Your whites are very yellowish, sir. Really way off.
Did the same with the jpg that I corrected with one click:
(193,201,195), (198,203,201),(201,209,207). Red-blue differences are 2, 3 and 6. Here the white sidewalls are actually white.
We're still talking about white balance, aren't we?
Mar 18, 2012 22:50:06 #
senad55verizon.net
Loc: Milford, NJ
pfredd wrote:
This whole issue seems to have become a tempest in... (show quote)
How did you establish the color temperature of the light source at the car show? How did you determine the amount of temperature reduction required for cortrection?
There is no tempest, and certainly no sign of a teapot. This is a rational discussion about how to correct the color balance (also called white balance) in a somewnat difficult photographic situation.
One way to do that is to simply push sliders (like color temperature) back and forth until the image looks pretty good. What we're talking about here is alternatives to that approach.
Mar 18, 2012 23:06:49 #
Meredith was kind enough to show me a link on how to "process multiple files" in the Elements Editor. There is also a little tutuorial by Matt Kloskowski that shows how you can use it to bulk process a group of photos from RAW to jpeg while making a number of the corrections your camera makes when it creates jpegs. Alas, white balance isn't one of them.
But I think you can also process multiple files in Adobe Camera Raw for white balance.
But I think you can also process multiple files in Adobe Camera Raw for white balance.
MtnMan wrote:
... You'll probably want to make some other adjustments as well such as saturation. When using jpegs your camera makes those adjustments to the RAW data before doing the jpeg compression.
I suspect that there is then a way to apply that white balance fix, and maybe the whole set of fixes, to your whole bunch of photos taken under the same conditions. I know you can do that in L ightroom. But I do not know how to do it in Elements. I'm still learning it.
I suspect that there is then a way to apply that white balance fix, and maybe the whole set of fixes, to your whole bunch of photos taken under the same conditions. I know you can do that in L ightroom. But I do not know how to do it in Elements. I'm still learning it.
If you want to reply, then register here. Registration is free and your account is created instantly, so you can post right away.