Correcting Shadows
Jan 18, 2012 20:41:39 #
senad55verizon.net
Loc: Milford, NJ
Allen Acker wrote:
In CS5 You can select the history brush to lighten or darken places in your photo. To lighten change the blending mode to screen and opacity to 50% and paint in the dark area. to darken an area, change the blending mode to multiply and paint in the light areas. I also use a soft brush when doing this. Hope this helps.
Didn't sound quite right, but I tried it and it works! For a bit more subtlety and control, reduce the opacity to about 20%. For good reversibility, work on a duplicate layer with the Background as reference
Jan 18, 2012 21:17:38 #

I don't see any problem with the way it is!
Shadows = modeling. Not a bad thing.
Shadows = modeling. Not a bad thing.
Jan 18, 2012 21:46:43 #
Rich
Loc: Titusville, Fl
bk2nature wrote:
do you want birds with no contrast?[/quote]Whether the issue is with my laptop or my printer, what I see here is not what I see when it's printed. I was looking for a way to lighten the female's neck without altering the rest of the photo. It comes out distractingly dark when printed.
Now that I know how to do that, I can lighten it up for printing![/quote]
I just took a photo class and the first thing that they made me do was calibrate my monitor. It made a major difference for me. If you constantly print dark you can change the exposure a little in PS.
Jan 18, 2012 22:12:14 #
senad55verizon.net
Loc: Milford, NJ
Rich wrote:
bk2nature wrote:
do you want birds with no contrast?Whether the issue is with my laptop or my printer, what I see here is not what I see when it's printed. I was looking for a way to lighten the female's neck without altering the rest of the photo. It comes out distractingly dark when printed.
Now that I know how to do that, I can lighten it up for printing![/quote]
I just took a photo class and the first thing that they made me do was calibrate my monitor. It made a major difference for me. If you constantly print dark you can change the exposure a little in PS.[/quote]
Getting a reasonable facsimile on paper printed with inks or pigments of an image first viewed on a luminous phosphor screen is a whole 'nother problem.
Jan 18, 2012 23:58:55 #

In Elements ..... what you want to do is use the magic wand to select her neck .... make sure you get the back of her head also or it is going to look a bit strange....
Once you have that part selected ... go to the enhance menu / adjust lighting / shadows and highlights ... and just slide the shadows slider to the right .... however much you want ....
this process is only going to affect the selected part of the photo. This one was lightened all the way to 100 so there is no way you are going to mess it up so don't worry.
Then just ctrl/d to deselect and save as a new name that way you still have the original.
:)
original
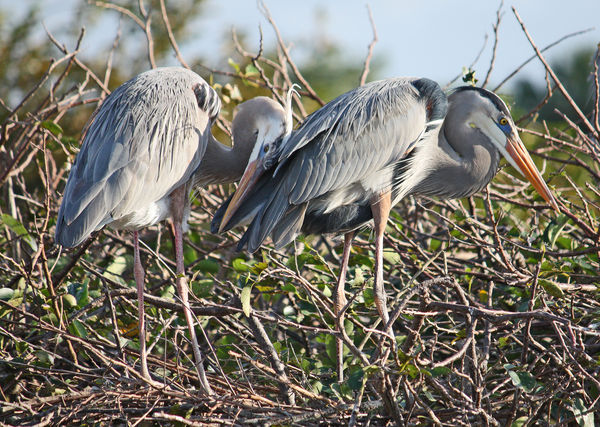
neck shadow lightened

Jan 19, 2012 10:40:09 #
Jan 19, 2012 22:41:28 #
There are probably 15 ways to do it, but these look pretty good as-is.
Jan 20, 2012 02:08:11 #
bk2nature wrote:
do you want birds with no contrast?[/quote]Whether the issue is with my laptop or my printer, what I see here is not what I see when it's printed. I was looking for a way to lighten the female's neck without altering the rest of the photo. It comes out distractingly dark when printed.
Now that I know how to do that, I can lighten it up for printing![/quote]
If the neck shadows are too dark in your prints, then the bodies are darker in general in your prints than what you are seeing on the monitor too. You'd be better off to work on matching your monitor brightness, contrast, color saturation, etc. to your printer output instead of using a stop gap shortcut measure for this one photo. Also have your monitor screen always at the exact same angle when you edit. Otherwise you will consistently have printer output that you aren't satisfied with. Once they match or are at least close to matched, you'll have a true, "What You See Is What You Get" editing system.
Jan 20, 2012 10:33:06 #
Try this to give a little more control. In PSE copy your background to a layer. Then add a levels mask. Move your mid level slider to the left until you get slightly more lightening than you want on the darkest area you want to lighten. Ignore the rest of the washed out image. Now paint the layer mask black (use the paintbucket). Select a fine soft brush. Pick a gray color (experiment, I usually start out with about 50%). Paint the areas that you want to be light. If it isn't light enough, switch color to a lighter gray. If it's too light, switch to a darker shade. If you make a mistake, just paint over in black and try again. Now go up to Oppacity and adjust until the overall image is just how you like it. More work, but you have total control.
Also remember that you can use the RGB colors individually if what you want to affect is a predominate color. Won't work in this case since your bird is gray.
Also remember that you can use the RGB colors individually if what you want to affect is a predominate color. Won't work in this case since your bird is gray.
Jan 27, 2012 11:44:59 #
Bk2, This works well for me when i am working with shadows,If you are using photoshop try this.Hold down the shift+ctrl. the letter n this will open a box select blend mode to overlay or soft light and ck ok this will put this on it's own layer.You can then use the brush tool to lighten or darken by painting with white or black. Set your brush to 10% opas.after your done you can add a gaus. blur to blend.
Jan 28, 2012 17:28:16 #
vislp wrote:
Ewww, better not to do it on a laptop. Laptops just aren't made to do photo work. It can REALLY mess with your mind. Laptops give horrible color and contrast renditions. Seriously, I'd do it on your desktop. :)
VisLP
VisLP
I agree with that, I use my lap top basically to help in backing up images to the internal hard drive and to a secondary external hard dive while away on a trips, and to sort out the keepers and to surf the web.
All of my editing is done on a primary computer that I have calibrated and profiled and it is used in a room that has blackout
curtains to prevent glare and reflections and to prevent the introduction colors being reflected to the screen influencing my judgement of colors.
It can seem like a lot to go through to get the colors right.
Jan 29, 2012 21:11:06 #

A link for a software title that will help with calibrating your monitor. Freeware.
http://www.quickgamma.de/indexen.html
If you want a hardware solution, the 'best one' (for the price) is Sypder4 ($169.00)
http://spyder.datacolor.com/product-mc-s4pro.php
With that you will need a calibration file for your printer. Do a google search under "calibration for - printer name"
I have the spyder3 and it makes a difference.
As to laptop not being up to par for photographer, the problem is the same as for the desktop computers. Caveat: you have to disable the 'save power' feature to get the full color gamut.
Feb 3, 2017 08:01:31 #
Feb 11, 2017 18:26:39 #
If you are new to the magic wand, you will find that it often grabs a much larger space than you want. To reduce it to just the area you want, hold down the alt key and, while continuing to hold it down, move the cursor through the area you don't want to grab.
Feb 11, 2017 18:26:53 #
If you are new to the magic wand, you will find that it often grabs a much larger space than you want. To reduce it to just the area you want, hold down the alt key and, while continuing to hold it down, move the cursor through the area you don't want to grab. (sorry for the double post)
If you want to reply, then register here. Registration is free and your account is created instantly, so you can post right away.