Correcting Shadows
Jan 17, 2012 12:24:12 #
Hi all - I have been following along for months but this is the fist time I've jumped in!
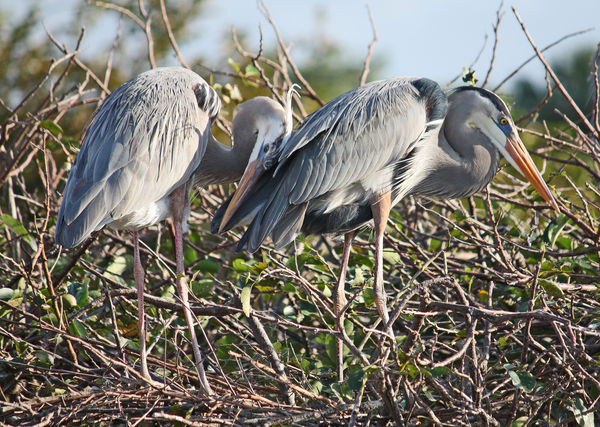
I am still feeling my way through PSE and have worked on this photo but I can't figure out how to lighten the shadows on the necks without altering the rest of the lighting.
Camera set to Sport; f/5.6; 1/800; ISO probably 200
Thanks in advance for the help!
I am still feeling my way through PSE and have worked on this photo but I can't figure out how to lighten the shadows on the necks without altering the rest of the lighting.
Camera set to Sport; f/5.6; 1/800; ISO probably 200
Thanks in advance for the help!
Jan 17, 2012 14:28:02 #

Jan 17, 2012 15:36:37 #

How about just selecting the shadows you want to lighten with the magic wand and adjust them to your liking.
Jan 17, 2012 17:23:51 #
Country's Mama wrote:
How about just selecting the shadows you want to lighten with the magic wand and adjust them to your liking.
Thank you! It's going to take some practice but that's exactly what I was looking to do!
Jan 17, 2012 17:32:10 #

What's wrong with the shadow as is ? If you take out too much shadow you'll lose some of the depth and it will look flat !
Jan 17, 2012 17:38:22 #
edwinj wrote:
What's wrong with the shadow as is ? If you take out too much shadow you'll lose some of the depth and it will look flat !
Yeah, I've struggled with this one. I'm using a laptop so sometimes it depends on the angle of the screen but it's way dark when printed.
Jan 17, 2012 17:52:26 #
vislp
Loc: Level Pebble
Ewww, better not to do it on a laptop. Laptops just aren't made to do photo work. It can REALLY mess with your mind. Laptops give horrible color and contrast renditions. Seriously, I'd do it on your desktop. :)
VisLP
VisLP
Jan 17, 2012 18:19:15 #

Hmmmm, when shooting wildlife/nature I would be careful about any adjustments. You do not want to look un-natural. Shadows enhance most of these pictures and removing them may not provide what you are looking for.
Jan 18, 2012 01:29:08 #
edwinj wrote:
What's wrong with the shadow as is ? If you take out too much shadow you'll lose some of the depth and it will look flat!
I concur. Your photo looks good on my monitor. I see the face of left bird, even in the shadow.
Jan 18, 2012 10:23:08 #
docrob
Loc: Durango, Colorado
bk2nature wrote:
Hi all - I have been following along for months but this is the fist time I've jumped in!
I am still feeling my way through PSE and have worked on this photo but I can't figure out how to lighten the shadows on the necks without altering the rest of the lighting.
Camera set to Sport; f/5.6; 1/800; ISO probably 200
Thanks in advance for the help!
I am still feeling my way through PSE and have worked on this photo but I can't figure out how to lighten the shadows on the necks without altering the rest of the lighting.
Camera set to Sport; f/5.6; 1/800; ISO probably 200
Thanks in advance for the help!
do you want birds with no contrast?
Jan 18, 2012 11:00:57 #
[/quote]do you want birds with no contrast?[/quote]
Whether the issue is with my laptop or my printer, what I see here is not what I see when it's printed. I was looking for a way to lighten the female's neck without altering the rest of the photo. It comes out distractingly dark when printed.
Now that I know how to do that, I can lighten it up for printing!
Jan 18, 2012 13:50:57 #
Jan 18, 2012 14:28:41 #
senad55verizon.net
Loc: Milford, NJ
Try something easy and non-destructive:
Duplicate your layer (Ctrl J in PS), call up the dodge tool, call up a small brush with a very feathered edge, set the exposure level to about 25% and lighten away to your heart's content. Go back over it as much as you need to. If you don't like what's happening back up few steps, or delete the layer and start over.
Also, this is the kind of thing that Highlights/Shadows imaage adjustment was made for. Sometimes it works, sometimes it doesn't.
It's all worth a try on a discardable layer.
Jan 18, 2012 18:10:43 #
Jan 18, 2012 18:43:22 #
Allen Acker
Loc: Mn
In CS5 You can select the history brush to lighten or darken places in your photo. To lighten change the blending mode to screen and opacity to 50% and paint in the dark area. to darken an area, change the blending mode to multiply and paint in the light areas. I also use a soft brush when doing this. Hope this helps.
If you want to reply, then register here. Registration is free and your account is created instantly, so you can post right away.