Posts for: erinbaby
Oct 17, 2011 18:48:14 #
Oct 17, 2011 18:47:07 #
I teach LR and PS to underwater photographers, and those are some of the very first moves I show them in Lightroom. Being able to manipulate the Histogram interactively like that is fab, but I often find myself skipping to the Tone Curves panel, where I feel like I have a bit more specific control.
Great tips, though! Thanks!
Great tips, though! Thanks!
Oct 17, 2011 18:30:28 #
Nikonian72,
it's true that a shot overexposed to the point of complete blow-out is not recoverable. That said, a RAW image which appears overexposed in the preview may be right on the money with very little editing (see the image below).The trick is to snug the histogram as far to the right as possible, without actually blowing out significant detail in all channels.
The histogram for the RAW image is based on jpeg data, and may be more than a stop off at the top end (differs from camera to camera). A jpeg image is already edited in-camera by the camera software algorithms, so the histogram and preview are more directly related to the information in the actual image.
Remember that a jpeg only holds 256 tonal values while a 12-bit RAW has 4,096, and a 14-bit RAW (5D Mark II) has 16,384, making a jpeg much less pliable in post.
The shot below was edited in Lightroom 3 using one click of the White Balance tool, a -1.25 value on the Exposure slider (which does not correlate exactly to stops), and a value of 15 on the Recovery (only effects the highlight data) slider. The most grievously overexposed areas still had information in at least one channel, so detail was able to be recovered. I've included the histogram on the Before and After RAW images so you can see what the tonal shift looked like.
In this instance, it was better to overexpose than to underexpose, which would have eliminated almost half of the image data, leading to noise in the image. If I had shot this as a jpeg, I doubt that I would have been able to make this adjustment at all.
GWS_over

GWS_adjusted

Oct 17, 2011 16:55:41 #
Most digital photos benefit from some post production because of the way digital sensors collect information. If shooting RAW, straight-out-of-the-camera images are softened and slightly flattened by the low-pass filter in the camera. Initial editing (input sharpening and curves adjustment) helps to get the best possible digital negative.
I disagree that editing implies dissatisfaction with the original. I often edit my images in order to get various versions (B&W), and to restore full sharpness and contrast.
Digital post-production is as valuable and legitimate a tool as any analog darkroom technique.
I disagree that editing implies dissatisfaction with the original. I often edit my images in order to get various versions (B&W), and to restore full sharpness and contrast.
Digital post-production is as valuable and legitimate a tool as any analog darkroom technique.
Oct 17, 2011 16:28:39 #
Oct 17, 2011 16:20:32 #
For the sake of argument, assume that a SLR has 5 stops of dynamic range. A RAW image is mostly recorded as a 12 bit image (12 bits in a 16 bit space). If you're lucky enough to have a camera that records in true 16 bit, the following concept holds true, but with slightly different math.
A 12 bit image can hold 4,096 values, but the values are not collected equally. Because sensors collect data in a linear fashion, where each F-stop records half the light of the previous one, fully half of the image's data is contained in the first stop.
First stop (brightest tones) = 2048 levels
Second stop (bright tones) = 1024 levels
Third stop (mid-tones) = 512 levels
Fourth stop (dark tones) = 256 levels
Fifth stop (darkest tones) = 128 levels
Therefore, an underexposed image will always result in a noisy conversion, because there's so little data with which to work. You've got to get the shot at a decent exposure that uses that top fifth of the histogram, then deal with the noise later.
Also remember that the histogram and previews on the back of the camera, whether they be RAW or jpeg, are based on jpeg thumbnails. In most cameras, you have another stop on the right (bright) end of the histogram before clipping really starts. The shot may appear overexposed in the preview, but has all the data you need to properly expose it with a RAW(non-linear) converter, still holding detail in both the highlights and shadows.
Oct 16, 2011 15:26:50 #
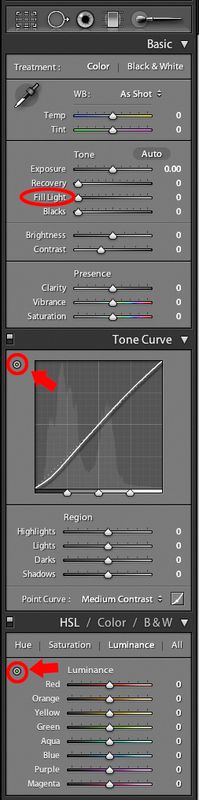
In the develop module, try using the Fill light slider to restore detail in the darkest areas. Another way to go might be to use the Luminance targeted adjustment tool in the HSL (Hue Saturation Luminance) panel, or in the Tone Curve Panel. The HSL panel isolates areas of your image using color information, and by clicking on the targeted adjustment tool and dragging in your image, you can intuitively adjust specific color ranges in your shot. The TAT in the Tone Curve panel works the same way, but with tonal information instead of color.
Lightroom is an extremely powerful program, with all the editing power of Adobe Camera Raw (the engine is identical), and the best database out there. That said, it does not allow you to work locally with layers, or layer masks like Photoshop. I usually do as much of the heavy lifting as I can in Lightroom, then move to Photoshop for more detailed finishing if needed. You cannot compare PSE or even Photoshop CS5 and LR. They are all different animals with different capabilities. LR is a wonderful (and at least for me) necessary companion to either CS5 or PSE.
Lightroom is an extremely powerful program, with all the editing power of Adobe Camera Raw (the engine is identical), and the best database out there. That said, it does not allow you to work locally with layers, or layer masks like Photoshop. I usually do as much of the heavy lifting as I can in Lightroom, then move to Photoshop for more detailed finishing if needed. You cannot compare PSE or even Photoshop CS5 and LR. They are all different animals with different capabilities. LR is a wonderful (and at least for me) necessary companion to either CS5 or PSE.
Develop Module capture
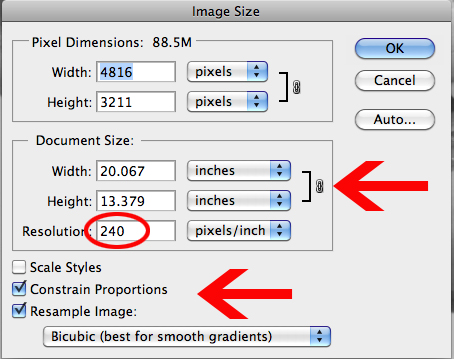
Oct 16, 2011 14:44:03 #
In the image size dialog box, make sure that both constrain proportions and resample image are checked ON. Set the resolution to something reasonable for printing (200+). Set the unit measurement to inches, and enter either the width or height - photoshop will fill in the other value, based on the constrained aspect ratio. The 10% upsize used to be the way to go, but in CS4 and 5, you can do a straight one-step interpolation with identical results. As mentioned in a previous post, the quality of your image will be degraded to some degree when you up-rez. You'll have to make the call whether or not you still want to go ahead with a print at that size after seeing the results.
Image Size CS5