Posts for: roycebair
Mar 13, 2014 18:11:17 #
Here's what National Geographic has in their Photo Submission Guidelines:
We encourage you to submit photographs that are real. We want to see the world through your eyes, not through photo editing tools. Please do not digitally enhance or alter your photographs beyond the basics needed to achieve realistic color balance and sharpness. If you have digitally added or removed anything, don't submit the shot.
BURNING AND DODGING: Brightening or darkening specific areas in an image is allowed, but should be kept to a minimum and not done to the point where it is obvious. Your goal in using digital darkroom techniques should be only to adjust the dynamic tonal range and color balance of an image so that it more closely resembles what you saw, and communicates the mood of the scene.
STITCHED PANORAMAS: These are allowed only if the segments were all made within the same time frame. Don't create panoramas with sections made at significantly different times. If your photo is a stitched image, please indicate so in the caption.
HIGH DYNAMIC RANGE (HDR): These shots are allowed only if the combined parts are made at the same time. Don't submit final images where the foreground was shot at noon and the sky at sunset. If your photo is an HDR image, please indicate this in the caption. ( The final image, when done successfully, produces a final image with a greater dynamic range than is possible with a single exposure.)
Mar 13, 2014 11:05:03 #
CORRECTING LENS VIGNETTING: I don't believe in doing a lot of post processing manipulation, but I think we should correct problems or change the image to reflect the way we saw it. In my "NightScape" photography, I have to shoot astro-landscapes with a fast lens, and almost alway wide-open (the widest f/stop). Most lenses exhibit quite a bit of vignetting when you do this. Here is how I correct that:
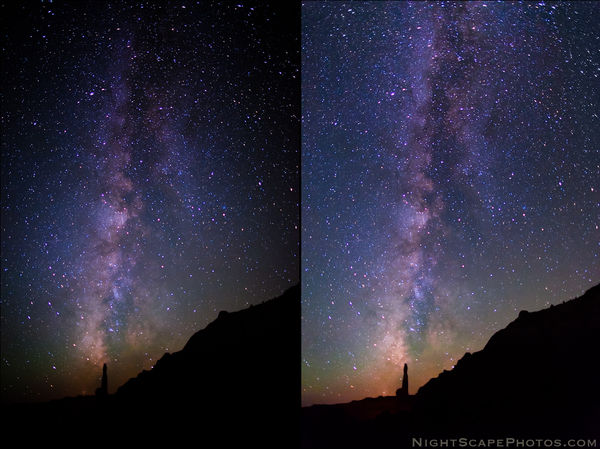
Post Processing Tutorial: There is no lens vignetting correction on left image. Adobe Camera Raw's "Lens Corrections" has been applied to the right image. See more comparisons and learn how at my Correcting NightScape Lens Vignetting blog post.
BTW, I hope you'll visit my NightScape Survey and take our poll.
Photo: Milky Way Paint Brush" - Kodachrome Basin State Park, Utah USA ~ © Royce Bair
Nov 19, 2012 09:50:10 #
Light Painting continued...
http://static.uglyhedgehog.com/upload/2012/11/16/thumb-1353076043289-the_organ_light_painting_compared.jpg
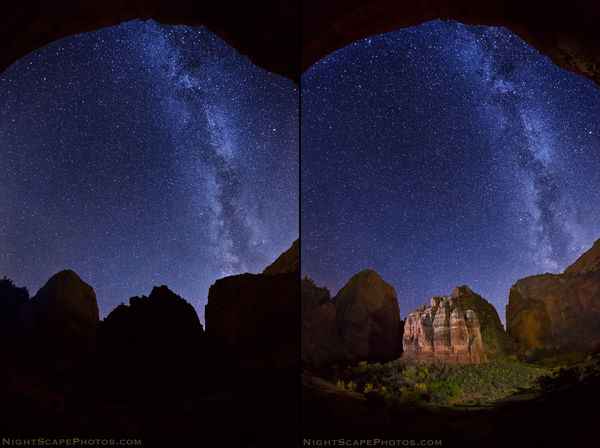
Light painting "The Organ" ~ a before and after photo.
This NightScape was more complicated to light paint than most of my astro-landscape photos because of the huge size of the The Organ.
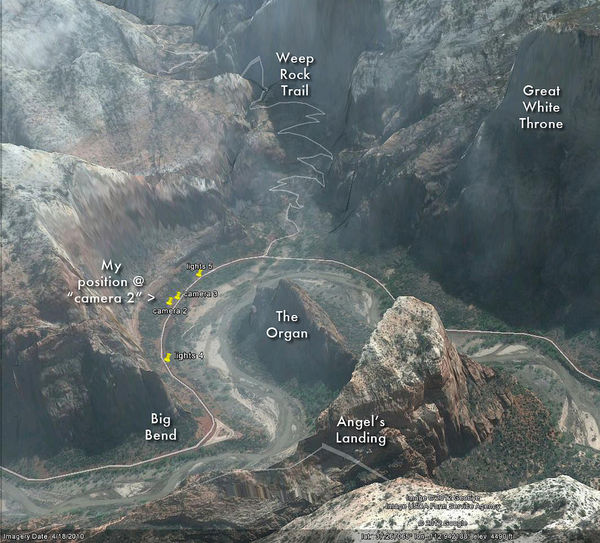
Below is a Google Earth view showing our actual camera and lighting positions. My assistant son, Chris, fired a 5,000 w/s strobe (placed 700 feet to the left of the camera) via my radio command. The light on my right (500 ft. away) was a constant incandescent, 200-watt (5,000º Kelvin daylight) in a 24-inch reflector, which was on during the entire 30-second exposure (this "fill" light was calculated to produce 1/2 the power of the strobe). All lights were powered by large, 12-volt batteries, with power sent through an inverter (converted to 110-volt AC current).
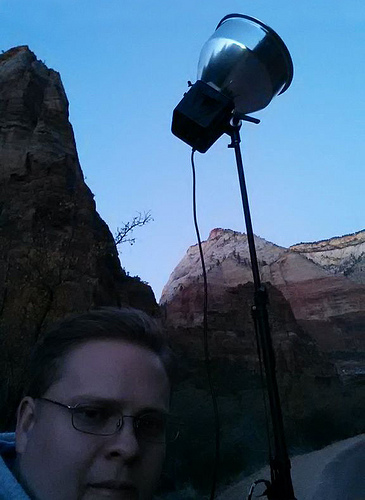
Further below is a self-portrait of Chris manning the main light. That telescopic reflector produces a narrow, 28º beam and a light equivalent of 5,000 watt/seconds (it has an ISO 100 Guide Number of 400), or something similar to 16 Nikon or Canon Speedlights (lites) going off at the same time!
Less Complicated Light Painting Examples: Most light painting doesn't have to be this complicated! I'll show you some easy examples in future posts, as I continue this tutorial... In the meantime, please keep those comments and questions coming!
.
http://static.uglyhedgehog.com/upload/2012/11/16/thumb-1353076043289-the_organ_light_painting_compared.jpg
Light painting "The Organ" ~ a before and after photo.
This NightScape was more complicated to light paint than most of my astro-landscape photos because of the huge size of the The Organ.
Below is a Google Earth view showing our actual camera and lighting positions. My assistant son, Chris, fired a 5,000 w/s strobe (placed 700 feet to the left of the camera) via my radio command. The light on my right (500 ft. away) was a constant incandescent, 200-watt (5,000º Kelvin daylight) in a 24-inch reflector, which was on during the entire 30-second exposure (this "fill" light was calculated to produce 1/2 the power of the strobe). All lights were powered by large, 12-volt batteries, with power sent through an inverter (converted to 110-volt AC current).
Further below is a self-portrait of Chris manning the main light. That telescopic reflector produces a narrow, 28º beam and a light equivalent of 5,000 watt/seconds (it has an ISO 100 Guide Number of 400), or something similar to 16 Nikon or Canon Speedlights (lites) going off at the same time!
Less Complicated Light Painting Examples: Most light painting doesn't have to be this complicated! I'll show you some easy examples in future posts, as I continue this tutorial... In the meantime, please keep those comments and questions coming!
.
A Google Earth view showing our actual camera and lighting positions ("Lights 5" is the main 5,000 w/s strobe. "Lights 4" is the second "fill" light).
A self-portrait of my son, Chris, manning the main light (earlier that evening).
Nov 19, 2012 09:12:24 #
yhtomit wrote:
By "splashy", I mean "colorful" and drawing attention unto themselves (the technique). I find many of the images in this splashy light painting group, colorful and fun to look at. My type of light painting should not draw a lot of attention to itself and the technique. Instead, it should enhance and draw attention to the landscape. I take great pains to make my technique more subtle and more natural with the landscape. If you're interested in how I do this, follow this thread.I guess I should ask "could you expand on your use of the adjective"splashy".
Sorry, I did not respond yesterday, but I usually take Sundays off to be with my family and the friends in front of me --rather than my virtual friends ;-)
Nov 17, 2012 17:32:07 #
Algol wrote:
Wally has been doing this style of astro-landscape photography longer than anyone I know. Imagine having Tom Bopp present you with a Hale-Bopp comet photo!Check out Wally Pacholka's photos of Comet Hale-Bopp at: http://www.newcreations.net/comet/page2.htm
Tom Bopp presented on of Wally's photos to me several years ago, they are truly amazing when seen in person.
Tom Bopp presented on of Wally's photos to me several years ago, they are truly amazing when seen in person.
Nov 17, 2012 10:49:07 #
mountaincamper wrote:
...I would love to be able to take shots like this. I have a D3100 with the lens that came with it but also have an older 300mm lens that you have to focus manually.
Can shots like this be taken with the equipment I have now or do I need better equipment like a better lens.
Can shots like this be taken with the equipment I have now or do I need better equipment like a better lens.
You can take photos like this with your Nikon D3100!
Camera Basics Needed: Your entry-level DSLR has some great features. My Astro-landscapes are often called "High-ISO Milky Way Photography". That's because I use high-ISO's (like 3200 and 6400) so that my exposures can be relatively short (30-seconds or under). This is so the stars remain as points of light rather than moving / blurring and becoming star trails.
High ISO Capability: Your D3100 is capable of shooting at a maximum ISO of 3200 (even 6400 and 12800 via a special menu boost). The only difference between your camera and my Canon 5D Mark III is that photos shot with my camera will have less grain or noise at the same ISO's. (I'm licensing my images for publication, so photo editors expect more from me.)
Lens - Wide and Fast is Better: The other component needed to take good astro-landscapes is a fast lens. All my lenses are f/2.8 or faster. Hopely the "kit" lens that came with your camera was the Nikkor 18-55mm f/3.5-5.6G VR, rather than the Nikkor 55-200mm f4.5-5.6 lens. That's because wide-angle lenses are more useful for astro-landscapes than telephoto zooms like the 55-200mm. AND the other reason is because the 18-55mm's f/3.5 aperture is one full stop faster than the 55-200mm's f/4.5! F/3.5 is only 1/2 stop slower than the more expensive f/2.8 lenses that I use.
Basic Exposure Set-up: If you set your D3100 to ISO 3200 and the exposure/picture taking mode to "manual", you can manually set your aperture to f/3.5 and your shutter speed to 30 seconds (30" ). Zoom your lens to its full wide angle of 18mm. Take your lens off auto focus (AF) and switch to manual focus. Manually set your lens' focus to infinity, otherwise your focus motor will move back and forth all night trying to focus in the dark! ;-) You'll need either a remote release or to use your camera's built in self-timer to fire the shutter. (Note: this exposure is about one-stop under exposed for a wilderness area with little to no light pollution, but is about right for an average country setting, 30 miles from the city. If you are in a very remote area without light pollution, try a shot at ISO 6400 by using the special boost menu.)
Color Balance: I usually just leave my camera set to "Average" color balance, and make final color adjustments in post production. Some like to shoot in the "Tungsten" color balance mode. This setting will give you a beautiful blue sky. However, if you do any light painting, your landscapes will also be blue-bias, and you'll have to create a mask for them and re-adjust the color back to normal. If you don't plan to do any light painting, this is a cool setting to use.
Light painting during this 30-seconds exposure is optional. My most popular NightScape has no light painting. Next week I'll show you what I did on this Zion N.P. shot, and teach you some simpler ways to light paint when you want to add this.
Star Movement: The 30-second exposure time I gave you is going to give you a little bit of star movement (noticeable only in enlargements above 8"x10" prints). A more proper exposure for this 18mm zoom setting would have been 15-seconds; however, this would have greatly underexposure our image, and proper exposure is more important that a little star movement. Later, down-the-road we'll discuss more about star movement and such things as the "600 Rule", and etc.
Step-by-Step Recipe: Here's a simple list of steps to great NightScape photography:
1. Set your camera on a tripod (of course) :)
2. If you have a remote release, use it. Otherwise, you can use you self-timer to set off the shutter (I set it for 2 seconds delay instead of the normal 10 seconds).
3. Turn your lens to manual focus, or shut auto focus off (otherwise the camera goes bonkers trying to see any contrast in the dark, in order to focus).
4. Set your focus manually to infinity (I sometimes even tape it down).
5. Set your camera mode to manual, with is usually "M".
6. Select the highest ISO you have. For most cameras this is 1600. If you have ISO 3200 or 6400, select those instead.
7. Set your lens aperture ("F" stop) to the widest aperture (smallest number), with is usually F/3.5 (2.8 is better, but F/4 or 4.5 is acceptable).
8. Zoom to the widest angle of view (the smallest number, i.e. "15, 18, or 24" ).
9. Set you White Balance to Average (AVG) or Tungsten (3500º Kelvin). Average will give you a dark gray colored sky (you can change this to a more colorful sky in post production using Photoshop or Adobe Elements). Tungsten will give you a dark blue colored sky, which is neat, too.
10. Set your shutter speed to 30 seconds. This is the longest exposure most cameras will give you without going to "B" for "bulb", which allows you to keep the shutter open as long as you hold down the button on your remote release -- which you probably do not have -- so stick with the "M" mode for manual, and turn your shutter selection dial until you get 30 seconds, which usually reads as 30"
11. Frame on the Milky Way or an interesting star constellation, (try to silhouette an interesting foreground, i.e, a row of trees) and take your shot.
Post Production: If you can, shoot in RAW, and use a raw converter plug-in with Photoshop to process your images. They will look better in the end, with better contrast, color, and lower noise. However, most of you are not at this stage in your hobby. Adobe Elements will work fine and do a great job even with your JPEG images. Your digital images of the sky and stars are going to look flat, straight out of the camera -- really blah! They'll be much brighter than what you saw with your naked eye (because of the 30 seconds of light gathering that your camera did).
You'll need to increase the contrast of your digital camera image. You can do this in your "Level" adjustment by clipping off the right side of the histogram and adjusting the middle slider (gamma) until the image gains the contrast you desire, without burning out detail in the stars, or making the sky too dark. You'll also want to change the color of your sky --often to more of a bluish/cyan, by switching to blue and red layers and adjusting the sliders (adding a little magenta can sometimes help the look, too). The more powerful method of adjustment is via "Curves". Experts often apply a "S" curve adjustment that gives much better control.
Post Production Processing Example: Please read this short article I wrote about photographer, James Neeley: Capturing a Glimpse of the Divine. Scoll down to the bottom of the article and see his before and after post production images for a good visual lesson!
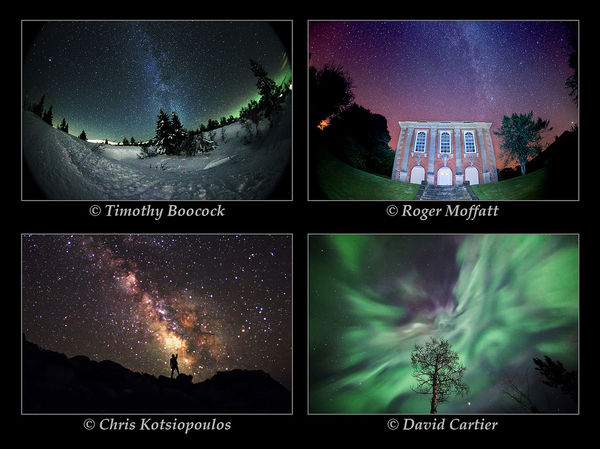
NightScapes on a Budget: Here's a little Hope and Inspiration from a gallery of photographers using equipment similar to your Nikon D3100 -- complete with exposure info.
Please keep those questions and comments coming...!
Astro-landscapes-on-a-Budget: 4 images from the above link
Nov 16, 2012 10:34:58 #
sczurs wrote:
Great shot and thanks for sharing your technique. Did you do the light painting in Photo Shop, or ?
No Photoshop trickery --this is the real deal :)
jmdenver wrote:
How long an exposure did you use for this photo? And what type of light source did you use to paint such a large area?
30 seconds on this one. Thanks for your kind words. Starting next week, I'll show photos and diagrams explaining the type of light source I use to paint such a large area. I'll also discuss exposure techniques and etc. Please keep those questions coming! (I feel like I'm at a workshop) ;-)
Nov 16, 2012 10:15:13 #
Hi! Until now, I've only been a lurker in this section. I made my first response today on a Mirror lock topic.
Yesterday, I started a regular "photo gallery" discussion on a Night Work tutorial in Zion N.P. Today, I continued that tutorial with a discussion on light painting.
I realized that this part of the discussion might be more appropriate here, where there might be stronger opinions about mixing landscape light painting and astro photography!
Definitions: BTW, I define "NightScapes" as night skies with a landscape feature -- some refer to this style as "astro-landscapes".
My personal opinion is that light painting should only be used in natural NightScape photography if it will enhance the recognition of the land feature and not distract from it. If one just adds light painting as a gimmick to the NightScape, then I feel it is out of place --there are already groups that have a following for splashy, light painting photos.
Still, there are those that feel that any light painting on a natural landscape is distracting and should be avoided. What is your opinion?
You be the judge: In the comparison photo below, I show my NightScape of The Organ with and w/o light painting, and I'll let you judge for yourself: Is it appropriate here? I try to be subtle, and not too over-powering. I feel that the correct light painting provides an opportunity to show the natural landscape in a new "light" (pun intended). For instance, The Organ is facing North. It only gets light on this side during the month of June, when the sun is in its northern-most seasonal cycle. However, because the canyon is so deep here at The Bend, only the tip gets that light, and never the front. Good light paint not only can enhance recognition, but it can show off enhanced texture to a feature never seen by natural man. (For instance, compare the beautiful color and texture of the front sandstone of The Organ in the before and after photo below, to this daylight view.)
Please let me hear your feedback and opinions...
BTW, the photo below is a single exposure of 30 seconds, taken with a Canon 5D Mark III, using a LF 15mm f/2.8 Fisheye lens @ f/3.5 ISO 6400. (In this extreme wide angle view, the high canyon wall behind me is shown at the top of this image.) Light painting info is scheduled to be discussed next week in this thread.
Before and after light painting of "The Organ" in Zion N.P.

Nov 16, 2012 09:50:32 #
Moonstone130 wrote:
When photographing star trails using the stacking method, is it useful to use mirror lock? {snip}
Mirror lock up is beneficial only when you have tripod exposures that are fairly short, i.e. in the 1/60 of a second to 1-second range. That's because the mirror "slap" vibrations occupy a large portion of that total exposure time. The major portion of these slap vibrations last about about a 1/4 of a second. Exposures longer than 1-second are much less affected by the vibrations, and you rarely see any improvement in sharpness with a mirror lock up.
Nov 16, 2012 09:27:23 #
Definitions: BTW, I define "NightScapes" as night skies with a landscape feature -- some refer to this style as "astro-landscapes".
The next thing in this tutorial I want to discuss is light painting. My personal opinion is that light painting should only be used in natural NightScape photography if it will enhance the recognition of the land feature and not distract from it. If one just adds light painting as a gimmick to the NightScape, then I feel it is out of place --there are already groups that have a following for splashy, light painting photos.
Still, there are those that feel that any light painting on a natural landscape is distracting and should be avoided. What is your opinion?
In the comparison photo below, I show my NightScape of The Organ with and w/o light painting, and I'll let you judge for yourself: Is it appropriate here? I try to be subtle, and not too over-powering. I feel that the correct light painting provides an opportunity to show the natural landscape in a new "light" (pun intended). For instance, The Organ is facing North. It only gets light on this side during the month of June, when the sun is in its northern-most seasonal cycle. However, because the canyon is so deep here at The Bend, only the tip gets that light, and never the front. Good light paint not only can enhance recognition, but it can show off enhanced texture to a feature never seen by natural man. (For instance, compare the beautiful color and texture of the front sandstone of The Organ in the before and after photo below, to this daylight view.)
Please let me hear your feedback, opinions, and questions before I continue with my next segment on how to properly light a landscape feature at night.
Before and after light painting of The Organ

Nov 16, 2012 08:49:33 #
GeneM wrote:
Very interesting pics. Love them all. Thanks for sharing. Have you tried this forum?: http://www.uglyhedgehog.com/s-109-1.html
You are the second person to mention this group to me, but I have yet to post anything there. Thanks for the reminder! So far I have only been a "lurker". I will have to start sharing, soon.
Nov 15, 2012 09:47:14 #
Jay Pat wrote:
...I envy your knowledge of different flashes and their use!
I have enough trouble with one speedlite....
I have enough trouble with one speedlite....
That's funny that you should compare my knowledge of different flashes with the Speedlite. ;-) I do pretty good on some of the bigger flashes, but some days I have problems programming my Speedlite to do what I want it to do. They are so amazing in the variable combinations they can perform!
Nov 15, 2012 09:31:24 #
rpavich wrote:
...Any good info you could provide for us lesser mortals would be appreciated.
Funny! ;-) I'm happy to see there is some interest here. I'm not necessarily a better photographer, I've just spent about 30 years studying and doing night photography. I'm glad to share a little of that knowledge here, if there is interest...
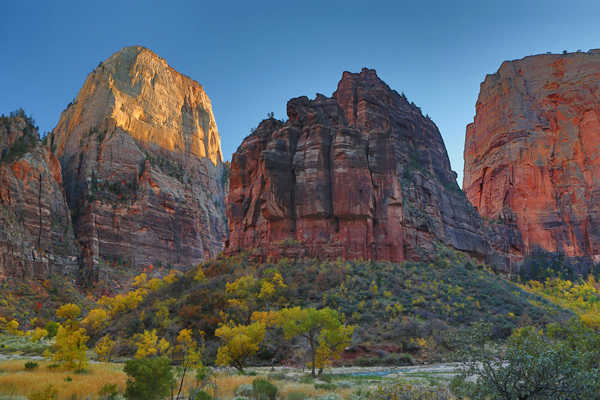
The first thing I do is obtain a knowledge of the area and its positioning. I've been to this unique area of the "Big Bend" in Zion Canyon many times. Here is a view from the same position as the top NightScape, but taken with my 24mm lens just 3 hours earlier, as the sun was setting.
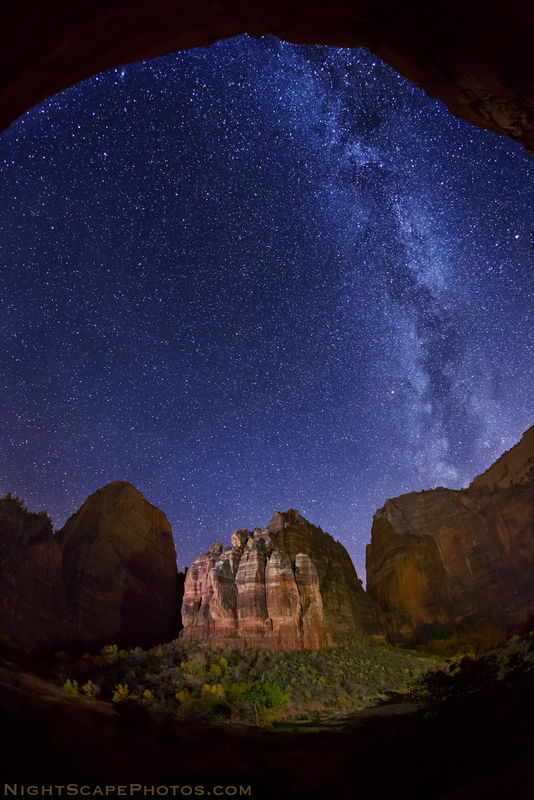
The second thing I do is to research the position of the Milky Way via Stellarium (a 3D planetarium software) so I'd know exactly where it would be in relationship to the all the monument features (using maps and a compass). Here's a similar night view (bottom photo) that I took in May, with the same fisheye lens used in the original top view, but in a horizontal position. The land features are lit only by starlight and an approaching dawn. Note the much higher position of the Milky Way in this late Spring view (from late Fall through the Winter months, the bright bulge of the Milky Way can only be seen in the Southern Hemisphere).
Tomorrow, I'll answer other questions, i.e. the light-painting techniques I used on the top image ...or whatever else is of interest to you.
"The Organ" (in the "Big Bend" area of Zion Canyon) at sunset. Using a 24mm lens

A NightScape taken last May - lit only by starlight & approaching dawn. Note higher position of the MW.
Nov 15, 2012 08:49:47 #
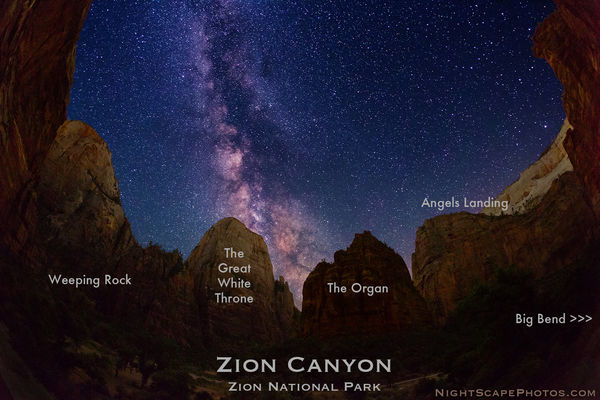
Here is a NightScape I took last week of The Organ in Zion National Park (flanked left and right by The Great White Throne and Angel's Landing). Light painting added to enhance recognition. This vertical, fisheye lens view shows the canyon wall behind me at the top of the image.
Would you like me to do a tutorial discussion here (with how-to photos) of how this photo was taken? Your questions would be appreciated :-D
Would you like me to do a tutorial discussion here (with how-to photos) of how this photo was taken? Your questions would be appreciated :-D
Canon 5D Mk3 15mm f/2.8 Fisheye @ f/3.5 30 sec. ISO 6400
Nov 14, 2012 15:54:01 #
sheandee wrote:
Does anyone know where I can get a postcard template? I want to sell some of my photos as postcards, and it woulde be so much more convenient if I had a postcard template for the Address/Message side of the card. Thanks.
GotPrint.com sells real postcards: 500 for $20. The price is for-real and the quality was superb. I wrote this post about my experiences with them:
http://www.uglyhedgehog.com/t-75230-1.html