Posts for: profbowman
May 4, 2024 15:05:15 #
Rudolf wrote:
Hi Richard, My work is done by hanging pendulums with LED light/lights attached to the bottoms. Very little of Photoshop is used, mainly cropping. Simple mechanics.
I have studied and taught fractals and non-linear dynamics. I like that this is done with a physical pendulum. I am lthinking that at some point I did this kind of thing with a difference equation, too. But that would require me to dig over the teaching notes I have saved, not very many anymore, and dig it out.
May 4, 2024 13:47:38 #
Rudolf wrote:
No prognosis yet, nor cure.
These are indeed intrigiomg cp,bomatopms pf art amd matire.
Have you talked about this type of art before? What I am wondering if this is from an editing program, or do you have coding for some fractals that you use? If you are willing to share you secrets, that is. --Richard
May 1, 2024 17:14:35 #
TonyP wrote:
I'll play. C works best for me.
As several others have said, D is the best for me. I need the motion staying inside the frame rather than moving out aa in A and B.
C is just going the wrong way for me. I am not sure why. Maybe as some sugested it is simply due to cultural tastes. I live in the US but have lived three years in Belize and two and a half in Albania. I am not sure if those times affected me in this case or not.
BTW, I would have wished the photographer had caught the bird just out of the greenery a bit. --Richard
Apr 30, 2024 17:33:18 #
CHG_CANON wrote:
Useless? yep.
1, Where are you going to find someone online to receive and print your ENORMOUS 16-bit TIFF?
2, Didn't you shoot in RAW and edit in that native RAW format with a qualified digital editor? The sRGB export to JPEG properly mapped all those colors with no color banding; hence, no issue.
1, Where are you going to find someone online to receive and print your ENORMOUS 16-bit TIFF?
2, Didn't you shoot in RAW and edit in that native RAW format with a qualified digital editor? The sRGB export to JPEG properly mapped all those colors with no color banding; hence, no issue.
Just to add a bit to Chuck's good response, let me rind those of us who edit the jpg files from our cameras whether mostly or from time to time that there are a number oof lossless JPEG formats to which we can save our intermediate and even final edited images.
https://www.uglyhedgehog.com/t-780424-1.html
The only thing we need to do when we need to send a copy to a friend, to print, or to post on the web is to open the lossless JPEG file and save it as a regular JPEGH or print it from our viewing program
Apr 30, 2024 15:32:58 #
sippyjug104 wrote:
good job and may God bless him for his caring and sharing.
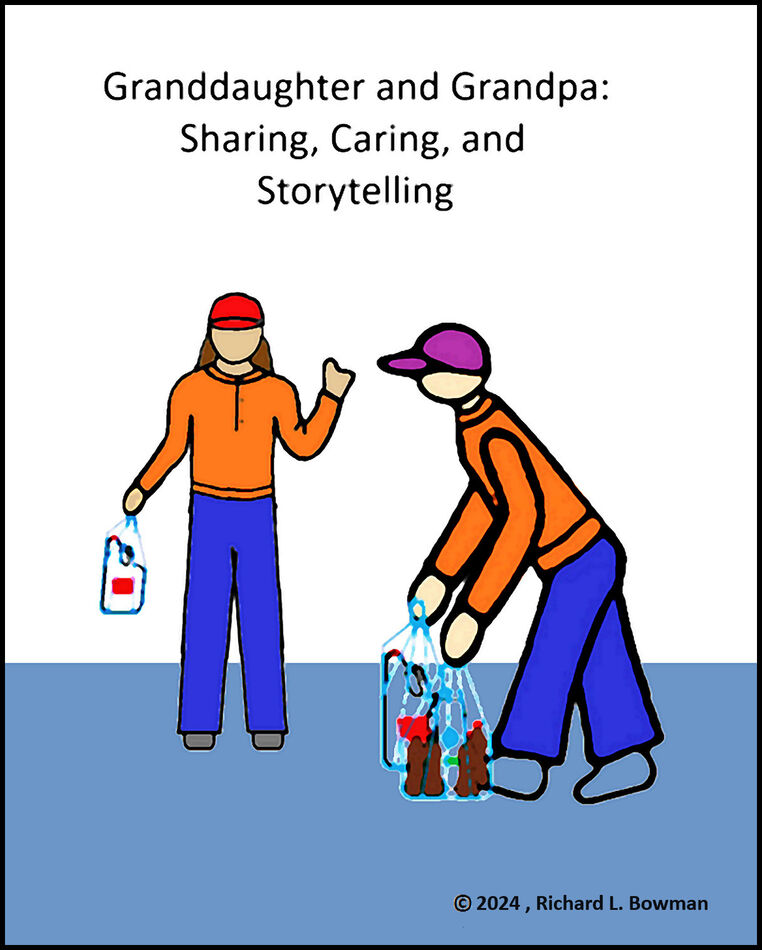
Thanks to you and Erich for your kind comments. I I do miss being able to talk with dad.
I keep thinking of how I might improve the image to more fully tell what I want it to do. Maybe this minor change is more effective. --Richard
Apr 30, 2024 14:33:32 #
selmslie wrote:
Resolution needed for printing is pretty much a ma... (show quote)
Yes, you have given us a good calculation to remember. I do remember reading somewhere about a dpi requirement of 600 being stated. Maybe it was one of my book publishers. Anyway, with my poor eyesight, I can never count on framing a photo as I want it in my camera. So, I am glad that I have a 24MB camera allowing me to cut my photo dimensions from 6000 x 4000 to 3000 x 2000 pixels and still get a printable image.
As to your experiences with the Augusta Military Academy, as an Anabaptist Christian, I am a strong conscientious objector to participating in war. Having worked as a supervisor of boys who were defined as juvenile delinquents back in the late 1960s and seeing how the "state" and several of the other supervisors treated them, I am convinced that there are better ways to "redeem" our youth than by using aggressive force. Well, we could talk aboout that more but not here. --Richard
Apr 28, 2024 21:57:30 #
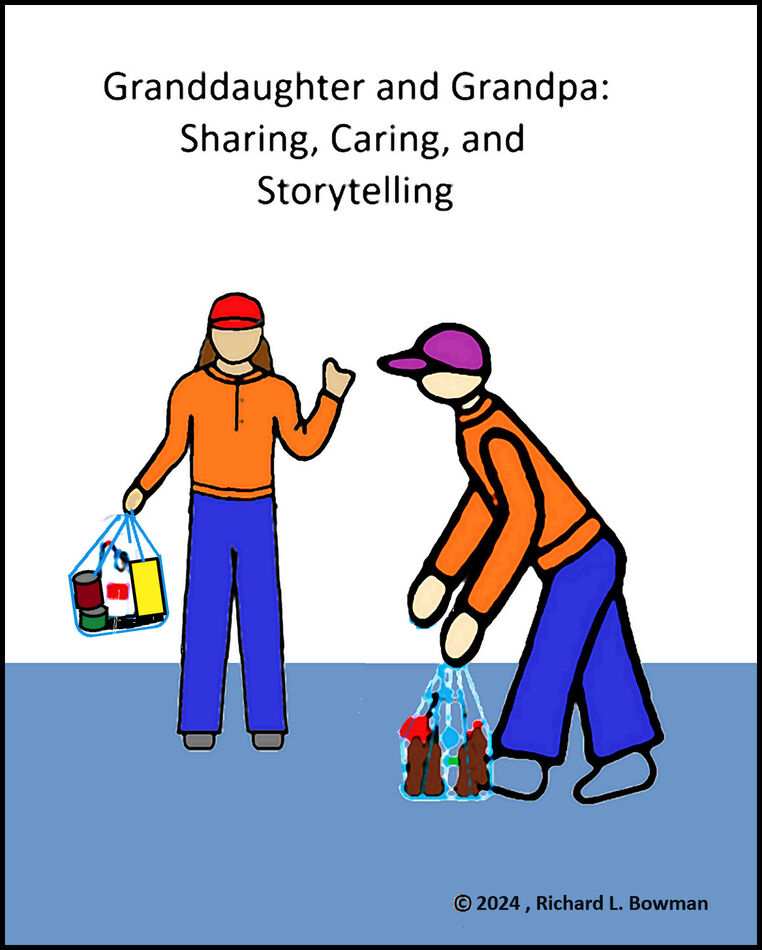
Three weeks ago, my dad died at 95 years old. I was pondering what to do in honor of him. He cared for people and enjoyed talking with anyone regardless of their status in life.
So, I used my cartoon digital artistry and made this poster to honor him. --Richard
P.S. Anyone please critiqué this as you wish. I keep trying to learn more in all my art including photography and digital art.
So, I used my cartoon digital artistry and made this poster to honor him. --Richard
P.S. Anyone please critiqué this as you wish. I keep trying to learn more in all my art including photography and digital art.
Apr 27, 2024 09:48:19 #
selmslie wrote:
I have figured out what is happening in the two ph... (show quote)
Thanks for this exploration of Capture One. It seems to me to verify my conclusion that when comparing two images, one should look at both at 100% size so that no downsizing occurs. This will show the true nature of any highlights or darks areas and any fuzziness that is present in the image as saved in the file. If one looks at an image at a larger size than 100%, then the software must make up pixels that are not there and present them on the screen. If downsizing, the software removes (or somehow averages out) some of the actual data to show less pixels on the screen.
As to printing, my sense is that one needs to experiment with dpi and desired size to "see" what is the best viewing situation--details seen at a given viewing distance. --Richard
Apr 27, 2024 09:12:34 #
Bill_de wrote:
You did not take bananas into account. 
---
---
nor mangoes. ha, ha!
That is the problem with metaphors. Sometimes they don't work, and one only ends up with fruit salad. --Richard
Apr 26, 2024 16:37:55 #
selmslie wrote:
I wish it were that simple, but it's not. It's no... (show quote)
I was not espousing any particular method or filter to be used during resizing. I was demonstrating how downsizing from four-pixel groups to one-pixel groups will result in loss of information.
IrfanView, which I use because I it gives me a lot of analytical control over all of my editing functions, has a number of algorithms what the user can avail themselves of during resizing.
Hemite fastest)
Triangle (bilinear)
Bell
Mitchell (bicubic)
B-Spline
Lanczos (slowest)
I use Lanczos because it seems to give the best results and modern PCs are not haunted by slow processors.
Looking at Capture 1, I noticed that it gave the user a lot of choices on exporting image files. So, it is important that you give us all of those parameters.
One that is most important to me is the 80% quality factor for JPEG exported images. As has often been noted here on UHH forums is that if this quality value is kept at 90-1000%, there will not be a noticeable reduction in visual quality. Using a value of 80 is guaranteed to give you artifacts and loss of sharpness and other data losses. Even though Capture 1 has 80 as the default, change it to 100 while you are editing or printing.
There are a number of other file formats that produce smaller size files without lossing any information in reduction. Two examples are JPEG-20000 and PNG. --Richard
Apr 26, 2024 11:47:42 #
selmslie wrote:
That's the crux of this subject, whether resizing [down] will result in a loss of detail that is reflected in the final result. The question is whether that becomes apparent in the final image.
I think that it does if fine detail is a significant feature of the original image. For some subjects, it is. For others it is not.
I think that it does if fine detail is a significant feature of the original image. For some subjects, it is. For others it is not.
My point is that in geneeral when one reduces the size of an imalge, one loses pixels and therefore loses information. This loss of pixel information means that reducing the size of an image always leads to reduction in detail if the photo has detail to begin with. Only in rare cases of blank areas of a given color will nothing be lost.
Note that this loss of pixels can never be rreconstructed with accuracy since there is always many combinations of pixels that can result in reduced pixels.
Here is a simplified illustration, an 8 x 1 pixel image, showing this loss of information from the reduction in the number off pixels. --Richard
Apr 25, 2024 18:17:23 #
selmslie wrote:
When you are looking at an image in your editor you are looking at the full size image. ,,,
The next post shows three different sizes of the same finely detailed high contrast B&W image. You might see the difference in the thumbnails.
If you download the images and look at them without pixel peeping, you can see how much resizing altered the appearance of the image. The difference also shows up when I print the three images.
There are several reactions I have when reading your comments and looking at your b&w images.
1.l When one edits a photo file, one is not looking at the full-size image unless one lis using a camera witth a small sensor with a few pixels or one has an enormous monitor.
2. This reminds me of a discussion I had numerous different times with the reviewers and staff at Shutterstock. When comparing photos, one needs to compare apples with apples and not apples with oranges. If my image is 2000x20000 pixels, and another participant's photo is 6000 x 60000 pixel, the only fair way to compare them is at 100% size where each pixel in each photo gets mapped to one pixel in the viewing software which is usually one machine pixel on the monitor. If both my photo and the other participant's photo look just as clear at their respective 100% view, then they must both be accepted as being of the same quality.
3. It seems obvious to me that any photographer, professional or knowledgeable amateur, should know that if a 6000 x 60000 pixel image is resized to a 1500 x 15000 pixel image, then 4 pixels in the original must have been mapped into 1 pixel in the final photo. with the resulting loss of detail.
4. If I want to compare the two images, I referred to in #2, then to be fair in comparing these prints, I need to print them at the same dpi. Thus the 36 MP image will print bigger than the 4.0 MP image, but both should look equally sharp at the same difference away.
So, either we are discussing apples compared to oranges or we are preaching to the choir. To me, neither of these is very informative. --Richard
Apr 16, 2024 09:21:14 #
pfrancke wrote:
I am sure that I am not saying it well. When I sa... (show quote)
Thanks again for sharing your procedure and the philosophy behind it. I definitely understand how stacking reduces random noise. What I am unclear about is how stacking hides or enhances regular motion.
For example, with a period of 4.5 days, Jupiter's Giant Red Spot is moving at just over 3 deg per hour. So, long exposures and/or stacking will affect how this motion is recorded in the final photo. Just things I think about from time to time but without the equipment to experiment. --Richard
Apr 14, 2024 22:07:33 #
claytonsummers wrote:
While setting up for M81 and M82, I took a couple of snapshots of the comet. This is 120 seconds iso 400 (644mm focal length at f/5.6) and is unprocessed, SOOC. I did convert it 8 bit to get under 20MB. It gets nice and dark out in the desert.
That is a good looking photo of the comet. To help me get a geographical orientation and time frame for this photo, could please add N, S, E, W to the edges of the photo and tell us what time it was taken? I noticed that the EXIF data had been removed, so I cannot get those myself.
Thanks. --Richard
Apr 14, 2024 21:45:22 #
pfrancke wrote:
thanks Sonny, and br Richard, thanks for asking. ... (show quote)
I have never used staccking software, b ut I keep thinking I want to do so. But with astronomy, I do wonder about what data I will lose.
Reducing noise is a wonderful thing in astro-photography except for certain dynamic subjects. Does it blur out the dynamic part of eruptive prominences, and will it wipe out some of the Stirling nature of the Red Spot in Jupiter's atmosphere? I am curious. --Richard