Posts for: SonyDoug
May 11, 2021 21:00:12 #
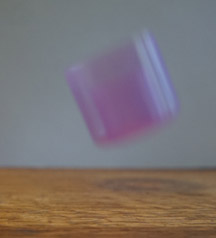
Here's another with 1/400 shutter in manual camera mode. No motion blur to speak of.
It appears closer to the table top implying faster response.
It appears closer to the table top implying faster response.
May 11, 2021 15:05:53 #
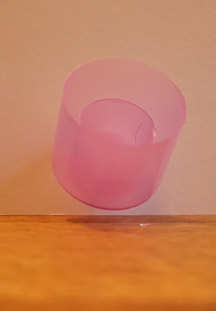
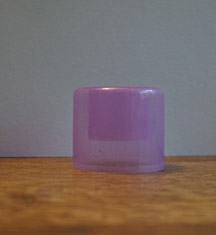
Here are a quick couple test shots using a cap from a hair spray can, it bounced nicely. Captur Pro shutter trigger in sound activated mode with zero delay.
Done strictly in automatic camera mode, no attempt to fine tune camera settings of shutter or aperture.
The bounce is the after first contact with table top, not a second bounce since the object went out of camera view onto the floor.
Looks promising.... my concern was how quickly the camera could react to the sound trigger. I suppose if I thought hard enough I could remember my physics and determine time after contact.
One shot shows the object being focused on and the other bounced.
May 10, 2021 12:53:18 #
Thanks for all the replies. I don't know what it is about kids, but explosives are a major interest to some (or most). Both my brother and I ended up in the hospital after playing with homemade gun powder. For me it was relatively minor burns on the backs of my hands when a pile of gun powder ignited unexpectedly. For my brother it was much, much worse, a glass marble accidently shot through his foot with our homemade gun. So I do have first hand experience in stupidity.
I have a shutter sound triggering device, maybe we'll try that outdoors. My first thought was it wouldn't react fast enough, but we'll see. Maybe a safe test like dropping a steel ball on a hard surface and see if at what point it catches the rebound.
Several posts have mentioned that what I want to do has been done many times. I just want to do it myself though. Unbelievable how pleased I was when I got a sequential shot of my arm moving using the strobe function on my flash.
The firecrackers are left over from a purchase several years ago at a nearby indian reservation. They're 1/4" diameter, about an inch long. No where near as powerful as we used to get back in the '50's.
May 9, 2021 16:19:03 #
Just for fun... I want to get a shot of a firecracker exploding. Actually, it's my grandson who wants to try this.
The setup will be in my basement workshop in the after dark hours. We'll cover the window as much as possible so for practical purposes it'll be totally dark.
The firecracker will be ignited by an electric igniter like used used by the model rocket folks.
Camera will be focused on firecracker, lights turned off, shutter in bulb mode. Assuming there is a flash with small firecrackers we should get an image. BTW: the fire cracker is small enough to not cause damage to camera from a 5 to 10 foot distance.
Any thoughts?? Suggestions... Dangers other than the obvious from playing with fireworks..?
Feb 18, 2021 07:04:10 #
After yesterday's outing, nice sunny, 45 degree day, I may have the process nailed down. Online research tells me what I want to do is "parallel motion panorama" or "linear panorama". It's an issue that's been discussed a bit and presented solutions mostly needed specialized cameras and software where for certain situations accurate panoramas were critical. For my use I'll be satisfied with a hi-res panorama that a casual observer won't see obvious distortions or discontinuities.
My tentative solution is to establish a parallel line to the face of the building to be panorama'ed. Using my Bosch laser measuring device establish equidistant points on each end of building. Stretch a string/ rope between those points. Mark points on the ground with chalk along the string, then remove string. Use another laser head mounted on tripod that projects a straight line on to the ground allowing the moved tripod assembly to maintain a perpendicular line of sight to building by aligning the projected line on the ground to the chalk marks. All of the items needed are already owned by me. It's just a matter of mounting everything on a heavy surveyor's type tripod which I also have.
Spacing between overlapped images can be pre-determined (calculated) by using the lens's field of view and distance to building. 70mm and a longer lens worked well yesterday. For yesterday's shooting I was able to use concrete seams in a paved area fronting on a building to crudely maintain the important camera alignment. My best panorama yesterday covered 100 feet at 153 mp.
I believe all the setup and a shoot could be done by myself in an hour+ and quicker with a helper.
Feb 17, 2021 15:55:07 #
RichinSeattle wrote:
Moving the camera won't work well. Each shot will have a different perspective focal point. What you're trying to do is create what an architect calls an elevation (without perspective). However, you might get acceptable results by walking down the opposite side of the street, as far from the building as possible, and taking a large number of shots using your 70 mm. lens. BTW, I'd suggest using PS Elements' panorama ("merge") function rather than a free app.
Rich, you're right to a certain extent. When I said I had success, I thought I did, except for the left starting end of the panorama there was a small section that wasn't right, that was easily cropped off. Closer examination further down the pano-image I noticed a few very slight errors or distortions which were barely noticeable to me and would likely not be noticeable to someone not familiar with the building I shot.
As far as the software I've got a theory..... ICE would barely touch the panorama, only about two of the images were used. So my immediate thought is high end software like ICE would not perform the job if it determined there were problems. Where as, the lower end software just continued and made the best of problem areas.
Using my car as a mobile camera platform worked well. Having accurate camera leveling and perpendicularity to the object seem to be most important. Now that Seattle's snow is history I 'll try some other shooting locations.
Feb 16, 2021 00:18:27 #
Success today... my grandson and I ventured out to do some tests. Camera mounted level with a window clamp on the drivers side. He stood by the front of the car. I took a shot then moved forward so he was in line with the camera, stopped car. He moved forward to front of car again and I took another. This way we had a even overlap between images. 13 images were taken.
They wouldn't stitch in MS ICE which surprised me. A couple of trial downloads worked, Panoweaver and Panorama Studio. Panoweaver is too expensive, Panorama studio is under 40 bucks.
I did find a glitch in this process. We were shooting a fenced boat yard with a chain link fence going back to the horizon. The first image showed the north side of the fence, the next image showed the south side. The software didn't know how to handle that, it kinda doubled up the panorama image, but it can be edited out. The solution may be to only shoot deep 3D objects head on, no left or right views. Definitely more 2D-ish surfaces are going to give the best results.
We've had a bit of snow in Seattle so today was not the best of conditions. light snow and rain. It wasn't possible to keep constant distance from the target fence line because plowed snow made us veer in closer. At any rate I learned a lot.
Tomorrow I may go downtown to the old section of Seattle where the empty buildings have plywood panels over windows . Artists were paid to paint murals on the plywood, it's colorful.
Feb 14, 2021 20:15:39 #
I've had some minor luck. I have a Fotodiox tilt shift adapter on my Sony a6000 which uses Canon FD lenses.
Using a 50mm FD, two shots, full shift left and right about 3/8" offset from center on each side. Stitched perfectly. A single image should be about 6000 wide by 4000 high for approx 24mp. My stitched image came out 9777 wide by 4034 height. So the stitched image is roughly 1.62 times wider or 3777 pixels wider. Hardly a great panorama, better than nothing though.
Tried my 28mm Vivitar FD mount and got a much wider view stitched image with less height. That lens is no where near the quality of the 50mm so not a great image.
What this tells me is the images need be very accurately aligned prior to importing to stitching software. At lest that's my theory at this point.
Feb 14, 2021 13:58:11 #
Leitz wrote:
Why not post this in the Panorama section?
Thanks for the idea..... where do I find the Panorama section? I don't see that as an option.
Feb 14, 2021 13:50:48 #
wjones', thanks, good idea about the curb, except this is a semi-rural, unpaved, pot holed street. No straight reference surfaces.
Feb 14, 2021 12:16:15 #
As the title says I want to make a panorama of a unique 200 foot long building front by moving the camera instead of panning from a central spot. The building is on a narrow street so the farthest away I can get is about 40 feet. It's also an hour drive from home.
I did the usual panning type panorama on this last year. The fish eye distortion is what I want to eliminate.
If I had a slider 200 feet long it'd be easy (I think).
Trying this at home on a close-by building gave mixed results. I moved the tripod enough to get overlap, but not being able to keep the camera axis exactly perpendicular to the building face caused some discontinuities in stitching. I'm using ICE, Microsoft's free stitching program.
My current thought is to mount the camera in my car, mark stop points on the street and move down the length of the building taking many shots ( I think I can drive straight for 200 feet). I thought my 50mm lens might be good, but maybe 70mm might be a better choice?
Any thoughts, recommendations, lens, etc?
Nov 29, 2020 12:12:24 #
Kind of a newbie question...
Recently I became aware of Gigapixel AI. I have the 30 day trial now. Pretty amazing to me what it did for the old images I've run through it.
All my lenses are the lower end E mount Sony's on my a6000, purchased used in the +/- 200 buck range. So the question is, does the software ever become a replacement for higher end lenses?
Nov 15, 2020 16:56:41 #
CHG CASNON and Gene51,
Thanks for the replies and clear explanations..
Having always been attracted to the large blowups from the early photographers, I feel like I've discovered a way to do the equivalent. Besides that, I don't have to take the advice of the my local camera $tore and go full frame (just yet). I feel like I'm made a major discovery.
Nov 15, 2020 15:26:43 #
Okay, somewhat of a newbie here.....
Sony 24 megapixel (mp) camera. I just discovered, duh, by stitching an array of 4 images, a horizontal row, on top of another horizontal row I get an image with far more than 24 mp. My quicky test of two rows of 2 images each (lots of overlap) yielded a 70 mp image in Affinity Photo. 135 mm Canon lens on my Sony shooting a wall 20 feet away.
For discussion, the question is, how is this different than if I had a camera with a 70 mp capability?
And, what about lenses? The mythical 70 mp camera with a 135 mm lens, would the resolution be the same?
For that matter, exactly what is resolution?
Oct 29, 2020 13:30:22 #
Thanks for all the replies....
Turning the screen brightness down seems to help.
But, what just occurred to me is, we don't know how she appears to others on ZOOM. I think that's the important concern.
Turning the screen brightness down seems to help.
But, what just occurred to me is, we don't know how she appears to others on ZOOM. I think that's the important concern.