Posts for: architect
Nov 24, 2013 11:55:22 #
It is not a camera problem. I suspect the dynamic range of the subject does not require the bracketing at +/- 2. And especially if the minus 2 image is much too dark. Or, it may just make sense to set your exposure compensation at minus 1 to shift the exposure range so it is useful at both ends.
I find that with RAW, and especially indoors, bracketing is not needed if care is taken to read the histogram for extremes. Exceptions might include any brightly lit windows or very dark alcoves that could benefit from bracketing.
I find that with RAW, and especially indoors, bracketing is not needed if care is taken to read the histogram for extremes. Exceptions might include any brightly lit windows or very dark alcoves that could benefit from bracketing.
Nov 17, 2013 19:05:48 #
snails_pace wrote:
How do you know that the picture actually shows the horizon? It may be the top of a sloped hill that is shown here. Further, forcing the line of the top of the sloping ground to be horizontal will about make the tree grow on its side.
The horizon appears to be a water feature, either a very large lake or a sea. It will always be level. There is no large wave to distort this. Because the horizon is near the middle, there will be no perspective distortion of the tree. If it leans, it leans. Sloped horizons in landscapes, when it is clear what they are, are a form of mannerism, or artsy-fartsy photography, or simply naitevity. Surfers in action can be an exception.
Nov 9, 2013 10:41:24 #
russelray wrote:
Old school........That's funny. br br Old school ... (show quote)
I too was old school, doing darkroom work with B&W and finding the perfect exposure and composition with Kodachrome, back in the 60's and 70's. Those skills learned the hard way apply perfectly to digital photography. Sloppy technique in digital, to be "fixed" in post, is not good photography, any more than it was in film.
Get your shot as good as possible in-camera, then refine it or totally modify it in Photoshop. Digital techniques, such as HDR and extreme low light photography, have few equivalents, if any, in film.
Lightroom does do a lot of what you may need, but combining it with Photoshop will give you everything. I use Photoshop CS5, with Bridge and Camera RAW. I may never need more that that to do everything I ever intend to do.
Oct 29, 2013 14:41:59 #
mcveed wrote:
Well now, is it the centre of the image or the centre of the building that must be vertical? I have always corrected to get the vertical line closest to the camera vertical. From there everything else seems to look good.
For the Photoshop Lens Correction software to work properly, the center of the IMAGE must be perfectly vertical, assuming of course the building has perfectly vertical lines, as most do. That corresponds to a level horizon of course. That mimics the "tilt" in view cameras.
It also works for horizontal perspective correction as well, if that is desired. That mimics the "swing" in view cameras or specialized lenses.
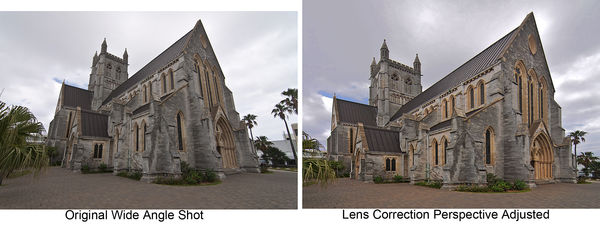
Note that perspective correction also works to make trees vertical in wide angle landscapes. BTW, nice shot George.
Oct 28, 2013 13:21:36 #
georgevedwards wrote:
I notice you used it on a perfectly symmetrical bu... (show quote)
George. Please note that I said that the CENTER of the image to be corrected by using the Lens Correction method, MUST be perfectly vertical. If not, the program will correct both side equally and it will correct one side correctly and not the other.
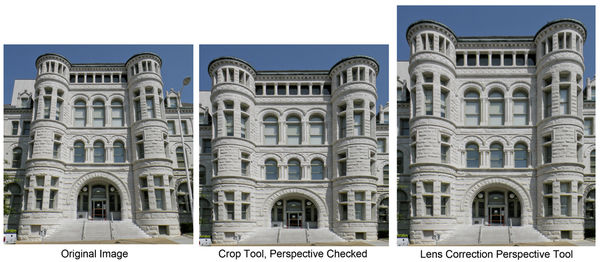
As an architect (retired) who has constructed many perspectives by hand, I truly understand the dynamics and geometry of perspective control and can easily see when a building's proportions are squished. When used as I have noted, the Photoshop Lens Correction method is much more accurate in final proportions. However, when the corrections are minor, I also use the Crop/ Perspective box checked method, as you do.
Below is an asymmetrical example of using the Lens Correction method. This is an extreme example using an 11 mm lens (16.5 mm equivalent), and I was backed up as far as I could go.
Oct 26, 2013 13:11:26 #
georgevedwards wrote:
There is also another way which I always use, it i... (show quote)
I also use the method you describe. and it can be used quite effectively when small amounts of distortion are present. The problem is that when used to correct significant keystoning, the result will show the building more squished. You then need to eyeball the proportions by increasing the image height alone until it looks right.
It is very important when suing the Lens Correction perspective adjustment that the horizon be level, by making the center of the image to be corrected perfectly vertical.
See below to see both methods used and compare the results. Note that this is a rather extreme correction, with the vertical perspective slider in Lens Correction, moved to near it limits. Note the wide angle distortion at the tops of the building.
Oct 26, 2013 09:40:12 #
Musket wrote:
Sometimes you cannot fix perspective. Lightroom 5 ... (show quote)
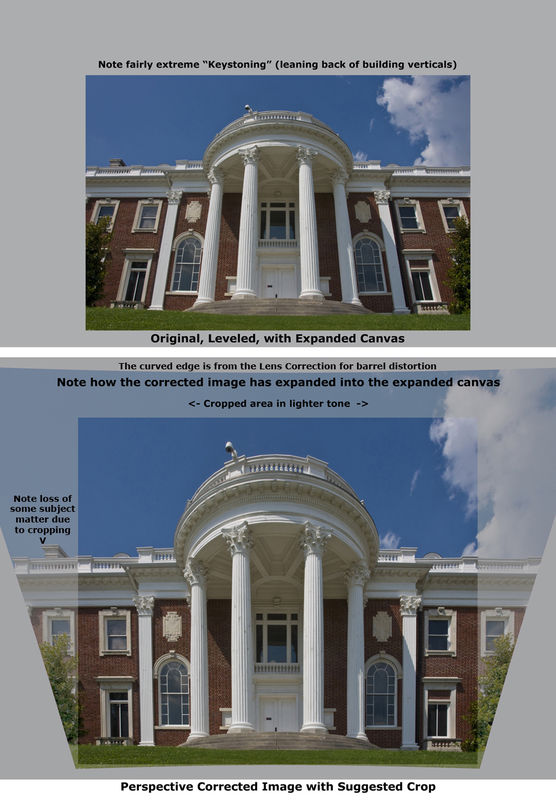
Attached is an extreme example of perspective correction done using Photoshop CS5's Filter/ Lens Correction. This shows what portion of the original gets cropped.
It is very important to start with the horizon level. That is best done with architectural subjects by making a vertical element IN THE IMAGE CENTER perfectly vertical (actual horizons to level are rarely found in this kind of subject).
To avoid losing even more of the image, increase the size of the canvas before adjusting perspective. Note that the image will lose some quality, as the software is interpolating pixels to create the new perspective.
If you know you will be correcting the perspective, include a wider angle shot to minimize important image content that will be cropped.
Oct 25, 2013 11:20:35 #
jpintn wrote:
I agree. You lose complete control over noise with auto ISO. I prefer to set ISO manually for the lighting condition. But many of the cameras today produce fairly low noise at ISO's of 800 or less.
I prefer to lose control of noise rather than sacrifice control of depth of field or control of shutter speed. You can set limits on the top ISO setting using auto ISO. I will set mine at 800 or 1600 depending on what conditions I am expecting. That assures me of the images being taken at the lowest ISO setting appropriate for my aperture and shutter settings.
Oct 25, 2013 10:44:36 #
Gauss wrote:
I leave ISO at its minimum value - 200 on my D40 - because that should generally produce the lowest noise images and hence highest quality images. I increase it if there's no other way to get the aperture and shutter settings I want.
Of the three legs of the exposure triangle, only 2 provide artistic control... Aperture for DOF and shutter speed for stopping or enhancing movement. With today's cameras that have low levels of noise at high ISO's it makes sense to me to use auto ISO so that you have full artistic control. And auto ISO will give you the minimum ISO required for your artistic settings.
Sure beats having to change film type to control ISO (ASA) as in the old days.
Oct 15, 2013 00:25:58 #
nekon wrote:
I have been a wedding photographer for over 50 years-yes I have used the raw process, but because I can nail exposure and white balance due to due diligence and experience, all I need to do in post process is adjust the gamma in levels, rendering the raw process time- consuming and unnecessary for me.
Congratulations. I am sure around 40 of those years was with film. I agree working with RAW is time consuming. Worth it for my work. But not nearly as time consuming as working with film.
Oct 14, 2013 22:38:29 #
nekon wrote:
Never a problem if you get incident readings
If you can do that in the chaos of a wedding, just as one example, then you are a better man than I am. I will continue to shoot in
RAW and optimize my images, rather than accept what the camera dictates in Jpeg.
Just curious. Have you ever shot using RAW files? Have you ever compared the refined RAW files to your Jpeg files? No question using Jpeg files are quicker to use. My experience is that RAW files gives me much more artistic control over my images, including shots that are near perfect in exposure etc. Marginal shots can be much improved if shot in RAW.
Oct 14, 2013 21:49:53 #
nekon wrote:
...., And More pros than amateurs use Jpeg format-it's just more practical in most situations.
That may make sense for photographers who shoot hundreds of shots, at a wedding for example, and have a short deadline to produce results. But for those of us who want the most out of our images, RAW delivers the goods. Even with wedding pics, where brides are wearing white, a notoriously difficult color to get just right, RAW is the superior file choice to get the details in the highlights.
Oct 14, 2013 17:13:04 #
nekon wrote:
Wrong-ego is for raw shooters, who believe it's a religion......
I think YOU are wrong. It is hardly a religion, only a better choice. RAW contains more image data than Jpeg and the photographer gets to make the fine adjustments, not the camera's manufacturers. It is no more ego involved than a film shooter who chooses to select the best, most appropriate, film for their particular requirements. I shoot both RAW and Jpeg, but use RAW for serious subjects.
Oct 13, 2013 21:58:50 #
Winpix wrote:
...Once the photographer has mastered the various functions of each of the three controls and how the various auto modes deal with them then there is only personal choice involved in how correct exposure is achieved. There is no one way to make photographs and anyone who tells you there is is lying to you!!!
I am not sure they are lying, just ignorant of the possibilities and ways of creating the image. Auto modes, used intelligently, and modified as required by exposure compensation, allow more freedom to capture great images, in my opinion.
Oct 13, 2013 20:12:16 #
Not sure if you are still following this Chuck. 21 pages? WOW. Is that a record?
I completely agree with you. Although I choose Aperture (auto) priority 90% of the time, if you know how the camera works, as you apparently do (so do I), then it makes simple common sense to let the camera do some of the work. Or all of the work some of the time. For real creative control, under certain conditions, manual control is needed. And as long as you understand when that is needed, then keep doing what you are doing.
I completely agree with you. Although I choose Aperture (auto) priority 90% of the time, if you know how the camera works, as you apparently do (so do I), then it makes simple common sense to let the camera do some of the work. Or all of the work some of the time. For real creative control, under certain conditions, manual control is needed. And as long as you understand when that is needed, then keep doing what you are doing.