Posts for: bpulv
Jun 24, 2020 10:07:03 #
jederick wrote:
Gorgeous flora, thermal pots and old growth scenes are also special sights to behold!!

Jun 23, 2020 09:52:37 #
Robert R wrote:
I am planning a trip this fall to National Parks in Southern Utah, Arizona, and New Mexico. I am planning to take many photos, mostly landscape. I use Canon 7D mark 2, backup is Canon 70 D. My lens I will take include Canon EF-S 10-22 mm., Canon EF-S 18-135mm, Canon EF 50mm, Canon EF 100-400mm L, IS, ll, and Tamron 18-400. My question is about filters. All my lenses have UV filters, and I have 77mm Sigma polarizing filter. Are there any other filters I should consider?
Ditch the UV filters. They only have an effect on film and are useless on digital. If you are using them because you are trying to protect your lens, your lens hood will do a better job and does not introduce an extra piece of glass that has the potential for degrading your images. On the other had, you should have a polarizing filter for every lens size you will be using or a single polarizing filter for your largest lens and adaptors for all your other lenses. Your polarizer should be of top quality because inferior polarizers may degrade your images. I predict that you will be using polarizers for many of your landscapes.
Jun 23, 2020 09:43:17 #
sadams wrote:
Thought I would post here: Noctilucent clouds are very rare, and rarely show this far South, They normally are at the Higher Latitudes and center over the North Pole area. Meterologist claim that they are formed by dust that is left in the "higher Altitudes" from meteors and bind to microscopic water droplets that create the hi altitudes clouds at 60,000' to 450,000' ( please feel to educate yourself by Googling this rare phenomenon)
Hit download for better viewing
Hit download for better viewing
Wow, that is amazing. ". . . this far South. . . ." means nothing unless you tell us where you are.
Jun 22, 2020 11:28:27 #
SuperflyTNT wrote:
I’m not saying you can’t get excellent images with cropping your D800. I can even crop images from the D500 fairly extensively and get great prints of that size. I’m disagreeing with your assertion that’s there’s somehow an advantage to shooting FF with shorter lenses.
I am not asserting that there is an advantage to shooting FF with a shorter lens. I am asserting that if reducing cost is an important factor, which in the case of the person who originally asked the question it appears to be, that this is a way to use a less expensive lens to mimic a very expensive long telephoto lens.
Jun 22, 2020 10:45:37 #
SuperflyTNT wrote:
I disagree. Sure you can crop more with a full frame camera, but using the same lens on a D800, to crop to the view you would get an a D500 you would lose about 60% of your pixels. Instead of the 20 mp of the D500 you’d be working with less than 15 mp.
I use my D800 that way all the time and regularly print 19" x 13" and even larger prints all the time. I can put those prints side-by-side with similar photographs where the full frame was printed and I challenge you to notice any noticeable decrease in image quality. It is a matter of knowing how to use ISO to your advantage and that can be learned.
Jun 22, 2020 10:34:24 #
lrm wrote:
Many of the rreplies herein mention the D500 with the Nikon 200-500. I agree with one caveat. I have replaced my 200-500 with the new 500PF prime. lens. It is superior to the 200-500 and is much, much lighter and easier to shoot hand held. You mentioned cost is not important --- go with the 500 PF if you can find one.
Again, your best option is a used Nikon FX full frame body with a sensor that is 30Mp or higher. Cameras such as D800 will allow you to effectively double and more the effective focal length of cropped images from those cameras while maintaining image quality at a price that is comparable to many mid-price range new DX crop frame bodies.
Jun 22, 2020 09:30:17 #
robertjerl wrote:
That would be the D500 or the D7500 if on a budget and semi-pro is too expensive. The lenses are where the real money will come in when talking about birds. With bird photography there is no such thing as too long a lens and seldom long enough.
Oh, I am a Canon shooter but since you seem to like Nikon those are the ones. In Canon it would be the 7DII or the 90D.
Oh, I am a Canon shooter but since you seem to like Nikon those are the ones. In Canon it would be the 7DII or the 90D.
That is all true, but here is something to consider. If you could spend the money for a full frame DSLR with a high megapixel sensor such as a used Nikon D800 https://www.adorama.com/us%20%20%201279802.html ($759), you may be able to get by with shorter focal length lenses and save a lot on the total cost. The image on a D800 or other 30 Mp plus FX camera bodies can be substantially enlarged without loss of image quality. So 95-percent of the time you could, for example, use a 200mm lens and crop the image in post to the equivalent of a 400mm or even longer lens. I do not usually do bird photography, but I use my camera and lens like that all the time with great success.
Jun 21, 2020 15:07:43 #
Fredrick wrote:
Excellent article. Thank you.
I read your post and looked at their website that did not give a lot of detailed information. There is nothing that indicates if there is a Mac version of the software available. Do you know?
Jun 21, 2020 12:02:10 #
DirtFarmer wrote:
I use a similar system, but since I'm not one to r... (show quote)
Although what you said is all true, the considerations regarding another entity having control over your data can be an issue and, as you said, you can't be too careful. Even megacorporations have gone bankrupt in recent history. When that happens, the first thing that happens is that their assets are often frozen until the court figures out what belongs to the corporation and what does not belong to the corporation. That can take a very long time and during that time you might not have access to your data.
Costs that are not under your direct control must also be a consideration. A cloud provider can change its prices with only a thirty day notice. That can pose two problems for the photographer. First is the obvious issue of the additional cost that the photographer did not anticipate and second is the fact that if you decide to switch to another cloud service and you have thousands of large files on the cloud, there may not be time to download all your photos and upload them to the new service before the notice period from your old provider expires.
Regarding filing systems. The problem with using titles first is one you have or will quickly discover. Each event can be identified by many different possible names. That leads to similar a lack of uniformity in naming files because you will not necessarily remember the title you previously used for a similar event and, therefor the titles are constantly expanding without any way to relate one to another. Have you thought of using a list of key words? If you had a program that can search on a combination of key words, you could use key words as the title of each file and have a way to efficiently search.
Jun 21, 2020 10:29:56 #
Willssnr wrote:
We have over 15000 photos accumulated over the years. We are now paying a lot on iTunes ( iCloud storage).
I am nervous of putting all onto a single hard drive ( having lost info before on a dead drive)
Any tights on systems?
I am nervous of putting all onto a single hard drive ( having lost info before on a dead drive)
Any tights on systems?
My Backup System
Computer security experts say you should always maintain a minimum of three (3) forms of backup for your photographs. At least one should be off site to protect against loss in the event of fire or natural disaster. The Cloud is not the best choice because your photos will be under the control of a second party that may have technical problems, financial failure or bankruptcy, sale to an unreliable party or may hold your data hostage to rising costs. Furthermore, upload speeds for large RAW files is way too slow and over time causes undue ware to hard drives. I have a system that will store hundreds of thousands of RAW, TIFF and JEPG photographs. Although you do not need anywhere near the 31Tb storage system I have, You will be able to glean some ideas by looking at how I protect my photographs. My system provides both on and off site redundant backup that is completely under my own control.
My system consists of the following:
1) All storage of photographs is external to the computer’s (iMac) internal drive.
2) Downloads from the camera, editing, final product and primary storage is on a 5Tb Western Digital My Book drive. Additional drives can be added as needed.
a) Each shoot is stored in a folder identified by job date and name. The date code is in a format that allows any software to automatically sort my files into date order for easy retrieval. The order is YYYYMMDD_Descriptive Title. For example, 20200521_Jones Family Reunion means that the photos were taken on May 5, 2020 of the Jones Family Reunion.
b) Within each folder are four sub-folders labeled “RAW”, "PSD",“Edit” and “Final”. All uploads are made to the RAW folder and only copies of the raw files are copied to the Edit folder for editing. The final output that may include JEPG, TIFF, etc. files are transferred to the Final folder.
3) The complete primary storage drive is backed up to a Drobo 5-drive RAID (Redundant Array of Independent Disks). This allows multiple backup copies of the data along with offsite backup. In addition, the Drobo’s firmware automatically corrects any data transfer errors and insures that all backup drives have matched data. The RAID consists of five Western Digital Red Drives, which are designed for this type of service and have an excellent reputation for reliability. Furthermore they are “hot swappable” which means they can be safely inserted and removed from the Drobo without removing power from the system. If one or even two hard drives fail, the Drobo will use the remaining three drives to write back the correct data to two replacement drives.
4) The Drobo is only powered on when backups are being made. Otherwise, it is powered off. This limits the exposure to possible hacking and greatly prolongs the life of the backup drives.
5) I have two additional external USB drives that I alternately exchange with my son who lives about twenty miles away. Those drive provide off site storage so in case the house burns down or there is a natural desaster, I will not loose my photographs.
Jun 20, 2020 11:59:57 #
(Trains)
JustJill wrote:
I would love to see some of your pictures!
I have only one print, and perhaps the 4" x 5" Kodacolor negative somewhere in my collection of the Moffat Tunnel to which I referred. If I find it, I will scan and post it. I have posted some of my more recent photos in the Cajon Pass on UHH previously. Here are a few:
(Click on "Download" to Enlarge Photographs)
Four trains moving through Sullivan's Curve. A very rare sight.
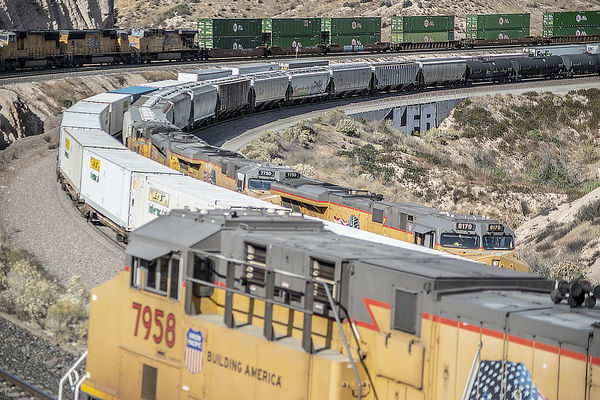
(Download)
Dawn at Summit
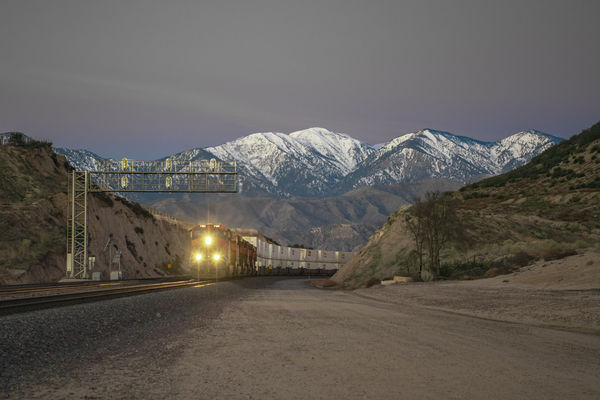
(Download)
Morning Fog at Sullivan's Curve, Cajon Pass
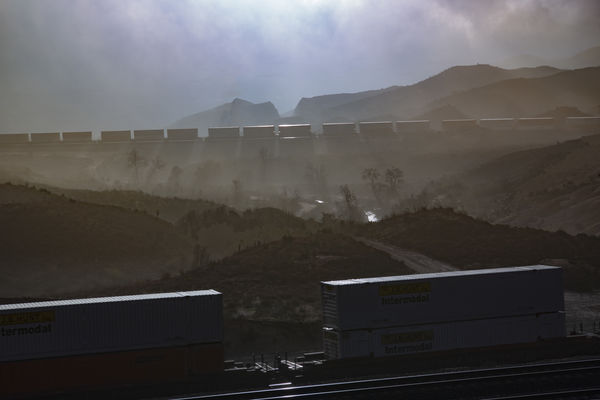
(Download)
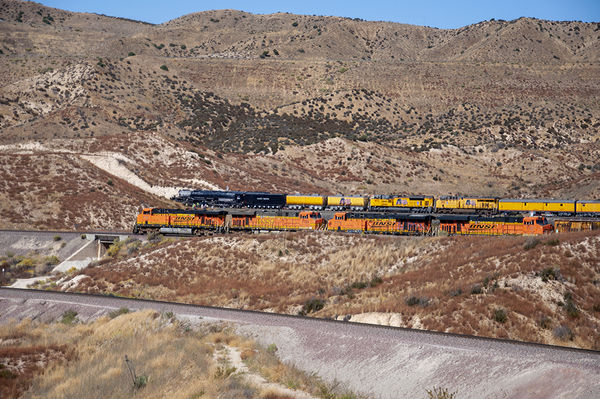
Big Boy Approaches Summit

(Download)
Big Boy Stops For Safety Check Before Descending the Cajon Pass
(Download)
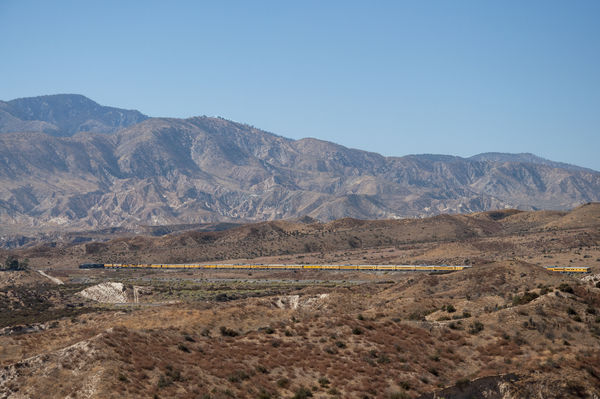
Big Boy and Its 22-Car Consist Descending the Cajon Pass 10/14/2019
(Download)
Jun 20, 2020 11:07:42 #
(Trains)
JustJill wrote:
Thank you for viewing and commenting. I was waiting for a train because it is a pretty busy track. But it started to rain.
Some of my best pictures have been shot in the rain. Hang in there!
Jun 20, 2020 09:59:08 #
(Trains)
JustJill wrote:
This tunnel in East Dubuque IL is 851ft long through the bluff and comes out on the Iowa side to that rotating railroad bridge I have posted pictures of. I have never taken a picture from this side before. It is on the BNSF tracks.
A very classic looking tunnel. It reminds me of the Moffat Tunnel in Colorado when I photographed it in 1967 with an F-unit exiting it.
Jun 20, 2020 09:52:34 #
(Trains)
ghill42 wrote:
Good shots. A railfan and a Ham, too? Hope you can show more soon.
Your images both appear to have a soft quality and to be out of focus. The lettering on the locomotives are not crisp because, perhaps the images may have been downsized too much before uploading to UUH. I find that I need a file that is in the range of 750 Kb to 10 Mb when sized for 1024 pixels wide to appear as a quality image on UUH. If you did try to resize before uploading these images, try replacing them with files in that range at 98-150 dpi. The problem could also be that you over-cropped the images.
73,
WB6WUW
Jun 19, 2020 15:33:04 #
Jmcurrysr wrote:
I realize that this might be over simplifying the exposure triangle for my students...but when teaching beginner photogs, I suggest to them to take a photo in auto, check it for their liking, pay close attention to the settings and then switch to manual and adjust settings appropriately. It helps them get a starting point. Of course, this works best in subjects that are stationary and the light isn't rapidly changing.
I disagree with the idea of students starting off using any automatic mode. You should teach them to use a light meter in conjunction with the exposure triangle. When I start students, I initially let them use a Sekonic analog incident light meter. That is because they can see all the possible settings on the calculator dial and that reinforces what they are taught about the exposure triangle. Their first assignment is to take three pictures; first, a shot at a correct setting, then one under and one over to see the affect and more quickly understand the basics. Then I have them take three pictures doing the same altering the ISO between shots and finally, repeat with (camera on tripod) shooting a person running through the frame with a range of shutter speeds. When they have mastered that exercise, I explain and show them how to take a reflected meter reading off a grey card and white card and show them how it coincides with the grey and white card readings. Once they understand that I show illustrations of how the different metering options in their cameras work and, only then is it time to let them start using the their camera's metering system. Until they understand these basics, I only allow them to use manual settings. Also, I also show them what a metadata file looks like and impress on them that if they cheat on a submission, I will know. Only after they understand all of this do I go through the automatic modes with them so they will be equipped to make intelligent decisions about when to use which mode and for what purpose.