Posts for: pbradin
May 2, 2018 09:09:17 #
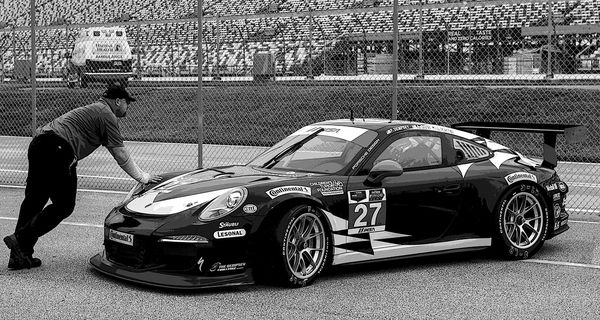
You left out my absolute favorite type of racing - sports car racing. Like you, there were no tutorials and no books when I started in 1962 (yes, I am ancient). But I found out very quickly that a lens of about 200mm sure helped out. I was shooting with an old Miranda "D", and I don't remember what lens I had on the camera when I was at the first Daytona Continental in January of 1962 (Dan Gurney won in a Lotus 19 - Ford sponsored by the Aciero Brothers). That race was a three-hour race, but it has grown into what is now the Rolex-24. After that first race, I bought a Soligor f5.6 "preset" lens. One thing I found was that working races as a course worker, steward, or, in my case doing timing and scoring helped with the photography. I worked my first race doing T & S at Sebring in 1963. I got a free pass, a free special parking spot in the paddock behind the pits, and only had to work half the race, doing three two-hour stints. I did that for twenty-one years, during the great battles of Ferrari, Porsche (908's, 910's, 917's, 935 Kramer K3's, and 962's), Matra (the loudest, headache creating high-pitched sound) and, of course those original Ford GT's, Mk IV's and Cobra's. There were the amazing Chaparral's, too. But, we had access to the pits and the paddock, literally walking through the pits during the practice days before the race. Same at Daytona and Road Atlanta and Palm Beach International Raceway. Timers and Scorers have been virtually eliminated by transponders installed in every racecar, so now I am a "civilian" again, but I learned a lot about shooting cars at speed. I still use a lens of about the same length, although at some tracks, like the banking at Daytona requires a little more reach. I have been using a 70-200 f2.8 lens, and for the longer reach I just slap on a 1.4X teleconverter.I always shoot at about f8 or more if I have the light, to keep the depth-of-field from being to shallow, although you can do some creative things at 2.8 and zero-in on just the driver or the front of the car or whatever. I learned that you want to shoot at about 1/250 to 1/300th of a second to blur the spinning wheels and the background to show the "speed". Image stabilization in "panning mode" helps, especially if you are an old guy like me. A 70-200 f4.0 would work well, too, and be a bit less expensive and lighter, too, and it will still autofocus pretty well with a 1.4X TC on the back. A lot of this transfers to Stock Car Racing, and Sprint Cars , too, except the Sprint Cars are raced mostly at night. If you have some of this kind of gear, you should try shooting a race. It is a lot of fun. You can use a lot of your experience from shooting birds in flight since both things require a longer lens and panning. Try it. If you know someone who races, even better, and offer to give him some shots of his car that he/she can pass along to sponsors (that makes sponsors happy!), friends and family and crew members. The black and white is of the Patrick Dempsey (of television and movie fame) car at the 2014 Daytona test session before the 24-hour race.

May 1, 2018 07:20:50 #
I build my own computers from scratch, since most "pre-made" computers aren't particularly suited for heavy Photoshop work. That being said, I use a 256GB SSD for my boot drive (the one your operating system and programs are loaded on) then I have a 2TB internal standard 7200RPM hard drive (both Seagate and Western Digital are good brands although I tend to lean towards WD Caviar Black), then I have a 128GB SSD that I use for a "scratch disk" for Photoshop to use as temporary storage (nothing else is stored on this drive). All of those are internal drives. I use external drives for photo storage (currently have 12TB of externals - on rodeo weekends I may take over a thousand shots and I shoot raw + jpeg medium so it eats up space fast, without a rodeo on weekends, I take about 200 shots per week, again raw + medium jpeg). My current computer is the first one where I used an SSD as a boot drive and it really speeds up booting and working on my shots. My computer is about 4 or 5 years old now with no problems. If I was building a computer today, I would probably go with at least a 512GB SSD for a boot drive and more likely a 1TB just to give me more space for saving files that I am currently working on and for having more programs. Prices today for SSD's are soooo much cheaper than they were when I built this thing. To complete my rig, just for informational purposes, I have an Asus motherboard (I had 2 computers that I built with Gigabyte MB's and they both failed), Radeon 4GB video card (I use a two monitor setup, but might go to a single 34" curved monitor), 32GB of RAM, and my processor is a 2nd generation Intel Core I 5 processor. I have a Corsair liquid cooling system for the processor. I also have four cooling fans in the case to keep it all cool in addition to the two standard fans that came with the case (a Corsair 200R mid-tower). My operating system is Windows 7 64-bit Pro. This system has been stable as hell since day one, and I love stability. The two systems before, with the Gigabyte motherboards were a little finicky, sometimes shutting down in the middle of working on a photo. I never threw the computer across the room, but I wanted to. Maybe the emphasis on cooling this time has helped, but I have always liked Asus MB's. Anyway, SSD's have become very reliable. I chose a SanDisk SSD (Samsung's are good ones, too, and are easier to find) just because I have always used their Compact Flash cards in my cameras and have never had one fail, even when I ran them through the laundry in the pocket of my blue jeans. Just a footnote. Computers are pretty easy to build. It is basically "insert Tab A into Slot B". As long as you use "mainstream" components that have been on the market for a year (that gives manufacturers time to work out communication bugs) and you don't go for "bleeding edge" components you will get a problem-free system. That's my 10 cents (it may be a nickle overpriced). Good luck, I think you will enjoy the faster speed of an SSD boot drive.
Apr 25, 2018 14:28:59 #
Where on campus is this? I am just familiar enough with the campus to make me dangerous.
Apr 25, 2018 14:14:42 #
I was using inexpensive tripods with a 400mm Canon lens and a Canon 7D and I used a remote release. I still didn't get perfectly sharp shots. I finally bit the bullet and bought a $900 tripod and a $375 head. I could have easily spent more if I had gone with a Really Right Stuff tripod and gimbal head, but I wanted to continue eating. Your 150-600 is the problematic part of the equation. You need a heavy-duty tripod for that thing. A remote release will help. You can buy an off brand one for just over $20. Whatever you can afford is the thing. The tripod head is more critical than the legs. You can make the legs more stable by hanging a camera bag off the legs (remember to by a tripod with a hook so you can do that. Get the absolute strongest head you can. If the type of head isn't an issue, you get more stability for the buck out of a 3-way adjustable head (the ones that have a couple of long twist-grip handles sticking out). Ball heads require more precise machining, so they are more expensive for the same weight capacity. Go to one of the big online retailers to look at what is available for a given price range. That will weed out things that you don't want. The real camera businesses in NYC (I am trying not to name names) have very knowledgeable people to talk with. All of them are photographers who have probably been where you are right now. Use them. Don't feel guilty about taking up their time. Good luck.
Apr 22, 2018 08:30:34 #
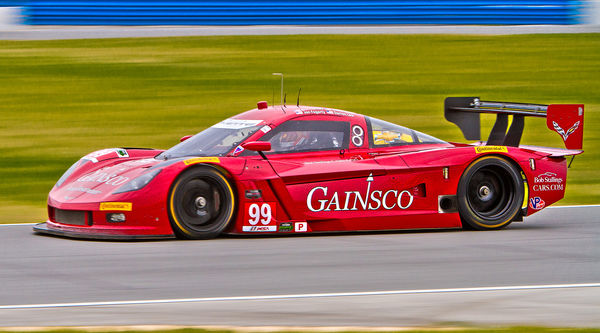
Much of the decision on which lens you use is base on a couple of things. I do racing photography at Daytona (Rolex 24) and the 12-hour race at Sebring. For shots on the banking at Daytona, I am shooting between 300-400mm on a crop sensor Canon 7D II. But on infield shots I use a 70-200 f2.8. A warning. The longer the lens, the shallower the depth of field, so you may need to stop down a little on your f-stop to get all of what you want in focus. Be prepared to crank up the ISO a bit. I usually pan my infield shots at at about 1/250th second. With the IS set on "mode 2" (panning mode), I can get clean shots, but the rotation of the wheels and the background are blurred, showing the "speed". Individual lenses will require different settings. I would take both lenses and be prepared to use each one, depending on how far you are from the action. Also, you may want to get a large part of the field on the first lap and then shift to shooting individual riders, even face and body close-ups which would require the longer lens. "Jump" shots can be a lot of fun, but get the hill in the shot, too, to help "tell the story" of what is actually happening. A motorcycle against a blue sky is kind of boring. Make sure you have a camera bag to keep your second lens in and some microfiber cloths with you (I buy mine in the automotive department at Walmart or Target. I am cheap) I carry about half a dozen with me to a race. Many people say they use a monopod, but I cannot move the camera fast enough with one attached to the camera or lens. I do everything free-hand. Try lots of different angles, coming right at you, panning as the go by you, although I am almost always getting a sort of front view as they get close. Pure side shots are harder to capture and keep sharp. remember, motocross is done on dirt and so their will be a lot of dirt flying around. Be prepared.
Apr 22, 2018 07:56:57 #
There are two ink types in the various printers out there. Both types will produce photos that look good. Most inexpensive printers (below $300) use dye based inks and will have about 4 colors. They will produce nice photos, especially on photo glossy paper. The downside is that very subtle differences in color may not be produced because of the limited number of color cartridges, but if you are not selling them or entering them in competitions, a dye based printer on glossy paper will do just fine. These are also less expensive than pigment ink printers. Canon and Epson both produce reasonably good dye based printers for $150 or less. As with almost anything, more expensive printers produce better results on more different types of paper. The one downside to dye based printers is longevity of the print. If you want something that will last 25 years and still look good, you would want to go to a pigment based printer. Since you are just starting out, you might want to go this route. Epson has a series of printers that have "ink tanks". Instead of buying ink cartridges, you buy bottles of ink and refill the tank and the cost per photo drops quite a bit. Your ink price is almost cut in half.
if you want a larger size than 8 1/2 x 11 inches, you will probably have to get a pigment based printer. They are more expensive, but they usually have more ink colors to better reproduce subtle differences in color and smoother color gradations. You can buy these printers that will print in larger sizes, up to 13 x 19 inches and 17 x 22 inches in a table-top machine. The cartridges are more expensive for these machines and there are more of them, so your ink cartridges will cost more. They are also larger capacity. I have an Epson 3880 and each cartridge costs $61.00 and there are 10 of them, including both blacks. Do the math. It is well over $500 for a full set. However, I get beautiful, long-lasting prints on a wide variety of papers, including "metallic" paper. I do not recommend something this expensive for you since you are just starting out.
My "ten cents" (it may be a nickle over priced) is to go with a dye based printer and glossy paper (which will get you the best looking photos with dye based inks). This way you can try your hand at printing your own photos without a big investment. That was how I started. My first printer was an Epson R200, back around the year 2000. The quality was about the same as a drug store photo print. I was actually surprised at how good those photos looked, and I used that printer for 4 years. If your prints don't look good at first, there are "dialogue boxes" that will allow you to adjust color saturation, hue, contrast, etc. Take the time to read the instructions, buy some glossy photo paper by the same manufacturer as the printer and play. I say this because "non-manufacturer" paper might have subtle color shifts or contrast differences. Later on, you can start playing with paper from other manufacturers (like Red River Paper) but make sure the paper is for the type of ink you are using. Not all papers will work with dye based inks, especially "fine art papers". Good luck and have fun.
Apr 22, 2018 07:01:20 #
Apr 8, 2018 06:34:50 #
It's impossible to answer the question without asking what are you shooting? In my case the lens that spends the most time on my Canon 7D II is my Canon 70-200 f2.8 L IS, but that is because I am not usually shooting things that are "close up". I have three lenses and two teleconverters along with one extension tube. All of them are always in my camera bag with me unless I am doing bird photography, then it is only the 70-200 f2.8 with the 2X and the 1.4X teleconverter, and then it is mostly with the 2x on the lens. My other lenses are a Canon 17-40 f4 L and a Canon 24-105 f4L IS. The 17-40 usually gets used on wide angle landscape and cloud shots.The 24-105 is used mostly for people shots or when I am doing specific close up stuff. And, if I am getting kind of "crazy creative weird" stuff I might very well add the extension tube, usually to the 24-105. But, none of these setups is a true "favorite". They are favorites for particular situations and my mood changes depending on what is going on outside with weather, etc. I know I probably didn't help, but maybe I am just too serious into my photography. I guess something like an 18-300 with IS would be a good "all around lens" if you could only afford/carry one lens. That way you could do a wide-angle cloud shot and then turn around and do a bird shot without having to change anything except zoom the lens out. One of the things I found that helps make it more affordable is that none of my lenses or teleconverters were bought new. All of my lenses were bought refurbished from the manufacturer or used from B&H, Adorama or KEH. I had a problem with the 24-105 when everything locked up. I couldn't zoom or autofocus. I had purchased it used and I was past the warranty date by a couple of months. I called them and told them of the problem. They agreed to fix it as if it was still under warranty and for me to ship it back to them. I had an event where I needed that particular lens in a week. They agreed that if they could not get my lens repaired and back to me in time, they would send a replacement. After looking at my lens after I sent it back to them, they said there was no way to repair it in time. They sent me the replacement FedEx next day air for no charge and I had the lens for the event. Moral of the story? Buy from reputable people and if there is a problem, be reasonable, and they will bend over backwards to take care of you. You are a walking, talking advertisement for their business and they know that word-of-mouth advertising is the most productive advertisement of all.
Mar 26, 2018 05:56:01 #
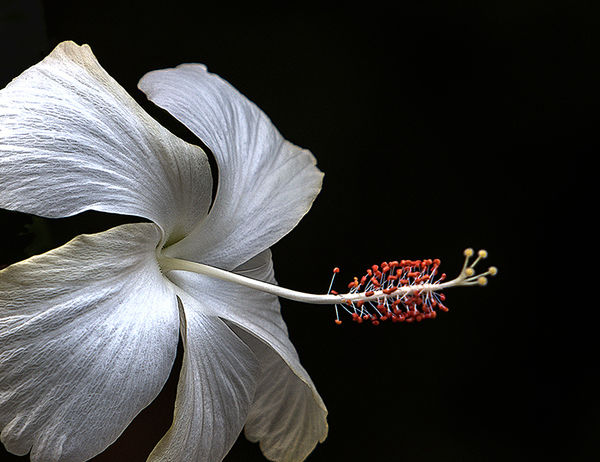
Sorry, I just saw the post, only a couple of month's late. I love that minimalist approach, where it is about the primary subject with no interference from anything else. On this photo, I spot metered on the flower itself and all the dark green leaves that were in shadows in the background just disappeared.
Mar 20, 2018 17:15:49 #
Try going to Nikon's website and go to "deals" to look at what the "refurbished" camera body is selling for. I have been buying used/refurbished lenses for a dozen years (KEH for used, and manufacturers for refurbished, although you can sometimes find refurb at Adorama and B&H) and have only had one problem and it was taken care of really quickly even though I was out of warranty by a couple of months. Good vendors will always back up their sales of equipment with good service.
Mar 20, 2018 17:07:28 #
Since you have a 70-200 f4, I would certainly use that instead of the 24-105 f4, especially on a full frame camera, unless you want to do a bunch of wide angle, close up group shots. But, you said that you don't know how far you might be from the stage, so that makes the 70-200 even more of a better choice. You can always take both. Instead of buying a 24-70 f2.8, think about renting one, unless you just really want that 2.8. The low-light capability of the 5D MKIV is pretty good and both of your f4 lenses have the same light gathering capability, so for the actual ceremony on stage, I think the 70-200 is the lens of choice. Now, if you want to buy a 70-200 f2.8 for that extra stop of light gathering capability............................
Mar 20, 2018 16:53:11 #
The only lens that fits most of your criteria and is weather sealed is the Tamron 150-500 zoom. I went to B&H's website to see if the 80-400 Nikon lens was weather sealed, but there is no mention of it. The Nikon will be a little bit better optically, though, than your other choices. Also, the Nikon is a little bit faster at f5.6 at the long end, but that is only 400mm compared to the Tamron at f6.3 at the 500mm long end. I did not see any data on what it is at 400mm. As usual, lens choices are always a trade off on what is more important to you - longer reach vs. slightly sharper vs. weather sealing. The Tamron gives you two out of three, whereas the Nikon gives you one out of three. But, if a "tack sharp" lens is more important to you than anything else, the Nikon would be your choice. Since this is a $2,000 expenditure, I would want to see if there are any real camera stores within a couple hundred miles to see if you can "see, touch and feel" what you are looking to purchase. If you have a Nikon camera body, take it with you along with a fresh battery and a storage card. Most camera stores will let you put the lenses on your body and shoot a couple of shots, but usually inside, unless you can talk a sales person to go outside with you. The other alternative is to rent a lens from one of the camera/lens rental companies and take a weekend to shoot with one or all possible choices. You're spending some decent amount of money, here. Take the time and effort to make sure you will be happy with it.
Mar 19, 2018 13:35:53 #
Something about this doesn't sound right. First, when I save files on an external hard drive, I do not "move" them. I "copy" them. Then when I delete the files off the original drive, "copied" files don't get deleted. If you "move" them, there is still only one copy of all those images. It is just in a different place so when you "delete" them off of your drive, it goes to what ever drive you have "moved" them to and deletes them. So when you want to "move" those files to an external hard drive "copy" them from the original drive, then "paste" them on the new drive. That eliminates the connection between the two sets of files. The duplicate files on the external drive are truly "copies" and not the same images in a different place. That is how I upload files from my memory cards to my computer, too. I go to whatever "drive" the computer calls my card reader, then open the folder with the images in it then "click on the first one, then scroll down to the last one and hold down the "shift" key and "click" on the last image. Every image in between will be highlighted. Then I right click on any of the images and click on the word "copy". Then let go of any buttons or key that you are holding and find the folder where you want to put those images and open that folder and just right click again on the empty space and right click on the word "paste" in the drop down menu that shows up. A dialogue box will open up and show you how many items it is copying into that folder and how long it will take. When all the images are copied, the dialogue box will disappear. I use this procedure for every batch of images I want to move around. This way if something goes wrong while the process is DUPLICATING the files to the new file folder, the original files are still intact. It takes a little longer, but you don't end up hating your computer and using language that upsets those around you. After it is finished, open the new folder just to make sure the images are really there. ONLY then can you go back to the original folder where your original files of all those images were and delete them, knowing they are all nice and comfy in their new home. I am not sure what keys do the same thing as the "shift" key on a PC, so find someone who knows. It might be the "alt" key but don't trust me on that. Good luck. Just remember, "copy and paste". Don't "move".
Mar 19, 2018 12:59:51 #
After I download images to the computer via a card reader, I will put the card back in the camera and reformat it every single time. That makes the cards completely uniform with nothing to "trip up the camera" as it writes new images during a 15 or twenty frame burst of RAW + jpeg files. Yes you will use up more write/rewrite cycles but unless you are a pro photographer shooting hundreds of images every day, you won't have to worry. I used to fill several cards completely full (8GB) every weekend while shooting rodeos, and had a "runner" take cards from me back to the computer after every event (barrel racing, bull riding, calf roping, etc.) so that they could be uploaded onto the computer so we could get a slide show going on our digital TV screen right after that particular event was over. I reformatted every card in the camera every time it came back to me as part of my "card out/card in" procedure. I did that for several years and never had a card failure. Even when I left them in pants pockets and they went through a wash/dry cycle by accident they still worked just find. I even had a 32GB card stepped on by an angry bull and it had a dent in it and it still worked! I always bought pro-series cards - more money, but lost images were more expensive than the best cards. So basically had two rules: 1) Completely reformat the card before using it in the camera, and, 2) Always reformat in the camera. I had a third rule that I already mentioned, buy the best cards you can afford. I also always uploaded images to at least 2 external hard drives so that there were duplicates of EVERY image. I have kept every image I took, even the really bad ones (thank God for 8TB drives!). I have gone back to those "bad shots" and used some for teaching purposes and also to do very creative stuff. You just never know. I no longer do the rodeo thing (too many close calls with angry bulls and I have slowed down too much. I lost a digital camera under the hoof of one of those bulls, but that bullet-proof 70-200 f2.8 lens was still good. Thank you, Canon.) Anyway, enjoy the "photo" part of photography, and don't get so bogged down in the technical stuff that you stop enjoying the creative part. One of the best ways to do that is to develop routines that you go through before every shot or burst of shots. Those routines that become habits will save your energy for the creative part.
Mar 18, 2018 18:04:28 #
I am a Canon shooter, but I agree with Elnikkor that the D500 and the relatively new Nikon 200-500 zoom is the best combo, if your budget will support it.