Posts for: E.L.. Shapiro
Nov 28, 2014 20:17:49 #
I am really enjoying this thread. I have been a photographer just about all of my life but I never was a camera collector except for a few really old wooden portrait cameras that I use as conversation pieces and décor in my showroom at the studio. I wend through quite a number of them but usually traded them in or gave them away but hearing about some of the great and not so great oldies always brings back fond memories.
Back in high school I was on the yearbook staff and out official camera supplied by the New York City Board of Education was the Argus C-3. The camera even had an engraved metal plate riveted to it that stated that ownership. Not surprisingly enough; so did everything in the school; the rulers, the books, the desks and even the doorknobs were stamped, engraved or had this notice of ownership molded right into their makings. Well- it WAS kind of a tough neighborhood! That camera was tough and it was shaped like a BRICK and that thing could withstand the rough usages we kids gave it by dragging along to sports events in our gym bags. If my stats are correct; it was the most proliferated 35mm camera manufactured in the United States and perhaps anywhere else- there were hundreds of thousands of them. Back in the there was a kit comprised of the camera, a flash attachment, 2 rolls of Kodachrome 135-36 and 6- #5 flash bulbs that sold for something like $49.95. That made it possible for many young serious enthusiasts to get into color photography and make some of those brilliant Kodachrome slides.
The Topcon was made in Japan and imported by Besler- the same folks who brought us those enlargers that were engineered to withstand the then predicted nuclear holocaust (well just in case). The color head was so heavy that the built in motorized elevator system could hardly bring it up the chassis without a helping hand! This was one tough not so little camera. It too was chosen by one of the military branches for a general use 35mm camera.
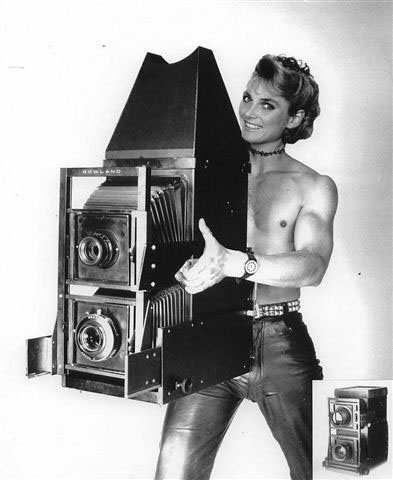
WOW! The Gowlandflex! I had the pleasure of meeting Peter and his lovely wife and purchasing a 4x5 Gowlandflex. What a great piece of equipment- I could make brilliant black and white and color negatives AND smashing 4x5 reproduction grade transparencies with the ease of using a 2 ¼ medium format camera. I still have that camera and will never sell it mainly it reminds me of Peter Gowland, not only a suburb and versatile photographer and a master builder of specialized cameras but a fine gentleman of the highest calling. Attached is an image: This was the Gowlandflex of my dreams but never acquired because Peter had only one prototype and it was a work in progress. He passed away before he finished the project. This image is kinda wacky- looks like someone did a bad PhotoShop job on changing heads but dig that camera! LADIES AND GENTLEMEN- I give ya'll the 8X10 Gowlandflex!
Ed
Back in high school I was on the yearbook staff and out official camera supplied by the New York City Board of Education was the Argus C-3. The camera even had an engraved metal plate riveted to it that stated that ownership. Not surprisingly enough; so did everything in the school; the rulers, the books, the desks and even the doorknobs were stamped, engraved or had this notice of ownership molded right into their makings. Well- it WAS kind of a tough neighborhood! That camera was tough and it was shaped like a BRICK and that thing could withstand the rough usages we kids gave it by dragging along to sports events in our gym bags. If my stats are correct; it was the most proliferated 35mm camera manufactured in the United States and perhaps anywhere else- there were hundreds of thousands of them. Back in the there was a kit comprised of the camera, a flash attachment, 2 rolls of Kodachrome 135-36 and 6- #5 flash bulbs that sold for something like $49.95. That made it possible for many young serious enthusiasts to get into color photography and make some of those brilliant Kodachrome slides.
The Topcon was made in Japan and imported by Besler- the same folks who brought us those enlargers that were engineered to withstand the then predicted nuclear holocaust (well just in case). The color head was so heavy that the built in motorized elevator system could hardly bring it up the chassis without a helping hand! This was one tough not so little camera. It too was chosen by one of the military branches for a general use 35mm camera.
WOW! The Gowlandflex! I had the pleasure of meeting Peter and his lovely wife and purchasing a 4x5 Gowlandflex. What a great piece of equipment- I could make brilliant black and white and color negatives AND smashing 4x5 reproduction grade transparencies with the ease of using a 2 ¼ medium format camera. I still have that camera and will never sell it mainly it reminds me of Peter Gowland, not only a suburb and versatile photographer and a master builder of specialized cameras but a fine gentleman of the highest calling. Attached is an image: This was the Gowlandflex of my dreams but never acquired because Peter had only one prototype and it was a work in progress. He passed away before he finished the project. This image is kinda wacky- looks like someone did a bad PhotoShop job on changing heads but dig that camera! LADIES AND GENTLEMEN- I give ya'll the 8X10 Gowlandflex!
Ed
Nov 28, 2014 01:03:53 #
Here's some trivia for y'all! Back in the day one of the Miranda models was chosen as their official camera by the United States Navy. I seem to remember that that model was so well constructed that it was less susceptible to damage or malfunction due to dampness, wetness, salt air and moisture- kind stuff you find aboard ships. I was in the Army- our official 35mm camera was the Nikon F at the time.
I do remember the Miranda as being built like a brick outhouse, rather chunky and not the kinda thing you want to drop on your foot. Maybe the Navy figured that the thing could double as a weapon!
Ah- Nostalgia! Ed.
I do remember the Miranda as being built like a brick outhouse, rather chunky and not the kinda thing you want to drop on your foot. Maybe the Navy figured that the thing could double as a weapon!
Ah- Nostalgia! Ed.
Nov 26, 2014 13:24:18 #
I have been a full time professional photographer for my entire adult life- I actually started out as a teenager as a gofer/janitor/apprentice in a professional portrait and wedding studio. Besides my experience I was fortunate enough to have a pretty comprehensive technical education- OK so suffice it to say I am well credentialed. So
big deal! So
Whats with the résumé?
yall might ask. So
Get ready to laugh! Here I am; over 50 years later, still working, running (?) my own business add I am still the main janitor, gofer and not surprisingly enough, my lovely wife is the real boss- I just hang around and take pictures and still loving it. I like to share my knowledge with others of all ilks in photography- amateurs and pros alike and I enjoy teaching. On some of the other online forums there seems to be a degree of friction between the amateurs and the pros and the rookies and the advanced workers. Some of the beginners or casual hobbyists oftentimes become intimidated or angered by the more advanced enthusiasts and the pros; perhaps there is too much techno-babble and photo-slang? As far as I am concerned; I might talk about things from a professional viewpoint but rather explain things rather that criticize folks for lack of knowhow or knowledge. I dont feel that many amateur or rookie pros are stupid or necessarily inapt- its just that many of them are operating under serious misconceptions. This is especially apparent in the areas of LIGHITNG and thats why I decided to address this issue in this thread.
When folks want to learn to play a musical instrument they usually learn to play the scales, do the etudes and learn the theory. If one wants to learn how to paint in oils or water colors they learn how to mix paints and pigments, how to select papers and stretch canvases and master the use of their brushes, palette knives and other tools of the trade. What with todays technologies in photography; many newcomers become preoccupied with equipment before they take time to learn the basics. The most important areas to study about in photography is the understanding, SEEING and manipulation of LIGHT! As photographers, suffice it to say, we are painting with light!
Not understanding the behavior of light and how to control it is what leads to ill informed purchases and usages of equipment. When folks become disappointed with their photography, oftentimes their first instinct is go out and buy more gadgets, perhaps upgrade their lighting gear and even buy more expensive cameras. Surprisingly enough, the remedy for their woes might be in a piece of Tupperware, a roll of gutter tape and some rubber bands- Velcro for the more advanced workers! Lots of photographer makes fun of Gary Fong bur the guy is a genius in that he refined Tupperware and designed it so it wont look unprofessional and so it is not likely to fall off your flash unit while you are trying to work. I mean- when some guy comes over to you at a wedding assignment and remarks that that thing atop your camera looks like something he stores leftover sardines in to prevent stinking up is fridge and you have to tell him that you use it to prevent harsh shadows- how embarrassing is that? Meanwhile Gary is laughing all the way to his bank because all of his contraptions do work well providing you know haw and where to use them!
So Whenever I have a chance to post here, I would love to field questions about all the basics and lighting and write some articles in lighting basics such as angle of incidence, the inverse square law and others such entertaining subjects, however, I will try to keep them in the English language, have some fun with them and add some of Cheap Eddies (thats me) fly by the seat of your pants improvisational methods. I will also try to advise folks about some real neat buy from the camera store stuff that makes off camera lighting and all that good stuff easier and more convenient.
Send me some feedback! Thanks for reading! Ed
:thumbup: :mrgreen:
Nov 25, 2014 21:56:56 #
Some tips on feathering:
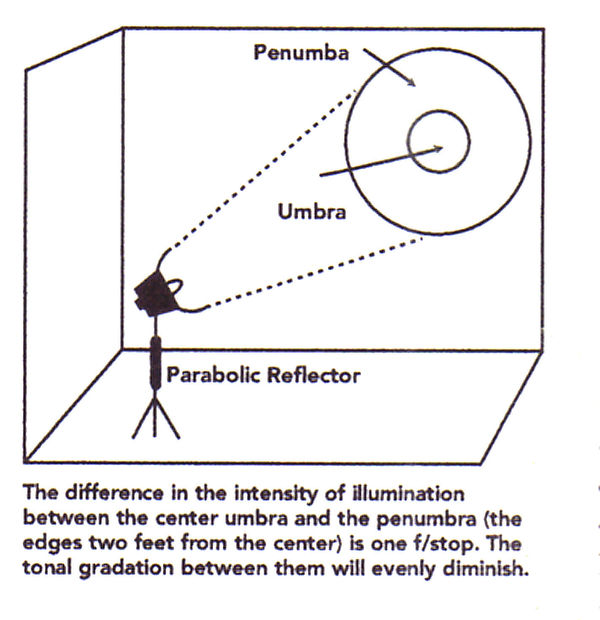
Feathering of the lights, especially in classic portraiture is a time honored technique among many master photographic portraitists. It terms for the days when most photographers used raw parabolic lights and Fresnel spotlights. The light beams from those kinds of lighting apparatus have two main components the hot spot in the center of the beam known as the umbra and the surrounding area and the edges of the beam, of softer light, knows as the Penumbra.
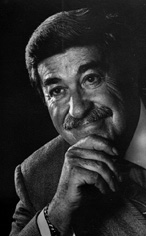
The basic idea of feathering is to use the edges of the beam rather that the center. It s done by placing and aiming the lights using the hot spot portion of the beam as to your desired lighting pattern or configuration you want and the rotating the light toward the camera position so that the edge of the beam takes over where the center of the beam was dominant. This will give you better and more even lighting across the mask of the face, render texture perfectly and create excellent specular highlights that just pop off the page. All exposure and ratio issues should be calculated or metered with the light in their aesthetic position, that is, after fathering is in place. In the attached (black and white) image all the lights; the main, fill, hair and accent lights were all rotated as described.
One can also feather the main light downward at the same time. This is great for executive portraiture where you want to avoid hot spots on the subjects forehead (a common problem) and at the same time the hot post lands on the dark clothing and maximized shadow detail in the clothing.
Technically speaking, when using white umbrellas, soft boxes, and beauty lights the effect of feathering is not all that pronounced in that most of those modifiers do not have very pronounced hot spots. Beauty lights have a baffle covering the photoflood lamp or flash tube so that negates the hot spot. Silver umbrellas may have a bit of a hot spot but white ones usually do not have a significant hot spot. Soft boxes usually produce very even light beams because we are dealing with internal bouncing of the light being further softened by scrims or at least the front panel. Feathering with theses modified lights do have some good effects as to rendition of texture and evenness of lighting.
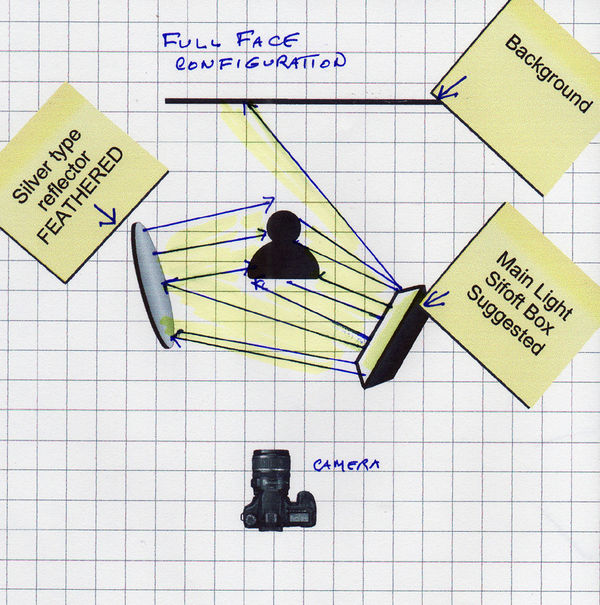
There is, however, another feathering technique that works especially well with a single soft box. It is a one light system entailing 1 soft box equipped single light source and a simple silver type reflector. In the diagram below, you can see how feathering the soft box so that some of the light strikes the subject and some of the light strikes the reflector. This is a great system for working on location or shootin wedding formals portraits with a minimal of equipment and still coming up with studio quality lighting. Feathering the soft-box light slightly upward will cause a pleasant falloff of light thereby creating a soft vignette.
I hop this helps!
Ed
Feathering of the lights, especially in classic portraiture is a time honored technique among many master photographic portraitists. It terms for the days when most photographers used raw parabolic lights and Fresnel spotlights. The light beams from those kinds of lighting apparatus have two main components the hot spot in the center of the beam known as the umbra and the surrounding area and the edges of the beam, of softer light, knows as the Penumbra.
The basic idea of feathering is to use the edges of the beam rather that the center. It s done by placing and aiming the lights using the hot spot portion of the beam as to your desired lighting pattern or configuration you want and the rotating the light toward the camera position so that the edge of the beam takes over where the center of the beam was dominant. This will give you better and more even lighting across the mask of the face, render texture perfectly and create excellent specular highlights that just pop off the page. All exposure and ratio issues should be calculated or metered with the light in their aesthetic position, that is, after fathering is in place. In the attached (black and white) image all the lights; the main, fill, hair and accent lights were all rotated as described.
One can also feather the main light downward at the same time. This is great for executive portraiture where you want to avoid hot spots on the subjects forehead (a common problem) and at the same time the hot post lands on the dark clothing and maximized shadow detail in the clothing.
Technically speaking, when using white umbrellas, soft boxes, and beauty lights the effect of feathering is not all that pronounced in that most of those modifiers do not have very pronounced hot spots. Beauty lights have a baffle covering the photoflood lamp or flash tube so that negates the hot spot. Silver umbrellas may have a bit of a hot spot but white ones usually do not have a significant hot spot. Soft boxes usually produce very even light beams because we are dealing with internal bouncing of the light being further softened by scrims or at least the front panel. Feathering with theses modified lights do have some good effects as to rendition of texture and evenness of lighting.
There is, however, another feathering technique that works especially well with a single soft box. It is a one light system entailing 1 soft box equipped single light source and a simple silver type reflector. In the diagram below, you can see how feathering the soft box so that some of the light strikes the subject and some of the light strikes the reflector. This is a great system for working on location or shootin wedding formals portraits with a minimal of equipment and still coming up with studio quality lighting. Feathering the soft-box light slightly upward will cause a pleasant falloff of light thereby creating a soft vignette.
I hop this helps!
Ed
Nov 25, 2014 16:05:18 #
Bounce flash explained (to a fault):
Flash photography has been around for a long time. The technique started with flash powder (kinda like gun powder) in at troth-like T-Gun; a flint activated device that supplied an ample amount of flash fire to provide enough illumination to properly expose the sensitized plates of the day. Well, it worked but there was allot of airborne soot, a few self emolliated photographers and the occasional burned down building. Basically they were dealing with explosives and incendiaries- better used for excavating and warfare. Some folks still call their strobes and speedlights flash GUNS.
Then came the flashbulbs (one shot flash lamps)! The early ones looked like larger household light bulbs containing with metal foil, magnesium or zirconium mesh or wire that looked like steel wool- they also contained a gas- possibly argon. They were battery operated and some were designed for household current. In this concept the bulbs were inserted in a flash holder sometimes referred to as a gun, which was equipped with a reflector to thrust the light forward toward the subject. Eventually there were flashbulbs in every imaginable size, configuration, power, flash duration and color balance type. To accommodate theses lamps, there were every imaginable configuration of flash holder, reflector, size and style. The basic idea that upon synchronization with the cameras shutter, the power was sent to a filament which in turn would ignite the flammable material or gas inside the lamp which would produce the required flash of light. Theses lamps were relatively safe- the odd one would explode sending flying glass toward the subjects so plastic flash-guards were employed to prevent injuries. Remember, the lamps were one shots and had to be ejected and replaced for each shot and they were hot immediately after they were spent so there were some burned fingers. Exposure calculation was kinda difficult because there were different power outputs from different types of lamps and there were various effective light outputs depending on the design, surface finish and size of the reflector. Unlike strobes and speedlights, most flashbulbs had rather long flash durations whereby they would ignite, burn to a peak output and then decline, therefore shutter speeds had more influence over exposure than our modern electronic flash units. Of course there were no auto-flash goodies, TTL, dedicated exposure systems or flash meters to depend on so the photographer had to know his or her flashbulbs!
Although some more experienced and professional photographers used multiple flashbulb methods, off camera flash techniques in order to create more aesthetically pleasing results, for the most part, flash photography was considered strictly utilitarian- something you do when there is not enough existing light or was considered a method relegated to fill in light on sunny days- that was know as synchro-sunlight photography. During most of the 1950s and into the 60s, among portrait, art, and even news photographers; the concept of flash photograph held a stigma as being flat, having no dimensionality or mood and accompanied by ugly wall shadows, overexposed foregrounds and underexposed backgrounds and generally harsh and unrealistic. Available light was the in thing. Photographers put up with grainy films pushed to the hilt in dynamite developers rather than results with artificial looking flat light.
When the transition into electronic flash usage began to start, photographers had a much more convenient portable at-the-ready light source with many advantages over flashbulbs but the quality of the lighting in hand held/on the camera flash usage was still the same- flat, boring and without mood- the stigma among artistic photographers remained and in some circles still exists.
So why all the history? What does this have to do with bounce lighting? Lots! OK- Here goes. It seem that the doers and shakers in the archives of photography and the art-photography community noticed that those old photographs made with those nasty flash powder guns hand much better lighting- more natural than what modern shooters were achieving with single flash units mounted on the camera and aimed forward. Why? Those old T-Guns were shaped like a paint roller and the troth containing the flash powder were aimed upward toward the ceiling. The burst of flame also projected upward far enough that some of the light was projected forward toward the subjects. The result was what we now can achieve with a partial bounce technique where some of the light is reflected from the ceiling and some of it goes forward and strikes the subjects.
Also, even back in the day, there were photographers who were studying the dynamics, behaviors and physics of light- concepts such as reflectivity, angle of incidence and the inverse square law. There were many photographers with portrait and commercial backgrounds who wanted to apply their time honored continuous studio lighting techniques to their flash photography. All of this gave rise to many new flash techniques that involved taking the flash unit off the camera. Manufacturers caught on quickly and began to create quick release brackets and clamps, coiled flash cords and other accessories to enable the photographer to easily get the flash unit off the camera and take control of his flash lighting modes in a fast and convent manner. As I recall, the press photographer were one of the first groups to adopt bounce flash techniques.
Basically, in bounce lighting, you have to make simple choices for any given photographic situation- you can use your portable lighting tool in direct or indirect modes or a combination of the two. When you aim your relatively small and harsh flash unit at a large reflective surface such as a larger expanse of a white or light wall or ceiling you are, in effect, creating a much larger light source which looks more natural in the results, covers larger areas more evenly and allows the photographer to gun and run with a minimal amount of equipment especially when there is no time for more sophisticated multiple lighting setups.
The very basic bounce light method is to simply aim your primary, on camera, light source toward a white ceiling which will fill a vast area with light, thereby defeating the black hole affect of the inverse square law while providing a softer and more realistic lighting that is intrinsic in larger light sources- the ceiling is the secondary light source but is better than the primary light source in direct configuration because if its aesthetics and efficiency of coverage. Unless this basic theory is fully understood, visualized and appreciated it is easy for an uninitiated photographer to aim his or her flash unit arbitrarily upward (to obtain a better results as per incomplete information) without considering the prerequisite reflective ceiling and /or walls. Its not silliness or stupidity- its simply a misconception and people going out with an incomplete scenario like when you want a more natural picture- just aim the light upward or at 45º! Once the complete concept is grasped the photographer will thereafter come to know that a simple ceiling bounce method will not work in a room with vaulted ceilings, a large cathedral or hall, an arena, a room with a black or dark ceiling, a grand ballroom just as it wont really work in an out-of-doors setting. Light also is reflected from walls that are in close proximity to the subject.
Now that you understand the history and the basic concept you are ready for the infinite world of indirect lighting- its amazing! Its fun and it can be expensive or cheap depending on your resourcefulness and improvisational abilities. Even most photographic rookies will soon come to know all about the vast word of light modifiers; umbrellas, soft-boxes and all manner of contraptions, reflectors, diffusion panels, gadgets and doohickeys that are on the market. This modifier thing is an industry in itself, I would guess that there are more profits for dealers selling theses accessories than in selling cameras and upscale lighting gear. Dont be confused- just about all of them are various forms or attempts at BOUNCE LIGHTING. So if any location doesn't have good ceilings and walls (or none al taal) at your disposal you simply bring your reflective device along with you. You can aim you light at or into a larger flat reflector or various sizes and shapes of parabolic umbrellas. You can choose form a large selection of soft-boxes- a more sophisticated reflection system whereby the light is bounced off one or more reflective surfaces within the box and further diffused by scrims (translucent frosted plastic or cloth panels) to create any number of effects. Most of this is till various forms of bounce lighting. Theses devices are available in a vast scope of sizes ranging from some little guys at are compact enough to fit right on your camera mounted light to units the size of a Volkswagen (including their camper model). There are specialized studios where full sized cars can be photographed and are equipped with enormous bounce light sources which are filtered through yards of sailcloth and they are all basically bounce lighting methodologies- not any kind of rocket science but good lighting science boiled down to practical techniques.
Once yall get the feel for it, you can invest in some expensive gadgetry or get out the matte knife, buy some Cor-Plast or Foam-Cor boards, some white glue and gutter tape and make you own stuff. My favorite source of diffusion material is from my local dollar store- $3.00 white translucent shower curtains. Oh- dont forget the roll of wide aluminum foil from the supermarket! The dollar store white umbrellas aint half bad either- just snap of the handles or wait for a rainstorm and they fall off all by themselves. You can also line any old umbrella with aluminum foil- either the matte or glossy side- just crush it- re expand it and glue, tape or staple it in place. If you simply bounce you light off the ceiling, just tape a teaspoon to the unit so that it throws a wink of light into the eye sockets to create some catch-lights and more shadow detail in the subjects eyes and prevent dead eyes or raccoon eye sockets that sometimes accompany straight ceiling bounce. You can also make bounce cards and reflectors form cake boards that are available from baking supply stores and some supermarkets- cheap and dirty- well clean- the ARE made for food service and the are very efficient!
OK- so I do own some expensive stuff but still make things for one-off kinda jobs. When I opened my first commercial studio I was reluctant to allow any of the big-shot buyers and art directors into my studio- the place looked like a do-it-yourselfers nightmare; there were equipment hangin form old venetian blind pulleys, soft boxes made out old crates and wires and cables everywhere- visitors would fear electrocution. My biggest fear was that once they saw my joint they would refuse to pay my fees but my portfolio was in good shape!
So As you can see- I kinda like to write long articles and tutorials and I like to teach some professional stuff. I also realize there are some top pros and advanced workers here as well as a goodly population of new folks, that is, new to photography. Oftentimes too much techno-babble and advanced photo slang is scary to the new folks. Like I might use the term kicker which pertains to a specific lighting placement in a studio setup but some folks may think that means a guy on a football team- but thats OK- not to worry! So if you are an experienced pro- you can sometimes just ignore me, if your are an aspiring pro or a serious amateur- you can listen up if you wish and if you just wanna have fun with your photography you can just add some of my stuff to you bag of tricks and consider it fun!
If you think I am an idiot or a crazy person- just say so- tell me- I am used to it; I have my lovely wife of 45 years, two adult kids, 3 teenage grandkids and an 8 year old one, a whole bunch of in-laws, out-laws and X-laws, a staff at work and a raft of clients who would agree with you! I am a great trouble shooter and sometimes an inept troublemaker but I promise to behave myself here on the forum. Anyone can ask me any question about photography- I never talk down at anyone, every question deserves an answer and the only bad mistakes in photography are the ones that dont teach us lessons and make us strive for better results next time.
Ed
:thumbup: :thumbup:
Nov 25, 2014 00:12:17 #
Thanks all! For a very encouraging welcome. I shouldn't have posted that pizza shot- I am on a diet here and ended up with my nightly salad! Well the goal of food shooters it to make the customer's mouths water.
Thanks again Ed
Thanks again Ed

Nov 24, 2014 23:54:35 #
Hi Jim! Thanks for the come back.
My experience goes back to the Viet Nam era- a long time ago. We used K- series cameras hanging out of gun ships and specialized under the wing cameras on more sophisticated aircraft. Nowadays all of that stuff is museum pieces- antiques. So am I! Some years back I went down to a reunion of my old unit. My goodness- my specialist (5th) class ranks no longer exists and I found out that my old job (MOS) is extinct! I mean allot of this stuff is classified but I got the scuttlebutt that me and my group have been replaced by satellite technology a long time ago. God forbid the next world war can be fought from computer driven control centers.
Back in the day, our shots were sent to interpretation centers where they were analyzed, sent to cartographic centers and converted into logistics maps. With the color IR film we could immediately see different coloration where tunnels were located in that where the ground has been undermined it emits a different temperature or level of heat in contrast to completely solid ground, therefore, where the tunnels existed the ground was a different color.
Its the same technology that is used to detect insulation breakdowns and heat leaks in houses.
I think you are right about the military, nowadays, having some pretty crazy stuff- things out of a science fiction flick but really exist. They also know how to spend the big bucks. I hope they use all that gear to put an end to the current wave of terrorism. Peace!
Ed
Nov 24, 2014 23:14:27 #
As other have pointed out, you probably observed a photographer using one of many types of flash modifiers which would entail having the flash unit in a seemingly upward vertical position but in actuality, the light is bouncing off the interior of the modifier and going back at the subject. A similar system could be a bounce card or a small spoon taped to the flash unit which would project a small amount of wink of light forward- enough to fill some of the shadows and create more illumination in the eyes along with catch-lights.
Another technique that can be used indoors and out-of-doors is partial bounce or upward feathering; this also solves the problem of raccoon eyes with indoor ceiling bounce or overhead lighting from overcast or hazy skies.
Yet a third possibility is using bare bulb for outdoor fill or off-camera lighting: If the flash unit has removable or interchangeable reflectors; the bare bulb should be oriented vertically because most of the light is emitted from the sides of the flash tube, not the front. Theses techniques give the photographer more control over their lighting ratio when working out-of-doors.
I hope this helps! Ed
Nov 24, 2014 22:42:34 #
I became very familiar with IR film and haze cutting issues when I was in the army doing aerial reconnaissance work. A red filter such as #24A will darken skies dramatically but has nothing near the haze cutting ability of IR film, IR Ektachrome Aeriographic Material (a special film) or a digital camera especially converted for IR work.
Aesthetically speaking, a red filter will not render foliage as white in black and white or other interesting colors when the camera is in the IR color mode.
With Kodak gone, I don't know if any other manufacturer is making an E-6 aeriographic film- it was great stuff for detecting bunkers and doing some crazy abstract work.
Ed
Nov 24, 2014 22:22:32 #
:thumbup: Hi Gang- My name is Ed.
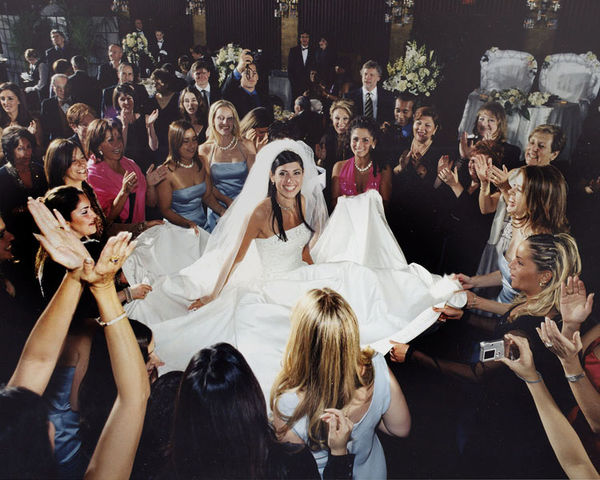
I have been a professional photographer for over 50 years. I started of in the wedding/portrait sector of the industry and still shoot about 12 big wedding each year. Nowadays, the bulk of my work is in commercial and industrial photography, corporate portraiture and allot of work for the food-service industry. I live and work in Ottawa, Canada. I do some teaching and private seminars as well.
I would love to contribute to this forum.
