Posts for: larryjphoto
Aug 2, 2015 09:34:20 #
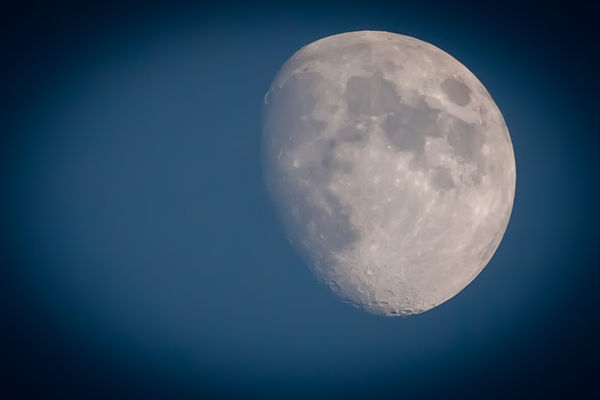
If you are going to shoot the moon in any of the "auto" settings... be sure to set your metering to the "spot" metering mode. Anything else will take the "average" of the sky and try to compensate for all the darkness. I would use manual mode. You will need a very high -stop and the longest shutter speed you can use without getting motion blur. I've used your same lens and here is one of my shots.
Mar 16, 2015 10:41:35 #
I stand corrected. Although I believe my Canon has the option for both.
Dngallagher wrote:
I would go with ALL FOCUS, not initial focus...Once BBF is used, any auto focusing is done by the BBF button, not with the shutter button.
Mar 16, 2015 10:39:05 #
Full blown Photoshop has the ability to increase the size (i.e. expand out the edges) of your photo thus allowing you to fill in the background areas, however even with the simplest backgrounds, it can be tedious and time consuming. Jeep Daddy has the best answer... don't crop so tight in the future, leaving you more room for cropping. Some cameras have the ability to set the crop area right on the camera... but you have to know what ratio you want up front.
Mar 16, 2015 10:27:25 #
Canon guy here too, but I'm pretty sure they are two different functions on Nikon's as well. You need to enable continuous shooting. This is the function where the camera continues to fire when you hold the shutter button all the way down.
Back button focus is the setting where initial auto focus is "removed" the the shutter button (the half press), and resigned to a different button on the back of the camera.
Back button focus is the setting where initial auto focus is "removed" the the shutter button (the half press), and resigned to a different button on the back of the camera.
Mar 16, 2015 10:14:45 #
These are awesome cars! I'd love to have one... but I'm not sure how they would function in Chicagoland winter weather (assuming I would be brave enough to drive it in that kind of weather! I'm also not sure the charging infrastructure is in place yet to facilitate "road trips". It is certainly a look at what the automotive future has in store. One interesting note: the Tesla was conspicuously absent from the Chicago Auto Show.
Mar 16, 2015 10:06:42 #
Thank you all for the kind words... unfortunately finding eagles in the Chicago area is very difficult although they are making a strong comeback. In the winter they migrate down from the north when the lakes and rivers they fish become frozen. They seem to like the lock and dam areas along the Mississippi river along the Illinois/Iowa border. December through February seems to be the most active. Lock and Dam #14 is about a 2.5 hour drive from the Chicago area.
Feb 15, 2015 13:15:09 #
I suggest NOT using Auto ISO when shooting flash. Many camera autoexposure algorithms get really confused when auto ISO and flash are used.
Use Aperture Priority if your main concern is light, and adjust your speed and ISO to give you proper exposure. Use Shutter Priority if your main concern is stopping motion, and adjust your aperture and ISO to give you proper exposure. In either mode, keep ISO as low as possible to reduce noise.
Use Aperture Priority if your main concern is light, and adjust your speed and ISO to give you proper exposure. Use Shutter Priority if your main concern is stopping motion, and adjust your aperture and ISO to give you proper exposure. In either mode, keep ISO as low as possible to reduce noise.
Feb 15, 2015 13:05:00 #
I've been using OnOne since version 6. I do use it on a Mac, but to date have had no crash issues, even after upgrading to version 9. I will tell you that I use the software only occasionally when I want to do those "special" edits. Most of my basic editing is done in LightRoom.
Adicus wrote:
I had a lot of problems with it and almost got a refund too . There is a big thread on here under my name with the various answers from fellow hoggers. I actually found the problem for me and it is because I had so many photos on my pc that Onone was loading up into the "browse" section that it was overloaded and would crash all the time. I cleaned up my pc ,{and that took a long time} and put a lot of photo's on ext hard drives and it works fine now
Feb 15, 2015 12:49:00 #
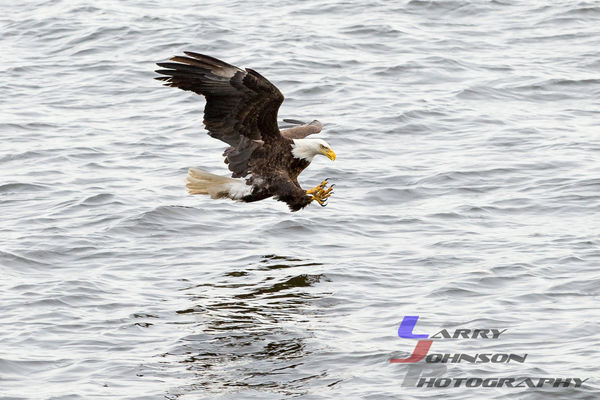
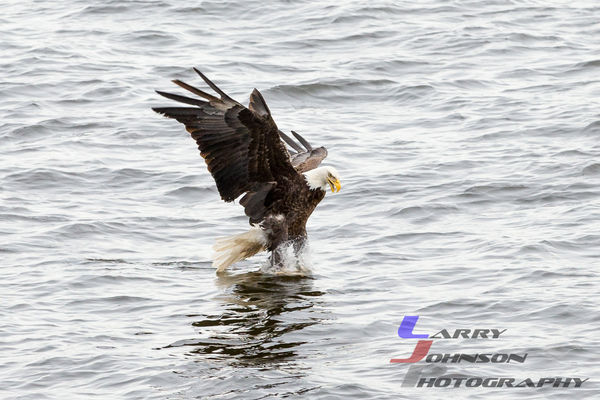
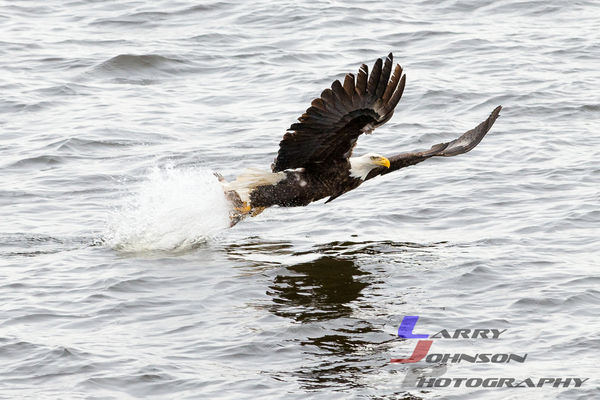
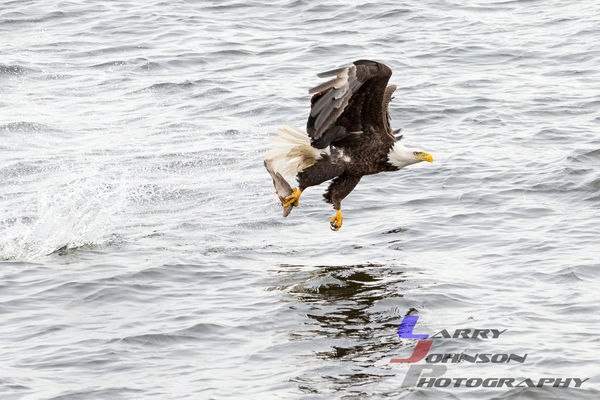
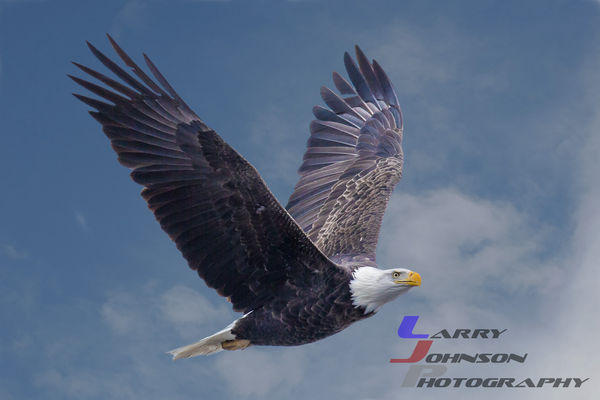
Some eagle shots along the Mississippi River at Lock and Dam #14 near Davenport. The first five shots are of a eagle fetching lunch. Shot with a Canon 1DX and EF 70-200mm f/2.8 L IS II, 1/2000, f/5.6,ISO 1250, 165mm.
On the last shot I had the awesome opportunity to use a friends EF 600mm f/4. What a sweet lens! 1/2000, f/5, ISO 320.
On the last shot I had the awesome opportunity to use a friends EF 600mm f/4. What a sweet lens! 1/2000, f/5, ISO 320.

Feb 15, 2015 11:57:13 #
First of all as a novice wood worker (some of it wood lathe experience) let me say your work is awesome. I can't begin to imagine the time and patience involved with such a project! Kudos!
As others have stated to get a blurred background, you need to shoot at as wide an aperture as your lens allows. You also need separation of the hat from the background. Make sure your depth of field doesn't become so narrow that you can't get the whole hat in sharp focus. You might also want to consider a darker background to give you a bit more contrast to the hat. You could do this with proper studio lighting.
Lastly, try using a softer light source. Large soft boxes work really well with this type of photography. I would light this with three light sources. 1. A large soft box directly overhead and a bit forward of the object. 2. A small soft box at the same level coming in 45 degrees off camera as fill. 3. (Optional) a snoot coming in 45 degrees off camera in the opposite direction of the fill light, and 15 to 45 degrees above the hat to give some highlights.
It's a lot of lighting hassle, but your work deserves great lighting. Good luck. I hope to see the results!
Jan 6, 2015 12:48:14 #
skipick wrote:
Yeah, so I would have to switch from Auto to P/Tv/... (show quote)
You should be able to turn off Auto ISO in all modes, even "A" (Auto Exposure mode). It will take some practice, but you will soon learn the light situations that require you to push the ISO up. As far as your tilting your Speedlite up at an angle.. (Bounce flash), the flash sends data to the camera that it is tilted up, and the ETTF system tries to compensate for the lack of light due to bounce flashing. When Auto ISO is enabled... the system tries to balance all three components (ISO, aperture and shutter speed) to give you a correct exposure. Generally, the last setting you want to change is ISO, only when you can't get the proper exposure using aperture and shutter speed.
Here is a nice video explaining the relationship of ISO/aperture and shutter speed. https://www.youtube.com/watch?v=fnVzXVsKdXU
Here is another that illustrates ISO specifically. https://www.youtube.com/watch?v=gIQpk8xHwjI
These apply to flash and non flash photography.
Best thing is to get to know your camera. Nothing can replace experience! Happy shooting!
Jan 6, 2015 11:40:19 #
Generally, I agree with JohnM, I never use auto ISO when I use any kind of flash system. I start at ISO 100, and work up from there as needed.
Dec 27, 2014 13:33:09 #
Just remember Paul, there is no right or wrong... You are the artist and your photos should reflect your vision.
All the "rules" are made to be broken! :)
All the "rules" are made to be broken! :)
Paul3156 wrote:
Hi Larry thank you for looking and your comments on my shots. Comment like yours will help me improve with my studio photography. It does not matter how much i improve, positive comments are always welcome. Thank you again for your comments and taking the time to look at my photos.
Dec 27, 2014 13:16:42 #
A couple different ways to go.
1. Shoot in Aperture Priority at as low an aperture as your lens will allow. This will give you a narrow DOF and separate your subject from the background. You will need to shoot at at least 1/800th/sec, but faster would be better. To do this you need to raise your ISO. Raise it just high enough to allow the camera to achieve the higher shutter speed.
2. Shoot manual at your lowest aperture, shutter speed at 1/800th, and ISO high enough to get you a decent exposure.
In both cases use auto focus in constant focus mode (AI Servo on Canon cameras).
You will be likely pushing your camera to the edge of it's envelope (or beyond). Good luck!
Dec 27, 2014 12:58:43 #
Photo #1: Agree with above... the tucked under right leg with the high boot makes her leg look strange do to the calf muscle bulge. That leg straight out, or at a slight bend would work better.
Photo #2: My favorite. Maybe just a bit less light to her right side, and maybe a kicker from the right rear, or a backdrop light.
Photo #3: Not a fan of the blurred edges. Would rather see you seperate her from the backdrop with a kicker or backdrop light.
Photo #4: Try to avoid shots of females where their body is straight on toward the camera. Women almost always photograph better turned more away from the camera as it provides a slimming look to their bodies. Especially if you are showing their hips.
Photo #5: Nice Rembrandt lighting here. Again need a hairlight/kicker.
All in all a very good start for your first studio shots. Keep shooting!