Posts for: CaptainC
Oct 13, 2018 23:05:03 #
Yo0u do NOT need a release since the images are for the parents. If you were to take that image and use it to advertise a product, then yes.
Oct 11, 2018 18:58:29 #
There are not that many options. Set the ISO to the lowest. I think that is 100. Maybe 64. You can be in Aperture Priority and adjust the aperture to the smallest opening and that will automatically give you the longest shutter duration for that ISO. Or be in Shutter priority and set the shutter to the longest duration you can until the lens will no longe go to a smaller aperture. A Neutral Density filter will help a LOT. AT least a 3-stop and denser is better.
That tripod is a required piece of gear.
That tripod is a required piece of gear.
Oct 7, 2018 13:24:25 #
I have been shooting the State Marching Band Championships for at least 12 years. THE lens is a 70-200. I shoot for an organization that wants waist-up images of the kids, so wider than 70 is not much use and 200 at the long end seems good MOST of the time. There are times when longer would be useful, of course. But since we shoot in bright sun AND stadium lights, that f/2.8 aperture is sure handy at night. Not to mention day or night the ability to take advantage of a narrow DOF to isolate the musician.
I do get to shoot from the sidelines, so your shooting location will determine your requirements. If you are in the stands, that 300 may be a better bet.
Use a monopod.
I do get to shoot from the sidelines, so your shooting location will determine your requirements. If you are in the stands, that 300 may be a better bet.
Use a monopod.
Sep 27, 2018 22:00:23 #
Depends on what one does. I am a portrait photographer and LR just does not have the tools for highly detailed work. Great for more global stuff, but without layers and the ability to on small areas it just does not fit what I do. For some....maybe many...LR might well be all that is needed. So for me, no it is not a high-end application. For a landscape person, maybe it is.
Sep 24, 2018 17:17:50 #
Sep 24, 2018 17:15:40 #
Extremely well done. While I generally would prefer B&W in images of this type. I do like the color version a bit better.
Sep 18, 2018 22:10:05 #
Karrie wrote:
These are my first attempts at portraits. I'd appreciate any feedback. I'm using a Nikon D3200, Lens was a 55-200mm. I have photoshop elements 11. We went early in the morning and many of my pictures have a green hue. It was in a botanical garden. I'm thinking I should have bought a reflector.
I hope this image helps. It was one I could find without much looking. It does break the "angle" guideline, but with folks this thin we can get away with it a bit. This is an unusual image for me as it is 100% natural light - I shoot with off-camera flash 99.987497% of the time. The light has direction since it is blocked from the top by the ceiling. Blocked from the left by the wall. Blocked from the bottom by gray concrete with no light on it. So she is lit from our right by the outside light. Note the definite shadow from her nose--one side darker. Her face has one side darker, There is "almost" a Rembrandt light triangle under her camera-left eye. There is a small, but definite space between her arms and waist. The diffuse light from a LARGE area is soft (a wide highlight-to-shadow transition). The eyes have a catchlight.
So the lesson is that we have to USE natural light, not just be IN natural light.

Sep 18, 2018 19:54:08 #
While I know there are a few specific reasons for shooting both. Personally, I have never seen a good reason. There are times I shoot JPG and most of the time I shoot Raw. To do both as a standard practice seems awfully redundant .
One good reason is if one is using a Camranger. It can take forever to transfer raw files while a JPG transfers pretty fast. So the raw is on the card, but the JPG shows up on the iPad or whatever.
One good reason is if one is using a Camranger. It can take forever to transfer raw files while a JPG transfers pretty fast. So the raw is on the card, but the JPG shows up on the iPad or whatever.
Sep 17, 2018 15:09:17 #
bkyser wrote:
I'm telling you, your processing is second to none. I'd love to see your workflow some time.
I know you start with perfect light placement, but the tones are just awesome.
I know you start with perfect light placement, but the tones are just awesome.
I am asked a lot how I get that look and it is very difficult to describe. There is no "formula" for it and even if I told you step-by-step for one image, it would be a little different for the next image.
As you mentioned, the light is the base and nothing is going to save lousy light!
The tools are (in no particular order) Topaz Clarity, Topaz Remask (to extract from the background so I can use my custom digital backgrounds and floors) Topaz Adjust, standard skin cleanup, Dodging and Burning the face, eye enhancement, localized sharpening ( I use Photokit Creative Sharpener by Pixel Genius), Denoise in PS to soften skin a bit, A High Pass sharpening layer, several NIK filters MIGHT be Used ( Low Key, Darken/Lighten Center, Detail Extractor, Bleach Bypass, Silver Efex), color grading is done with multiple layers from the Photoshop Color Lookup Adjustment Layers (those require lots of playing with which colors you want to use an then manipulating the blend modes and opacity to get the "look"). Essentially, every image is a "one off."
Even though I have done this many times, I would say each image takes about 30-40 minutes.
Sep 17, 2018 12:56:36 #
julian.gang wrote:
I know this has been said before, but isn't any post-processing, processing a lie?...Julian
No.
Sep 16, 2018 23:59:23 #
Karrie wrote:
Great insights. The top 2 were taken very early before the sun had gotten into the walled garden. There is about 1.5 hour difference. Would you recommend a specific reflector i.e..gold, silver or white? She is naturally a pale red head.
Well yeah...when planning outdoor portraits we need to plan for and pick the right time of day for the location. The gold reflector, IMO, is awful if directed at the skin. It can be great giving us a rim or backlight, but it kills the skin tones. So silver or white. White is a bit more forgiving, but sliver is more efficient. Get the 5-in-1 that has a silver, white, gold, and black cover and then the frame is a translucent fabric that can be used between the subject and the sun. Then play.
With skin that pale, the color balance technique of applying a bit of magenta and yellow can make her much healthier! How much? gotta eyeball it.
Sep 16, 2018 23:35:25 #
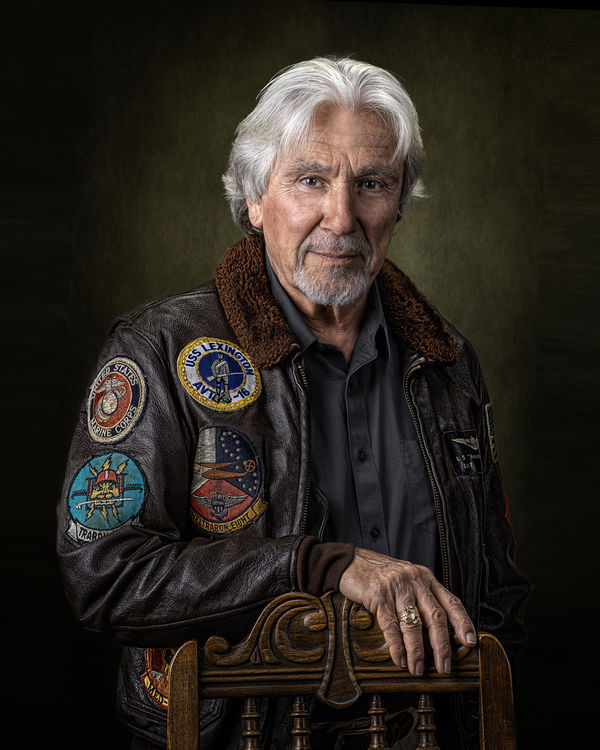
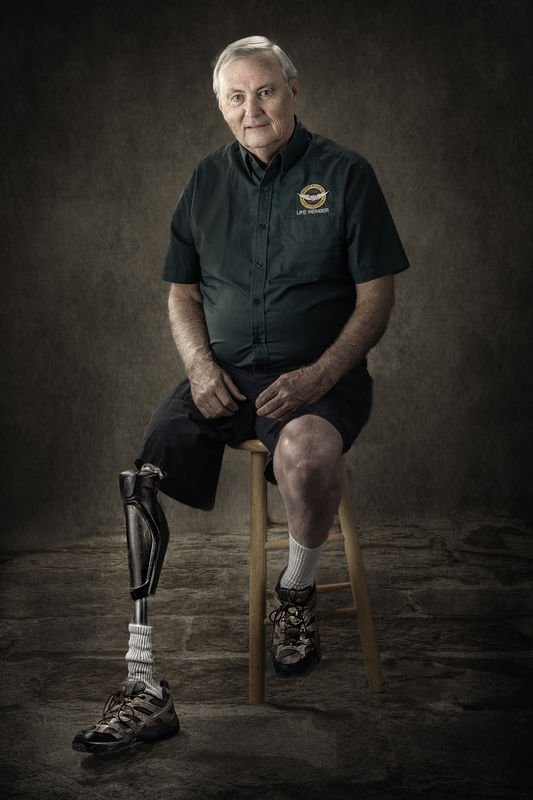
Here are two guys from a recent session.
Top image is a Marine helicopter pilot - flew the CH-46 and bottom image is an Air Cavalry Scout Pilot. The story of him losing his leg is a thriller! He is the only individual to be licensed to fly helicopters with an above-the-knee amputation.
Top image is a Marine helicopter pilot - flew the CH-46 and bottom image is an Air Cavalry Scout Pilot. The story of him losing his leg is a thriller! He is the only individual to be licensed to fly helicopters with an above-the-knee amputation.
Sep 16, 2018 18:38:51 #
Sep 16, 2018 17:41:25 #
The top two need better light (that reflector), and to get rid of the green. To do that, in Photoshop, go to Image>Adjustment>Color Balance and add some Magenta and Yellow. That adds a much healthier look to the skin.
The light in the top two has no direction. It is dull and flat and gives the face no shadows and shadows in portraits are what gives the face/body dimension. A reflector held HIGH could direct some sunlight from off to the side to give you that shadow.
The lower image has several issues. One is she is facing square to the camera making her look as broad as possible--made even worse by having her arms merge with her waist. For most people and certainly with most females we want some angle to the shoulders/body. It makes them appear thinner. We also want some space between the waist and arms.
The light in that lower one DOES have direction since she is shielded by a roof and the building off to camera left. But the light appears to be bounce off the ground, so is too low. A reflector held by someone out in the sun might have been the solution. Her face is also the darkest part of the image and it should be much brighter. That light setup also robs her of any catchlight in her eyes and that gives the eyes a lifeless look.
Natural light portraiture is ALL about finding and using the light. Just being outside is not enough.
Sep 9, 2018 13:58:26 #
fourg1b2006 wrote:
Anything to make it harder for the consumer.
Right. They should never improve anything. Keep the dynamic range where it was in 2003, color where is was in 2005, etc., etc. Sure wish music was still released on 8-track tape.
I am sure the industry is improving things just to irritate consumers.