Posts for: Linary
Aug 16, 2019 12:32:27 #
Cwilson341 wrote:
I am an Affinity user from raw to finished product... (show quote)
As far as I could, I turned everything off. I read somewhere that a profile must be added into the conversion mix. In Lightroom these profiles can be changed at will but it does not seem to be so easy in Affinity.
Just because an immediate conversion in one programme looks better, does not mean that programme is better. It depends on where the application allows you to take it.
I am experimenting in baby steps in comparing the two, if Affinity added a DAM as they promised I probably would not hesitate to change.
Aug 16, 2019 10:36:07 #
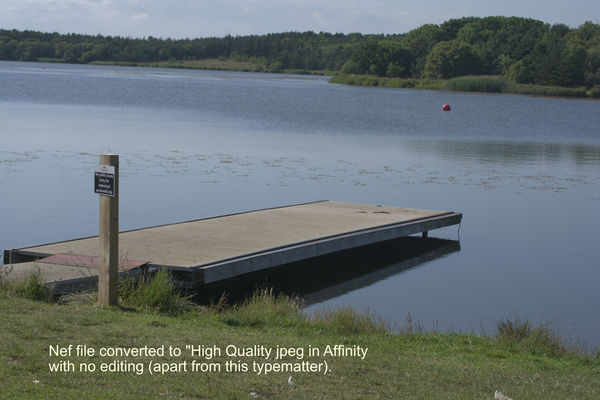
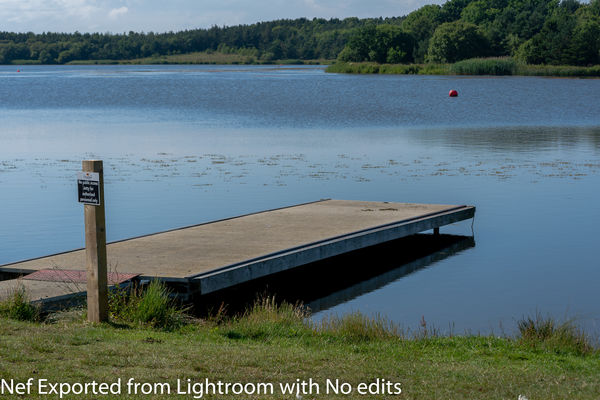
I am one of those thinking about using Affinity instead of Lightroom for Processing raw files. An exercise I tried out this morning was to open a raw file into Affinity and immediately convert it to a jpeg image with no editing or presets applied. I did the same thing in Lightroom with the same image.
Both images I have watermarked so they can be identified. The result is shown below.
The is not a test of the programmes capabilities, that will have to be by processing in each of the two programmes to get the best out of the photos but I think it is an interesting first step. First the Affinity followed by the Lightroom version.
Aug 14, 2019 15:40:24 #
desperante wrote:
I hope everyone is having a great day! I just wan... (show quote)
Loads of tips and free advice on the Post Processing section, just click on the link, subscribe and create a topic - you could even start by reposting this post.
https://www.uglyhedgehog.com/s-116-1.html
Aug 13, 2019 17:56:40 #
This is a really good idea, especially applying the concept to emailing images. I often send a layered image to a friend who refuses to use Dropbox so I resort to posting a thumbdrive (snailmail). I will try this out and see what happens.
Aug 13, 2019 17:45:06 #
kitrn wrote:
I have 59 missing photos in my LR library. I went... (show quote)
Do this to just one of the "missing" photos -
In the Library click on the exclamation mark
On the dialogue that appears click on "Locate"
A navigation window will appear, navigate to where you know the image is located
Select the photo (so it's title appears in the navigation window)
Click on "Select"
You will be returned to LR and the exclamation mark will have disappeared. Bearing in mind you only clicked on one image, don't be surprised if all 59 images also lose their exclamation marks. If they don't you may have to repeat the above process.
If the found images are in the correct location on the disc drive, then the job is finished.
If you need to locate the images to move them to a different location, right click and choose "Goto Folder in Library", select the images then drag them to the correct folder.
All moving should be done from within Lightroom.
Aug 13, 2019 17:06:51 #
artBob wrote:
While some of the scaling is believable, it is, unfortunately not correct. To make scaling correct you have to
1. establish vanishing points (one in this case, as your perspective is "one point," the view parallel to the camera)
2. Find a base figure or shape that you can compare to other shapes (the head-to-hips in this case) and draw perspective lines to the vanishing point
3. Use that size to scale a similar shape.
I hope this diagram helps.
This is a concept I have never understood so I have a couple of questions -
Assuming the horizontal line lies midway between the main figure's hips and top of head
How is the vanishing point established along that line? (the red lines are at a converging angle - how do you decide on the angle?)
One white line from the second figure is from her hips to the vanishing point but the uppermost white line is not from the top of her head. I assume that because the white line is differently placed is why you say the scale is incorrect, but my question again is how is the angle (of the two white lines) established.
To get the scale correct, should the angle of the white lines be equal to the angle of the red lines?
Probably basic stuff to you but a complete mystery to me.
Aug 9, 2019 15:12:15 #
D-5008 wrote:
How about a compromise; Have a section where you post the SOOC and the edited/processed picture and let the viewer decide which they prefer for themselves.
Personally, I don't particularly like adding things that were not there in the first place, but that's my hangup
and I understand others may differ, (and yes I do edit.)
Personally, I don't particularly like adding things that were not there in the first place, but that's my hangup
and I understand others may differ, (and yes I do edit.)
Once again I suggest the Post Processing section where you can do exactly as you describe. Several members always post that way in the PP section.
Click on this link and don't forget to subscribe. You will be made very welcome.
https://www.uglyhedgehog.com/s-116-1.html
Aug 9, 2019 15:08:22 #
D-5008 wrote:
How about a compromise; Have a section where you post the SOOC and the edited/processed picture and let the viewer decide which they prefer for themselves.
Personally, I don't particularly like adding things that were not there in the first place, but that's my hangup
and I understand others may differ, (and yes I do edit.)
Personally, I don't particularly like adding things that were not there in the first place, but that's my hangup
and I understand others may differ, (and yes I do edit.)
Once again I suggest the Post Processing section where you can do exactly as you describe. Several members always post that way in the PP section.
Click on this link and don't forget to subscribe. You will be made very welcome.
https://www.uglyhedgehog.com/s-116-1.html
Aug 9, 2019 04:29:32 #
Drbobcameraguy wrote:
Good evening fellow Hoggers. I am having trouble w... (show quote)
We do have a Post Processing Section on the Forum which may well fit your needs and also you may teach us a thing or two about improving photos.
The section can be found at https://www.uglyhedgehog.com/s-116-1.html
Don't forget to subscribe

Aug 9, 2019 04:20:36 #
In Affinity, open Preferences > User interface, move the first slider all the way to the left (Background Grey Level)
Open in Affinity Photo, press the Tab key to remove menus etc.
Open in Affinity Photo, press the Tab key to remove menus etc.
Aug 8, 2019 15:17:55 #
Thank you all for applying your skills. I am puzzled as to how I got into this in the first place. Living in a harbour village, I have taken hundreds of photos of the water and most actually look like water. I can only conclude that a combination of mid-day sun, high shutterspeed and shallow water have caused this effect. I have about fifty of these photos, of which I might try and salvage five or six using the methods you have kindly demonstrated.
Aug 7, 2019 19:39:01 #
Franku wrote:
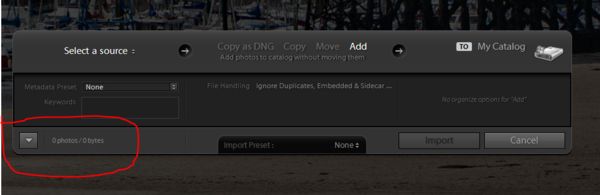
Until this week I followed the procedure listed be... (show quote)
Click on the button at bottom left of the panel (see photo attached)
Aug 7, 2019 15:53:19 #
R.G. wrote:
The jpg and the DNG are both very small. Is there anything bigger to work on?
Try this one (DNG) it is about 7.7Mb
My original is 25 Mb
Aug 7, 2019 14:14:15 #
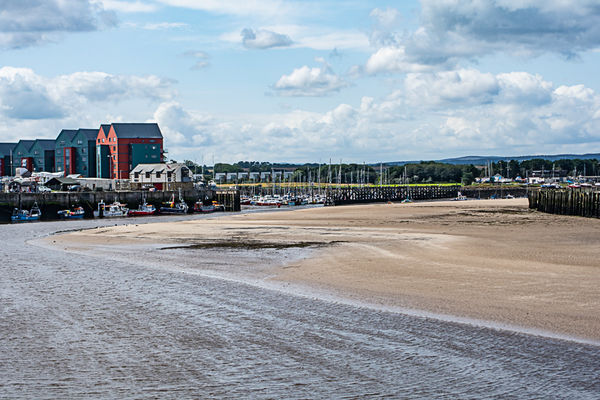
I snapped this river scene recently and the result is far from ideal. My main problem with it is the water looks more like a gravel roadway that the wet stuff.
Can anyone turn gravel into water please?
Can anyone turn gravel into water please?
Aug 6, 2019 19:32:41 #
senior techie wrote:
I always shoot in raw and upload them to Lightroom. I am new to Affinity Photo and each time I try they are uploaded to Affinity in jpeg. What are the steps I am missing.
If you are going to use LR as your catalogue and to do the initial conversion from raw, you might want to try the following as a workflow. I use both Photoshop and Affinity as my pixel editors after using LR to work on the raw file.
I assume you have imported the raw files into LR and edited them as you want them and also you have set Affinity Photo as an external editor.
Now right click on the image and choose "Edit in"
The dialogue that opens will show Affinity Photo (or whatever you named the preset as), click on that and a second dialogue will open, in this you can choose the format of the image you are sending to Affinity and the format you will receive back (both formats will be the same). You can choose Tiff, PSD or jpeg. You can also choose the colour space, bit depth and resolution (ppi). When you have finished edits in Affinity, choose "Save" and the edited image will return to Lightroom.
Back in LR you will find the original raw file and a new file (the format you chose earlier) usually stacked together.
I would recommend you choose PSD files 16 bits Prophoto colour space. (if you have created layers in Affinity, using PSD files will preserve the layers in LR even though they cannot be seen in LR.
Lightroom's raw editor is in my opinion better than the Develop Persona in Affinity, but if you really want to use Affinity Develop Persona then it would be best to open and process entirely in Affinity. You cannot use the LR "round robin" system with raw files because neither LR nor Affinity can actually change the data files - only copies thereof. Then the original raw file and also the created file (but not Affinity's own file - afphoto) can be exported to a holding folder and then imported into LR.
The latter is a cumbersome untidy process and should be avoided.
To sum up
Import into LR
Edit in LR
If pixel editing is required "Edit in" Affinity Photo
Edit in Affinity Photo
Save
find both images in LR