Check out Film Photography section of our forum.
Posts for: RFranko
Sep 25, 2011 03:47:33 #
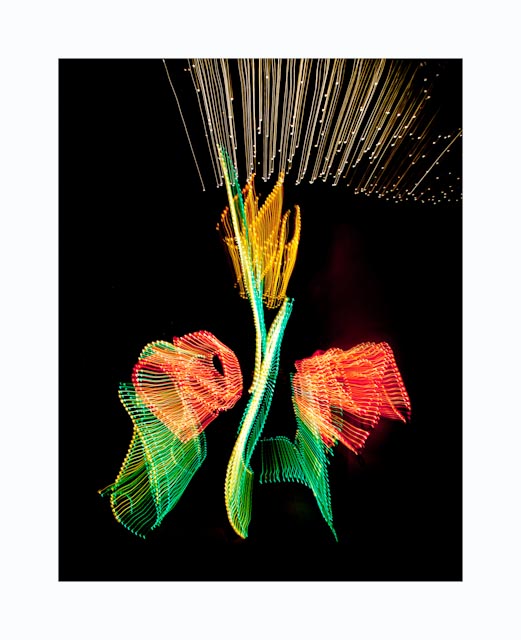
One last one. An example of working a scene. The first shot of what was there. The second 10 frames later and a little work in lightroom.
A straight snapshot
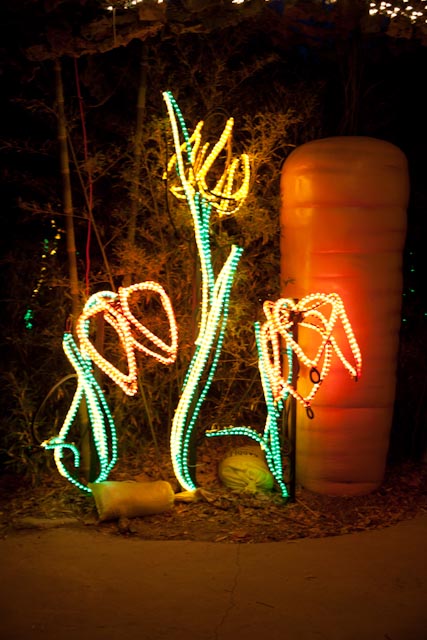
Playing with zoom and slow exposure - same scene.
Sep 25, 2011 03:33:36 #
While having dinner a Golden Corral - just another shot that I played with in Lightroom. Surely won't win any rewards but was fun to see what I could make of it.
What I photographed

How I changed it. eeh...
Sep 25, 2011 03:20:15 #
Here is a simple example of what was there and what I previsualized. Nothing great but I think it gets the point across.
What the camera saw.
What I previsualized
Check out Photo Critique Section section of our forum.
Sep 25, 2011 02:43:55 #
Like I said in some post or other, take critiques with a grain of salt. Keep shooting, I would like to see more. Here is a word. "Previsualize" See in your mind's eye what you would like the image to be before you take it. I'm sure you have seen painters hold up their two hands forming a square or rectangular window. They were previsualizing. Here is what I use to do to help me compose images, and it may be worth a try. Take an 8x10 piece of black cardboard, or art board and using an exacto knife cut a rectangular hole in the center, in the porportions of and image from your camera. The longest side should not exceed 1-1/2" or 2". It's called a viewing frame, or a previsualization frame. Now, you just hold it up and look through it while holding it at different distances from your face. Moving it farther and closer to your face is like zooming. Go out and pick a scene. Hold up your viewing frame, move it about until you get an image you think you would like. Now, take you camera and duplicate the image, and take the picture.
Well, you may say you can do the same thing using your camera and the zoom. No, It's just not the same. The viewing frame more closely represents a photo that you would put in a frame. For variety, also use a white frame. Once you have taken one exposure work the image. Move around look at it from different angles...high, low, tilted, close and far. Make 10 different images of the same subject. Try some in black and white. Continue shooting different scenes in the same way. When you get home, preview the images and pick the one you like best. If you like more than one, great! If you don't like any, set them aside and let them age. After a week or so, look at them again, and you may find one you like. Play with them in your editing software, croping and doing different things to see if you can create something you like from one of them. It's all in the fun of Photography...Enjoy!
P.S. I now use a 4x5 index card with a 35mm slide frame taped over a hole. After using the viewing frame for some time (a long time in most cases) your mind's eye will be trained to view images as if you were holding up the frame.
Sep 25, 2011 01:49:18 #
Now for the real story.
Although being a photographer since 1961,
It was in the mid 70's after a divorce that I dove into photography as a diversion from bars and the bottle. I had for years processed and printed my own images and read some about Ansel Adams' zone system. I purchased his two books, "The Negative" and "The Print". I spent days, and weeks calibrating and processing film. I bought 120 B&W film by the case to be sure to have all the same lot number. I then went out and practiced spot metering every subject wheather it was a 3 zone scene or the brightness went from zone 1 thru Zone 10. I even used multiple Mamiya RZ system backs and labeled them N thru N+ or - 3 so I would have the proper development for each roll. Actually, I think I got to be very good and a lot of my prints really showed the tonal range from pure blacks to those high minimum textured whites.
Then, one day when I felt accomplished I packed my gear, his two books, plus a couple on Yosemity valley, a case of 120 film and headed to Yosemity for the ultimate challenge.
I was going to duplicate his images and see if I could out do him. Finally after several days drive I entered Yosemity from the west entrance. The first drive through the valley and viewing some of the sites I must have eaten a dozen bugs. I would stand there with my mouth wide open and speechless in AWWW of the granduer of the place. After the first couple of days of just being a tourist and learning what roads went where it was time to get to work. With books, maps and notes in hand I set out and went from site to site making careful calculations and exposures of roll after roll of film. I even went so far in almost an act of blasphemy to create my own unique composition I felt would be better. Finally having what I came for I became a tourist and visited a few other sites like King's canyon and Sequoia National Park . After that it was off to meet the God of B&W photography himself. I was on the road to Carmel and Ansel Adams home for him to autograph his books. I arrived in Carmel and located his home. Unfortunately, I was unable to get an answer at the door so with a slight sigh of relief I turned and left. As it turns out my images of Yosemity valley where nothing to write home about when compared to his images. Of course he was using an 8x10 view camera hand developed each negative individually then bleached or intensified them as needed. Many of his prints were 1:1 of the negative. My camera was an RZ67 and I was shooting 120 roll film developed by time and temperature, with my prints no less than a 4X enlargement. In retrospect the images I have of the time I find I'm proud to have taken and with a little work now with digital photography and a good scanner, I could probably come up with some excellent prints.
Sep 24, 2011 23:27:36 #
something I would like to know. You responded to sinatraman's comment. Hum look at Sinatraman's thumbnail avatar..male or female? :?: Not that it matters.
Sep 24, 2011 23:21:33 #
for some realson i can't ype anny moore. change the "Hate" to HAT
Check out The Dynamics of Photographic Lighting section of our forum.
Sep 24, 2011 22:28:35 #
You are right on with Portrait professional. Its good and fast but photoshop is better is you know what you are doing. There may be tutorials available on line from www.Lynda.com if anyone is interested.
Sep 24, 2011 22:23:21 #
You are right on with Portrait professional. Its good and fast but photoshop is better is you know what you are doing. There may be tutorials available on line from www.Lynda.com if anyone is interested.
Sep 24, 2011 21:56:30 #
Go to a Bob Mielke post and click on his name and then from his profile click on the link for his web site. You are in for a treat!
Great Photographs Bob!
You have a great selection of images. Obviously an experienced photographer of years. My hate goes off to you and your excellent shots. A day at the zoo is great fun even for us oldies. Arrive early shoot, sit and watch people and animals, shoot more, snack, shoot, lunch, shoot, snack and be almost the last out the gate at closing. :thumbup:
Sep 24, 2011 21:35:37 #
Yep, you got it. Bob M is right on with the best answer.
Sep 24, 2011 21:06:36 #
If you are discouraged with your photography take heart.
Let me tell you a little story that may be half truths, but the point is the same.
Ansel Adams is acclaimed as a great photographer and its likely that he was. But it wasn't always that way and his claim to fame was only a short period in his career.
Ansel's images of the Southwest are the result of his being able to convince Congress to give him a grant to photograph it to help substaintate the need for National Parks to perserve the beauty of the land for future generations. Thank YOU! Ansel spent years photographing just Yosemite valley in all seasons and he created thousands of 8x10 negatives from his hugh view camera.
After admiring his work for years I took a trip to Tucson, Arizona to view images of a lot of famous photographers like Adams, Weston and others. The photographic archives are on the University of Arizona Campus in the Center for Creative Photography. I began to view all of Adams' work. Out of the hundred or so great images he is known for there are thousands and more that are quite frankly (with no disrespect) go from good to average, to mediocre, to amateur to lousy. There actually was only a short period in his life that he was at his peak, and after that he seemed to lose his drive and photographic eye. I must say that all the images he is famous for are really great images; that cannot be denied. However, as a photographer one has to put it all in perspective with his work as a whole. If you have the good fortune to be in Tucson AZ for a few days go on campus to the the Center for Creative photography and lose yourself for a couple of days in the images of famous photographers. You will never forget the experience. As a matter of fact you could use the visit to help find your photographic direction in your hobby or photographic career.
The center also has 4-5 $5,000 grants they will be awarding for studies in photography. The deadline for application is November 11, 2011.
Sep 24, 2011 20:56:31 #
Let me tell you a little story that may be half truths but the point is the same.
Ansel Adams is acclaimed as a great photographer and its likely that he was. But it wasn't always that way and his claim to fame was only a short period in his career.
Ansel's images of the Southwest are the result of his being able to convince Congress to give him a grant to photograph it to substaintate the need for National Parks to perserve the beauty of the land for future generations. Thank YOU! Ansel spent years photographing Yosemite valley in all seasons and he created thousands of 8x10 negatives from his hugh view camera.
After admiring his work for years I took a trip to Tucson, Arizona to view images of a lot of famous photographers. The photographic archives are on the University of Arizona Campus in the Center for creative Photography. I began to view all of Adams' work. Out of the hundred or so great images he is known for there are thousands and more that are quite frankly lousy. There actually was only a short period in his life that he was at his peak and after that he seemed to lose his drive and photographic eye. I must say that all the images he is famous for are really great images; that cannot be denied. However, as a photographer one has to put it all in perspective with his work as a whole. If you have the good fortune to be in Tucson AZ for a few days go on campus to the the Center for Creative photography and lose yourself for a couple of days in the imagaes of famous photographers. You will never forget the experience.
The center also has 4-5 $5,000 grants they will be awarding for studies in photography. The deadline for application is November 11, 2011.
Sep 24, 2011 19:27:39 #
You asked for it:
First I'm goint to guess you are using a point and shoot camera. If so your creative options are some what limited. If you are using a DSLR you need to learn about Depth of field. All that is another story. so let me review what I see in your prints. Please don't take my critique personal I just tell it as I see it without personal considerations or being polite.
Catus flower:
You need to isolate the flower just a little more.
Due to the background Not being totally out of focus it is distracting from the flower. Throw a piece of black, dark green, or brown cloath in your camera bag. Lay the cloth down so it is the background of the shot. if the BG end up looking gray or just too light put something or have someone put the BG in a Shadow causing to get much darker. You have now eliminated the distracting BG with a solid dark color and Isolated to plant. Next, if working in harsh sunlight ala AZ, buy a cheap white translusent umbrella. Hold the umbrella between the sun and the plant to soften the lighting and eliminate harsh contrasty shadows. ALWAYS shoot macro flower photography using a tripod. It frees you up to do other things and you will not get camera shake. Use a tripod...always.
Birds of paradice:
Confusing a bunch of little flowers on a partially infocus background. When doing flower work initially move in close and select a few of the best flowers. If the flowers are small you can alway tie them closer together with a little black sewing thread. In the group of flowers try to form a pleasing pattern or composition. "S" shape, diagonals, groups of 3, etc. maybe be symbolic...4-5 bright live flowers in a semi-circle around a dying flower. Maybe shot out of focus or through a piece of saran wrap to give it a heavenly glow.
El Train:
You got the idea. A compositional "S" curve in the tracks. Is there a place along there where you could get a similar shot but not have all the telephone poles and harware in the image?
Image ideas:
If you want to shoot flowers for example go to your local book store and browse any flower photography books they may have. Then maybe check out the reading books on flowers. Don't just look at pretty flowers, put your photographers cap on. How is it composed, close up far away? What is the lighting, hard/soft. shadows, no shadows. What is the background. Analyse what you see.
want to shoot trains for the day? do the same thing and see if you can copy it. there is no rule that says you can't try to duplicate someone elses work until you develop your own style. Years ago I took one of Ansel Adams' books with me to Yosemite, and found each location and tried to duplicate each image. It was a learning exercise I did. Some good, some bad but it helped me to see through his eyes when composing a shot and try to analyses why he shot it the way he did. Also I tried different views to do it better. Actually I feel a couple of mine are better! But, that is a personal opinion.
Unless you are a porfessional and photography is your "JOB" where you have to do what it takes to get the image that will put bread on the table you can do what you want. Hobby photography is just that, a personal expression of what you see and what you like. You will never reach perfection because if you do you will quite as there will no longer be a challenge. I have been in photography as a hobbist and professionally for over 40 years and gladly admit I'm far, far,far from great. Here is another rule of thumb you want to keep in mind. If you reach a level where you are getting 1 great shot in 20 you are doing good.
When you get discouraged think about this: The late David Munche went to Monument valley over 160 time and shot more than 20 sheet of film per day during his multiple day visits. He eventually created thousands of images of Monument Valley and the Navajo (or is it Hopi) population. No matter. His table top book I have of Monument Valley has 20 images in it.
Sep 24, 2011 18:48:53 #
Well, I think we all agree that it is not possible to get accurate colors for our prints when viewed on the internet and on this forum. Just way to many variables.
Now, we have entered the realm of getting a color matched print from a lab.
Yes, you can print a bunch of prints making adjustments with each until you get what you want coming out of the printer. That is time consuming and a waste of expensive ink. Yes, you can then take that print to the lab and have them match the colors, brightnes etc.
Here is a better way and a lot cheaper.
Buy an Xrite passport color checker and white balance. Go to www.xritephoto.com to see what they are about.
what you do is place the color checker/white balance in the scene you are photographing. As long as you are shooting under the same lighting conditions you only have to do it for the first shot. If you change locations or change lighting conditions reshoot the passport.
Now at you editing software you can balance the color and white balance by using the white balance eye dropper and clicking the white balance card. Next you syncronize alll the images that used that white balance.
modify and select the images you want printed by the lab. down load the image file AND the passport image to your cd and take it to the lab. Let them know that you have a calibration image on the disk. They will print your image exactly matching your image.
There is no need to be running a bunch of test prints and adjusting the color and printing a bunch out trying to get the one you want. You are just wasting time, paper, ink and money. The passport color checker/white balance cost $100..
Check out Sports Photography section of our forum.