Posts for: Anvil
Jul 26, 2019 17:37:25 #
That is a beautiful shot. The fog layer adds a great deal to it. When I used to hike in the East Bay parks, I would either get a crystal clear view of San Francisco, across the Bay, or I'd be in those clouds. I never got a view like yours.
A friend and I were just discussing lens compression, the other day. It is a very interesting effect, but it is always something I notice after the fact. A couple of weeks ago, I was in the mountains with my wife and our nephew. The lens that was mounted on my camera was one I'd usually consider too large to take photos of people, but I just wanted to get a profile shot of my nephew looking out over a great expanse. The big lens brought the background mountains quite close, but it wasn't something I really noticed until I reviewed the photos, at home.
A friend and I were just discussing lens compression, the other day. It is a very interesting effect, but it is always something I notice after the fact. A couple of weeks ago, I was in the mountains with my wife and our nephew. The lens that was mounted on my camera was one I'd usually consider too large to take photos of people, but I just wanted to get a profile shot of my nephew looking out over a great expanse. The big lens brought the background mountains quite close, but it wasn't something I really noticed until I reviewed the photos, at home.
Jul 15, 2019 21:27:04 #
Thanks! We live in Loveland, and we are only about 50 minutes, or so, from the Estes Park entrance, on 34.
Jul 15, 2019 16:51:05 #
bertloomis wrote:
I wonder if there would be a greater feeling of depth if one included foreground objects, like trees, for example, quite close to the camera?
That might work, although, in the instance, we were above the tree line.
Jul 15, 2019 09:54:27 #
Very good and interesting comments from all. Thanks for that.
Both John N and RG mentioned having the valley floor, or more of it, in sight. I think it might be worth mentioning that the floor has to be different from the sides of the valley. I'm thinking of a former hiking ground of mine. There were a few, interesting, deep gorges, in that area. Try as I might, I could never capture the feeling of depth of any of those gorges. The problem was that the bottom of those gorges looked the same as the sides -- rather dense foliage. I could never get the camera to recognize a significant difference between the sides and the bottom, no matter how much of the foreground (or even the sky) I included.
ArtBob's second example shows what I mean. The canyon floor, in that example, is obviously different from anything on the sides, and one can easily infer how far away that canyon floor is.
Jul 14, 2019 19:15:44 #
Thanks! One of the drawbacks to a post like this is that one is almost obliged to include a failure. It keeps me humble.
Jul 14, 2019 18:06:35 #
One of the challenges I've had (and still have) with landscape photography is getting the viewer to feel the depth of something like a canyon (or an abyss). Certainly, I can feel that depth when I'm standing on the rim of that canyon (or cliff, or whatever), but how do I imbue my photograph with that feeling?
It is clearly a matter of composition, rather than editing. It seems obvious to me -- now, that is -- that to imbue that feeling of depth, one must include at least a portion of the ground on which one is standing. (I had to take more than a few boring photos, until that sunk in. I had to scrape a few knees while learning how to ride a bike, too.) But how much of that ground, should be included, and how should it be included?
When I'm standing on a cliff, I can look straight out, and appreciate what would happen in I took one forward step too many. That doesn't translate too well, in composition, though. If the edge of the canyon is parallel to the bottom of the photograph, that feeling of depth may not be particularly acute, though it is certainly stronger than if that ground were not included, at all.
Okay, so the rim of the canyon should be on an angle, with respect to the bottom of the photograph. A leading line, if you will, although I'm not sure I want to walk that line.
There is more to it than merely including the foreground on an angle, with respect to the bottom of the frame. It seems that the more acute the angle is, the stronger the feeling of depth (or height, if you will). The angle could get so acute that only a portion of the safe foreground might be included in the frame. That's when things get interesting.
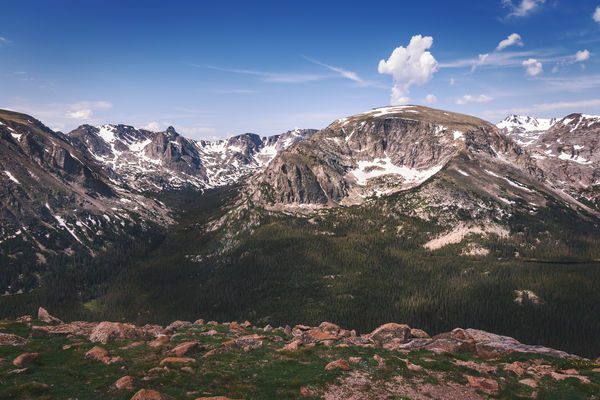
We were up in Rocky Mountain National Park, last Friday. We were just about as high as that particular road would go. I wanted to see if I could capture that feeling of height. I took a few shots, with the edge of the foreground at different angles. (In order to do that, the views have to be different, even though they were all taken in the same viewing area.)
The first shot is with the edge of the foreground parallel, more or less, to the bottom of the frame. The line of the foreground is also roughly parallel to the line formed by the tops of the mountains. The lines do not lead me anywhere. Consequently, the feeling of height, or the depth of the valley between me and the peaks, in the distance, is too subtle for this photo to make much of an impact. I only included it to show the difference between this one and the next two.
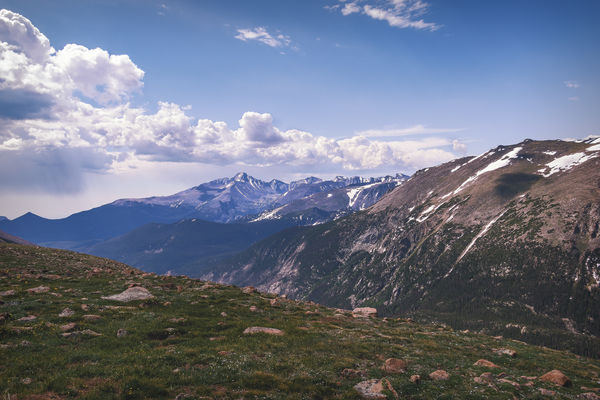
The second shot has the edge of the safe ground more on an angle, with respect to the bottom of the frame. That foreground line intersects with the line formed by the mountain tops. That point of intersection is just to the left of the frame. As a viewer, I start to feel the height. (If there were less foreground, yet it still spanned the width of the shot, I think I'd feel that height a bit more acutely.)
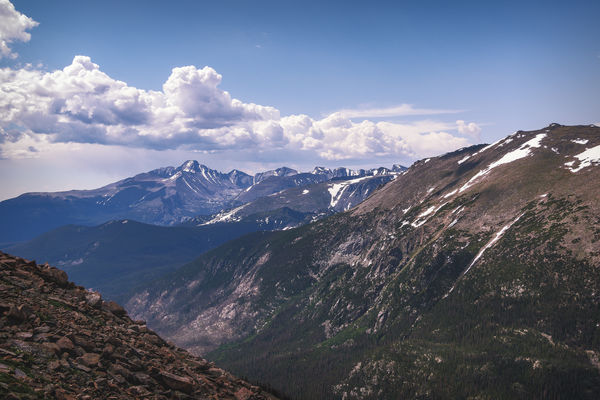
In the third shot, the foreground is on a very acute angle, with the foreground only spanning half the width of the frame. The first time I looked at this shot, in full screen, I got the impression that I was about to fall off the mountain. This one had more of an impact, on me, than the second one did.
So, I guess my takeaway is that, if I make sure the foreground line is not parallel to the bottom of the frame, I probably have a better chance of creating some meaningful leading lines.
It is clearly a matter of composition, rather than editing. It seems obvious to me -- now, that is -- that to imbue that feeling of depth, one must include at least a portion of the ground on which one is standing. (I had to take more than a few boring photos, until that sunk in. I had to scrape a few knees while learning how to ride a bike, too.) But how much of that ground, should be included, and how should it be included?
When I'm standing on a cliff, I can look straight out, and appreciate what would happen in I took one forward step too many. That doesn't translate too well, in composition, though. If the edge of the canyon is parallel to the bottom of the photograph, that feeling of depth may not be particularly acute, though it is certainly stronger than if that ground were not included, at all.
Okay, so the rim of the canyon should be on an angle, with respect to the bottom of the photograph. A leading line, if you will, although I'm not sure I want to walk that line.
There is more to it than merely including the foreground on an angle, with respect to the bottom of the frame. It seems that the more acute the angle is, the stronger the feeling of depth (or height, if you will). The angle could get so acute that only a portion of the safe foreground might be included in the frame. That's when things get interesting.
We were up in Rocky Mountain National Park, last Friday. We were just about as high as that particular road would go. I wanted to see if I could capture that feeling of height. I took a few shots, with the edge of the foreground at different angles. (In order to do that, the views have to be different, even though they were all taken in the same viewing area.)
The first shot is with the edge of the foreground parallel, more or less, to the bottom of the frame. The line of the foreground is also roughly parallel to the line formed by the tops of the mountains. The lines do not lead me anywhere. Consequently, the feeling of height, or the depth of the valley between me and the peaks, in the distance, is too subtle for this photo to make much of an impact. I only included it to show the difference between this one and the next two.
The second shot has the edge of the safe ground more on an angle, with respect to the bottom of the frame. That foreground line intersects with the line formed by the mountain tops. That point of intersection is just to the left of the frame. As a viewer, I start to feel the height. (If there were less foreground, yet it still spanned the width of the shot, I think I'd feel that height a bit more acutely.)
In the third shot, the foreground is on a very acute angle, with the foreground only spanning half the width of the frame. The first time I looked at this shot, in full screen, I got the impression that I was about to fall off the mountain. This one had more of an impact, on me, than the second one did.
So, I guess my takeaway is that, if I make sure the foreground line is not parallel to the bottom of the frame, I probably have a better chance of creating some meaningful leading lines.
Jul 10, 2019 13:41:49 #
This thread has a lot of interesting, and different, approaches to the subject of sharpening. A lot of information can be gleaned from this thread.
Every photo I take has some form of sharpening, sometimes two or three forms, especially if one includes the mild output sharpening used when I create a jpg file, using Lightroom.
Every photo I consider a keeper will undergo edge sharpening, in Lightroom. When it is time to sharpen, I'll usually kick the Sharpening Amount slider up to 70. (Depending upon noise introduced, I may back that off to as much as 50.) If I were employing global sharpening, this would probably be way too much, but I never employ global sharpening. I use the alt key, in conjunction with the Sharpening Masking slider, to refine the sharpening to the edges. This would remove all sharpening in areas such as sky or skin.
If I don't think the photo is worthy of the extra time of a trip to Photoshop, I might look into some areas of the photo that could be enhanced by a combination of clarity and texture, applied by the brush tool (never global).
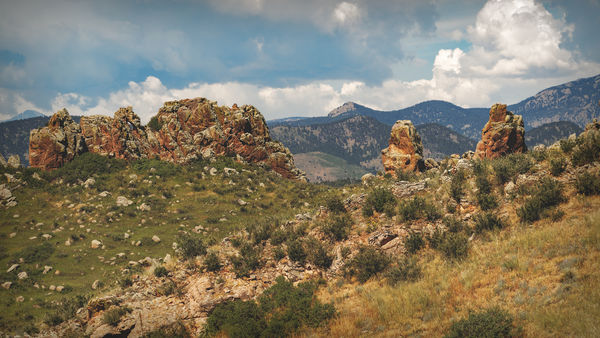
If I deem the photo worthy of a trip to Photoshop, I'll produce a rather flat psd file, though still with the edge sharpeing (and noise reduction, if necessary). Near the end of my Photoshop workflow, I will probably apply some very specific sharpening, though not with Photoshop's sharpening tool. Instead, I'll use something that is based on high pass filtering. This will be used sparingly and judiciously, as a means of enhancing the subject of the photo. For instance, in this photo, this type of sharpening was only applied to the rock formations.
Every photo I take has some form of sharpening, sometimes two or three forms, especially if one includes the mild output sharpening used when I create a jpg file, using Lightroom.
Every photo I consider a keeper will undergo edge sharpening, in Lightroom. When it is time to sharpen, I'll usually kick the Sharpening Amount slider up to 70. (Depending upon noise introduced, I may back that off to as much as 50.) If I were employing global sharpening, this would probably be way too much, but I never employ global sharpening. I use the alt key, in conjunction with the Sharpening Masking slider, to refine the sharpening to the edges. This would remove all sharpening in areas such as sky or skin.
If I don't think the photo is worthy of the extra time of a trip to Photoshop, I might look into some areas of the photo that could be enhanced by a combination of clarity and texture, applied by the brush tool (never global).
If I deem the photo worthy of a trip to Photoshop, I'll produce a rather flat psd file, though still with the edge sharpeing (and noise reduction, if necessary). Near the end of my Photoshop workflow, I will probably apply some very specific sharpening, though not with Photoshop's sharpening tool. Instead, I'll use something that is based on high pass filtering. This will be used sparingly and judiciously, as a means of enhancing the subject of the photo. For instance, in this photo, this type of sharpening was only applied to the rock formations.
Jul 5, 2019 09:47:10 #
Thanks, all!
It might have been a doorway to another realm. While I was setting up the shot, a very attractive young woman walked through, from the other side. She was camera shy.
It might have been a doorway to another realm. While I was setting up the shot, a very attractive young woman walked through, from the other side. She was camera shy.
Jul 4, 2019 10:42:30 #
Thanks, all, for your suggestions.
Creating a pano shot by stitching together several shots, each taken in portrait orientation, is something I've done many times, and the results have always been pleasing, but I've always done that using a fairly long focal length -- 100mm. I never tried doing the same thing with individual shots taken with a focal length in range of a wide angle lens. I always assumed that the distortion on the edges would make a such a pano look goofy, even if it could be stitched together.
I just put my assumption to the test. I went out into the yard, with the same camera and same lens. Using an 18mm focal length, I took five, vertical shots, hand held. I made sure I used a rather significant overlap, maybe about a third of a vertical frame, though I wasn't exact. I was about as exact as I would have been in the field.
Someone alert the media! My assumption was incorrect. The resulting pano turned out beautifully.
Thanks for suggesting this.
Jul 3, 2019 20:06:21 #
It was one of those circumstances when I didn't bring the right lens for the job, so I had to make do with what I brought. I brought a crop frame camera, and two lenses -- a 100-400mm lens, and an 18-135mm lens. I was going on a hike in the Devil's Backbone area. The big lens was on the off chance that I encountered some wildlife, and the little lens was for everything else.
We came upon an spot called Keyhole, which is a natural hole in the wall of rock, through which anyone could pass to the other side. (Not THAT other side!) Of course, this natural wonder deserved a photo. Normally, 18mm, on a crop frame, is wide enough for most things I want to do, and if it isn't, I just back up. In this case, however, backing up meant backing down, thus losing the hole. I would have preferred to show more of the Backbone wall, to give the hole a place in the environment, but I just couldn't back up far enough. (I can't tell you how many times I've brought a 10-18mm lens with me, on a hike, and it just sat in the backpack, because it just wasn't needed.)
Even though it wasn't what I wanted, I still thought it was cool enough to process and keep. Then, one of my sisters told me she wanted some Colorado scenes for canvas prints. I thought of this one, because it could look like a view to a different room. The natural framing is certainly there. (My guess is that she won't pick this one, but one never knows until one tries.)

Jul 1, 2019 08:48:31 #
I love it! Good imagination and execution!
Jun 29, 2019 12:04:47 #
Curmudgeon wrote:
Very nice set. Thank you for not turning the waterfall into whipped cream.  I think the clouds actually add to my interest in the second picture.
I think the clouds actually add to my interest in the second picture.Thanks! Even if I wanted to turn the waterfall into whipped cream, I don’t think I could have done it without a tripod.
Jun 29, 2019 08:42:58 #
Jun 28, 2019 16:22:32 #
UTMike wrote:
Very nice set, Jim!
Thanks! We hope to get back there, before too long.
Jun 28, 2019 13:36:32 #