Posts for: rhudston
Jun 18, 2021 11:04:56 #
Mark Sturtevant wrote:
Peterfiore presumably has it. br >But cameras ... (show quote)
Thank you - an excellent answer that outlines exactly what I feared I might have to do. You are correct: sometimes the science of knowing exactly must give way to the art of just working at it until you get it right.
Jun 18, 2021 10:58:29 #
SuperflyTNT wrote:
Not entirely true. It’ll be sharp at the hyperfocal distance and get less sharp as you get closer to each end of the focal range. In many instances it will still be acceptably sharp throughout, not always though. That being said, for landscapes 3-5 images is usually more than sufficient. Macro is a different story. I’ve used as many as 300 images in a stack.
I agree. With a sufficiently small aperture I can get the shot acceptably sharp at the hyperfocal length, but that is not what I was trying to do. The conditions at the moment were soon to be gone and I didn't have a tripod. I wanted the head of a tall wild grass about two feet in front of me in crisp focus, and then I wanted the middle ground in soft focus and the far ground in crisp focus. I used to be able to do this with a split focus filter on a film camera but now I'm playing with digital. Two frames in focus bracketing would have done it, but I haven't yet figured out how to make that happen the way I want it to.
Jun 18, 2021 10:40:56 #
Peterfiore wrote:
A quick google search brings this up from Fuji...I hope this helps.
https://fujifilm-x.com/en-us/stories/advanced-month-5-focusing-20-focus-bracketing/
https://fujifilm-x.com/en-us/stories/advanced-month-5-focusing-20-focus-bracketing/
Thank you. I had seen that article already and it does help, but it does not really explain much about steps. This morning I shot some small flowers; I set the camera for 50 frames at 5 steps with a 45mm lens and a 16mm macro tube, but the camera only took 25 frames. What I have read seems to imply that the camera will keep adjusting focus until it reaches infinity, but the articles seem to also imply that you need an adequate number of frames for the size of the step to reach infinity, but I can't seem to find anything to identify what a 'step' actually is. I'm guessing the camera stops changing focus when it reaches the end of its ability to focus with a macro tube but that didn't seem to happen when I shot a landscape scene without a macro tube - the final shot was not in focus in the far distance (to be fair, I tried this on a misty morning over our river, so I may need to try again in clear air). Anyhow, it is interesting trying to figure it out, and for a hobby that's at least half the battle. I see more posts down below so I'll keep reading.
Jun 18, 2021 10:37:28 #
Thank you. Bozsik's post is excellent as is his photography. I especially liked the image of the beetle at the end of the article. Something to aim for.
Jun 17, 2021 21:04:25 #
I've been wandering in the wilderness trying to set up focus bracketing on a Fuji X-T30. I've read the manual, but it gives no real information at all. What are the rules for "frame" and "step"? How do I shoot a landscape scene to get a nearby piece of grass in focus and then have the focus bracketing step up to focus on the trees in the far distance? The manual seems to imply that the focus bracketing will step up to infinity, but I am not getting that result with 10 frames at 5 steps. What exactly IS a step? I'm also experimenting with macro photography and I'm looking at focus stacking, but I'm not sure what camera settings I should be using to get a suitable series of focused shots.
May 26, 2021 09:24:34 #
rhudston wrote:
Way back when, in the days of film (as I might say... (show quote)
Many thanks to all for replies. The camera is a Fuji mirrorless, and after reading replies and a very helpful article I tried the linear polarizing filter again and, lo and behold, there IS an effect, just barely visible. The article talked about cross-polarization problems with mirror systems, so I dug out my old SLR and tried the linear polarizing filter on that and saw the stronger effect that I remembered. In fact, looking through just the linear polarizing filter at the sky and turning it, I see about the same effect as I see through my mirrorless camera - nothing at all like the effect I get with polarized sunglasses. Unfortunately, I sold my circular polarizing filter with my former Sony camera, so I can't report on anything further with it. So the issue seems to be with the 'strength' of the polarizing filter and whether or not it is used with a system with a mirror. So now I am wondering, are there different 'strengths" (for want of a better technical term) of polarizing filters?
May 25, 2021 17:13:16 #
Way back when, in the days of film (as I might say to my grandchildren), when you turned a polarizing filter on an SLR, you could see the effect of the filter through the viewfinder. The sky got darker then lighter, contrast increased and decreased, glare disappeared and reappeared - all until you got the effect that you wanted. I tried one of the new circular polarizing filters with a mirrorless camera and found no change in effect no matter which way I turned the filter, so I dug into my old kit and tried my old linear polarizing filter. Same thing - no change in effect no matter which way I turned it. Why?
Mar 17, 2021 16:11:42 #
Bill_de wrote:
If you use "Quote Reply" instead of "Reply" it won't matter that your post goes in at the end. Everyone will know (provided they are awake) what you are referring to. You can do that now by going to his original post.
---
---
Hahaaa, many thanks. I just figured that one out today. A great forum, but it works a little differently from others. Made perfect sense once I stopped and looked at it.
Mar 17, 2021 13:23:38 #
Ysarex wrote:
Your retouch job in that sample is more than adequ... (show quote)
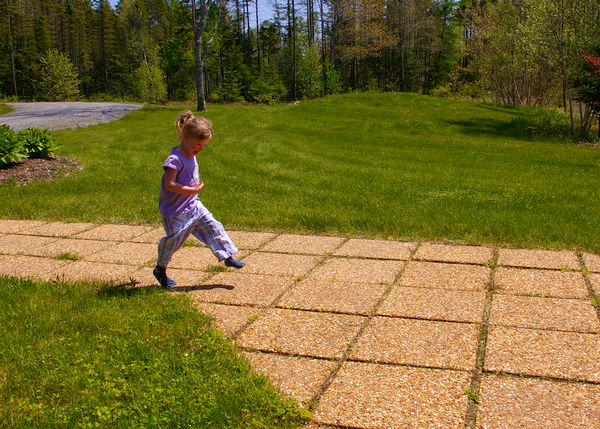
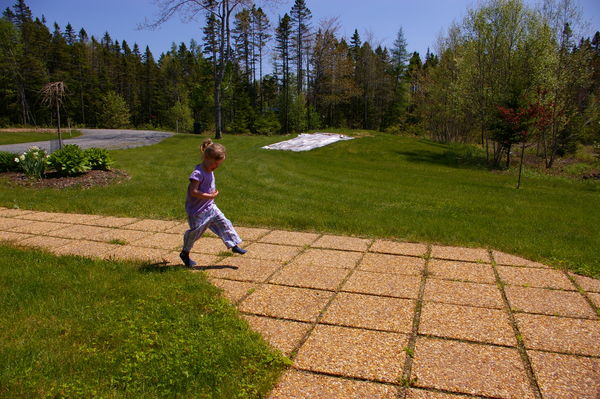
I keep looking at your cloning in the apple blossoms photo. I can see where the clone was lifted from, but the blending is superb, and you're right, if I didn't know that the photo was altered I would never spot the change. I've sent along a recent project - a picture my wife took of our granddaughter eleven years ago. I edited it with PhotoShop years ago, but when I saw what Capture One could do, I wasn't long in redoing it. I used C1 to straighten the shot a little, remove the plastic sheet on the lawn (I was reseeding a part of the lawn at that time), and add a little bit of reflected light to her face, but I still had to go back to PS to remove the green composting bin, the wires through the trees, the driveway markers, and the dead tree in the hosta bed. I'll keep working on making fuller use of C1, but right now it's been like opening a new toy at Christmas.
Mar 12, 2021 18:54:33 #
Thank you for the tip on how to do a cloning. I will be learning about Capture One for a long time. I downloaded a user manual - 776 pages+, wow - and any help will be greatly appreciated. Sometimes I have needed to rebuild a background (I removed a dead tree from a Hosta garden and then had to replace the Hostas and the gravel driveway from behind the dead tree), and I have found the clone stamp easier to use in tight quarters. I'm getting acquainted with differences between raster and vector graphics, but that is another steep learning curve.
Mar 12, 2021 14:08:21 #
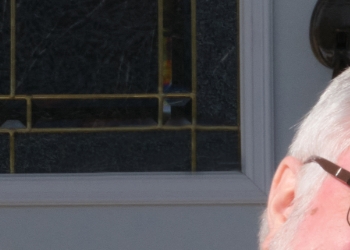
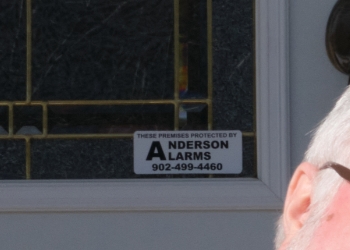
Ha - I'm glad I asked. I'm just now switching over to Capture One - a new Fuji camera got me headed in that direction - so I'm using the latest version and build. Photography is no more than a hobby for me, but retirement and digital images have allowed me to get more involved. I used PhotoShop to edit images for PowerPoint presentations, but the Fuji camera got me into shooting in RAW and then I needed something that would open and edit a .RAF image, which took me to Capture One Express and now I've bought the program. From what you've told me, I will keep PhotoShop and use it for the one thing it's good for and learn to use Capture One for everything else. Maybe I'll finally master the healing clone tool to the point where I can kiss PhotoShop goodbye. I've attached a couple of screen shots of a part of a photo I touched up in Capture One and then saved as a .JPG so I could remove the window sticker with the clone stamp in PhotoShop. The problem here was in cloning the brass seams and joints in the window. Just a small detail in the photo, but there didn't seem to be any other way around it.
I do want to thank you especially for your help and advice; the learning curve in digital editing is steep and it is good to know that there are knowledgeable folks out there who are willing and able to help. From what you have posted I know I would have enjoyed and benefited from your teaching.
I do want to thank you especially for your help and advice; the learning curve in digital editing is steep and it is good to know that there are knowledgeable folks out there who are willing and able to help. From what you have posted I know I would have enjoyed and benefited from your teaching.
Mar 12, 2021 09:10:41 #
I'm trying to reply to Ysarex' original post, but my reply seems to be far from the place where I'd like it to appear. Is there any way to delete a post, or move it to where it ought to be in a thread?
Mar 12, 2021 09:07:32 #
A question, if I could. I am just starting with Capture One. There are times I want to remove something from a photo - e.g. a sticker on a window behind the subject - and I find the clone stamp in PhotoShop easier to use and more accurate than the healing clone in Capture One. Like you, I would like to declutter, but I'm reluctant to let go of the clone stamp. Any suggestions?
Mar 12, 2021 09:02:56 #
A question, if I could. I am just starting with Capture One. There are times I want to remove something from a photo - e.g. a sticker on a window behind the subject - and I find the clone stamp in PhotoShop easier to use and more accurate than the healing clone in Capture One. Like you, I would like to declutter, but I'm reluctant to let go of the clone stamp. Any suggestions?
Mar 8, 2021 18:17:03 #
I never allow a program to decide for me what to save or delete. I also drive a manual stick shift. Old school all the way. I have found Capture One fairly easy to follow, but the green globs .... didn't know what to think. Many thanks to all on this forum who offered their advice.