Posts for: Peekayoh
Apr 7, 2012 08:12:01 #
oldtool2 wrote:
Nice shot except all many areas across the back and the tail is blown, over exposed.
Jim D
Jim D
I apologise for going too far and ruffling your feathers, I can be a bit blunt at times; my failing.
Having said that, if I stated anything incorrect about those four images you posted, let me know where I went wrong and I will post a retraction.
Regarding my Swan image, I don't see how I can post a full size image but what I can do is offer a rather large crop of the Swan's back which is where you said the image was blown.
It isn't, and here's a screen grab from the RAW processor this time. You can see that there isn't a single pure white pixel anywhere.
Crop
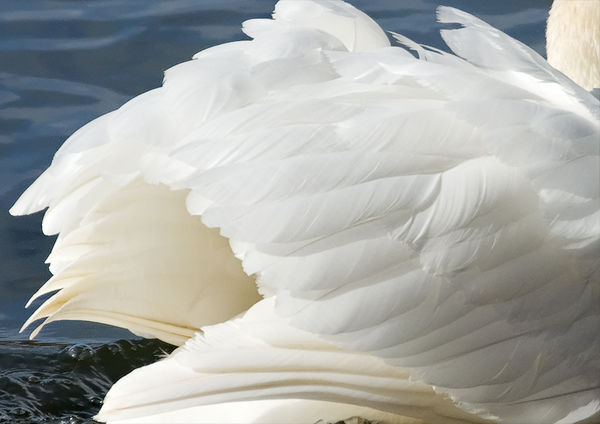
Screen grab

Apr 7, 2012 06:19:33 #
Hi Gayle, I understand your problem now, be careful up that ladder.
You're right, the 4/3rds Olympus cameras do get noisy above iso400 and cropping accentuates the noise even more.
Which camera and lens are you using and what settings did you use for those pictures you posted?
The latter two don't look far off, just a bit of a tweak to the curves I think. Are they a big crop?
Apr 6, 2012 12:56:57 #
rpavich wrote:
I just read through this thread and I'd be amazed if the OP doesn't run in fright.........
You're right of course, the OP must be badly confused or simply having a good laugh.
One of the problems with forums is that advice, good and bad is dispensed freely and how do you sort out the good from the bad?
The main proponent here of the guesswork method posts four poorly exposed images and then tells me that a correctly exposed image is blown out.
An incident light meter would be good but I doubt that the "Newbies" will have one, in fact I doubt that many people do these days, just us old timers from the days of film.
No matter whom the OP chooses to believe, I wish her well in the field. The tips asked for...
#1 Use a Tripod or Monopod, failing that, practice a good, firm stance and proper holding technique. Sit down if necessary; sorry Gale, you'll have to leave those Gucci Jeans at home
#2 Light is everything, the better it is, the better the picture will be. Good light means faster shutter speeds, lower ISO, lower noise, more detail, better colours and contrast. The Golden Hour brings as much to bird photography as it does to Landscapes; the light will be warm, soft and diffuse with less risk of blown highlights.
#3 Composition, avoid putting the bird dead centre if possible; think about the rule of thirds. Try to use an off centre focus point (if available) with the bird looking into the open space. Avoid distracting background if possible.
#4 Get as close as you can and use the long end of the lens.
#5 Set the widest aperture you have, DOF is unlikely to be a problem unless you can get really close and limiting the DOF will help to defocus the background (unless you want it) and make the bird stand out. A wide aperture will help to keep up the shutter speed.
#6 Shutter speed, aim for a minimum of 1/250th unless you have a long lens in which case remember the reciprocal rule. 300mm lens >> minimum shutter 1/300th sec. If the bird is in flight or flapping it's wings on the nest, you will need more speed. Faster speeds are better which is why your aperture is wide open.
#7 ISO is a balancing act between upping the shutter speed and losing quality. Hopefully, the light will be good so you can keep this setting low. Maybe with the Newbies you could start them at ISO400 which is a reasonable compromise between speed and quality and will help to elevate shutter speed.
#8 Focus is critical, of course, try to focus on the eye which should mean using an offset AF point. If this is not possible and you have to use centre spot, you may have to crop later.
#9 Take your time, enjoy your photography and keep in mind that its not life and death. Breathe slowly, line the shot up properly for light and composition, make sure you focus on the eye and then squeeze the shutter button.
#10 Everything I forgot to mention.
#11 Oh yea, EXPOSURE. Look at my first post!
Check out People Photography section of our forum.
Apr 6, 2012 12:09:32 #
oldtool2 wrote:
Well, you got that partly right. quote=Peekayoh quote=oldtool2 Nice shot except a... (show quote)
The camera histogram is a JPEG interpretation of the RAW data which may not be wholly accurate; that's why I often use Uni WB to resolve the problem.
The histogram I posted was taken from Photoshop and it does indeed tell the whole story.
There are practically no pure white pixels in the image as shown by the lack of any spike on the right.
There is a spike on the left where the blacks have blocked up but that is inevitable in an image which exceeds the DR of the camera.
Apr 6, 2012 10:34:40 #
oldtool2 wrote:
Nice shot except all many areas across the back and the tail is blown, over exposed.
Jim D
Jim D
No, it isn't. Why would I post a blown out photo to illustrate a point?
Check the Histogram.

Apr 6, 2012 10:22:15 #
JimH wrote:
How are your eyes? Have you adjusted the diopter ... (show quote)
That's always assuming that the AF is spot on, which often it isn't. The AF systems lands you inside the DOF, that's how QC sets them up. On a tripod, try several iterations of AF and you will see slight differences each time.
This may not be all that critical unless you have a fast (Say f/2) lens but then you will see how good/bad your AF system is; that's why top DSLRs have AF micro adjust.
The best way to set the dioptre lens, IMO of course, is...
Point the lens at a light defocused area
Look at the lines and/or focus points on the VF
Start with the dioptre adjustment at the + side.
Roll it back until the lines on your focus screen come into focus.
Stop as soon as it looks sharp.
Don't try to make those lines as thin as possible, you will be going too far and making your eyes work harder than they need to.
Apr 6, 2012 06:00:18 #
Clearly, there can be times when 2/3rds or so of negative compensation may be the correct exposure for an image and an experienced photographer may well be able to pick the correct compensation according to conditions.
To advocate using universal underexposure as a method for taking shots of white birds is simply wrong.
Moving on to the two images in your last post, in the first we see a completely blown area of white on the back of the bird and the second image is way underexposed apart from those specular highlights.
Jim, I really don't want to single you out for criticism as you are not the only one to advocate this flawed method. When helping fledgling photographers it's best to teach correct methods from scratch rather than advocating guesswork.
Mute Swan - Manual Exposure
To advocate using universal underexposure as a method for taking shots of white birds is simply wrong.
oldtool2 wrote:
Well, strictly speaking, we're talking of how the meter averages everything out and assumes that the result is a neutral grey but I think I know what you mean.I understand how the grey scale works.
oldtool2 wrote:
So what's wrong with using the zoom to fill the screen with the bird, spot metering and then recomposing?If I remember what Gayle asked is how to help her group take photos of a white bird. Now I may be wrong but I do not think they will be filling there lens with only white, it probably will have a background of some kind as her photo showed.
oldtool2 wrote:
But herein lies the problem of guessing at exposure values. The first image has completely blown areas of white all over the bird and the second image is of a grey bird.Here are two shots taken this morning. Both were shot in aperture priority. The first is under exposed by 2/3 (-2/3), the second is by 1 exposure (-1.0). Not the best but both would have been completely washed out had I not under exposed them.Jim D
Moving on to the two images in your last post, in the first we see a completely blown area of white on the back of the bird and the second image is way underexposed apart from those specular highlights.
Jim, I really don't want to single you out for criticism as you are not the only one to advocate this flawed method. When helping fledgling photographers it's best to teach correct methods from scratch rather than advocating guesswork.
Mute Swan - Manual Exposure

Check out Drone Video and Photography Forum section of our forum.
Apr 5, 2012 06:29:57 #
I'm new to this forum but I'd say some of the well intentioned comment and advice in this thread may be less than helpful without explanation.
Gayle, you should listen to MtnMan and should understand what the camera meter is attempting. Basically, the meter measures the brightness of various parts of the image, averages the measurements out and makes the assumption that the result ought to be a neutral grey. If the result is less than neutral grey it will increase the exposure and vice versa when the result is more. Surprisingly this works pretty well in most cases but, when the scene contains a lot of blacks or a lot of whites, the meter will be fooled.
You can easily demonstrate this to youself by taking a quick pic of a black (or very dark) object that fills the screen and also a quick pic of a brighly lit white wall or sheet of paper (make sure it fills the screen). You will see that both images will come out a nice shade of grey; the pic of the black card will be overexposed and that of the white will be underexposed. The same underexposure happens with a snow scene or a Bride in white, it/she will look grey without 1 or two stops more compensation.
If you transfer this experiment to the white bird you will easily see that, if you spot meter as you said you did, the white bird effectively fills the metered area and the result will be underexposure, a grey tone.
The best thing to do is to spot meter on the brightest part of the bird and increase exposure compensation by 2 stops; you may need more but thats depends on the camera and needs a bit of experimentation, bracketing is good strategy for now. By choosing to spot meter on the brightest part of the bird you will make certain that nothing important is blown out although the shadow areas will no doubt block up.
Check out The Dynamics of Photographic Lighting section of our forum.