Posts for: JimH123
Aug 28, 2023 00:17:24 #
colinc1 wrote:
Sorry, that is the only one I have. I did use AI but it replaced the whole face with 3 choices. None looked like her. I appreciate all your tries.
Very best regards to all.
Colin.
Very best regards to all.
Colin.
I'm not completely happy with my try. Sort of looks like she has a bit of a 5 o'clock shadow. That could be fixed, but I didn't try.
Aug 27, 2023 23:33:08 #
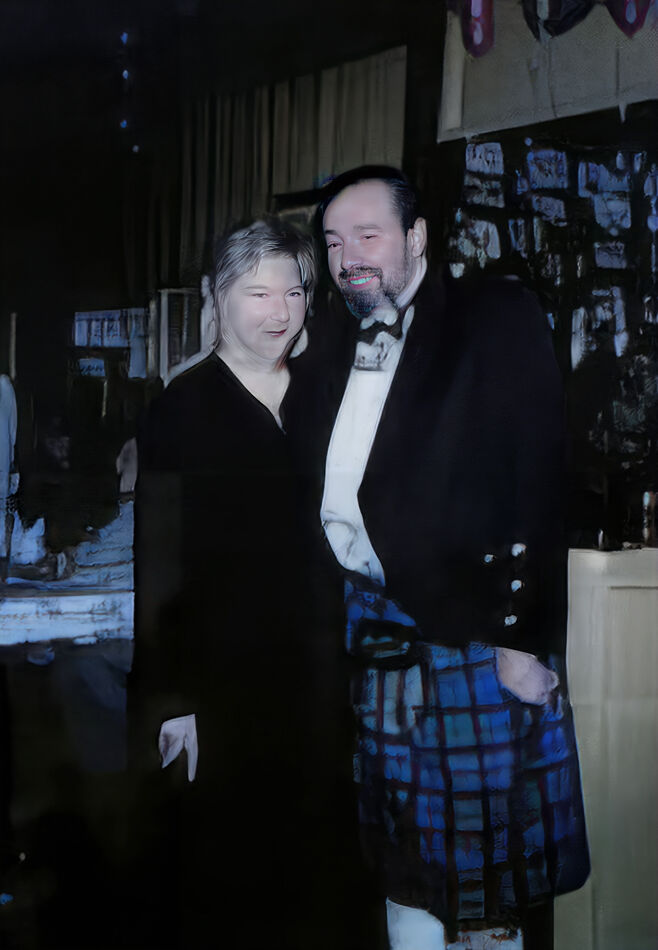
This is what I could do with the extremely low resolution. First I resized it 6x and turned on the face fix option using PhotoAI. The results were generally acceptable. But there is something wrong with the photo and it could not do anything with her face down to her neck and it was badly distorted. Then I resized it 4x more so that it is now 2544 x 3672 pixels. (Original was 188 x 256 before I cropped it) Understand that this is a resize of 13x. I have never attempted this much of a resize before.
Next I went to Photoshop and used Generative Fill and gave her new lips and a new chin. No clue if the results are close or not, but you wouldn't have liked what they were before I did this.
Can you somehow get a better copy of the image to work with? This is a miracle that it came out as it did with what you gave us to work with.
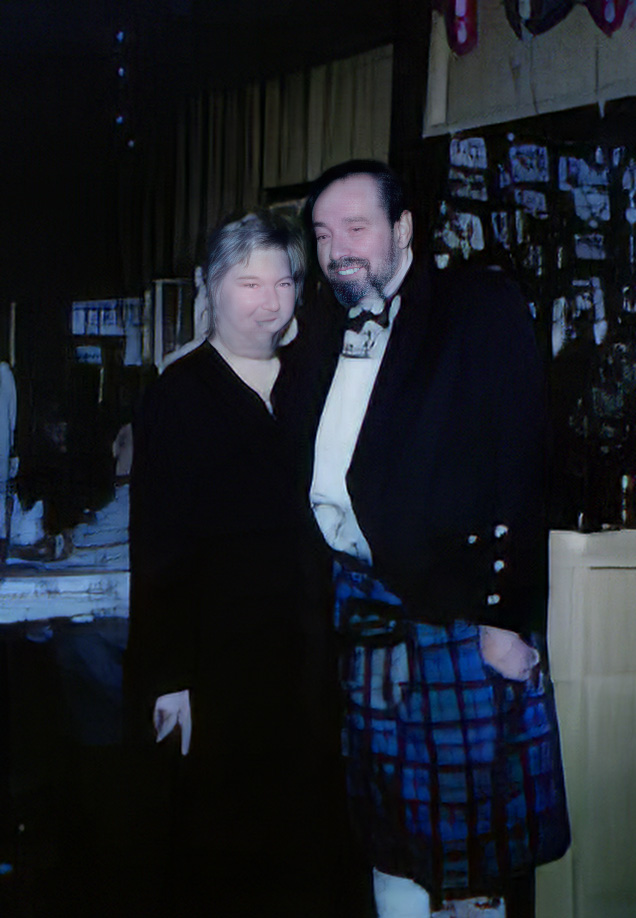
The 2nd image shows you what her lips to her neck looked like where I had to play act as a plastic surgeon.
Next I went to Photoshop and used Generative Fill and gave her new lips and a new chin. No clue if the results are close or not, but you wouldn't have liked what they were before I did this.
Can you somehow get a better copy of the image to work with? This is a miracle that it came out as it did with what you gave us to work with.
The 2nd image shows you what her lips to her neck looked like where I had to play act as a plastic surgeon.
Aug 27, 2023 22:33:03 #
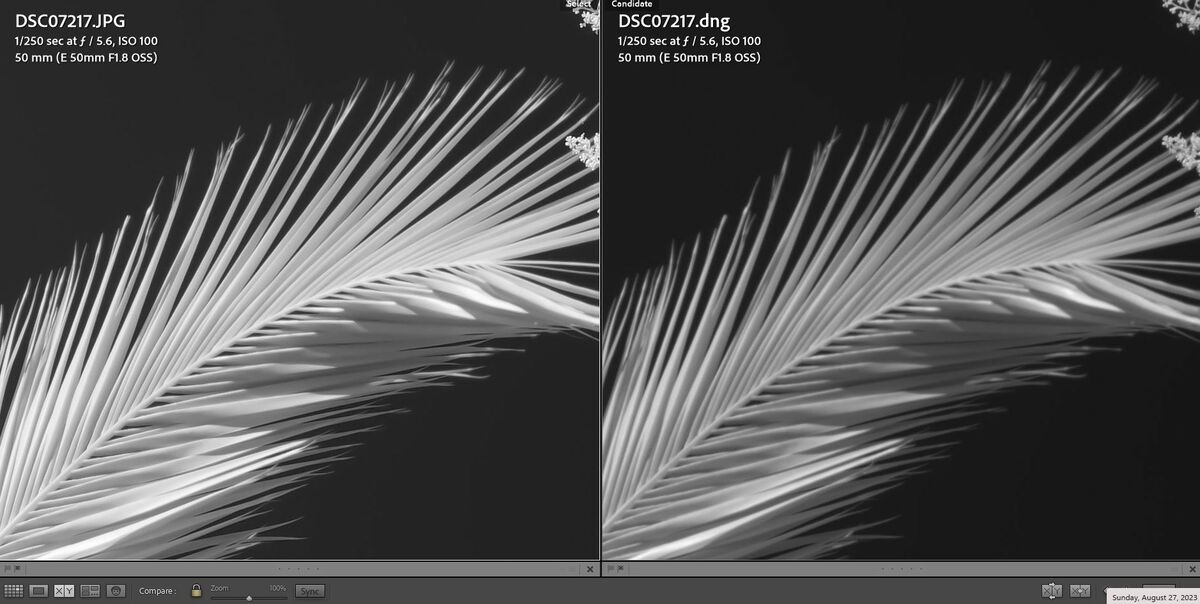
The attached image is the closeup (613%) of some vertical palm fronds. The camera was set to shoot JPEG + RAW at the same time. The JPEG result (in which Demosaicing was used) is on the left and the output of monochrome2DNG into a DNG file on the right. For the JPEG, the camera was set to use sharpness +3 and contrast +3. And perhaps that is the source of the artifacts seen around the edges. I should try again with more modest settings.
On the right, the DNG mono file was made directly from the RAW file. But the Sony A6300 uses a lossy RAW compression (no option for anything else), and it is not clear how that is exactly implemented. In certain locations, I can see to be what looks like a square that covers about a 6 x 6 pixel area. It is best seen on the vertical fronds on the right side, a little more than halfway up. I wonder if this is something to do with the lossy RAW compression that the Sony A6300 uses? The Non Compression option of the Sony A7ii would perhaps not show this issue? And by the way, the enormous sizes of the Non Compression files are just a short term issue since once the RAW is converted to DNG, the RAW file has no further use. Its no like color images where one might want to return to the RAW file and process again with DxO's (or Adobe's, anyone else's new Demosaicing algorithm).
From this comparison, I can see the sharpening effect on the JPEG image whereas the DNG shows how it was captured on the sensor.
The 2nd image shows side-by-side at 100%. The JPEG sharpening is causing the left image to appear sharper.
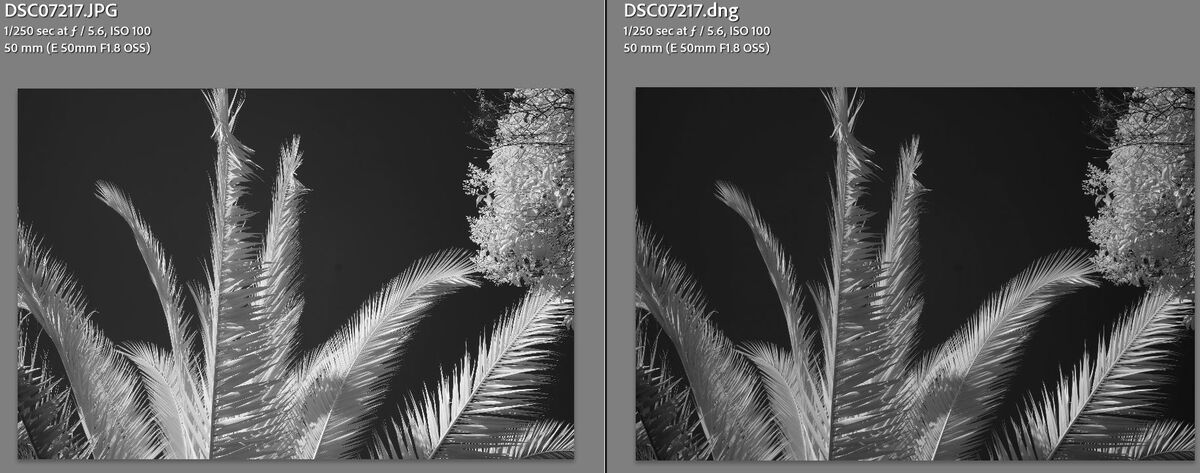
The 3rd image shows the full image side-by-side. The sharpening that the camera did on the JPEG pushes the image towards whiter whites, but I actually prefer the tonality of the DNG file on the right.
On the right, the DNG mono file was made directly from the RAW file. But the Sony A6300 uses a lossy RAW compression (no option for anything else), and it is not clear how that is exactly implemented. In certain locations, I can see to be what looks like a square that covers about a 6 x 6 pixel area. It is best seen on the vertical fronds on the right side, a little more than halfway up. I wonder if this is something to do with the lossy RAW compression that the Sony A6300 uses? The Non Compression option of the Sony A7ii would perhaps not show this issue? And by the way, the enormous sizes of the Non Compression files are just a short term issue since once the RAW is converted to DNG, the RAW file has no further use. Its no like color images where one might want to return to the RAW file and process again with DxO's (or Adobe's, anyone else's new Demosaicing algorithm).
From this comparison, I can see the sharpening effect on the JPEG image whereas the DNG shows how it was captured on the sensor.
The 2nd image shows side-by-side at 100%. The JPEG sharpening is causing the left image to appear sharper.
The 3rd image shows the full image side-by-side. The sharpening that the camera did on the JPEG pushes the image towards whiter whites, but I actually prefer the tonality of the DNG file on the right.

Aug 27, 2023 19:59:13 #
Linda From Maine wrote:
Color version is here.
Your feedback would be appreciated.
https://live.staticflickr.com/65535/53146360244_a7159bce02_k.jpgDinosaurs by Linda Shorey, on Flickr
.
Your feedback would be appreciated.
https://live.staticflickr.com/65535/53146360244_a7159bce02_k.jpgDinosaurs by Linda Shorey, on Flickr
.
No question that the B&W causes me to look at the picture longer and enjoy it more. In color, it is just so Ho Hum, but B&W invites you to study it.
Aug 26, 2023 20:06:13 #
imagemeister wrote:
I think I eluded to that ....? !
You do fabulous work with what you have shared with us. But we haven't seen you dip your toe into the world of AI noise/sharpening/resizing yet. It can be done on JPEGs too.
Aug 26, 2023 17:57:08 #
imagemeister wrote:
img src="https://static.uglyhedgehog.com/images/s... (show quote)

Imagemeister, Noise removing software has gotten so good now that it can now be used in auto mode where the user does nothing but run it and the results can be incredible. And software can now overcome a slight out of focus condition or a slight amount of camera shake. Remember that these last two are slight amount, not a lot out of focus or a lot of camera shake.
And even with Teleconverters, which tend to soften an image, software can undo some amount of that softening.
Aug 26, 2023 12:55:36 #
Next thing I tried are two closeups. Image 1 was taken with the mono sensor Sony A6300 and this is a 800% closeup of a palm frond showing the edges.
And next, Image 2, is using my Olympus EM1ii, which has no moire filter, and some palm fronds at 800%. But it is demosaiced. I didn't have many images of palm fronds to compare with, and I tried to find something with close to the same angle.
This sort of shows the difference in edges as I see the jaggies on the mono image seem tighter than the same on the demosaiced image.


Aug 26, 2023 12:29:05 #
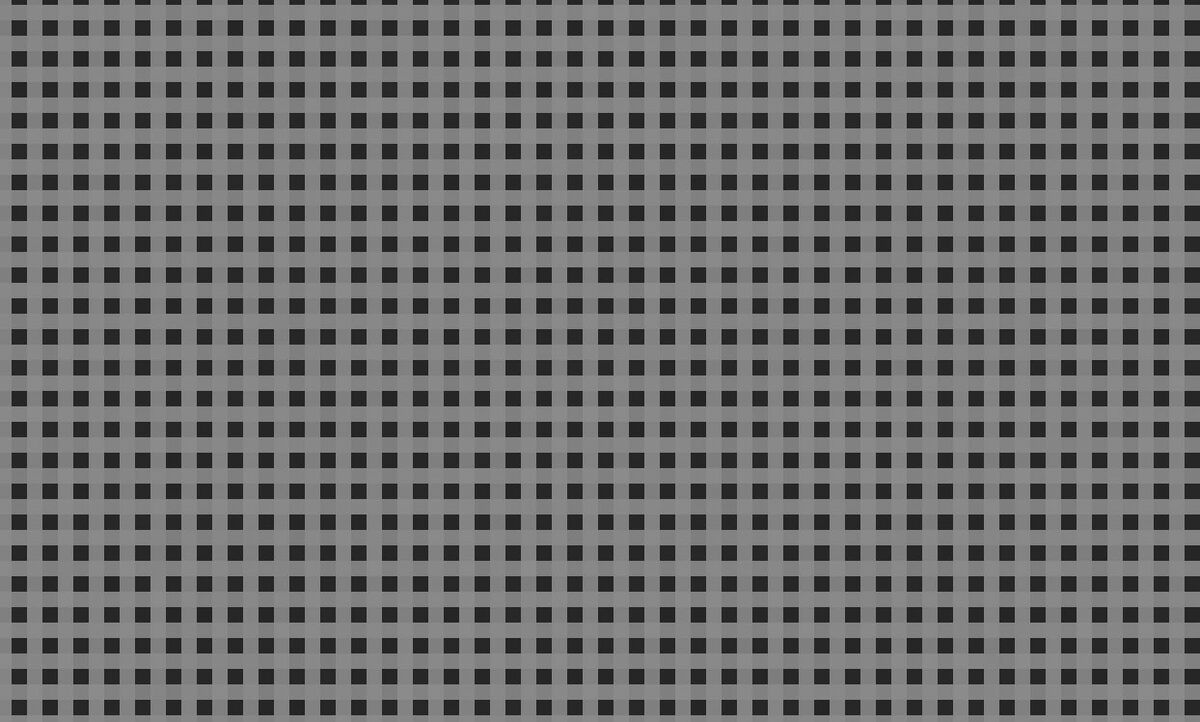
I also was looking at this option in Monochrome2DNG (Image 1) wondering if it might be useful in this discussion, but in the end, decided it didn't lead to anything useful.
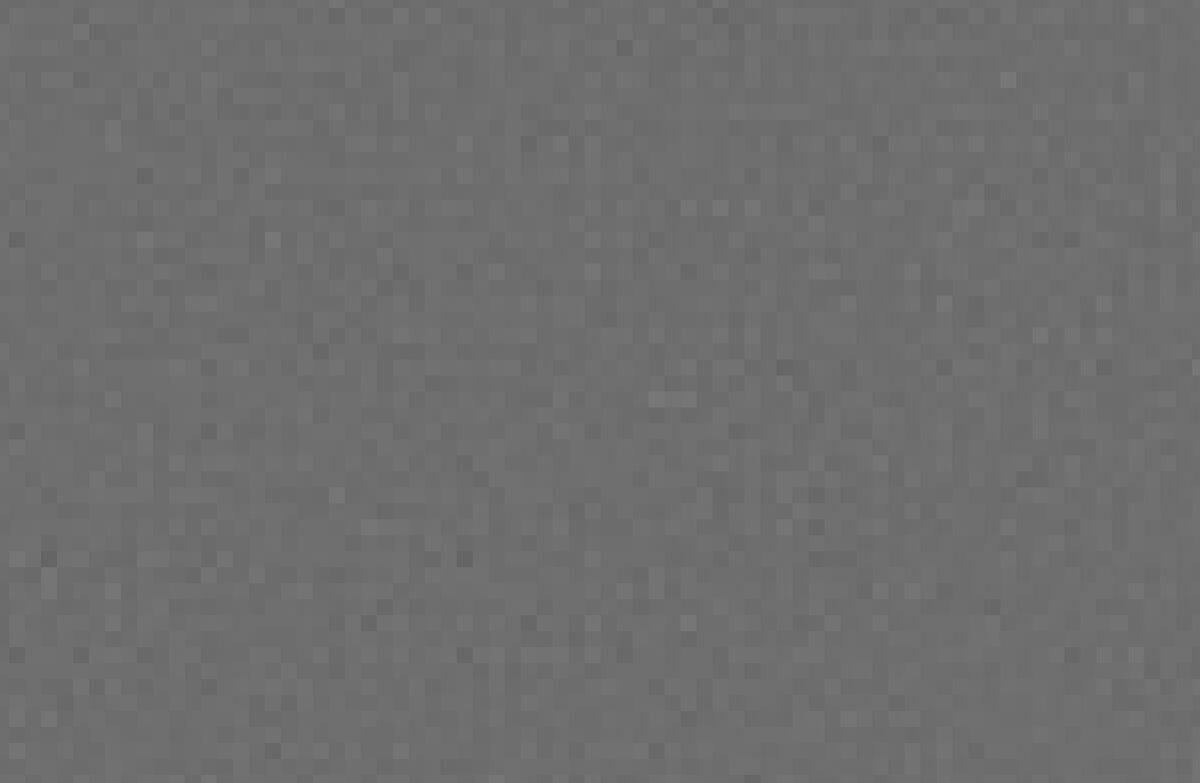
First thing I tried was to take a shot of a clear blue sky using my Sony A7iii which has the CFA. Image 2 is this shot at 1600% where I did not suppress the Mosaic Pattern. Then I followed in Image 3 where I did suppress the Mosaic Pattern.
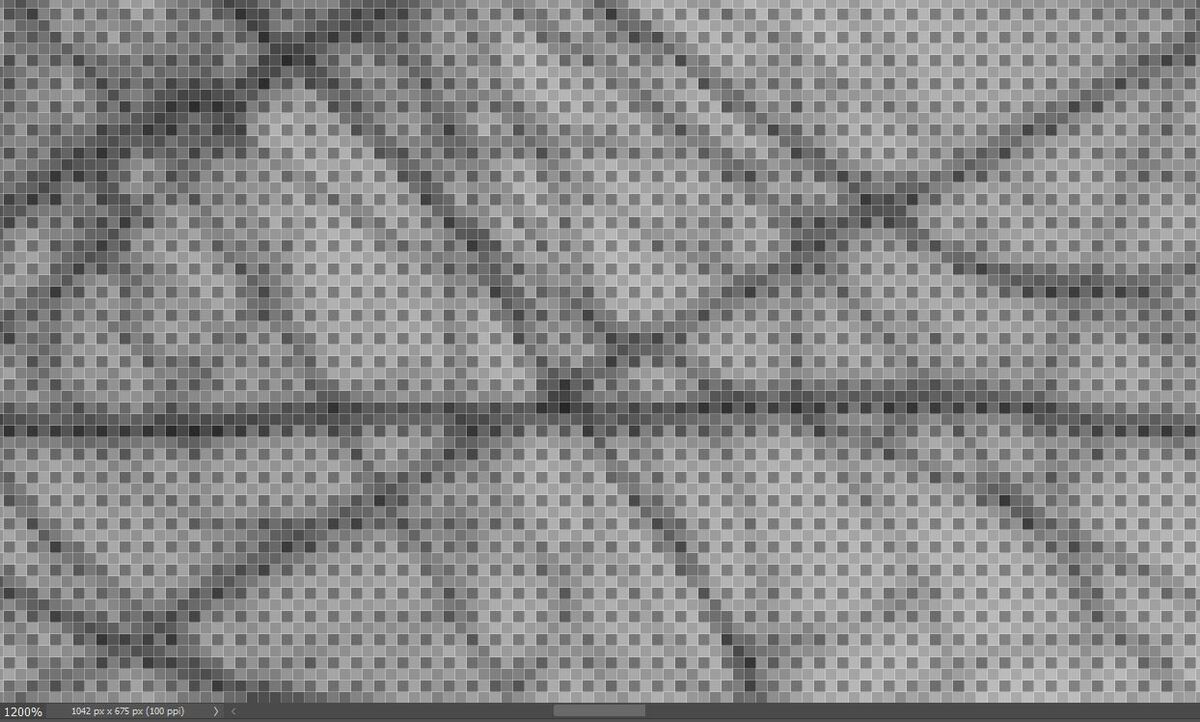
But then it fell apart when I shot at the top of a tree and had some leaves in the image.
Image 4 is not suppressing the Mosaic Pattern. Lowered the magnification to 600% so that a whole leaf could be seen.
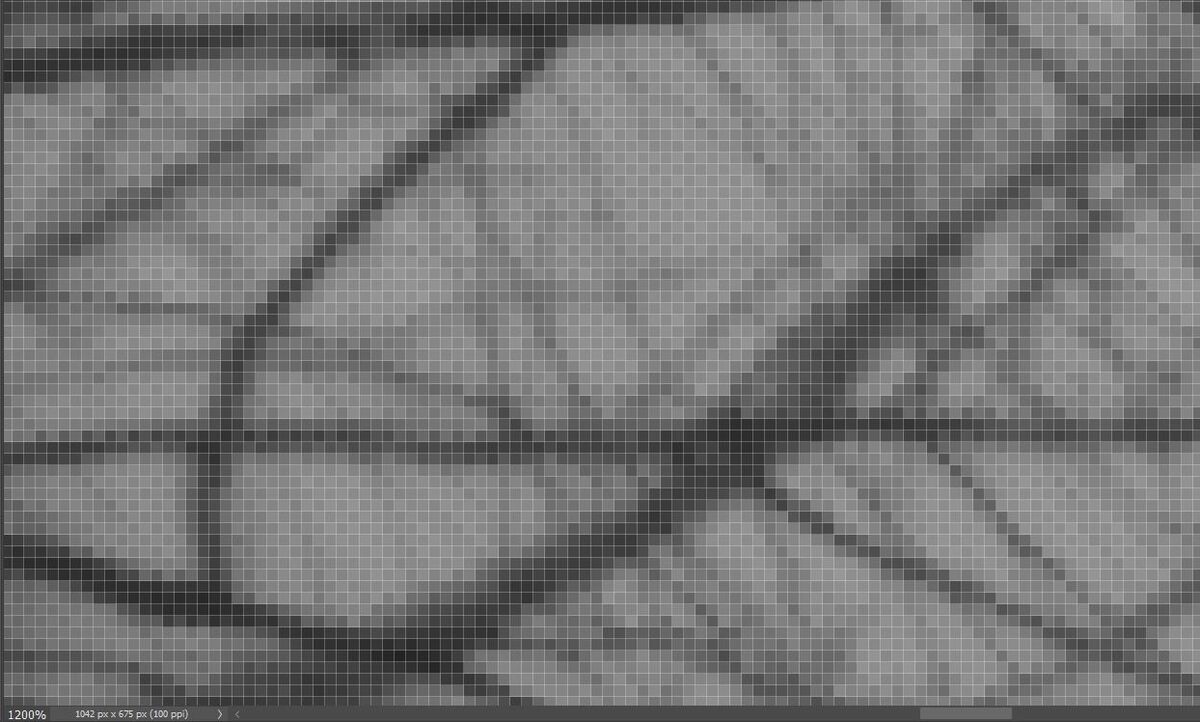
Then I tried it again where I did suppress the Mosaic Pattern. But the pattern was still there.
First thing I tried was to take a shot of a clear blue sky using my Sony A7iii which has the CFA. Image 2 is this shot at 1600% where I did not suppress the Mosaic Pattern. Then I followed in Image 3 where I did suppress the Mosaic Pattern.
But then it fell apart when I shot at the top of a tree and had some leaves in the image.
Image 4 is not suppressing the Mosaic Pattern. Lowered the magnification to 600% so that a whole leaf could be seen.
Then I tried it again where I did suppress the Mosaic Pattern. But the pattern was still there.


Aug 26, 2023 11:36:03 #
Ysarex wrote:
No, I know so. br br You said, "The problem ... (show quote)
Out of curiosity, what did you do on the right side to suppress the CFA pattern?
Image 1 is a closeup of the left side.
Image 2 is a closeup of the right side, and it resembles what I would see from a mono sensor.
Aug 26, 2023 02:22:15 #
selmslie wrote:
I would think that Vivid has more to do with color saturation so it might have no effect on the monochrome image.
You might get what you want from the DRO menu by adjusting the JPEG contrast levels from 1 to 5.
You might get what you want from the DRO menu by adjusting the JPEG contrast levels from 1 to 5.
Doesn't seem necessary to deal with DRO with the mono sensor. I can adjust contrast on the resultant image very easily. And I am finding that when I convert the RAW file to a mono DNG file, Lightroom doesn't know how to do lens correction. Using DxO Photolab 6 on the RAW file provides the lens correction. And I am just not finding that demosaicing a image captured from the mono sensor damages the detail very much. Probably less than a color image is impacted.
So shooting RAW followed by DxO works well, and DxO can make it behave as a B&W image rather than the mild magenta out of the camera. Or to just shoot JPEG works well and to let the camera do the lens correction.
Attached is an image shot in RAW and processed in DxO Photolab. A very busy image. So, yes, it was demosaiced, but I don't lack for detail one bit. And DxO knew how to do lens correction on the Samyang 18mm f2.8 lens that I was using along with a 720nm filter for which I get the lighter colored leaves which I like. I find that having lens correction done is a bigger deal than whatever slight detail improvement I would get by not demosaicing the image. The only things left to worry about is all the poison oak, rattlesnakes and occasional mountain lions we have in the Santa Cruz mountains. But at least the mountain lions are mostly nocturnal.
As for how this compares with shooting in color and converting to B&W, it is easier with the mono sensor, but I just don't know that it even matters with the cameras we now use. We have come a long, long ways from my first digital camera in 1998, which at the time, I thought was really fun to use with it's 1Mpixel images and about a 4 sec lag from pressing the shutter to it actually taking the picture. One time in Hawaii, took me about 100 tries to time it correctly to get a picture of the famous blow hole on Kawaii. On a more recent trip, I could capture many images as it started, reached its peak and dropped back to zero. Things have changed a lot.
Speaking of mountain lions, one of my friends with increasing problems with macular degeneration, was out in his backyard hand watering things and he thought he was seeing a deer that was in his yard and he sprayed it with the hose to make it go away since deer like to eat every green thing that grows in his yard. Wasn't a deer. Was a mountain lion. The stream of water startled just it enough to turn around and jump over the fence and disappear out of sight.

Aug 25, 2023 16:07:29 #
selmslie wrote:
It should since in a color file the process is trying to account for the difference in luminance levels recorded by the red and blue sensels compared to those recorded for the green sensels that get 60-70% of the final luminance weight.
What it would see is the entire image bathed in a peculiar color cast (magenta?) that wiped out the differences in color luminance.
What it would see is the entire image bathed in a peculiar color cast (magenta?) that wiped out the differences in color luminance.
I see that I only went out to shoot in JPEG one time. The monochrome images from the camera don't look bad. I tend to think that the demosaicing penalty just might be less when starting with a mono sensor. 720nm sensor was used on a 50mm lens.
This looks good enough to not bother with shooting in RAW when I just want to walk around. I also tried standard mode vs vivid mode, and for B&W, it didn't seem to matter. There was no need to do anything with the image. Contrast seemed good SOOC and there isn't much other things that one needs to worry about in monochrome.
I'll have to do more of this.

Aug 25, 2023 15:43:26 #
John Gerlach wrote:
Hi Hogs, br br I am about to begin the second rev... (show quote)
I don't understand all the discussion over this question. The answer is very simple:
If I want to control what Aperture is going to be used, I use Aperture Priority. (Shallow DOF wanted, or shooting in low light)
If I want to control what Shutter Speed is going to be used, I use Shutter Priority. (Moving subject where I want to prevent blur)
If I didn't care, I suppose I could use P mode and let the camera decide.
Also, should be mentioned in this thread is mechanical shutter vs electronic shutter. If preventing blur, and I depend on setting a high shutter speed, and leave the camera in electronic shutter, I am likely to get rolling shutter effects. Got to be aware of this. Of course this problem is also camera specific since some cameras are faster or slower at scanning the entire vertical range of the sensor.
Aug 25, 2023 12:22:31 #
Ysarex wrote:
That's right. What are folks trying to gain from t... (show quote)
The Leica M10 Monochrome would certainly be a step up over what I have in a modified camera. Since the camera would be aware that it is monochrome, it would open the door to walk around JPEG since the JPEG images wouldn't really need much in the way of post processing.
As a comparison with the modified camera, it is not aware that it is monochrome, and to take JPEG pictures, the camera is going to Demosaic the image and right away loose the resolution advantage.
Nor does it make sense to shoot in RAW and to then use DxO Photolab since it also would subject the image to Demosaicing too.
The following image represents what I do have to do to images with a modified camera. In this case, I am going to using the Sony 10-18mm wide angle lens at 14mm which in the original causes the lamp post on the left to lean inward towards the center and on the right, same thing for the edge of the building. This has been corrected with DxO ViewPoint. So the post processing steps are as follows:
1) Use Monochrome2DNG to process the RAW into a monochrome DNG file with no demosaicing performed.
2) Open the image in DxO ViewPoint to straighten the edges.
And I find that if opening the RAW in Lightroom, it uses the wrong lens model and doesn't fix the leaning problem.
The Leica M10 would have a huge advantage.
And I am adding the same RAW processed with only DxO Photolab as a comparison.
You can compare the 2. But I do think that when I look down the sidewalk with it zoomed in, I am thinking that DxO Photolab has done a better job on lettering even though it has been demosaiced. Perhaps demosaicing a mono file has less penalty than demosaicing a color file? I have been trying to work this out in my mind the difference, but I have not convinced myself one way or the other.
One difference I do see is if I look very closely at the twigs on the tree branches at the top of the tree. In the DxO image, I can see some holoing on some of the twigs. But I don't see that on the first image which had no demosaicing.
Aug 24, 2023 12:49:38 #
DWU2 wrote:
You might want to take a look at the NIK collection software - specifically SilverEfex Pro, but it's one of 7 modules sold together. It offers some remarkable B&W conversion options, and it's way cheaper than a camera conversion. Plus you get all those other interesting modules - ColorEfex is particularly good. A free trial is available.
But it still does "Demosaicing"!!! I have it and I use it. Great product. But mono sensors are in a different league.
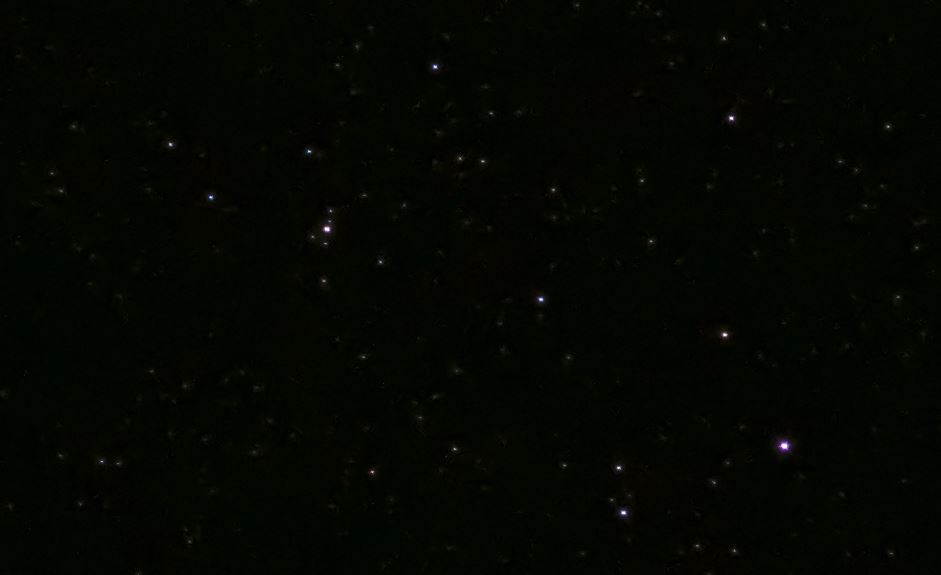
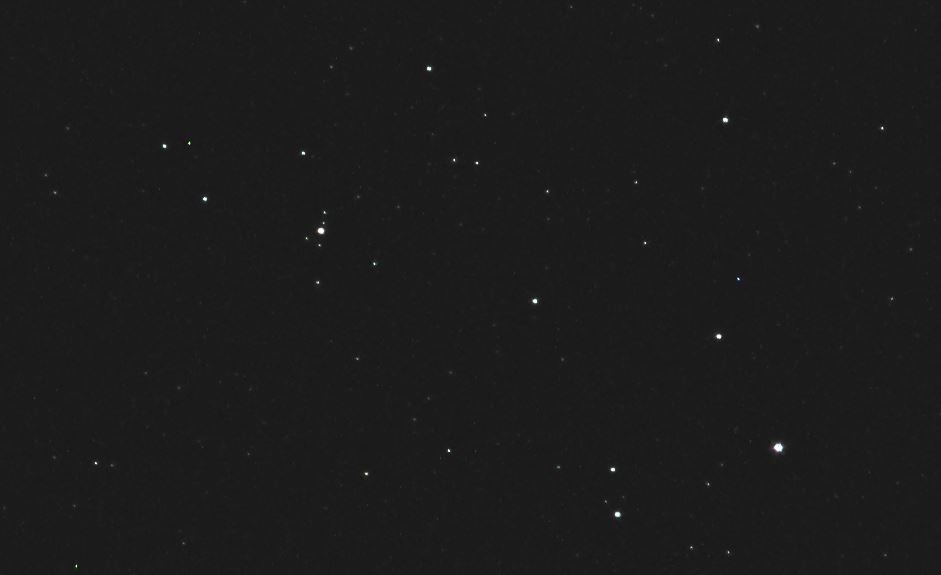
Two images here. They are at about 500%. The first image are some stars captured with a color sensor and demosaiced the normal way with a standard color editor. Lots of garbage and gunk from the demosaicing process. Demosaicing requires lots of averaging.
Image 2 is actually the same original file, but was processed with software specifically for astro imaging. The demosaicing process is greatly cut back and you can see the result with the improvement in the result. Not as good as the mono sensor, but much better than the original demosaicing. But I have experimented with processing normal camera images with this tool -- and all I can say is that you wouldn't want it. Colors are so far off as to be goofy looking.
Image 3 is with less cropping, but normal demosaicing, and image 4 with specialized Astro Imaging SW.
Demosaicing is not an exact science. RawTherapee gives the user a choice of about a dozen different demosaicing choices to try. Adobe uses their own. DxO uses their own version. Same with many other SW companies. All tweeked the best way they can come up with their goals. And with DxOs more recent move into DeepPrime, they did another tweak again to their demosaicing process. Same with Adobe and their "Enhance" option.
As for the cost of turning a camera into a mono sensor. I had a camera that wasn't seeing much use, and the cost was about the same as going out and buying a new lens. If I equate this to just buying another lens, its somewhat equivalent.
Aug 24, 2023 12:01:34 #
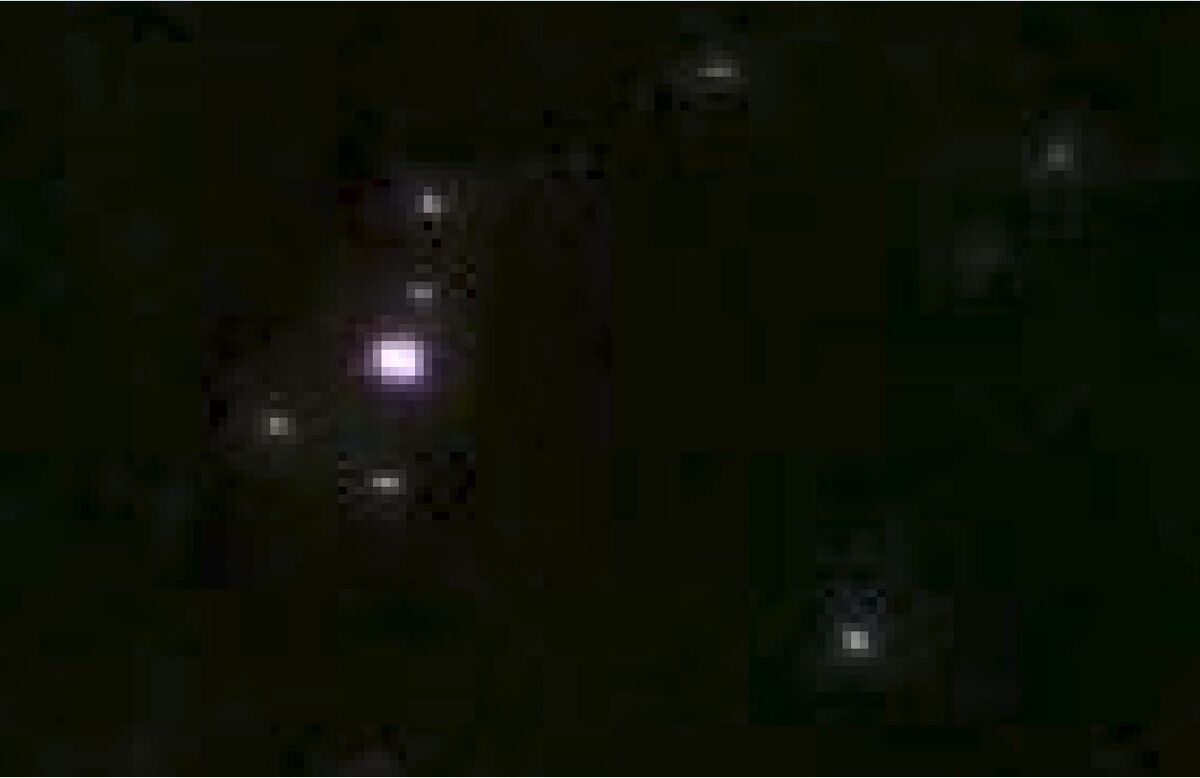
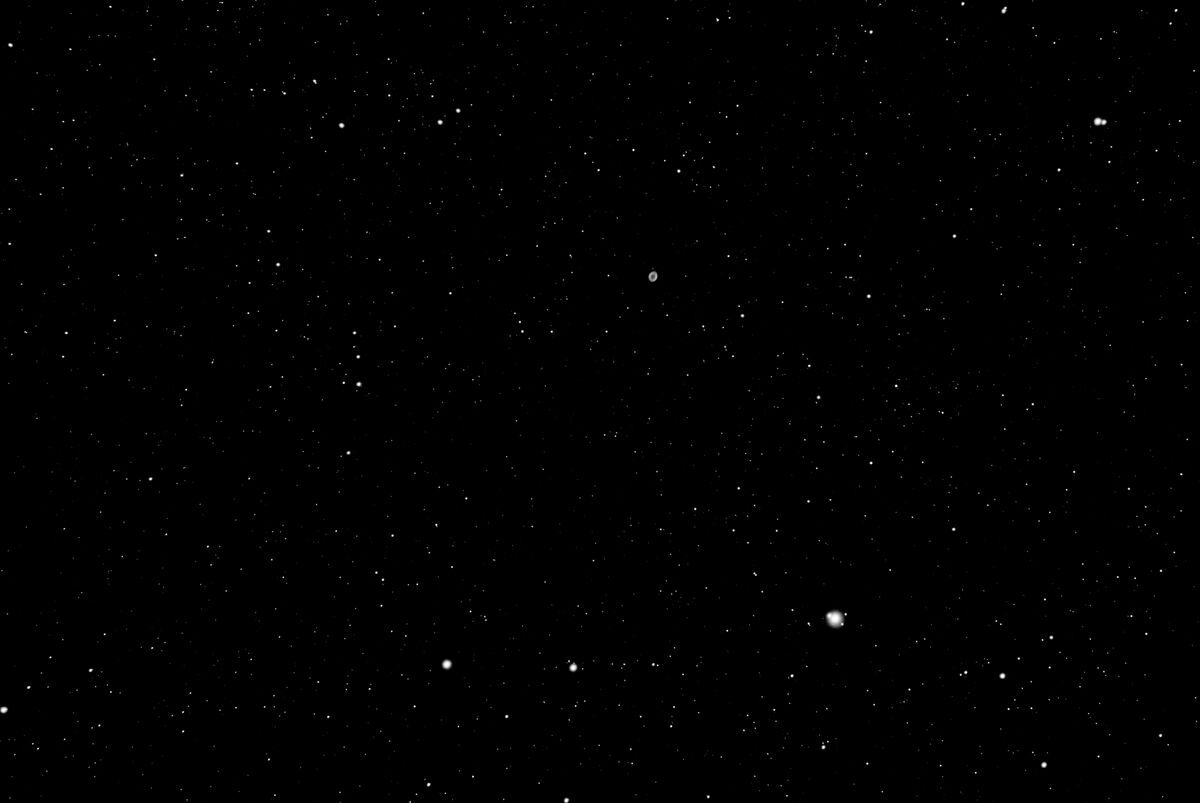
I am going to show an example of doing astrophotography in which the mono sensor far exceeds what the color sensor can accomplish.
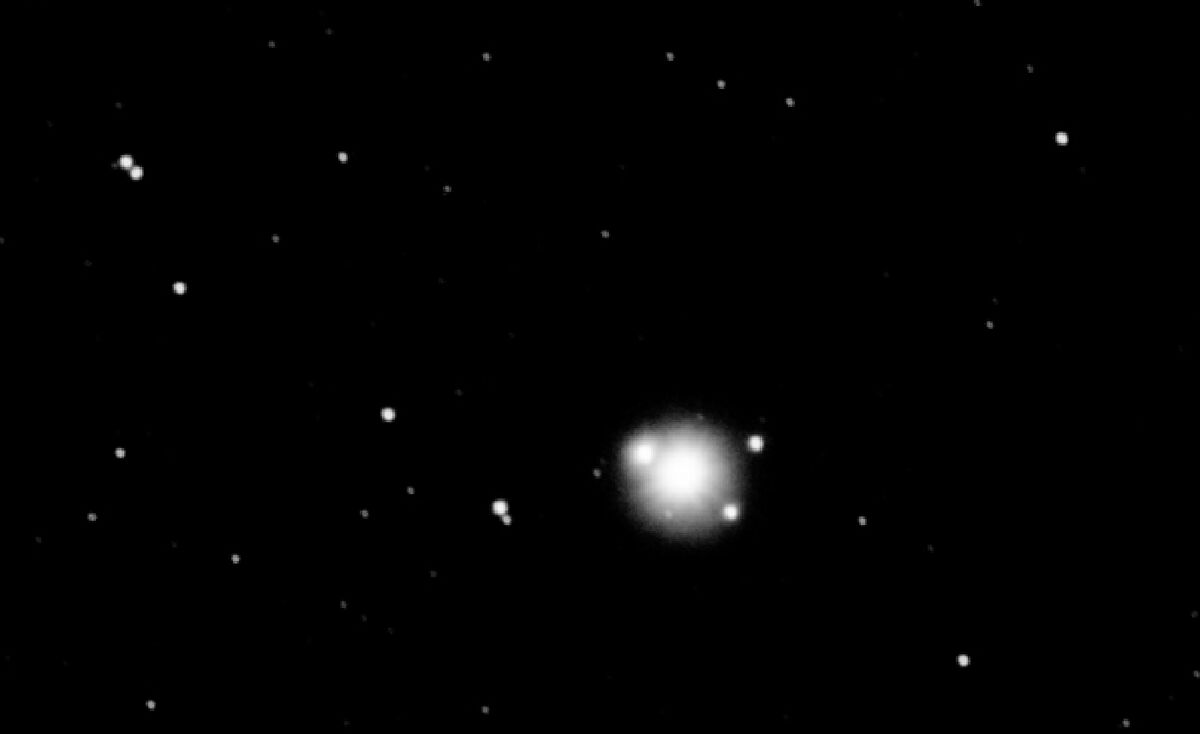
The 1st image shows the Ring Nebula in the center. In actuality, the Ring Nebula is a small target and is best photographed with a larger telescope. But in this case, I used an APS-C sized sensor camera, the Sony A6300, and a fairly small scope of only 360mm f6. It can see the objects in the sky, but doesn't blow them up very big. Also used a UV-IR cut filter for this image in that there was nothing in this view that would benefit from adding IR light. And this cut filter was one that includes the 656nm wavelength in which some camera makers offer an astro version to see nebulas better that glow in the Hydrogen Alpha wavelength.
One important thing to note is the round stars. Cameras with CFA's and the need for demosaicing have trouble producing nice round stars and instead tend to produce blobs. Towards the lower right is a brighter star that would be a problem for demosaicing and I will point that out in a crop.
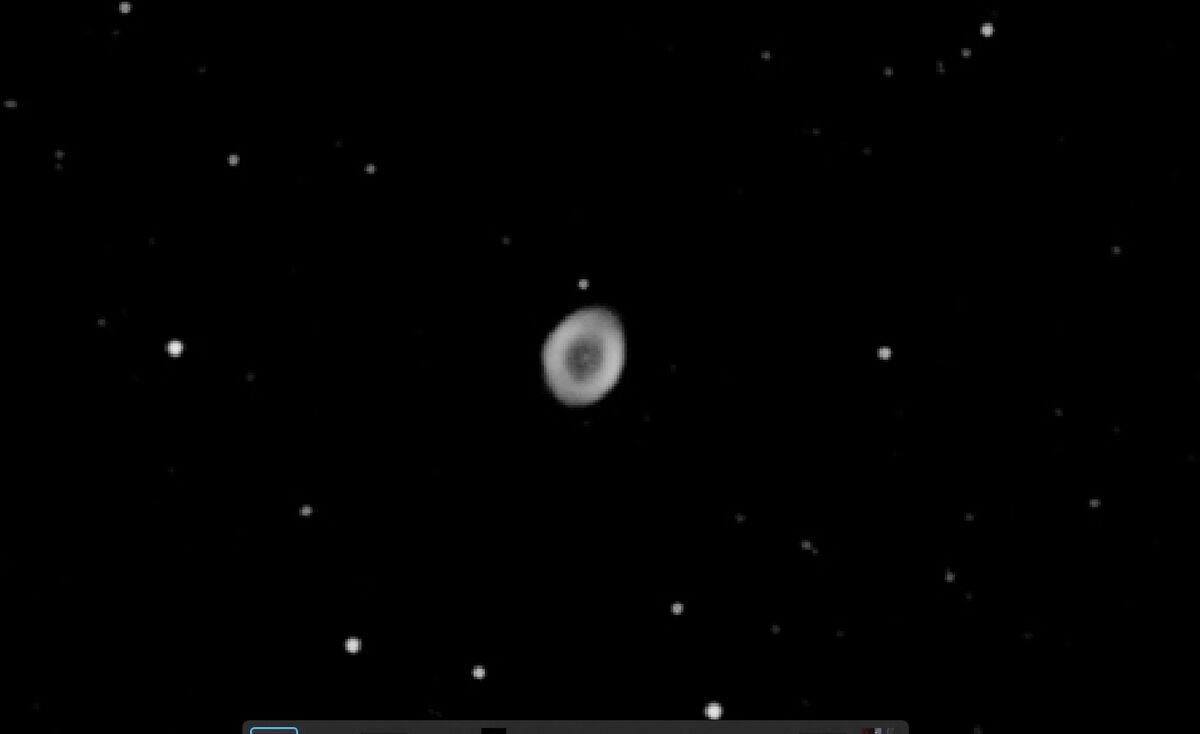
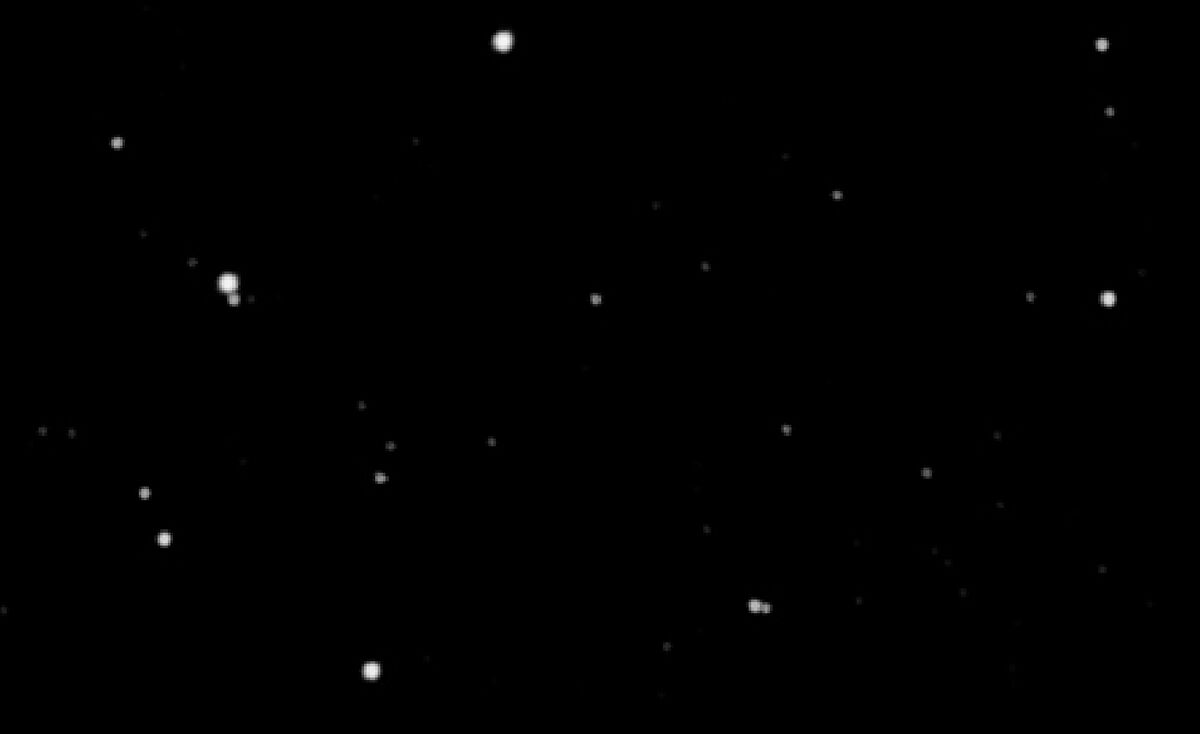
Image 2 is the crop of the Ring Nebula at 313%. Note that the center star can be seen (barely).
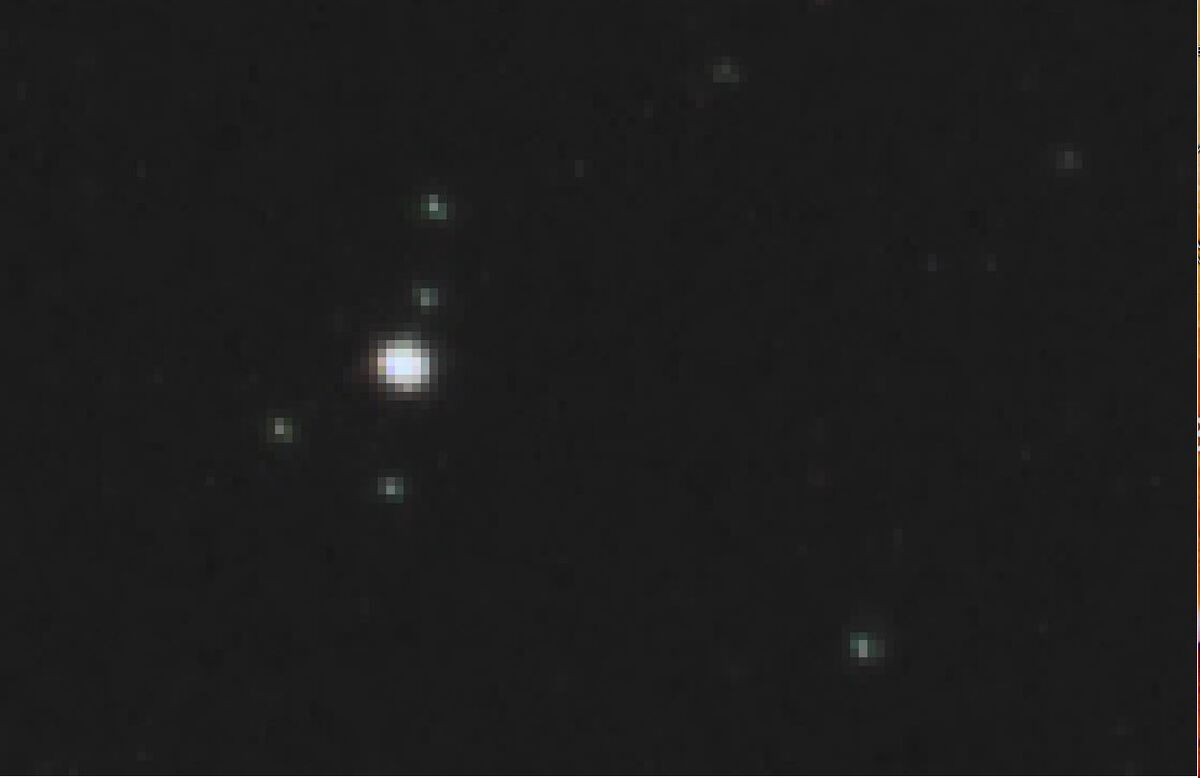
Image 3 is a crop of the bright star near the lower right. Note that there is a star within the bounds of the star at about the 10:00 position, and yet an even dimmer star at about the 7:00 position. And the two stars just to the right. Demosaicing would have blobbed this into a single mis-shapened blob. and to the left is a double star. Those would have been blobbed into one also.
Image 4 is yet another crop with a couple more double stars. Demosaicing would have blobbed those as well.
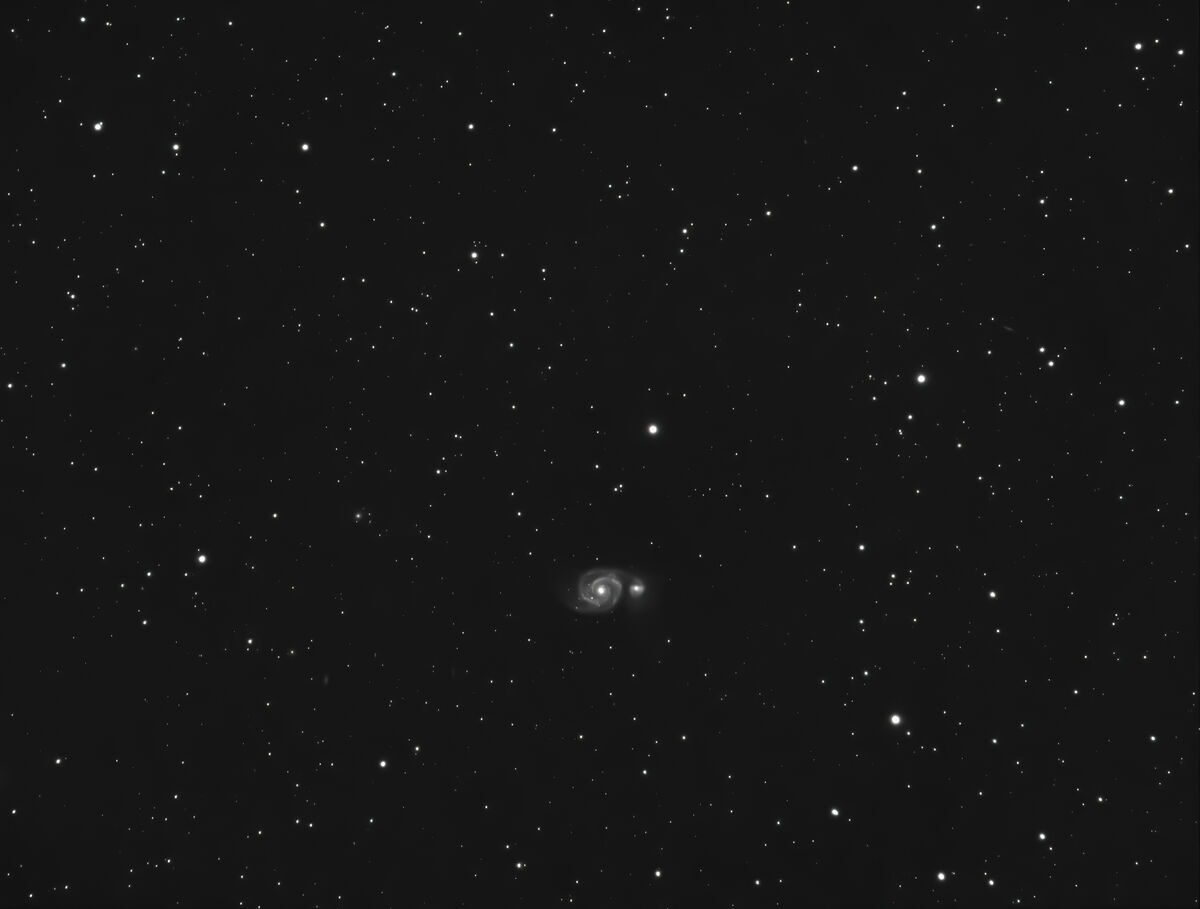
Image 5 was taken the same night of M51 which is a larger galaxy eating a smaller galaxy for breakfast. If you look carefully on this image, see if you can find 3 much fainter galaxies?
This is a taste of what a mono sensor is capable of doing.
The 1st image shows the Ring Nebula in the center. In actuality, the Ring Nebula is a small target and is best photographed with a larger telescope. But in this case, I used an APS-C sized sensor camera, the Sony A6300, and a fairly small scope of only 360mm f6. It can see the objects in the sky, but doesn't blow them up very big. Also used a UV-IR cut filter for this image in that there was nothing in this view that would benefit from adding IR light. And this cut filter was one that includes the 656nm wavelength in which some camera makers offer an astro version to see nebulas better that glow in the Hydrogen Alpha wavelength.
One important thing to note is the round stars. Cameras with CFA's and the need for demosaicing have trouble producing nice round stars and instead tend to produce blobs. Towards the lower right is a brighter star that would be a problem for demosaicing and I will point that out in a crop.
Image 2 is the crop of the Ring Nebula at 313%. Note that the center star can be seen (barely).
Image 3 is a crop of the bright star near the lower right. Note that there is a star within the bounds of the star at about the 10:00 position, and yet an even dimmer star at about the 7:00 position. And the two stars just to the right. Demosaicing would have blobbed this into a single mis-shapened blob. and to the left is a double star. Those would have been blobbed into one also.
Image 4 is yet another crop with a couple more double stars. Demosaicing would have blobbed those as well.
Image 5 was taken the same night of M51 which is a larger galaxy eating a smaller galaxy for breakfast. If you look carefully on this image, see if you can find 3 much fainter galaxies?
This is a taste of what a mono sensor is capable of doing.