Understanding masking
Mar 12, 2019 14:03:05 #
Iankahler wrote:
I know a lot of us use Photoshop, and other so... (show quote)
Really not a lot to understand, black covers up, white reveals, that's pretty much it, simple to me!
Mar 12, 2019 14:10:55 #
speters wrote:
Really not a lot to understand, black covers up, white reveals, that's pretty much it, simple to me!
Black in the mask hides (or covers) the changes and white reveals.
In the mask needs to emphasized, and that you get there by clicking the mask in the layer window. There have been times readers didn't understand that and painted on the image
Mar 12, 2019 15:00:04 #
Linda From Maine wrote:
Far less tedious than selection tools IMO and as G... (show quote)
Pg.2 Hi Linda. I saw this beautiful little Waxwing in the Newest Pictures section not knowing that it was part of this discussion. This is a very interesting thread and your example is very clear for such a "Not Clear" issue. Thanks.
Mar 12, 2019 15:15:03 #

SpyderJan wrote:
Thank you, Jan! As I mentioned in the thread, it was torture to learn layers and masks, but so very worth it once everything clicked.Pg.2 Hi Linda. I saw this beautiful little Waxwing in the Newest Pictures section not knowing that it was part of this discussion. This is a very interesting thread and your example is very clear for such a "Not Clear" issue. Thanks.
Mar 12, 2019 15:50:25 #
Look up ON1 software. They have a new masking technique in the 2019 version. You can get a 30 day free trial. That should help you understand.
Mar 12, 2019 16:29:43 #

fourg1b2006 wrote:
Look up ON1 software. They have a new masking technique in the 2019 version. You can get a 30 day free trial. That should help you understand.
It's a new take on the old QuickMask tool that mysteriously disappeared when they added raw. It's been a long time coming, but it is still a little buggy. The regular masking bugs, brush and refinement tools are unchanged.
Mar 12, 2019 16:35:57 #
Iankahler wrote:
I know a lot of us use Photoshop, and other so... (show quote)
Masking technique makes a bit of Photoshop Humor possible -
Mar 12, 2019 18:56:28 #
tcthome
Loc: NJ
Linda From Maine wrote:
Yes. I mentioned "gray" on page 1 with my photo; however, for anything less than full black, I just change the opacity of the brush itself.
Thank you.
Mar 12, 2019 19:05:30 #
tcthome
Loc: NJ
Guyserman wrote:
You nailed it Linda. More often than not my edits don't turn out like I envisioned and I have to start over.
That's a good reason to make a copy ( to play around with ) or work with layers. Don't like the out come delete the layer.
Mar 12, 2019 22:11:28 #
NCMtnMan
Loc: N. Fork New River, Ashe Co., NC
Iankahler wrote:
Thank you guys, for your input. br @bsprague, yes... (show quote)
Think of layers as clear sheets of acetate you place on top of your photo. Each sheet allows you to change a part of the photo like darken the sky or remove an object from view that detracts from the photo. You can add or remove sheets based upon what you want done. Each sheet equals a layer. You can add, delete or just turn off a layer.
Mar 13, 2019 00:26:47 #
Iankahler
Loc: Seattle WA
This has been an excellent thread to read. It is obvious that many of you understand masking.
Some of you see it as a simple process that you learned in five minutes. That's great for you.
However here is my conclusive opinion, which by NO means is intended to reflect negatively on those folks who have stepped up to share and teach.
Wisdom: To revel in what we can do; what we understand. We must also accept that there are mathematical, scientific processes, and events in life, that our mind will never comprehend. A wise person knows when to stop pursuing those processes and move on.
A wise teacher knows that their knowledge of a given subject cannot be imposed on everyone. They understand that no amount of explanation, by any given method, or process will cause their pupil to understand, when the pupil's mind is not created to absorb, envelop, and use such knowledge.
A wise pupil knows when to find another path to attain understanding; or when a path to specific knowledge has come to an inescapable end.
What do I take from this??? Simply that my mind will never understand layer masks. My brain just doesn't work in a way that any of the process makes sense.
What to do next for me. Use selection tools, gradients etc., and be satisfied and grateful that I can make it work for a result that pleases me.
The point is... the thread was not wasted on me. People are enthused, willing to try again. And I believe that is the purpose of this forum.
Mar 13, 2019 00:28:05 #
Iankahler
Loc: Seattle WA
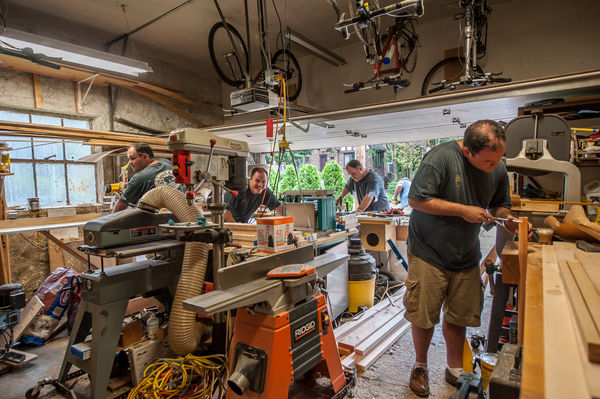
the tool workshop..... machines and people everywhere. OH yes... a great analogy. Masking.... total chaos!!
Mar 13, 2019 00:42:28 #
The most important thing you need to know about layers, masking and other selective editing tools is that there is an enormous range of beautiful photography you can do without it. Concentrate on mastering exposure and global editing techniques first.
Mar 13, 2019 01:11:22 #
amfoto1
Loc: San Jose, Calif. USA
Back in the day.... when I was working at newspapers... we used actual "masks" made of amberlith and rubylith to "drop out" backgrounds and do other modifications to images and graphics. Those were sort of like a plastic film, colored orange or red, which was semi-transparent. We'd use an Xacto knife to cup away and remove the portion we wanted to see, leaving the "mask" covering the portion of the image we wanted to disappear. Amberlith and rubylith came in sheets and rolls of tape in various widths. There were adhesive and non-adhesive versions.
Now it's much easier in Photoshop... you create a layer and add a mask to it... then use a "black" brush (or other tool) to "paint away" the portion where you want the base layer to show through. You also can use a "white" brush to paint it back if you make a mistake or change your mind (much easier than having to repair a mis-cut amberlith).
The top layer, with the mask, can be used for any number of different things. You can replace a background, add blur, do selective sharpening, apply different amounts of noise reduction to different parts of images, add a color correction filter to part of an image, and much more.
You can even create "gradations" with it, such as to make a faux depth of field effect where the background is gradually more blurred the farther it is behind the subject. The way I usually do that is to first use a 100% black brush to erase the layer, then switch to a 10 or 15% white brush and make repeated passes to "build back up" the effect, creating the gradation. Different size and different "harness" brushes can be used.
Once you learn to use masks, you'll have a very powerful tool at your disposal!
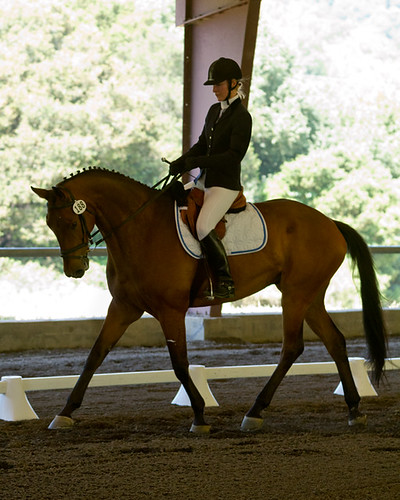
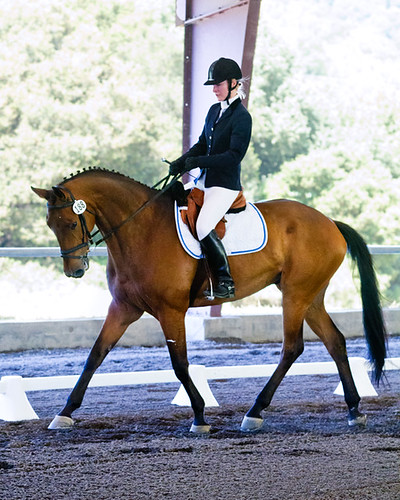
Here's an example where I used a mask to "correct" part of the image. This was a subject in a shaded location, in front of a very bright, sunlit background.... way more dynamic range than any camera can handle in a single image. Plus it was a moving subject, so I could only take a single image (couldn't use "HDR" or "high dynamic range" multiple image technique). So I shot the image RAW and "double processed" it... I made one version with both exposure and and white balance adjusted for the primary subject, indoors and shaded.... Then I made a second version of the image adjusted to recover some of the outdoor, sunlit background.... adjusting both exposure and white balance. Then I made a copy of the one image and placed it on top of the other as a new layer in Photoshop, created a mask on it and "painted away" the portion where I wanted the subject to show through... basically combining the "correct" portions of each image. In the end, I actually made the top (background) layer a little transparent, to look a bit more natural. (Note: the entire image has a bit of extra saturation due to the printing process that was going to be used.) Once it all looked right, I "flattened" the layers into a single image. That's necessary to be able to save the image as an 8-bit JPEG (if wanting to save an image with work still needing to be done, an image can be left in layers and saved as a 16-bit TIFF or PSD file).
Left is the version adjusted for foreground/shaded subject (bottom/main layer)... center is the background/sunlit version (top/masked layer)... right is the finished image combining portions of the other two, using layers and masks. I use layers and masks A LOT for all sorts of selective work.

Now it's much easier in Photoshop... you create a layer and add a mask to it... then use a "black" brush (or other tool) to "paint away" the portion where you want the base layer to show through. You also can use a "white" brush to paint it back if you make a mistake or change your mind (much easier than having to repair a mis-cut amberlith).
The top layer, with the mask, can be used for any number of different things. You can replace a background, add blur, do selective sharpening, apply different amounts of noise reduction to different parts of images, add a color correction filter to part of an image, and much more.
You can even create "gradations" with it, such as to make a faux depth of field effect where the background is gradually more blurred the farther it is behind the subject. The way I usually do that is to first use a 100% black brush to erase the layer, then switch to a 10 or 15% white brush and make repeated passes to "build back up" the effect, creating the gradation. Different size and different "harness" brushes can be used.
Once you learn to use masks, you'll have a very powerful tool at your disposal!
Here's an example where I used a mask to "correct" part of the image. This was a subject in a shaded location, in front of a very bright, sunlit background.... way more dynamic range than any camera can handle in a single image. Plus it was a moving subject, so I could only take a single image (couldn't use "HDR" or "high dynamic range" multiple image technique). So I shot the image RAW and "double processed" it... I made one version with both exposure and and white balance adjusted for the primary subject, indoors and shaded.... Then I made a second version of the image adjusted to recover some of the outdoor, sunlit background.... adjusting both exposure and white balance. Then I made a copy of the one image and placed it on top of the other as a new layer in Photoshop, created a mask on it and "painted away" the portion where I wanted the subject to show through... basically combining the "correct" portions of each image. In the end, I actually made the top (background) layer a little transparent, to look a bit more natural. (Note: the entire image has a bit of extra saturation due to the printing process that was going to be used.) Once it all looked right, I "flattened" the layers into a single image. That's necessary to be able to save the image as an 8-bit JPEG (if wanting to save an image with work still needing to be done, an image can be left in layers and saved as a 16-bit TIFF or PSD file).
Left is the version adjusted for foreground/shaded subject (bottom/main layer)... center is the background/sunlit version (top/masked layer)... right is the finished image combining portions of the other two, using layers and masks. I use layers and masks A LOT for all sorts of selective work.
Mar 13, 2019 06:18:36 #
Iankahler wrote:
This has been an excellent thread to read. It i... (show quote)
Iankahler, I'm sorry to see that you're throwing in the towel...
But thank you for starting this thread. As one currently struggling with learning photo editing, I very much appreciate all the good comments and suggestions you got on this topic. Thank you all very much!
If you want to reply, then register here. Registration is free and your account is created instantly, so you can post right away.