Cleaning Up The Scene
Jan 28, 2019 14:35:52 #

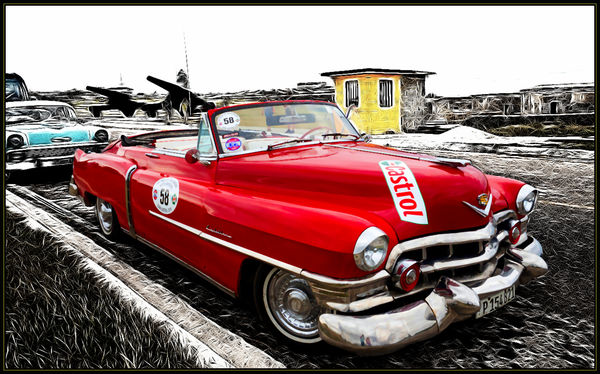
Do you do much clean up of your travel scenes? I don't clean them all up, but if there's one I like, I shoot it the best I have a chance to under the circumstances that present themselves (which can be rushed by a restless spouse or a fast moving tour guide, or subject to bad light, tripod or camera restrictions, and TOURISTS, some of which can be interesting but many of which are not).
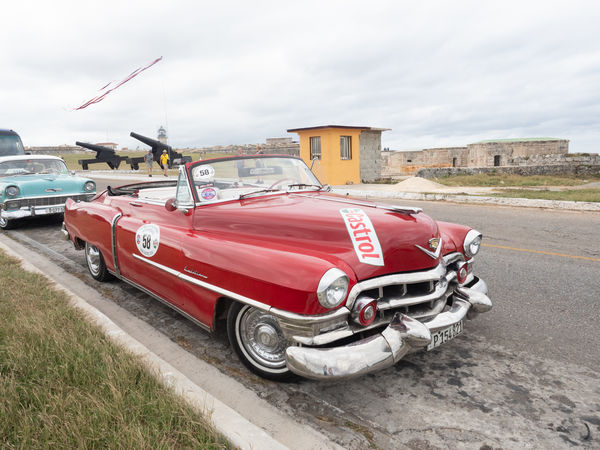
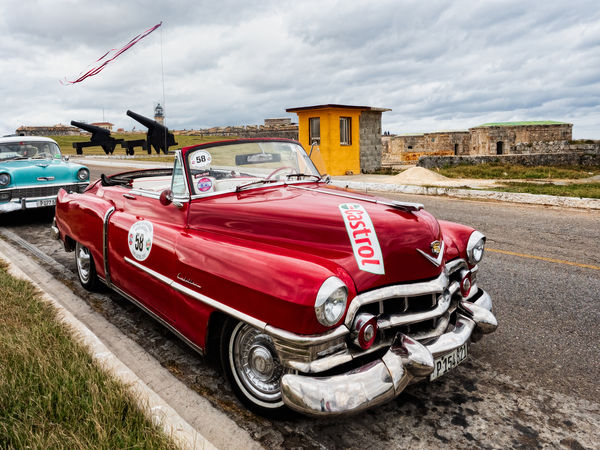
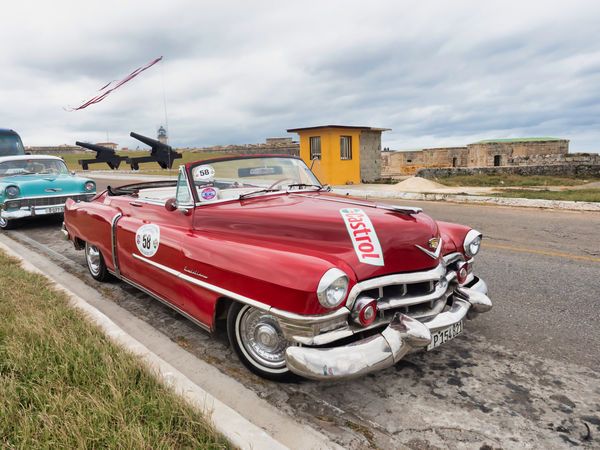
I took this in November in Havana at El Moro, on the grounds of the military base that was at the center of the Cuban missile crisis. Like all Americans, I became infatuated with the old cars of Havana, and took every opportunity to gather shots of them, regardless of circumstance, knowing there would be much editing to keep me busy on bleak winter days.
I'm not expert at getting rid of intrusions but took a little time yesterday to wrangle with this one. If you see other things I should do, feel free to suggest or try your hand. The captured image and the edited version are both posted. Cars like this can be processed in many creative ways, in this version I just wanted a brighter/ shinier version with less intrusion, but there are lots of options.
Jan 28, 2019 17:11:24 #

Amazing what a little wax job will do for red paint  Though I haven't traveled in some time, your message is equally relevant for me and many others. With a little patience, learned skills and interest in the result, we can polish up our shots very nicely.
From all the feedback I've received and given these past few years, I've learned to see the little "nitpicks" that can make a big difference: whether it's just a small fix (bright spot that distracts us from the subject, or a slightly tilted horizon, or a stray piece of litter) or something larger (color saturation, sky details, pieces of objects intruding into the frame's edge), I think it's a very valuable practice to spend time analyzing how to make the image better.
Many thanks for your time and talent, Minnie!
Though I haven't traveled in some time, your message is equally relevant for me and many others. With a little patience, learned skills and interest in the result, we can polish up our shots very nicely.From all the feedback I've received and given these past few years, I've learned to see the little "nitpicks" that can make a big difference: whether it's just a small fix (bright spot that distracts us from the subject, or a slightly tilted horizon, or a stray piece of litter) or something larger (color saturation, sky details, pieces of objects intruding into the frame's edge), I think it's a very valuable practice to spend time analyzing how to make the image better.
Many thanks for your time and talent, Minnie!
Jan 28, 2019 18:16:31 #

I’m intrigued with how you shined up that Caddy. I will nearly always have a “Spotting” layer that I use to ‘clean up’ an image. Seems there’s always something there that I don’t want.
Jan 28, 2019 18:27:24 #
You did an excellent job removing the people. Good job!
A picture like this is one that Shakey use to post and ask the UHH people to show their skills and mention the software they used to make their edits. In his memory I decided to try and fix it too. I took your picture and did a quick boost using Photolemur 3. From there I opened in Photoshop and removed the people using just the clone tool. It took me about 20 min. for the changes. If I had a bunch from a vacation I would only take time to do a few pictures. Snaps usually work for me for basic memories.
A picture like this is one that Shakey use to post and ask the UHH people to show their skills and mention the software they used to make their edits. In his memory I decided to try and fix it too. I took your picture and did a quick boost using Photolemur 3. From there I opened in Photoshop and removed the people using just the clone tool. It took me about 20 min. for the changes. If I had a bunch from a vacation I would only take time to do a few pictures. Snaps usually work for me for basic memories.
Jan 29, 2019 06:39:13 #
brucewells wrote:
I’m intrigued with how you shined up that Caddy. I will nearly always have a “Spotting” layer that I use to ‘clean up’ an image. Seems there’s always something there that I don’t want.
I downloaded the photo - opened it up in PS - clicked on camera raw under filters - Moved Highlights to the far left - Slide the Shadows slider to the right to +32 - slide the Whites slider to the left -60 - Slide the Black slider all the way to the left - Slide the Clarity slider to the right to +58
will give you a very close copy to his changes and make the colors of the 2 cars pop .This is how I did it , not sure how they did it .Tommy
Jan 29, 2019 08:33:39 #
Linda From Maine wrote:
Amazing what a little wax job will do for red pain... (show quote)
It’s also why having a second/third/more set of eyes on a piece makes such a difference. I went over this one at 200% a couple of times, exported it, then found a disembodied hand floating around.
Jan 29, 2019 08:38:30 #
brucewells wrote:
I’m intrigued with how you shined up that Caddy. I will nearly always have a “Spotting” layer that I use to ‘clean up’ an image. Seems there’s always something there that I don’t want.
Though I never recall all the steps I take, I think the main color impact was a layer of one of the jacked up Topaz Adjust color contrast/detail filters, masked to show mainly on the cars, then my usual NIK glamour glow on another layer. Once I got it kinda like I wanted, I duplicated it, blended it with multiply and masked it in at a reduced opacity just on the cars. Made the colors rich and shiny. I’m almost always experimenting. It’s never a direct route.
Jan 29, 2019 08:39:09 #
kubota king wrote:
I downloaded the photo - opened it up in PS - clicked on camera raw under filters - Moved Highlights to the far left - Slide the Shadows slider to the right to +32 - slide the Whites slider to the left -60 - Slide the Black slider all the way to the left - Slide the Clarity slider to the right to +58
will give you a very close copy to his changes and make the colors of the 2 cars pop .This is how I did it , not sure how they did it .Tommy
will give you a very close copy to his changes and make the colors of the 2 cars pop .This is how I did it , not sure how they did it .Tommy
Always glad to see someone else take a shot at it! Thanks for sharing your expertise.
Jan 29, 2019 09:02:29 #
minniev wrote:
Though I never recall all the steps I take, I think the main color impact was a layer of one of the jacked up Topaz Adjust color contrast/detail filters, masked to show mainly on the cars, then my usual NIK glamour glow on another layer. Once I got it kinda like I wanted, I duplicated it, blended it with multiply and masked it in at a reduced opacity just on the cars. Made the colors rich and shiny. I’m almost always experimenting. It’s never a direct route.
I never record my precise steps either, but you've given me a good idea of how it was done. Thanks.
Jan 29, 2019 09:02:33 #
Jim-Pops wrote:
You did an excellent job removing the people. Good... (show quote)
Thank you for taking a run at it! Photolemur is an interesting piece of software. I got it free as a bonus for something, but have only used it a couple of times.It does seem to do a pretty good job getting a starting place for color, contrast, detail. I agree with you about editing bunches of pictures. Most just get a basic LR preset that I apply on import, then some individual tweaks. Once that’s done I decide which I want to work further. The wet cold days of winter are when most of the creative editing gets done!
Jan 29, 2019 10:15:46 #
rborud
Loc: Minnesota
minniev wrote:
Do you do much clean up of your travel scenes? I d... (show quote)
Minnie This morning I saw your car and went crazy. I do love these older pieces of Detroit Iron. Thanks for looking. RBorud
Jan 29, 2019 10:20:52 #
rborud wrote:
Minnie This morning I saw your car and went crazy. I do love these older pieces of Detroit Iron. Thanks for looking. RBorud
Cool rendition! Thanks for sharing! Looks like you were attracted to the same Crayola colors I was, you just went much further in setting the limits on them. Your version turned out great. I shot a ton of pictures of these things, they were addictive, posting them here and on my Other Place.
Jan 29, 2019 10:39:26 #

Not only a shiny new wax job. But getting rid of that third vehicle, which didn't really belong in the same picture as the two classics.
Jan 29, 2019 22:07:40 #

I think clean up makes a lot of difference. I normally do quite a bit but not necessarily on scenes like this. When I do close ups of flowers I like to remove small blemishes, bugs, etc.unless they are adding something to the story.
Jan 29, 2019 23:34:56 #
NJFrank wrote:
Not only a shiny new wax job. But getting rid of that third vehicle, which didn't really belong in the same picture as the two classics.
Yes, the vehicle was worse than the people, who were pretty small. I did leave the distant people but got rid of the mid range set. The ones behind the red car were kind of a pain to get rid of.
If you want to reply, then register here. Registration is free and your account is created instantly, so you can post right away.