First time taking a image with home made pin-hole cap
Jan 16, 2019 16:39:55 #
wingclui44
Loc: CT USA
I took this image with my home made pin-hole cap, the hole is less than 0.5 mm ( measured with a caliber)
How do you think the image?
How do you think the image?

Jan 16, 2019 16:42:30 #

It looks like a fun experiment, but something tells me it won't be much use for BIF shots  .
.
.Jan 16, 2019 16:57:13 #

Jan 16, 2019 18:03:37 #
With a pinhole lens, I've found that it's better not to have foreground subjects. Like shoot a room or an exterior shot.
Jan 16, 2019 21:49:01 #
wingclui44
Loc: CT USA
Vietnam Vet wrote:
I think something should at least be in focus
By theory, every thing from near to far distance should be in-focus, but it all depends on the size of the hole (0.3mm ideally), the smoothness of the hole and the diffraction due to very small aperture! I will continue to improve the quality of the hole, but don't expect getting very sharp image like a regular real lens.
Jan 16, 2019 22:26:59 #
Looks like your 0.5mm is waaaay huge,
and so 0.3mm aint gonna be near ideal
neither.
Typical pinhole optics are around f:400
very approximately. Your 0.5mm is only
about f:32. I have glass lenses that can
stop down further than that !
.
and so 0.3mm aint gonna be near ideal
neither.
Typical pinhole optics are around f:400
very approximately. Your 0.5mm is only
about f:32. I have glass lenses that can
stop down further than that !
.
Jan 17, 2019 09:35:45 #
wingclui44
Loc: CT USA
User ID wrote:
Looks like your 0.5mm is waaaay huge,
and so 0.3mm aint gonna be near ideal
neither.
Typical pinhole optics are around f:400
very approximately. Your 0.5mm is only
about f:32. I have glass lenses that can
stop down further than that !
.
and so 0.3mm aint gonna be near ideal
neither.
Typical pinhole optics are around f:400
very approximately. Your 0.5mm is only
about f:32. I have glass lenses that can
stop down further than that !
.
Yes,you are right. As I said, I will continue to experience to improving the quality of the "hole", that's the fun part of my project!
You can't be sure it was f32. of my cap lens, it all depends on the distance of the projection to the sensor, so the "angle of the field" of the light ray will change if move the cap closer or farther away from the sensor. It means it may be like a 50mm lens or 100mm tele lens. so the f stop will be different.
Assuming my cap hole is 0.5mm (actually it's less than that by measuring with a caliper instrument)
Jan 17, 2019 10:38:32 #
Jan 17, 2019 11:14:41 #
wingclui44
Loc: CT USA
skeeth wrote:
It sucks
Thank you for your honest critic! The image is "sucks", I will keep working.
Jan 17, 2019 11:22:23 #

Presumably you have drilled a hole into something like a body cap. How does the thickness of the material (ie, depth of the light tunnel) affect the sharpness of the image? Would you get better results drilling a larger hole and covering it with foil that has a small pin prick hole in it?
Jan 17, 2019 12:37:52 #
wingclui44
Loc: CT USA
JohnFrim wrote:
Presumably you have drilled a hole into something like a body cap. How does the thickness of the material (ie, depth of the light tunnel) affect the sharpness of the image? Would you get better results drilling a larger hole and covering it with foil that has a small pin prick hole in it?
Yes, I drilled a 1/4" hole on the body cap, and use a sheet of aluminum with the pin-hole. then painted it with flat back paint, then glued it on the inside part of the cap.
Jan 17, 2019 13:29:18 #

wingclui44 wrote:
I took this image with my home made pin-hole cap, the hole is less than 0.5 mm ( measured with a caliber)
How do you think the image?
How do you think the image?
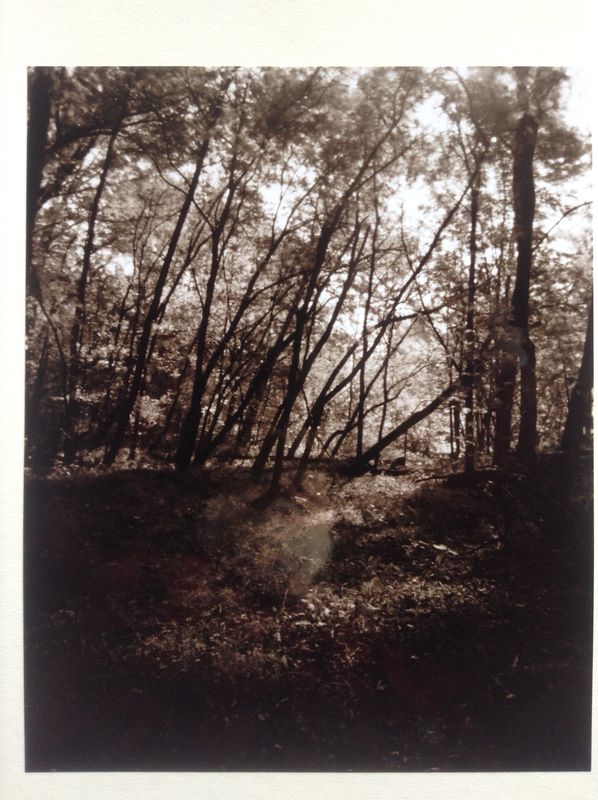
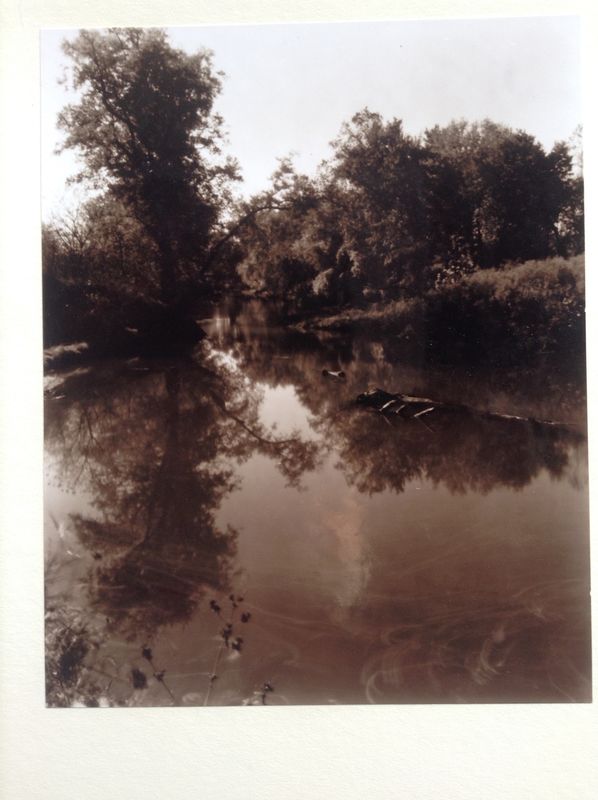
I haven't done the pinhole shots since 1974 when I spent a whole semester working with an 8x10 view camera and a pinhole in college. The thinner the "lens" material the better. If you change the distance between the lens and the sensor (film) you vary between wide angle and telephoto. The film then was only ASA400 (ISO400) most of my shots were 20 minutes to 1 hour long. So don't expect to shoot any hummingbirds. There is a formula out there somewhere to precisely figure out the best size hole. Sorry I don't have that any more. These are two shots from my college project. The image you see is just a iPad photo of the original 8x10. Good luck and happy shooting
8x10 pinhole camera
8x10 pinhole camera note: leaf swirl in lower right
Jan 17, 2019 16:30:22 #
wingclui44
Loc: CT USA
ORpilot wrote:
I haven't done the pinhole shots since 1974 when I... (show quote)
I have just took another image at almost the same object at ISO200 3.0sec. it shows a little batter. I took the image with a full frame Df.

Jan 17, 2019 17:14:52 #
wingclui44 wrote:
I have just took another image at almost the same object at ISO200 3.0sec. it shows a little batter. I took the image with a full frame Df.
Try a few outside with subjuct more than 10ft away and see if the focus is a little better. If not then use a piece of aluminum foil to make your pinhole.
Jan 17, 2019 18:13:19 #
I have noticed several readers experimenting with pinholes on UHH. I have experimented with pinholes in several different methods to take photos of my trains with depth of field from the nearest point in focus to infinity. One method which is simple and not expensive and involves obtaining a preset lens on ebay or elsewhere. There is one on ebay now for $40. It can be about 35-50 mm. They are also called T mount lenses, since the lens screws onto and adapter for your camera brand. The rear element of a T mount lens screws out. A pinhole diaphragm can be fashioned from a piece of BRASS shim. K&S makes a package of brass shims and would be available at a hobby shop or a well stocked hardware store. Selecting the thinnest piece a small hole is made with a pinvise #80 drill bit. You might get lucky and use a needle. Sorry, tin or aluminum foil will NOT work, for a perfectly round hole is needed. If you know a model railroader, they likely already have some drills, shimstock, and expertise working with small things. A small diaphragm 6-7 mm in size can be suspended in front of the front of the rear element, so it is very close to the diaphragm. It is suspended by 3 small pieces of brass wire glued to the brassdiaphragm you made and then to the metal surrounding the rear element. It is not glued to the lens glass itself. They can be removed if desired, for it is still a camera lens. No glue is applied to the front element of the removable rear element. Now, you have a real lens with glass rather than a hole without lense elements. Obviously, the photos are better. I can't locate my lens now to show a photo, but the concept and execution are easy. A high power magnifier is useful to examine the hole in the diaphragm for roundness.
If you want to reply, then register here. Registration is free and your account is created instantly, so you can post right away.