How to deal with sky over exposing?
Jan 4, 2019 06:34:52 #
If you have blown skies there is no way I am aware of to get it back in post. Bracketing would be your best option. Or shoot when the sun is at your back.
Jan 4, 2019 06:41:22 #

Bokehen wrote:
Avoid any post process editing. Learn to use the camera for it's worth by adding either a drop in or circular polarization filter.
How would you deal with the scene I posted above?
In today's digital photography environment, post processing is to be embraced, not avoided. It's really easy to do and it doesn't take long. I know of no camera that can produce a properly exposed image in a very high contrast situation. Learning the camera's "worth" and getting it right in the camera takes an entirely new meaning. If you are avoiding post processing, then you are most certainly leaving some money on the table, so to speak.
The first six images below are a bracketed set of jpegs - straight out of the camera. I think you would agree that not a single one is "properly" exposed for a jpeg. The last one was shot as raw, using an exposure setting that was between the 4th and the 5th image, and then post processed.
Knowing how to post process is as important today as it was in the days of film. Few fine art photographers displayed and sold "perfect" contact prints. Post processing was part and parcel of creating impactful and memorable images.
.


Jan 4, 2019 06:43:57 #
CO wrote:
I often bracket photos and merge them in Photomatix HDR Pro. Here are a series of three photos I bracketed. The lower one is the final version merged in Photomatix. It's especially good for interior shots where there's extreme contrast because of window light.
Good job.
Jan 4, 2019 06:45:18 #
hobbit123
Loc: Brisbane, Australia
Gene51 wrote:
How would you deal with the scene I posted above? ... (show quote)
Many thanks. Excellent example!!
Jan 4, 2019 06:46:59 #
WessoJPEG wrote:
Good job.
Thanks. It's really good for interior shots were there's extreme contrast because of window light.
Jan 4, 2019 06:47:25 #
billnikon wrote:
One of the ways you can balance this is using HDR (high density range) in your camera (if you have that) does not always work. Another way is to shoot Raw and take care of it in post. Another way is to shoot one shot for the sky, and another shot for the ground, and combine them in post. (you will need a tripod for this)
Or, you can get a Graduated Filter and holder for your lens, this will help you balance the shot in the camera.
Or, you can get a Graduated Filter and holder for your lens, this will help you balance the shot in the camera.
HDR=High Dynamic Range. You don't need a camera that offers an HDR mode - all you need to do is to adjust the exposure by manipulating the shutter speed. Shooting 2 different exposures - one for sky and the other for everything else and combining them in post IS HDR, done manually - aka compositing. Tripods are helpful for this but not an absolute necessity unless the exposure for "everything else" involves a longer shutter speed than can be safely hand held. Graduated ND filters have limited application - and are not a good choice when you don't have a clean straight horizon without trees/buildings/mountains etc projecting into the sky.
Jan 4, 2019 06:48:59 #
hobbit123 wrote:
Many thanks. Excellent example!!
Thanks!

Jan 4, 2019 07:07:09 #
Gene51 wrote:
How would you deal with the scene I posted above?
Gene51 at the time when I posted my comment, there wasn't any pictures. In other words, I've noticed recently that I'm not seeing several posting images by members. Moreover the image seem to be disappearing or were never posted in the first place. Also I might add, that upon occasion, when I view an image after making the first reply, the Oper may or may not actually delete/remove the image or edit his comments thus making my comment look out of place and irrelevant. This is what happens when forums allow members to edit or even delete their topics. granted I should "quote" post in the future thus locking in the comment i've responded to.
Jan 4, 2019 07:12:35 #
Bokehen wrote:
Gene51 at the time when I posted my comment, there wasn't any pictures. In other words, I've noticed recently that I'm not seeing several posting images by members. Moreover the image seem to be disappearing or were never posted in the first place. Also I might add, that upon occasion, when I view an image after making the first reply, the Oper may or may not actually delete/remove the image or edit his comments thus making my comment look out of place and irrelevant.
I have noticed weird stuff as well - sometimes when I post something it completely disappears. UHH definitely has a ghost in the machine.
Jan 4, 2019 07:32:47 #

Jan 4, 2019 07:42:55 #

I am fairly new to the digital game, and I don't have the proper computing strength in my laptop to effectively and/or efficiently use a "proper" post processing program such as LR or PS. So (I know I know horror of horrors) I am still shooting in JPEG!
That being said, I shoot a lot of wildlife and don't have the luxury of multiple shots of the same subject and then blending them in post. So while I understand what has been suggested so far, I am surprised that nobody has yet talked about the feature on the camera that will help in the original and often time, the only capture.
Nobody has spoken of using exposure compensation along with "spot meter" mode. When I shoot a darker subject against a lighter sky, to keep from blowing out the sky, I will set the EC to -.7 to -1.7 depending on the situation. I have set my playback to show "blinkies" or the highlights that have been blown out. While I cannot eliminate them all all of the time, I can eliminate total blown out sky, then in my limited post, I can expand the brightness and (sometimes as needed) some color saturation because I still have pixels to play with because they were not blown out. Once blown out, there is no processing that can bring back detail as the details are not there to salvage.
I am not sure what camera you are using, but even on my basic D3400 I could use EC and the playback "blinkies" to capture images that often are victims of extreme light values. If you have interest, you can check out my flickr page linked below and you will see this in my recent images from FL where the birds images are often against a bright sky. To get the EC setting, you need to click on "exif data" when you look at individual images.
Hope this helps
Jan 4, 2019 08:14:43 #

CO wrote:
I often bracket photos and merge them in Photomatix HDR Pro. Here are a series of three photos I bracketed. The lower one is the final version merged in Photomatix. It's especially good for interior shots where there's extreme contrast because of window light. For interior scenes you may even have to bracket five shots.
And did you go to the Iron Horse Restaurant across the street for a snack after your photo shoot? I assume the this is the Ashland, VA Amtrak stop.
Jan 4, 2019 08:19:46 #

hobbit123 wrote:
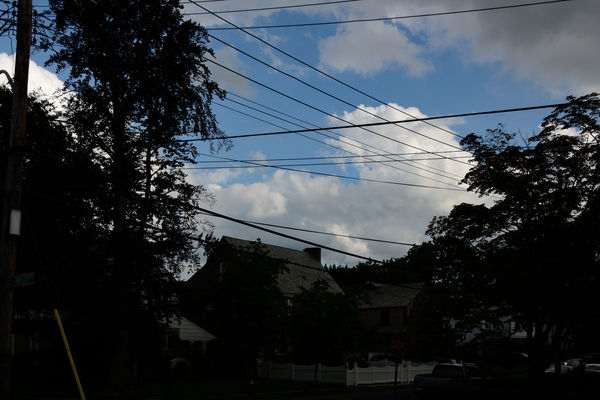
Probably a fairly basic question but whenever I take a shot that includes some sky it's always over exposed. The physics seem pretty simple, either the sky is exposed correctly (and the other stuff appears under exposed) or vice versa. I can't see how you can have a happy medium.
Am I missing something? Or do you correct in post?
Thanks
Am I missing something? Or do you correct in post?
Thanks
In the future, to improve the information you receive, you might want to include the equipment you are using and a sample photo that shows the issue you are having. There are many on UHH who will give you lots of specifics when you give them more to work with.
Jan 4, 2019 08:20:31 #

One thing to try is using the matrix mode for metering and (still) correct in post. Although a center weighted or spot meter will give best exposure on the part of the scene you focus on, the sky will be more blown out than in matrix mode (which I use almost exclusively).
In post, if you are using Lightroom (or Camera Raw in Photoshop), there are several ways to adjust the sky.
1. Lower the highlights slider. This is often effective by itself and I have brought visible clouds and blue sky into view with just this adjustment.
2. Apply a gradient filter to the top half of the image and reduce the exposure, or highlights, or both.
3. With a brush (not sure if you have that in Camera Raw), brush in the sky and make further adjustments to exposure and highlights.
Sometimes, if I want the sky to look more blue, I will use the brush (step 3 above) and slide the color temperature toward more cool (blue).
I find that it is better to overlay multiple brush effects instead of trying to make all of the exposure adjustments in one brushing - to me, it looks more natural.
As a last resort, you can replace the sky in photoshop or affinity (or whatever - they all do it). I have done it, but now you are spending a lot of time on an image that should only require a minute or so. It had better be an award winner if you are going to go to that length!
Jan 4, 2019 08:29:16 #
If you are photographing people, you can expose for the sky and use flash to expose your subject.
If you want to reply, then register here. Registration is free and your account is created instantly, so you can post right away.