photographing jewelry.
Jun 25, 2012 11:36:53 #
In addition to the advice Ive sent you , either camera I recommended would enable filling the frame with subject matter . The model 5 to a greater extent though at greater cost amd in my opinion , worth the additional investment .I own both models .
Jun 25, 2012 11:38:13 #
gregoryalanmccorkle
Loc: Seattle, Washington
Does anyone actually think about hiring a professional? Someone who actually shoots product for a living? Someone that went ro school for commercial photography? You have fine jewelry. It deserves to be captured by someone the really knows what ther're doing.
Jun 25, 2012 11:46:55 #

gregoryalanmccorkle wrote:
Yes, but wouldn't that take some of the fun out of it? :lol:Does anyone actually think about hiring a professional? Someone who actually shoots product for a living? Someone that went ro school for commercial photography? You have fine jewelry. It deserves to be captured by someone the really knows what ther're doing.
Jun 25, 2012 11:52:25 #
gregoryalanmccorkle
Loc: Seattle, Washington
It's all about getting the best results. When my car runs poorly I take itot to my mechanic.
Jun 25, 2012 11:59:51 #
A black background helps make pieces dramatic and encourages viewer to only focus on the subject. Don't be too se-metric in your layout, lay items out artistically and natural looking. A small branch may help adding interest to larger pieces or necklaces. Best wishes. WLS
Jun 25, 2012 12:06:02 #
gregoryalanmccorkle
Loc: Seattle, Washington
Purchase some high end fashion mags with jewelry ads. You can see what the pros are doing.
Jun 25, 2012 12:39:14 #
Depends on what the results are to be used for . For catalogue promotion of sales , absolutely go with the pros . For internal use it's expensive overkill .
Jun 25, 2012 19:17:56 #

I use a macro studio (you could make one yourself) shutter release and long exposure.
Jun 25, 2012 19:52:38 #

Beyond the already mentioned issues of backgrounds for Jewelry, it often has surfaces polished to near the wavelength of light of the light source, reflecting what is known as specular light. This light can be very intense and overexpose portions of the image spoiling its clarity. For a good example of specular light look at the reflection of the sun from a chrome bumper in full sunlight.
To correctly cancel specular light and truly enhance the quality of your jewelry images follow this lighting procedure:
1. Position a shiny coin perpendicular to the lens-coin line.
2. Position two photo flood lights at 45 degrees to either side of the lens-coin line.
3. Place a linear polarizing filter over each of the photo flood lights, which will cause the coin to be illuminated only by polarized light.
4. Focus your lens and place a linear polarizing filter on the lens of your camera.
5. Rotate the linear polarizing filter on the lens of your camera until the coin appears black in your view finder. You may also need to rotate the linear polarizing filter over each of the photo flood lights to achieve this effect.
6. Place a Grey Card just in front of the coin and manually measure and adjust for the correct exposure.
7. Replace the coin and the Grey Card with the jewelry to be photographed and make your exposure.
8. There is no need for further tinkering as you go from one piece of jewelry to another, just switch to next piece of jewelry and make your exposure, and so forth.
Let us see your results.
Dancnbare
Jun 25, 2012 20:07:15 #

I have used a light box with various colored fabric. Black is great. I have used for years a large magnifying glass in front of the lens and it does wonders for close ups of jewelry. I started using this method about 12 yrs ago with an HP point and shoot and I still use the same method today. Hope this helps its just what I do.
Jun 25, 2012 20:54:34 #
Wabbit
Loc: Arizona Desert
You don't need fancy equipment. These were taken with my 7 year old Canon A95 in macro, The lume shot was taken inside my Rubbermaid light box
Jun 25, 2012 21:01:11 #

Check out this site for some good tips about jewelry photography:
http://www.tabletopstudio.com/documents/jewelry_photography.htm
http://www.tabletopstudio.com/documents/jewelry_photography.htm
Jun 25, 2012 21:44:20 #

Jewelry is one of the most difficult things to photograph. Besides being small and reflective, you must place the piece in an interesting position. There are lots of articles about shooting jewelry, as some UHHer's have posted, but there is nothing better than lots of experience to teach you what to do...and what not to do.
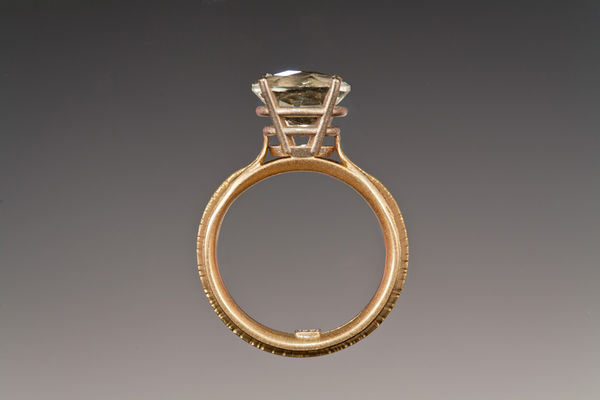
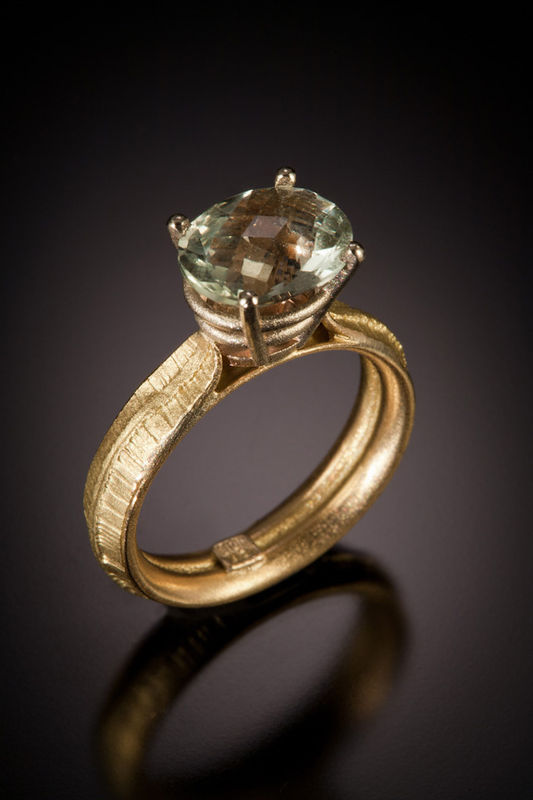
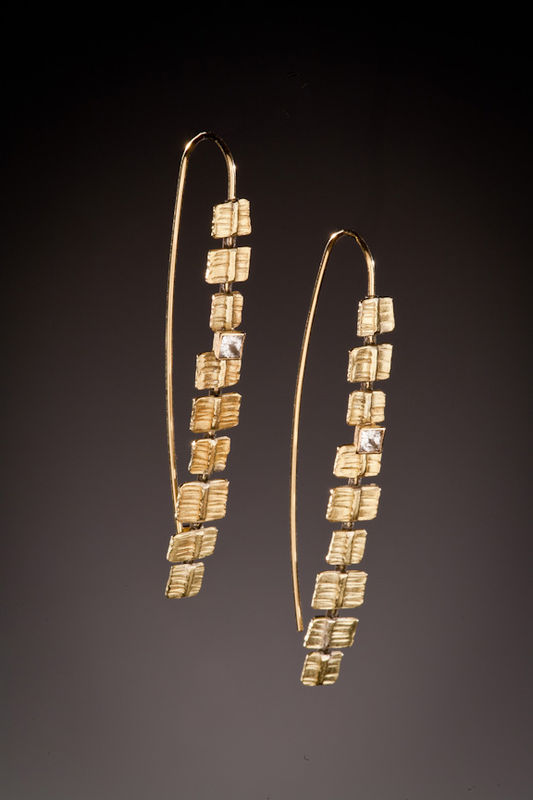
A camera with close-up capability is a must, but equally so important is the background and lighting. I am posting three shots I just did yesterday with three different background and lighting. I won't get into the details, but will provide a short description with each shot.
A camera with close-up capability is a must, but equally so important is the background and lighting. I am posting three shots I just did yesterday with three different background and lighting. I won't get into the details, but will provide a short description with each shot.
ring on glass with graduated paper background
ring on plexiglass with diffused light
earrings with graduated paper background
Jun 25, 2012 22:39:07 #

All the light tent suggestions will work. What light you use and where you position it is still important. The smaller the light source, the smaller and sharper the highlights. The broader the light source the larger the highlights will be. Use one light if possible, positioned off to one side, otherwise you will get multiple highlights in the shiny items. You also need some shadow to give the item a 3D quality.
A black background, such as velvet, is a good choice.
In a shiny round object such as the example you show, a reflection of the camera will show up on the item. There is no great solution to this. But if you use a longer lens the camera will further from the item, and the reflection will be smaller. It requires a larger light tent that some of the suggestions, however.
A macro lens is not always the answer. The macro allows you to get close, but that makes the reflection of the camera larger. It is better to use high resolution and photograph from a little further away. You can crop to the item and still not lose sharpness.
Jun 26, 2012 07:21:03 #
Would not the use of say a 180 mm. Macro lens in conjunction with a tele extender and APS size or larger sensor reduce the size of the camera's reflection to insignificance while at the same time greatly increase D.O.F. ?
If you want to reply, then register here. Registration is free and your account is created instantly, so you can post right away.