Lighting Question - using on camera flash as fill, with one or more off camera lights.
May 18, 2017 00:18:29 #
Now I'm off to research Q-Flash & Lumadyne equipment, BTW, I like your meter collection. I am using the Sekonic 758. I never thought of carrying my multimeter along. Thanks for the tip :)
May 19, 2017 13:58:36 #

@BramBuster and others who may be interested in this thread.
Re: you question about distances and fill light settings. As I alluded to in my last post, with candid shot I try to work fairly close to the action and use normal or moderately wide angle lenses and zoom settings. I use my longer lenses for close up portraits, creating better "bokeh" and shooting ceremonies where I can't get in close due to restrictions. With this method of operation I am usually working between 7 and 15 feet for most usual situations. So...when I am going to shoot a routine or predictable shot such the aisle shot in the church, the first dance, the toasts at the head table etc., social or ethnic dancing, I preset my focus and exposure for the usual distance that I use for these images. My exposure is always based on my main (usually the off-camera light) and the fill light is pre-adjusted for approximately a 1:2 ratio, that is about one toe 2 f/stops below the main light's output. If I want a more dramatic or low-key effect, I simply reduce the power of the on-camera fill light. Sometimes, if I find myself in a close proximity to the subject, say with the camera a 5 feet from the subject, I will place my had over my on-camera light and spread my fingers so as to just let a bit of the light out. Some years ago there was a "fl;ash valve" on the market that had rotating neutral density filters to accomplish this effect- I just use my hand! Now...if i cant get in a close as I like and have to use a telephoto lens or zoom in to secure the shot, I might have to increase my fill light power in order to provide adequate fill illumination.
If my fill light is slightly off, I prefer it to be more on the low side rather than over filling and ending up with a flat image. I like to keep my exposures and ratios in control as much as I can bur in fast action and spontaneous situations, I will "shoot first and ask questions later" rather than miss the shot entirely. Usually, I can anticipate the action or in some cases (wink, wink!) I instigate the action, but if something sneaks up on me or some unpredictable event occurs I just shoot first and address any mess-ups in diting. Most of the time, I am well in correctable range.
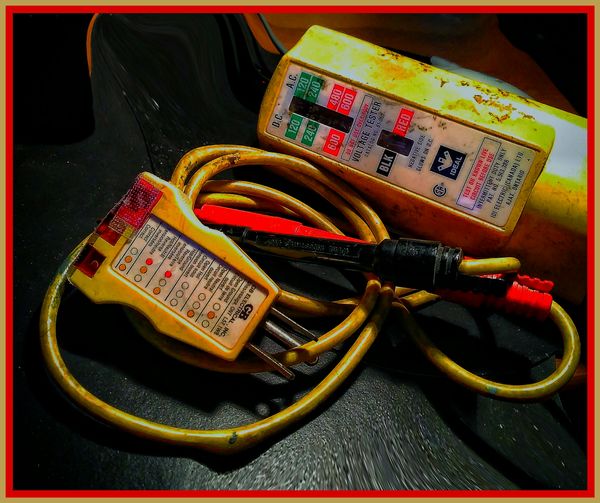
Here's the multi-meter thing: In my industrial work, sometimes in older factories, I fine that some idiot has replaced the outlet type in a 240 Volt or 550 volt electrical outlet. There are machines that require higher voltages. The same idiot replaces the plugs on this machinery with standard 117V. The guys in the plat know which is which but nobody else knows! I have seen this on more that one occasion. If I were to unknowingly plug in a mono-light or a power pack unit onto one of theses outlets, it will become the first strobe on the moon! Even some older wedding venues, there are dead or faulty outlets so I like to check out the line voltage on suspect outlets, especially if one of my units won't turn on- I want to know if the outlet is at fault or the unit is malfunctioning. Rather than using the the multi meter, I will carry a simple outlet tester for quick and easy verification- it also tells me if there is an open ground contact or a reversed polarity or reverse hot/neutral condition which can become a safety issue. This may seem a bit paranoid but I have seen some crazy stuff go down. In most modern facilities,the electrical systems are up to code and everything is OK but in some of the older and ancient halls, churches and plants I have worked in, the electrical systems have long seen better days. Better safe that sorry.
The multi-meter is also great for checking the TRIGGER VOLTAGE on electronic flash gear, especially some of the older models if you sill have any of them in service.. Most modern Speedlights and studio equipment have low trigger voltages, that is the voltage that comes through you cameras synchronization circuitry. Any voltage level over 10 volts can damage the entire electronic system of a modern DSLR or mirror-less camera. Some older flash units can harbor trigger voltages in the 200 volt range. Excessive trigger voltages and current can even carbonize and burn out contacts in simple non-electronic shutters. Higher than safe trigger voltages can also occur in a damaged of malfunctioning unit. When using older flash equipment with digital cameras, there are accessory "filters" that are placed on the hot show or plug in between you sync contact and the syn cord which safely reduces excessive trigger voltage.
The OHM stetting on your multi-meter is handy for checking out continuity on sync cords and other connecting cables when the are NOT connected to power sources.
I always mention that electronic flash equipment harbors harmful or even LETHAL VOLTAGES and that servicing or modification of such equipment, even some of the smaller units, should be carried out by experienced electronic technicians or those who are familiar with the servicing of high voltage apparatus . In my own case, I do have a background in electronics. At one time I had a small company that designed and repaired electronic flash gear. I use my multi-meter and other test gear to check the actual voltage output and preference of my electronic flash power packs, that is, if I suspect some kind of malfunction, power loss or detect arcing of unfamiliar sounds or smells emitting from the units. I can re-adjust the ready lights for more accurate indications of full recycled power output, I can properly discharge and replace faulty capacitors and some other parts, however, I still prefer to have major repairs preformed by a shop that is more up-to-date with some of the current circuitry. A always mention this because I hate the odor of burning flesh and like to remind folks that a cardiac defibrillator works on the same principle as an electronic flash power pack! Receiving a shock form a flash unit, across the chest, can mess up your ticker something awful! Rule of thumb- don't poke a screwdriver into any of your flash gear and if it makes funny noises, start to smoke or just ain't working right, send it in for service! If it's a current unit, send it to the official authorized service provider. If it is a Buff unit, send it there- their service is exemplary! If it is an older or out-of-manufacture unit, a mono-light or any older or out of warranted studio stuff, send it ti Holly Enterprises (hollyflash.com) they will repair just about anything that is worth fixing!
The Lumadyne a Q-Flash gear is expensive, but it is good stuff. I have found that the auto-flash and TTL fictions of the Q-Flash units are extremely accurate. I started testing them out years ago on transparency films because those films have comparatively less latitude that color and black and white negative films of the same era. Consequently, they work well with digital systems where we must expose for the highlights and fill the shadows.. With color and black and white negative films, I used to expose for the shadows and print down for the highlights- nor a method applicable to digital photography. The Lumadyne gear is extremely rugged and durable, I have used them from the first day the were introduced. The original designer was an electronic engineer who was also a professional wedding photographer back in the 1960s (I remember the guy from my days in Long Island, New York. He designed his units with the needs of the professional wedding shooter in mind. Some of the Lumadyne flash heads are equipped with modeling lamps which can come in handy for precise portrait lighting and for shooting, composing and focusing in dark venues. As far as I know,Lumadyne is still a family owned business and now have an updated line of equipment of exceptional quality.
Both manufacturers offer heads with interchangeable reflectors, bare bulb operation and user replaceable flash tubes.
I hope this helps!
Kindest regards, Ed
Re: you question about distances and fill light settings. As I alluded to in my last post, with candid shot I try to work fairly close to the action and use normal or moderately wide angle lenses and zoom settings. I use my longer lenses for close up portraits, creating better "bokeh" and shooting ceremonies where I can't get in close due to restrictions. With this method of operation I am usually working between 7 and 15 feet for most usual situations. So...when I am going to shoot a routine or predictable shot such the aisle shot in the church, the first dance, the toasts at the head table etc., social or ethnic dancing, I preset my focus and exposure for the usual distance that I use for these images. My exposure is always based on my main (usually the off-camera light) and the fill light is pre-adjusted for approximately a 1:2 ratio, that is about one toe 2 f/stops below the main light's output. If I want a more dramatic or low-key effect, I simply reduce the power of the on-camera fill light. Sometimes, if I find myself in a close proximity to the subject, say with the camera a 5 feet from the subject, I will place my had over my on-camera light and spread my fingers so as to just let a bit of the light out. Some years ago there was a "fl;ash valve" on the market that had rotating neutral density filters to accomplish this effect- I just use my hand! Now...if i cant get in a close as I like and have to use a telephoto lens or zoom in to secure the shot, I might have to increase my fill light power in order to provide adequate fill illumination.
If my fill light is slightly off, I prefer it to be more on the low side rather than over filling and ending up with a flat image. I like to keep my exposures and ratios in control as much as I can bur in fast action and spontaneous situations, I will "shoot first and ask questions later" rather than miss the shot entirely. Usually, I can anticipate the action or in some cases (wink, wink!) I instigate the action, but if something sneaks up on me or some unpredictable event occurs I just shoot first and address any mess-ups in diting. Most of the time, I am well in correctable range.
Here's the multi-meter thing: In my industrial work, sometimes in older factories, I fine that some idiot has replaced the outlet type in a 240 Volt or 550 volt electrical outlet. There are machines that require higher voltages. The same idiot replaces the plugs on this machinery with standard 117V. The guys in the plat know which is which but nobody else knows! I have seen this on more that one occasion. If I were to unknowingly plug in a mono-light or a power pack unit onto one of theses outlets, it will become the first strobe on the moon! Even some older wedding venues, there are dead or faulty outlets so I like to check out the line voltage on suspect outlets, especially if one of my units won't turn on- I want to know if the outlet is at fault or the unit is malfunctioning. Rather than using the the multi meter, I will carry a simple outlet tester for quick and easy verification- it also tells me if there is an open ground contact or a reversed polarity or reverse hot/neutral condition which can become a safety issue. This may seem a bit paranoid but I have seen some crazy stuff go down. In most modern facilities,the electrical systems are up to code and everything is OK but in some of the older and ancient halls, churches and plants I have worked in, the electrical systems have long seen better days. Better safe that sorry.
The multi-meter is also great for checking the TRIGGER VOLTAGE on electronic flash gear, especially some of the older models if you sill have any of them in service.. Most modern Speedlights and studio equipment have low trigger voltages, that is the voltage that comes through you cameras synchronization circuitry. Any voltage level over 10 volts can damage the entire electronic system of a modern DSLR or mirror-less camera. Some older flash units can harbor trigger voltages in the 200 volt range. Excessive trigger voltages and current can even carbonize and burn out contacts in simple non-electronic shutters. Higher than safe trigger voltages can also occur in a damaged of malfunctioning unit. When using older flash equipment with digital cameras, there are accessory "filters" that are placed on the hot show or plug in between you sync contact and the syn cord which safely reduces excessive trigger voltage.
The OHM stetting on your multi-meter is handy for checking out continuity on sync cords and other connecting cables when the are NOT connected to power sources.
I always mention that electronic flash equipment harbors harmful or even LETHAL VOLTAGES and that servicing or modification of such equipment, even some of the smaller units, should be carried out by experienced electronic technicians or those who are familiar with the servicing of high voltage apparatus . In my own case, I do have a background in electronics. At one time I had a small company that designed and repaired electronic flash gear. I use my multi-meter and other test gear to check the actual voltage output and preference of my electronic flash power packs, that is, if I suspect some kind of malfunction, power loss or detect arcing of unfamiliar sounds or smells emitting from the units. I can re-adjust the ready lights for more accurate indications of full recycled power output, I can properly discharge and replace faulty capacitors and some other parts, however, I still prefer to have major repairs preformed by a shop that is more up-to-date with some of the current circuitry. A always mention this because I hate the odor of burning flesh and like to remind folks that a cardiac defibrillator works on the same principle as an electronic flash power pack! Receiving a shock form a flash unit, across the chest, can mess up your ticker something awful! Rule of thumb- don't poke a screwdriver into any of your flash gear and if it makes funny noises, start to smoke or just ain't working right, send it in for service! If it's a current unit, send it to the official authorized service provider. If it is a Buff unit, send it there- their service is exemplary! If it is an older or out-of-manufacture unit, a mono-light or any older or out of warranted studio stuff, send it ti Holly Enterprises (hollyflash.com) they will repair just about anything that is worth fixing!
The Lumadyne a Q-Flash gear is expensive, but it is good stuff. I have found that the auto-flash and TTL fictions of the Q-Flash units are extremely accurate. I started testing them out years ago on transparency films because those films have comparatively less latitude that color and black and white negative films of the same era. Consequently, they work well with digital systems where we must expose for the highlights and fill the shadows.. With color and black and white negative films, I used to expose for the shadows and print down for the highlights- nor a method applicable to digital photography. The Lumadyne gear is extremely rugged and durable, I have used them from the first day the were introduced. The original designer was an electronic engineer who was also a professional wedding photographer back in the 1960s (I remember the guy from my days in Long Island, New York. He designed his units with the needs of the professional wedding shooter in mind. Some of the Lumadyne flash heads are equipped with modeling lamps which can come in handy for precise portrait lighting and for shooting, composing and focusing in dark venues. As far as I know,Lumadyne is still a family owned business and now have an updated line of equipment of exceptional quality.
Both manufacturers offer heads with interchangeable reflectors, bare bulb operation and user replaceable flash tubes.
I hope this helps!
Kindest regards, Ed
May 19, 2017 20:04:38 #
Thanks again ED, I really appreciate you explaining in such detail. I'm having a hard time changing my thinking, and how I set up the lights, But I can see how the image quality will improve, and it's a look most photographers (in this area) do not have. I'm going to do some tests so I know the output of my fill, at preset distances, then I can guesstimate my 1-2 stop drop,esp when things get moving.
That is an excellent idea with covering most the flash with your fingers! I'm going to steal that idea off you :)
Another great idea is the multimeter and outlet tester. I've done a lot of electrical troubleshooting (mainly 120vac & 12vdc). And should kick myself for not having the common sense to carry these tools. I have found most people assume the worst when something goes wrong...like a bad strobe or bulb, but if you start at the source.(outlet for example)-many times it's as simple as a breaker or switch.
You have completely sold me on the Lumadyne Q-Flash gear. But it will be awhile before I can afford that. (Otherwise I owe you a computer!).
Thats going on my wish list. Thanks for explaining.
I know nothing about flash troubleshooting, but For now, I may be using the strobes more often, esp for groups. since they have so much more power.
Thanks again!
May 19, 2017 21:12:29 #

bkyser wrote:
Hey, Jay...
How about using your trigger on a hot shoe, and putting a receiver/flash on a standard bracket? That way, you could fire the flash on (above) your camera, and also the ones on the stands?
How about using your trigger on a hot shoe, and putting a receiver/flash on a standard bracket? That way, you could fire the flash on (above) your camera, and also the ones on the stands?
Sorry, I missed this response. Probably getting engrossed with Eds tutorials. Anyway, yes I think that is the best solution. I have never used a flash bracket. Any suggestions?
May 20, 2017 21:18:49 #
RE: Flash Brackets:
Whether you use your on-camera flash unit as a fill light source in a multiple lighting setup, as a direct main (flat) flash light source, with or without a modifier, an indirect bounce source aimed at a wall or ceiling surface or in a bare-bulb configuration, a good flash bracket is essential for efficient and fast camera handling, consistently even light distribution and precise aesthetic control in a wide variety of lighting situations and shooting scenarios.
Mounting of a Speedlight or other kind of lamp head on the camera's hot show is certainly convenient but that position, in close proximity to the lens, has a number of aesthetic disadvantages, especially in a direct flash mode. The lighting effect can be too flat and completely lack in any kind of modeling or dimensionality. Sometimes, when the flash unit is too close to the lens, the light will enter the subject's eyes in an almost coaxial fashion and illuminate the blood vessels in the retina causing "red eye" which then requires some painstaking retouching procedures. Oftentimes, a flash unit mounted on the hot shoe or alongside the camera on a "L" bracket or similar setup will cast a distracting and unwanted dark shadow in back of or near the subject onto nearby walls or other backgrounds.
The best place for an-on camera flash unit, when used as a main or fill source is about 12 inches directly above the lens. Back in the day after quick release flash couplings and coiled extendable synchronization cord were invented, many photographers would hand-hold their flash unit in this recommended position, however, this method can be cumbersome and oftentimes results in uneven lighting. In the late 1950 and early 60s, many custom made and pre-manufactured so-called shadowless or overhead flash brackets began to appear in the equipment marketplace. I made my first one out of aluminum bar stock which becomes malleable when heated, at required bending points, with a propane torch. I used it on my 4x5 press camera and still have it to this day. There are currently many types and configurations manufactured by a number of reputable makers.
My favorite brand is Stroboframe (tm) (tiffen.com). The one I use on my Canon DSLR cameras is 30 years old and still works smoothly. It quickly flips the flash into the ideal position for both horizontal and vertical camera orientations. I have customized my bracket to enable bounce lighting with a bounce head form an old Jones(tm) bracket. I have drilled a hole and tapped 1/4x20 threads to accommodate my Pocket Wizard transmitter. I use plastic cable ties to help secure cables and provide strain relief to avoid cable damage and accidental disconnection when working quickly. My unit is quite the handful but I have rather large hands. Some of the more up-to-date Stroboframe models are lighter and more streamlined and there are adaptions for most kinds of hot-shoe and standard tripod socket kinds of mounting arrangements and handles found on various makes of electronic flash gear.
There are a number of advantages in this flash technique. When the on-camera flash is used as a fill light it is flat enough so as not to create a highlight and shadow pattern of its own thereby allowing the main (off-camera) light to become the principal aesthetic source. Positioning the light somewhat higher above the lens, however, will enable a little bit of downward or vertical modeling so when the on-camera light is used as the main source or in conjunction with a backlight or kicker, it will yield somewhat more dimensionality than a light placed closer to the lens. A light source positioned a somewhat higher ( more than 12 inches) above the lens can also give you a little more depth of lighting in that it helps to slightly remedy the effect of the inverse square law, that is, it helps a bit in avoiding "black hole" unnaturally dark backgrounds that result from single on-camera flash usage. A higher light position also helps correct for some reflections in eyeglasses. For the latter effects, some photographers use an extendable addition to their overhead type brackets.
For TTL and iTTL modes, most Speedlight manufactures make special extension cables available to conduct synchronization and exposure data to their flash gear when it used on a bracket and is off the hot shoe.
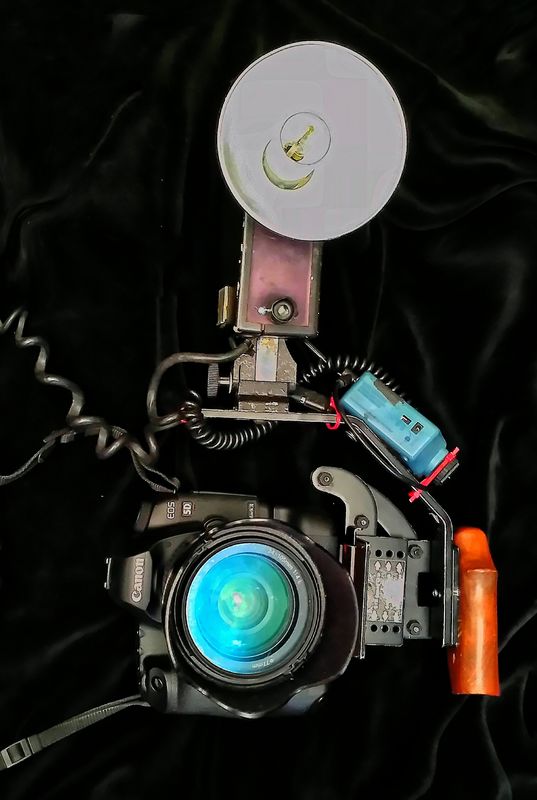
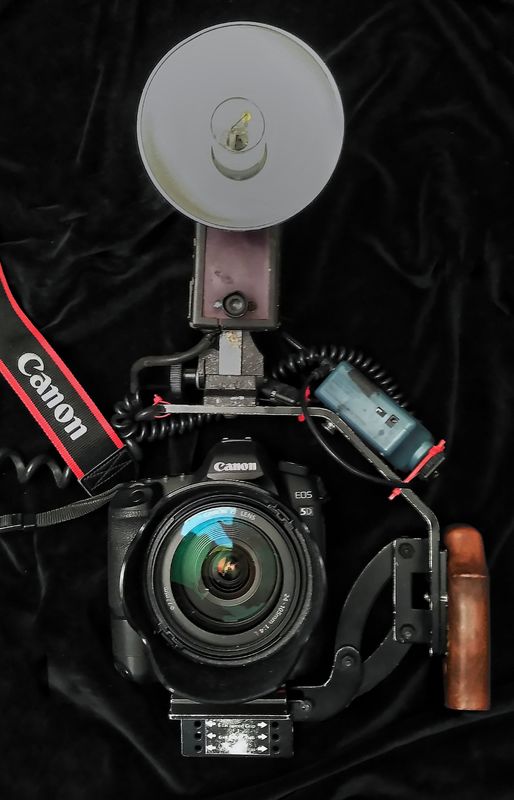
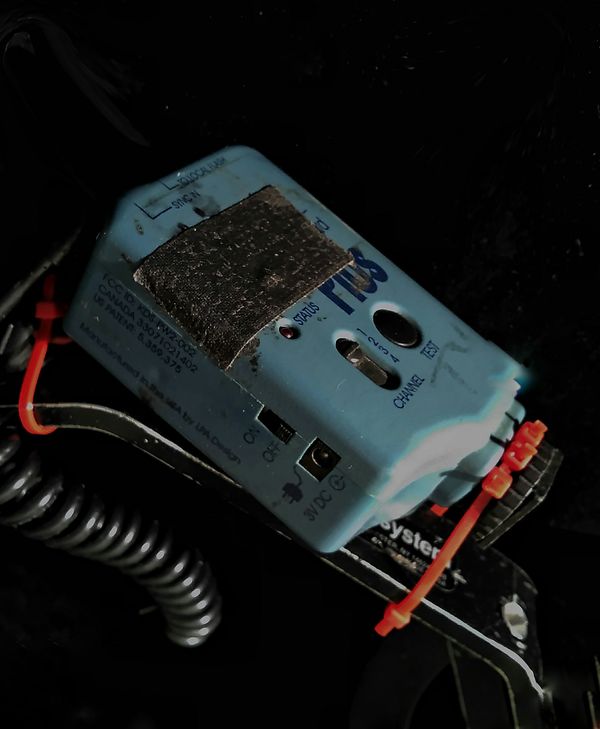
The accompanying images show my basic hand-held candid unit. From my camera position I can easily and quickly control the output of my on-camera flash unit, switch any one of four off-camera lights or banks of light on the sane channel on and off via the switches on the radio transmitter and position the light for both horizontal and vertical compositions- evrythng hangs on the bracket for easy access. I use a Stroboframe quick release to remove the camera from the flash rig for non-flash and tripod use.
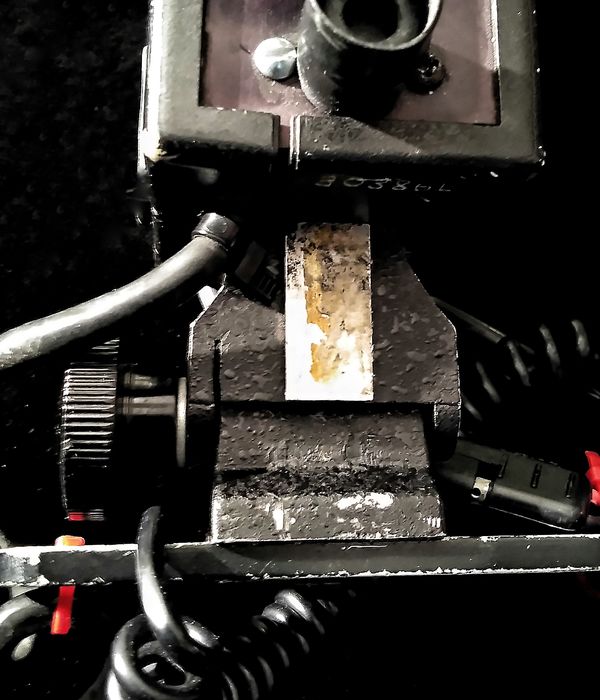
Please excuse the scratched and beaten-up appearance of my flash gear- it's old and ugly but well maintained and functioning, the guts are in better shape than the skin- just like ME!
Best regards, Ed
Whether you use your on-camera flash unit as a fill light source in a multiple lighting setup, as a direct main (flat) flash light source, with or without a modifier, an indirect bounce source aimed at a wall or ceiling surface or in a bare-bulb configuration, a good flash bracket is essential for efficient and fast camera handling, consistently even light distribution and precise aesthetic control in a wide variety of lighting situations and shooting scenarios.
Mounting of a Speedlight or other kind of lamp head on the camera's hot show is certainly convenient but that position, in close proximity to the lens, has a number of aesthetic disadvantages, especially in a direct flash mode. The lighting effect can be too flat and completely lack in any kind of modeling or dimensionality. Sometimes, when the flash unit is too close to the lens, the light will enter the subject's eyes in an almost coaxial fashion and illuminate the blood vessels in the retina causing "red eye" which then requires some painstaking retouching procedures. Oftentimes, a flash unit mounted on the hot shoe or alongside the camera on a "L" bracket or similar setup will cast a distracting and unwanted dark shadow in back of or near the subject onto nearby walls or other backgrounds.
The best place for an-on camera flash unit, when used as a main or fill source is about 12 inches directly above the lens. Back in the day after quick release flash couplings and coiled extendable synchronization cord were invented, many photographers would hand-hold their flash unit in this recommended position, however, this method can be cumbersome and oftentimes results in uneven lighting. In the late 1950 and early 60s, many custom made and pre-manufactured so-called shadowless or overhead flash brackets began to appear in the equipment marketplace. I made my first one out of aluminum bar stock which becomes malleable when heated, at required bending points, with a propane torch. I used it on my 4x5 press camera and still have it to this day. There are currently many types and configurations manufactured by a number of reputable makers.
My favorite brand is Stroboframe (tm) (tiffen.com). The one I use on my Canon DSLR cameras is 30 years old and still works smoothly. It quickly flips the flash into the ideal position for both horizontal and vertical camera orientations. I have customized my bracket to enable bounce lighting with a bounce head form an old Jones(tm) bracket. I have drilled a hole and tapped 1/4x20 threads to accommodate my Pocket Wizard transmitter. I use plastic cable ties to help secure cables and provide strain relief to avoid cable damage and accidental disconnection when working quickly. My unit is quite the handful but I have rather large hands. Some of the more up-to-date Stroboframe models are lighter and more streamlined and there are adaptions for most kinds of hot-shoe and standard tripod socket kinds of mounting arrangements and handles found on various makes of electronic flash gear.
There are a number of advantages in this flash technique. When the on-camera flash is used as a fill light it is flat enough so as not to create a highlight and shadow pattern of its own thereby allowing the main (off-camera) light to become the principal aesthetic source. Positioning the light somewhat higher above the lens, however, will enable a little bit of downward or vertical modeling so when the on-camera light is used as the main source or in conjunction with a backlight or kicker, it will yield somewhat more dimensionality than a light placed closer to the lens. A light source positioned a somewhat higher ( more than 12 inches) above the lens can also give you a little more depth of lighting in that it helps to slightly remedy the effect of the inverse square law, that is, it helps a bit in avoiding "black hole" unnaturally dark backgrounds that result from single on-camera flash usage. A higher light position also helps correct for some reflections in eyeglasses. For the latter effects, some photographers use an extendable addition to their overhead type brackets.
For TTL and iTTL modes, most Speedlight manufactures make special extension cables available to conduct synchronization and exposure data to their flash gear when it used on a bracket and is off the hot shoe.
The accompanying images show my basic hand-held candid unit. From my camera position I can easily and quickly control the output of my on-camera flash unit, switch any one of four off-camera lights or banks of light on the sane channel on and off via the switches on the radio transmitter and position the light for both horizontal and vertical compositions- evrythng hangs on the bracket for easy access. I use a Stroboframe quick release to remove the camera from the flash rig for non-flash and tripod use.
Please excuse the scratched and beaten-up appearance of my flash gear- it's old and ugly but well maintained and functioning, the guts are in better shape than the skin- just like ME!
Best regards, Ed
May 23, 2017 02:01:24 #
Thanks again Ed, Very well explained. And your equipment looks well used & time tested :)
I really like the Aperture settings on back of your flash(Q-Flash?), that could be very useful in a rush.
I really like the Aperture settings on back of your flash(Q-Flash?), that could be very useful in a rush.
May 23, 2017 15:17:24 #
HA! My last 2 weddings, I reverted back to the ‘60’s and 70’s. 2 weeks ago, I had my voice activated light stand holding the fill high above her head. This past weekend, I was the one holding it up there while I was shooting. Let me tell you, trying to zoom with a flash in your left hand is a feat in and of itself.. I now know why she was complaining at the other wedding. My arm was killing me! Although, she’s only 17, so she should be able to do “athletic” things like that.
Tim Stapp tried my set up, and didn’t like it at all. I guess at his age (ha ha) it REALLY gets tiring holding up the flash for fill instead of having it on the hot shoe. Actually,It just proves my point that you need to come up with a set up that works for you. We can talk all day long about what works for us, but in the end, you may need to do/try something completely different to suit your style. Neither one of us like flash brackets, so that wasn’t a choice. Mine was sitting at home gathering dust.
Tim Stapp tried my set up, and didn’t like it at all. I guess at his age (ha ha) it REALLY gets tiring holding up the flash for fill instead of having it on the hot shoe. Actually,It just proves my point that you need to come up with a set up that works for you. We can talk all day long about what works for us, but in the end, you may need to do/try something completely different to suit your style. Neither one of us like flash brackets, so that wasn’t a choice. Mine was sitting at home gathering dust.
May 23, 2017 16:04:44 #
bkyser wrote:
..... Actually,It just proves my point that you need to come up with a set up that works for you. We can talk all day long about what works for us, but in the end, you may need to do/try something completely different to suit your style. Neither one of us like flash brackets, so that wasn’t a choice. Mine was sitting at home gathering dust.
For the most part I agree. We all have to find what works for us. But I'm fairly new to taking this photography stuff seriously, So it really helps hearing what works for others. I will tweak what I like to fit me and discard the rest. But what a great place to learn from people like you, who have been doing this stuff for years, tweaking as you go. So keep talking! Some of us are really listening :)
May 23, 2017 22:02:06 #
E.L.. Shapiro wrote:
RE: Flash Brackets: br br Whether you use your on... (show quote)
I appreciate the info Ed. I don't know if I could get used to a flash bracket, but I may give it a try. My style is having my camera hanging from my Black Rapid strap on my hip. I wield it around freely as I go for different angles (reference my reception lighting post). There might be potential for damage. Both the equipment and or someone at the reception.
May 23, 2017 22:05:15 #
bkyser wrote:
HA! My last 2 weddings, I reverted back to the ‘6... (show quote)
I wish you could just order one of those voice activated light stands on Amazon.
May 24, 2017 09:10:57 #
jaysnave wrote:
I wish you could just order one of those voice activated light stands on Amazon.
No, I normally use teenage kids, they are easier to return if you get them locally, instead of ordering them online.
lol
May 24, 2017 11:49:21 #
The CASE for the flash bracket! Alright, I ain't in the bracket business- I've been known to buy them, customize them and even make 'em, but I don't sell or endorse 'em although I have made a few and given them to other photographers in need of a more convenient way to manage their on-camera lighting. I'm not saying that a bracket is a cure-all for every wedding lighting situation or method, however, when you are depending on flash illumination, especially when there is insufficient level of aesthetically poor quality or direction of available light, the use of a bracket addresses a number of issues in camera handling and lighting accuracy.
In my own case, I do set up and pose my formals and some of the semi-candid shots, however, I also shoot lots of totally spontaneous cnadids, or so-called grab shots. Even during formal session, I like to shoot a quickly and efficiently as possible to stay within limited time frames and not keep folks in static poses for extended or unnecessarily protracted periods of time. I like to get relaxed and natural expression even in my formal shots. I need to keep my hds free to adjust camera settings, control the power of my fill light and operate the zoom functions when required. I don't want to hand hold or fumble with my on-camera light. I want to make sure that the on-camera light is in the most aesthetically correct position so as not to cast shadows on the walls or take on a lighting pattern of its own and thereby conflict with the lighting pattern of my off camera lighting.
When shooting candids during the ceremonies or at the receptions, my on-camera light is employed in two different functions. When the off-camera light(s) are serving as the MAIN light, the on-camera unit is the fill light so I need it to be rather flat and even and I want to be able to control it s power output quickly and easily. When my off-camera lights are serving as kickers, that is placed about 135 degrees from the camera/subject axis, the on-camera-light functions as the main light, so again it needs to be even and easily adjusted as to power output. The bracket keep all theses controls at my fingertips including the radio transmitter whereby I can control which of my stationary off-camera light will fire and which ones I want to "turn off".
When my assistant is manning an off-camera light, it is USUALLY a main or a kicker, NOT the fill light. There are, however, instances where it is advantageous to elevate the FILL LIGHT to a higher position over the camera. Sometimes, when I am doing the aisle shots in a church or synagogue there are floral archways or flower baskets in the aisle or at the sides of the pews. Theses can become overexposed of over-filled and become a distraction. If the fill or on-camera light is held high overhead to will provide more depth of light and a more even distribution of light in foreground and background areas. If the frontal light, however, is held too high, it can cause "raccoon eyes", that is where the lights too far overhead and does not penetrate into the eyes and eye sockets leaving the subjects looking tired of like the have bruised eyes.
As I have mention before in this and other tutorial articles, the bracket method is primarily for flash photography and not necessarily for available light work. For situations where I want to use available light as my primary source, of course, all I need to do is turn off my flash equipment or reduce the power of my on-camera light so it just provides a "wink: of light to bring up some shadow detail and add a bit more light in the subjects' eyes. I also carry a second camera a a faster lens when I want to go exclusively with available light. The second camera, without a bracket is lighter in weight and easier to hos securely at lower shutter speeds. Sine there is no bracket, the tripod socket is more easily accessible for quick mounting on a tripod o monopod. I can also mount a transmitter in the second camera's hot shoe so, if necessary, it can be integrated into my flash system.
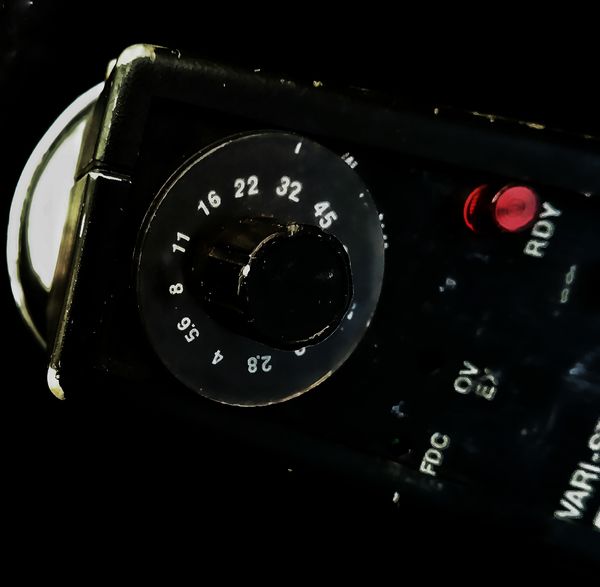
The flash head that I showed in my previous post, sadly, in no longer manufactured. It was made by GVI for Lumadyne or Norman power packs. It is a very accurate automatic flash head with a simple and concentric ISO setting and f/stop dial. I pref this to LCD screens and push button setting controls because it is faster in that the click stops proved very positive action. I can dial in any setting in fractions of seconds for full output to "winkl" light function. At one time Q-flash (Quantum) made a lamp head that is compatible with Lumadyne power supplies as well- I don't know if the still make that particular model. It had an LCD screen and a wide range of outputs.
There is no reason why good multiple lighting setups can not be accomplished with Speedlights, both in manual and iTTL modes.. It is just a matter of determining fast and efficient methods of adjusting outputs and thereby controlling lighting effects and ratios.
As I have alluded to in the past, my assistants are photographers-in-training so by the time they are working with me at weddings, they are fully aware of where I need that mobile light to be for a wide variety of shots and changing circumstances. I can't have inexperienced folks out on the jobs because the placement of my lights are critical. They need to be fast and aware of where I am and what I am doing and be able to change "gears" at the circumstances require. I don't want to have to shout instructions or continuously gesture or direct to my crew- that gets distracting and potentially obtrusive. I need them to work swiftly and not get in the way, accidently walk into the camera's field of view or cause flare by aiming a light into the lens. If everyone knows what they need to do, the assignments go smoothly.
What's more, when my lighting is even and consistent as to exposure, coverage, ratios, contrast and dynamic range, processing, editing and printing become significantly faster and easier. I prefer that my editing is more concerned with enhancing my images, creating subtle special effects and perfecting composition rather than having to make endless corrections for faulty lighting, erratic exposures and out of range contrasts. I don't want to spend more time editing than shooting! Even in the olden days of film, I always did my lab work in-house. Excessive darkroom time is not cost effective in that my time was and still is more beneficial to my business when I shoot and sell. Nice even and consistent negatives (nowadays files) make for smooth editing and fast delivers which helps in the cash flow and reputation departments.
In a couple of years, when I walk down the aisle backward, cameras in hand, for the very last time, the wedding aspect of my business will be fully staffed with competent photographers and assistants.
This is not an ARGUMENT! I don't believe in "old school" vs. new school. If a technique was effective in 1960 0r '70 it MAY very well still apply in an updated form. Sme old fashioned stuff has gone by the wayside but every now and again theses things reemerge. My business has always been customer oriented; as long as the clients are happy with the service and the results, the business will survive the years and prosper. I have never gotten into extremes in style in that I offer a MIXTURE of solid fine portraiture and photojournalism, I never went crazy with "chintzy" special effects or gag shots. Every wedding is different, some couples prefer a more photojournalistic approach and some, believe it or not, want more direction, I go with the flow. Thank goodness, since I left New York City, I have not had too many insane weddings with drunkenness, riots and fights... most folks are nice and most wedding go down without a hitch, we just tend to remember the bad ones! One day, I might write a book!
Kindest regards, Ed
In my own case, I do set up and pose my formals and some of the semi-candid shots, however, I also shoot lots of totally spontaneous cnadids, or so-called grab shots. Even during formal session, I like to shoot a quickly and efficiently as possible to stay within limited time frames and not keep folks in static poses for extended or unnecessarily protracted periods of time. I like to get relaxed and natural expression even in my formal shots. I need to keep my hds free to adjust camera settings, control the power of my fill light and operate the zoom functions when required. I don't want to hand hold or fumble with my on-camera light. I want to make sure that the on-camera light is in the most aesthetically correct position so as not to cast shadows on the walls or take on a lighting pattern of its own and thereby conflict with the lighting pattern of my off camera lighting.
When shooting candids during the ceremonies or at the receptions, my on-camera light is employed in two different functions. When the off-camera light(s) are serving as the MAIN light, the on-camera unit is the fill light so I need it to be rather flat and even and I want to be able to control it s power output quickly and easily. When my off-camera lights are serving as kickers, that is placed about 135 degrees from the camera/subject axis, the on-camera-light functions as the main light, so again it needs to be even and easily adjusted as to power output. The bracket keep all theses controls at my fingertips including the radio transmitter whereby I can control which of my stationary off-camera light will fire and which ones I want to "turn off".
When my assistant is manning an off-camera light, it is USUALLY a main or a kicker, NOT the fill light. There are, however, instances where it is advantageous to elevate the FILL LIGHT to a higher position over the camera. Sometimes, when I am doing the aisle shots in a church or synagogue there are floral archways or flower baskets in the aisle or at the sides of the pews. Theses can become overexposed of over-filled and become a distraction. If the fill or on-camera light is held high overhead to will provide more depth of light and a more even distribution of light in foreground and background areas. If the frontal light, however, is held too high, it can cause "raccoon eyes", that is where the lights too far overhead and does not penetrate into the eyes and eye sockets leaving the subjects looking tired of like the have bruised eyes.
As I have mention before in this and other tutorial articles, the bracket method is primarily for flash photography and not necessarily for available light work. For situations where I want to use available light as my primary source, of course, all I need to do is turn off my flash equipment or reduce the power of my on-camera light so it just provides a "wink: of light to bring up some shadow detail and add a bit more light in the subjects' eyes. I also carry a second camera a a faster lens when I want to go exclusively with available light. The second camera, without a bracket is lighter in weight and easier to hos securely at lower shutter speeds. Sine there is no bracket, the tripod socket is more easily accessible for quick mounting on a tripod o monopod. I can also mount a transmitter in the second camera's hot shoe so, if necessary, it can be integrated into my flash system.
The flash head that I showed in my previous post, sadly, in no longer manufactured. It was made by GVI for Lumadyne or Norman power packs. It is a very accurate automatic flash head with a simple and concentric ISO setting and f/stop dial. I pref this to LCD screens and push button setting controls because it is faster in that the click stops proved very positive action. I can dial in any setting in fractions of seconds for full output to "winkl" light function. At one time Q-flash (Quantum) made a lamp head that is compatible with Lumadyne power supplies as well- I don't know if the still make that particular model. It had an LCD screen and a wide range of outputs.
There is no reason why good multiple lighting setups can not be accomplished with Speedlights, both in manual and iTTL modes.. It is just a matter of determining fast and efficient methods of adjusting outputs and thereby controlling lighting effects and ratios.
As I have alluded to in the past, my assistants are photographers-in-training so by the time they are working with me at weddings, they are fully aware of where I need that mobile light to be for a wide variety of shots and changing circumstances. I can't have inexperienced folks out on the jobs because the placement of my lights are critical. They need to be fast and aware of where I am and what I am doing and be able to change "gears" at the circumstances require. I don't want to have to shout instructions or continuously gesture or direct to my crew- that gets distracting and potentially obtrusive. I need them to work swiftly and not get in the way, accidently walk into the camera's field of view or cause flare by aiming a light into the lens. If everyone knows what they need to do, the assignments go smoothly.
What's more, when my lighting is even and consistent as to exposure, coverage, ratios, contrast and dynamic range, processing, editing and printing become significantly faster and easier. I prefer that my editing is more concerned with enhancing my images, creating subtle special effects and perfecting composition rather than having to make endless corrections for faulty lighting, erratic exposures and out of range contrasts. I don't want to spend more time editing than shooting! Even in the olden days of film, I always did my lab work in-house. Excessive darkroom time is not cost effective in that my time was and still is more beneficial to my business when I shoot and sell. Nice even and consistent negatives (nowadays files) make for smooth editing and fast delivers which helps in the cash flow and reputation departments.
In a couple of years, when I walk down the aisle backward, cameras in hand, for the very last time, the wedding aspect of my business will be fully staffed with competent photographers and assistants.
This is not an ARGUMENT! I don't believe in "old school" vs. new school. If a technique was effective in 1960 0r '70 it MAY very well still apply in an updated form. Sme old fashioned stuff has gone by the wayside but every now and again theses things reemerge. My business has always been customer oriented; as long as the clients are happy with the service and the results, the business will survive the years and prosper. I have never gotten into extremes in style in that I offer a MIXTURE of solid fine portraiture and photojournalism, I never went crazy with "chintzy" special effects or gag shots. Every wedding is different, some couples prefer a more photojournalistic approach and some, believe it or not, want more direction, I go with the flow. Thank goodness, since I left New York City, I have not had too many insane weddings with drunkenness, riots and fights... most folks are nice and most wedding go down without a hitch, we just tend to remember the bad ones! One day, I might write a book!
Kindest regards, Ed
May 24, 2017 20:49:21 #
Ed; Please, please, please: write a book. I would be more than happy to proofread your manuscript. You should get out of the city and shoot a "country wedding." The drunkeness and tractors for limos would drive you crazy, not to mention the bridal party shenanigans. The first wedding that I shot with Bob Kyser and the first that I shot solo were the only ones that I could call "normal" or "formal." The rest have been in back yards, horse barns (although thoroughbred race horse barns complete with three bedroom apartments above the horses and $15,000 shotguns as props) and beaches. Cowboy boots, sneakers and bare feet seem to be the norm. Must be the area in which I live. More than one has had hay or straw bales for seating for the guests. Harsh sunlight and dark barns make for extremes. I hope someday to get my lighting in place and be able to do what you do.
May 24, 2017 20:50:19 #
bkyser wrote:
No, I normally use teenage kids, they are easier to return if you get them locally, instead of ordering them online.
lol
lol
Yes, but they are cute as a button :)
May 24, 2017 20:51:46 #
jaysnave wrote:
deleted - in poor tasteI wish you could just order one of those voice activated light stands on Amazon.
If you want to reply, then register here. Registration is free and your account is created instantly, so you can post right away.