Check out Black and White Photography section of our forum.
Snap Shot's Special Frame
Dec 5, 2016 06:18:34 #
Many have commented on the frame I made for one of my photos the other day. I'm humbled by such interest being expressed and would like to share how easy it is to do. I use Adobe Photoshop Elements 12 to make the frame. Most PSE versions can do this. It simply involves making two photos, your original and a copy of it to be transformed into the back ground image. Then simply placing the original over the copy, in the layers panel, and reducing the size of the original.
Please follow these instructions exactly to start out with; it will be much easier to follow along. Once you get the basic ideas down, you can make whatever changes you like.
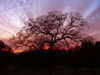
First choose your photo carefully; make sure it is fully processed using whatever editing programs you like, but must be full frame and cropped to 7X5X300 resolution in PSE 12. ( See my Photo 1.)
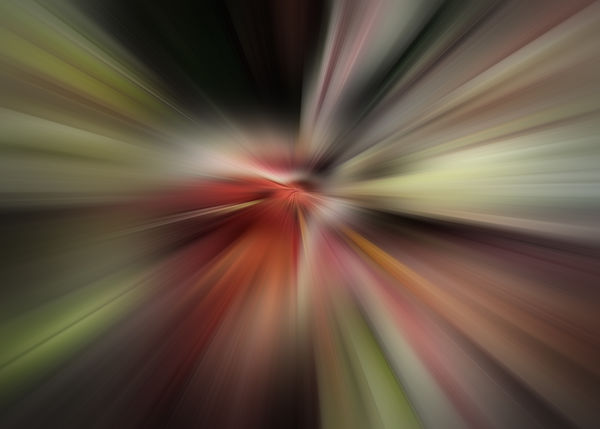
Next, bring up your finished Original into PSE, duplicate the layer (Ctrl >J) and select from the upper tool bar, Filter>Blur>Radial Blur. Click on Zoom and Best and slide the slider all the way to the right and Click OK. Next, Ctrl > F two times to give the blur more definition.(See my Photo2.)
Now save this image as a jpg with a different name than your Original or the Finished Original or you will over write them! Save it to the same folder as the Original and processed Original. This way everything is in the same folder and easy to find if you need to start over again.
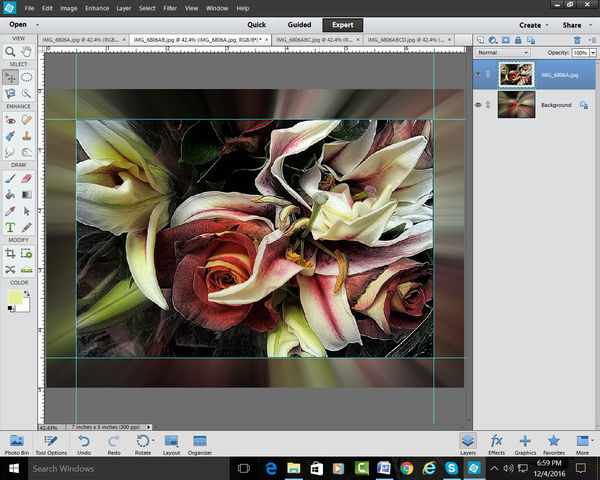
Here is where it can get difficult! Pull up both your processed Original and the Blurred Images, you just saved, into PSE. On the bottom lower left side of PSE is the Photo Bin. When you click on it, you'll see your two images listed below the main work screen above. Click on the Blurred Image so it fills the upper screen. Now hold your mouse over your Original image in the Photo Bin, left click your mouse and drag the Original up and over the Blurred Imageinto the work screen. Next click Ctrl>T, the Transform Tool. Now hold down the ALT and Shift Keys and drag the upper Left corner of your Original diagonally to the lower right corner just enough to expose the Blurred Image on all 4 sides. Click the green Check Mark to set it in place. Now go to the upper Tool bar and click View and select Rulers! You'll see the dimensions of your images to be 7X5 inches. What we want to do is drag the Side and Top rulers in about a half inch on all sides of the Blurred Image. You do this by holding down your mouse and dragging the rules blue Line 1/2 inch from the top and sides. (see Photo 3.) With this done, click on Ctrl >T and drag each side of your Original image to rub up against the blue Edit lines. Hold your mouse on the little squares on each side when dragging. When everything is lined up, click the green check mark to set it in place.
To get rid of the blue Edit Lines, click on Ctrl > ; and to get rid of the Ruler click on View and Rulers.
We're almost done! Find and click on the Color Picker Tool in the left Tool Bar. It looks like an eye dropper, drag it over your Original and click on a color you want your Original to have as a frame line around it. When you click, the top box on your bottom Left tool bar it will be that color with the back box as white. To reset these boxes just double click the small black box under the bigger boxes.
With that done, make sure the Original Layer, in the Layer's panel, is highlighted! Now go up to the upper Tool Bar and select; Layers>Letter Style>Letter Settings and Stroke! Set the thickness of the line to your liking by dragging the Size slider. Keep the Opacity at 100%. If the color you want is different than Black, click on the Black box, drag your mouse over and click on the color in your top Box on the lower left Tool Bar! You'll now see that color in the pop up display. Click OK and click OK in the Style Settings and it will be around your Original inner Photo! CONGRATULATIONS YOUR DONE! Unless you want a line around the Blurred image as well! Think about this: if you're going to print this photo, GO No Further! The printer needs room to grab your paper and will cut off some of that outer most line! If it's going to stay as a jpg than go for it.
With that decided, make sure the upper layer in the Layer's panel is highlighted and hold down the Ctrl>Alt>Shift and E keys at the same time to combine both Layers in the panel with a new upper Layer. Next go to the Upper tool bar and click on EDIT>Stroke. Whatever color you have in the upper Box on the lower Left Tool is the color you'll get around the outer photo. In the Pop Up box you'll see the color. The thickness of the line is whatever number you Type in the upper Width box. 10 -15 is usually a good number. Make sure Center, Normal and 100% opacity are selected! Click OK and it's done! If you want to change any of this, click the Undue option at the bottom tool Bar as many times a s necessary!
I highly recommend that you save your project as a PSD! This way if you have something you want to change, you will have all the layers at your disposal! Otherwise, you'll need to start over again, from Scratch!
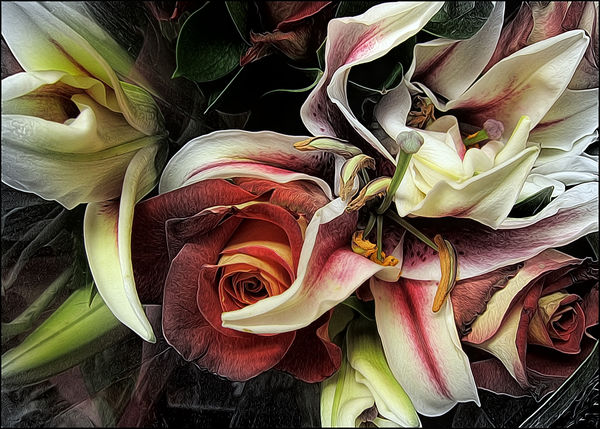
My Photos 4 and 5 are finished variations of this Technique!
Have fun,
Snap Shot
Please follow these instructions exactly to start out with; it will be much easier to follow along. Once you get the basic ideas down, you can make whatever changes you like.
First choose your photo carefully; make sure it is fully processed using whatever editing programs you like, but must be full frame and cropped to 7X5X300 resolution in PSE 12. ( See my Photo 1.)
Next, bring up your finished Original into PSE, duplicate the layer (Ctrl >J) and select from the upper tool bar, Filter>Blur>Radial Blur. Click on Zoom and Best and slide the slider all the way to the right and Click OK. Next, Ctrl > F two times to give the blur more definition.(See my Photo2.)
Now save this image as a jpg with a different name than your Original or the Finished Original or you will over write them! Save it to the same folder as the Original and processed Original. This way everything is in the same folder and easy to find if you need to start over again.
Here is where it can get difficult! Pull up both your processed Original and the Blurred Images, you just saved, into PSE. On the bottom lower left side of PSE is the Photo Bin. When you click on it, you'll see your two images listed below the main work screen above. Click on the Blurred Image so it fills the upper screen. Now hold your mouse over your Original image in the Photo Bin, left click your mouse and drag the Original up and over the Blurred Imageinto the work screen. Next click Ctrl>T, the Transform Tool. Now hold down the ALT and Shift Keys and drag the upper Left corner of your Original diagonally to the lower right corner just enough to expose the Blurred Image on all 4 sides. Click the green Check Mark to set it in place. Now go to the upper Tool bar and click View and select Rulers! You'll see the dimensions of your images to be 7X5 inches. What we want to do is drag the Side and Top rulers in about a half inch on all sides of the Blurred Image. You do this by holding down your mouse and dragging the rules blue Line 1/2 inch from the top and sides. (see Photo 3.) With this done, click on Ctrl >T and drag each side of your Original image to rub up against the blue Edit lines. Hold your mouse on the little squares on each side when dragging. When everything is lined up, click the green check mark to set it in place.
To get rid of the blue Edit Lines, click on Ctrl > ; and to get rid of the Ruler click on View and Rulers.
We're almost done! Find and click on the Color Picker Tool in the left Tool Bar. It looks like an eye dropper, drag it over your Original and click on a color you want your Original to have as a frame line around it. When you click, the top box on your bottom Left tool bar it will be that color with the back box as white. To reset these boxes just double click the small black box under the bigger boxes.
With that done, make sure the Original Layer, in the Layer's panel, is highlighted! Now go up to the upper Tool Bar and select; Layers>Letter Style>Letter Settings and Stroke! Set the thickness of the line to your liking by dragging the Size slider. Keep the Opacity at 100%. If the color you want is different than Black, click on the Black box, drag your mouse over and click on the color in your top Box on the lower left Tool Bar! You'll now see that color in the pop up display. Click OK and click OK in the Style Settings and it will be around your Original inner Photo! CONGRATULATIONS YOUR DONE! Unless you want a line around the Blurred image as well! Think about this: if you're going to print this photo, GO No Further! The printer needs room to grab your paper and will cut off some of that outer most line! If it's going to stay as a jpg than go for it.
With that decided, make sure the upper layer in the Layer's panel is highlighted and hold down the Ctrl>Alt>Shift and E keys at the same time to combine both Layers in the panel with a new upper Layer. Next go to the Upper tool bar and click on EDIT>Stroke. Whatever color you have in the upper Box on the lower Left Tool is the color you'll get around the outer photo. In the Pop Up box you'll see the color. The thickness of the line is whatever number you Type in the upper Width box. 10 -15 is usually a good number. Make sure Center, Normal and 100% opacity are selected! Click OK and it's done! If you want to change any of this, click the Undue option at the bottom tool Bar as many times a s necessary!
I highly recommend that you save your project as a PSD! This way if you have something you want to change, you will have all the layers at your disposal! Otherwise, you'll need to start over again, from Scratch!
My Photos 4 and 5 are finished variations of this Technique!
Have fun,
Snap Shot
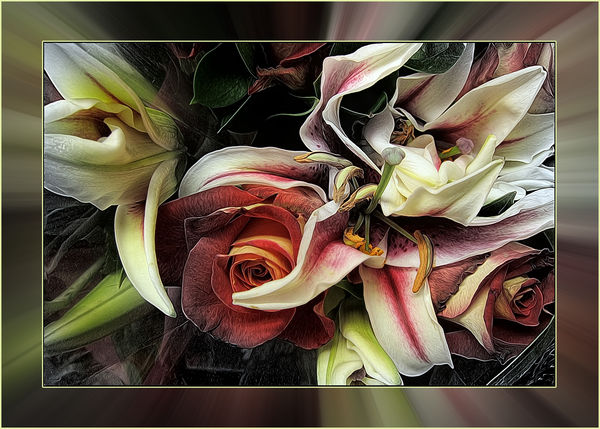
Photo 1 Original Fully Processed
(Download)
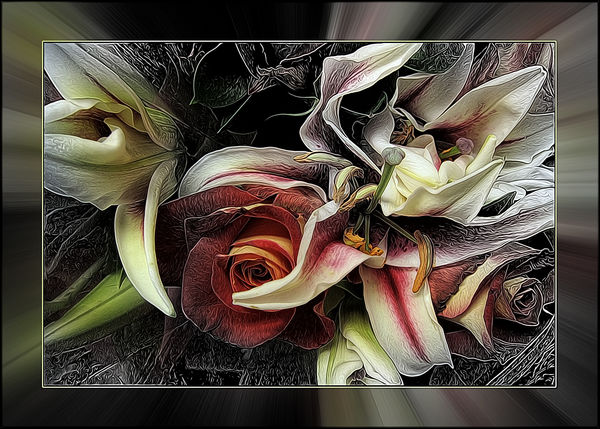
Photo 2 Original Transformed and Saved
(Download)
Photo 3 Shows Edit Lines and Ruler Tools
(Download)
Photo 4 Finished Frame Example
(Download)
Photo 5 Finished Frame Example
(Download)
Dec 5, 2016 06:23:36 #
Dec 5, 2016 06:25:44 #
Check out True Macro-Photography Forum section of our forum.
Dec 5, 2016 06:34:21 #
golferbob wrote:
Thanks for the instructions...nicely done.
golferbob, I'm glad you like the instructions! Please feel free to post your results on this feed!


Dec 5, 2016 06:35:44 #
jerryc41 wrote:
Thanks for that. I saved your directions.
I'm glad to hear that Jerry! I'd love to see your results posted here!
Dec 5, 2016 07:41:01 #
Dec 5, 2016 08:09:29 #

For someone who hates to type, you sure did a lot!!!
Thanks for sharing your creations, Bill!
Thanks for sharing your creations, Bill!
Check out The Dynamics of Photographic Lighting section of our forum.
Dec 5, 2016 08:10:08 #

Great job Snap Shot. Informative, thorough, Thanks for sharing. Don
Dec 5, 2016 10:01:17 #
WayneT wrote:
Thanks, This is an excellent idea.
Wayne, please post your results on this feed! I'd love to see the fruits of my labor!
Dec 5, 2016 10:03:31 #
angela k wrote:
For someone who hates to type, you sure did a lot!!!
Thanks for sharing your creations, Bill!
Thanks for sharing your creations, Bill!
Angela, it took for ever! I hope you try it and post your work on this feed! It would make it all worth while to see somebody actually use this stuff!
Dec 5, 2016 10:04:53 #
donrosshill wrote:
Great job Snap Shot. Informative, thorough, Thanks for sharing. Don
You're welcome Don! Please post your results on this feed! That would make my day!
Check out Advice from the Pros section of our forum.
Dec 5, 2016 10:22:33 #
Snap Shot wrote:
Angela, it took for ever! I hope you try it and post your work on this feed! It would make it all worth while to see somebody actually use this stuff!
Dec 6, 2016 06:13:16 #
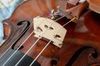
Excellent !! This gets put into my "Photo Helpful Hints" folder. ~FiddleMaker
Dec 6, 2016 09:49:26 #
FiddleMaker wrote:
Excellent !! This gets put into my "Photo Helpful Hints" folder. ~FiddleMaker
Thank you for your interest FiddleMaker! Now take it out of your folder and start fiddling with it! It's always nice to see a new visitor!
Dec 6, 2016 11:32:45 #
I really love the photos. Thanks for taking the time to send the instructions. Much appreciated.
Sharon
Sharon
If you want to reply, then register here. Registration is free and your account is created instantly, so you can post right away.