Check out Panorama section of our forum.
Men at Work (plus a question about dealing with lens vignette)
May 25, 2016 15:04:34 #

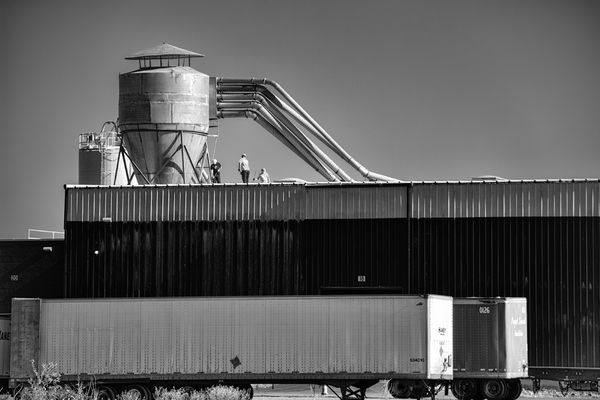
1. I was attracted to the graphics, tones and lines of this scene, thinking in b&w all the way. Your feedback is welcomed, including crop suggestions if you find a stronger composition within. (I did not do anything to reduce the lens vignette yet; see question below)
2. There is vignetting in this 18-135 mm APS-C lens and of course when I'm shooting in my cloudless blue skies, it's most evident.
How is best way to alleviate in pp? I usually use cloning, at reduced opacity. When I do prior to b&w conversion, you can sometimes see the corrections, depending on my other edits. Any tricks you can share? PS Elements 13, Nik Silver Efex.
Thanks for your time!


May 25, 2016 15:58:58 #
Frank2013
Loc: San Antonio, TX. & Milwaukee, WI.
In Ps go to image, adjustments, replace color. click in corner to select the color to replace, adjust fuzziness a bit, then click lower color square for color to replace with, then click in photo sky and take it from there, mask back out if need be. Best I can do.
May 25, 2016 17:10:20 #
Frank2013 wrote:
In Ps go to image, adjustments, replace color. click in corner to select the color to replace, adjust fuzziness a bit, then click lower color square for color to replace with, then click in photo sky and take it from there, mask back out if need be. Best I can do.
Thank you kindly, Frank. I have Elements, but I can do similar and will give it a try.
Check out The Dynamics of Photographic Lighting section of our forum.
May 25, 2016 17:12:32 #
Frank2013
Loc: San Antonio, TX. & Milwaukee, WI.
Linda From Maine wrote:
Your example photo was a prime example for this tool.Thank you kindly, Frank. I have Elements, but I can do similar and will give it a try.
May 25, 2016 17:13:53 #
May 25, 2016 18:15:15 #
I really like the first B/W, perhaps cropped just above the wheels of the front car. Very cool Linda!
May 25, 2016 18:27:45 #
pfrancke wrote:
I really like the first B/W, perhaps cropped just above the wheels of the front car. Very cool Linda!
Thanks so much, Piet.
May 25, 2016 23:11:11 #
I'm normally a fan of color (understatement) but in this case, I think the B/W treatment adds some drama to the shot, and I'd pick it over the color version. The only thing I might suggest would be to straighten/level the lines of the roof and trucks, but that's your call.
Any number of ways to fix the vignetting, if it bothers you. Frank's method, your cloning technique, dodge the darkened corners a bit, or you could replace the sky entirely, if you wish.
Any number of ways to fix the vignetting, if it bothers you. Frank's method, your cloning technique, dodge the darkened corners a bit, or you could replace the sky entirely, if you wish.
May 26, 2016 07:49:56 #
Treepusher wrote:
I'm normally a fan of color (understatement) but in this case, I think the B/W treatment adds some drama to the shot, and I'd pick it over the color version. The only thing I might suggest would be to straighten/level the lines of the roof and trucks, but that's your call.
Any number of ways to fix the vignetting, if it bothers you. Frank's method, your cloning technique, dodge the darkened corners a bit, or you could replace the sky entirely, if you wish.
Any number of ways to fix the vignetting, if it bothers you. Frank's method, your cloning technique, dodge the darkened corners a bit, or you could replace the sky entirely, if you wish.
Thanks very much, Randy. Frank and I had a discussion about straightening in my follow-up negative image of this shot. My brain was stuck where the verticals were level, and I didn't think about the horizontals being more important in this case.
May 26, 2016 11:45:36 #

One approach if you are good at making selections would be to place all sky on a layer, then operate on the layers. Just altering the color will not even out the corner darkening, but usung the clone tool could even those out. Then, when satisfied, blend the layer to background at 100% or some other % to suit your taste. When finished do Save As to a new file name so you don't lose the original.
May 26, 2016 11:49:04 #
John_F wrote:
One approach if you are good at making selections would be to place all sky on a layer, then operate on the layers. Just altering the color will not even out the corner darkening, but usung the clone tool could even those out. Then, when satisfied, blend the layer to background at 100% or some other % to suit your taste. When finished do Save As to a new file name so you don't lose the original.
Thanks so much, John. I do use layers, so it sounds like a combination of tools and processes, on a separate layer, is the way to go.
Check out Bridge Camera Show Case section of our forum.
May 26, 2016 13:08:07 #

I'm not sure if you have the equivalent of Lightroom's Adjustments brush. If you have you could use a large well-feathered brush to select the vignette (making the feathering match the fall-off of the vignette), then hit it with several duplicate applications of lifting the shadows and follow that up with a reduction in contrast and a Brightness adjustment.
The below edit is after one application of what I just described. The vignette in the corners is resistant to treatment, and if it was still too strong for your liking you could repeat the above.
After a few applications of lifting the shadows it stops having any effect, but if you wanted to go further you could use brightness adjustments and contrast reduction. With a flat, detail-less sky like that you can drop the contrast as much as you want, and even throw in a reduction in Clarity.
-
May 26, 2016 13:09:48 #
R.G. wrote:
I'm not sure if you have the equivalent of Lightro... (show quote)
Thanks so much for your time, R.G. Would you normally do this prior to b&w conversion?
May 26, 2016 13:16:49 #
Linda From Maine wrote:
Thanks so much for your time, R.G. Would you normally do this prior to b&w conversion?
I think if B&W was my objective I'd do it after the conversion. Before conversion you could end up adjusting things that were best left alone, and also fail to adjust things that needed adjusting after conversion. My experience is that it's VERY difficult to look at the colour original and make an accurate prediction about how it'll look after conversion.
May 26, 2016 13:37:13 #
R.G. wrote:
I think if B&W was my objective I'd do it after the conversion. Before conversion you could end up adjusting things that were best left alone, and also fail to adjust things that needed adjusting after conversion. My experience is that it's VERY difficult to look at the colour original and make an accurate prediction about how it'll look after conversion.
Makes sense to me! Thanks again for your time.
If you want to reply, then register here. Registration is free and your account is created instantly, so you can post right away.
Check out Infrared Photography section of our forum.