White dog
May 13, 2016 15:33:08 #
May 13, 2016 16:35:46 #
May 14, 2016 00:46:49 #

CatMarley wrote:
Of course when you cannot expose for the optimum a... (show quote)
So how do handle the Bernese?
We can go round and round on exposure, but for negative media to record shadow detail, you had to do exactly the opposite - expose for the shadows (over) and develop for the highlights (underdevelop). If you underexposed you risked not getting enough image density - aka irrevocably lost shadows. No matter how you arrived at the correct exposure, if you wanted shadow detail it had to be denser than the film's base density and the fog that came with the developing process. I would routinely expose Tri-X at ASA 200 to ensure proper shadow capture, and under develop to minimize burning in highlights.
I think we are going to have to agree to disagree. But try what I suggest - you'll find that you won't need to change exposure, you'll use the highlight slider to bring the highlights into range and your shadows will be cleaner. Or not.
Take a look at some of the work in my flickr albums in the link I provided.
May 14, 2016 10:54:57 #
Gene51 wrote:
So how do handle the Bernese?
.
.
Since most of the dog is dark, and one would be interested in the texture and details of most of the body and expression, I would probably spot meter on one of the tan patches on the dog and let the smaller white markings blow out, and as a second shot, meter on the black but dial in a one and a half stops negative compensation as insurance.
You are quite right about the negative film - I did not express myself adequately. You always had to expose for a little greater density if you wanted to preserve detail, which meant a bit over rather than under, which is what I meant, but was thinking of density so misspoke. With the positive slide film, a little underexposure gave richer color and better highlights. I also did a lot of color printing with that paper - I don't remember what it was called - came out in the late 70's - made some nice prints. Whatever happened to that stuff? It was expansive, but nice. As soon as color printers arrived it totally disappeared.
The important thing as far as the OP's question goes is to have her fully understand what the camera's meter is doing. It is setting the exposure to make whatever is being selected to meter appear as a fairly light neutral tone which in B&W would be 18% gray. So if you can spot meter on some part of the subject that is a light to medium tone you will get it properly exposed and the rest of the scene proportionally arrayed in tone. With people of medium complexion, spot metering on their skin works well. On very fair skin, you may need to compensate by dialing in some compensation. (Very easy to do with my Fuji XT-1) Likewise with very dark skin.
May 14, 2016 12:49:46 #
I am repeating myself. It's worth repeating.
White balance is function of, i.e determined by, the light source, not the subject. The very same is true of EXPOSURE. (ok, ok-- I acknowledge that exceptions to these rules may exist, but in the greater scheme of things they would relatively rare and not applicable in this instance.) Your best solution for THIS situation is a hand held incident light meter. Reliable and accurate incident light meters are now available at prices that most can afford:
http://www.bhphotovideo.com/c/product/1219217-REG/sekonic_401_307_l_308s_u_flashmate_light_meter.html/prm/alsVwDt1
http://www.bhphotovideo.com/c/product/1016936-REG/gossen_go_h264a_sixtomat_f2_exposure_meter.html
With a little bit of practice, if a hand held incident meter is used the color of the dog (or zebra or lion) will not matter.
May 14, 2016 16:56:11 #
DJO wrote:
I am repeating myself. It's worth repeating. br... (show quote)
I doubt that the average person taking photos of their dog wants to encumber themselves with a handheld meter after paying for a camera with autoexposure built in. This is especially true if one understands how your built in meter decides how to expose.
May 16, 2016 10:45:11 #
CatMarley wrote:
Since most of the dog is dark, and one would be in... (show quote)
My students find this explanation helpful:
http://photography.tutsplus.com/tutorials/understanding-using-ansel-adams-zone-system--photo-5607
May 16, 2016 10:49:55 #
CatMarley wrote:
I doubt that the average person taking photos of their dog wants to encumber themselves with a handheld meter after paying for a camera with autoexposure built in. This is especially true if one understands how your built in meter decides how to expose.
Yup! And nearly all cameras offer a 'spot meter' function (more or less). The only time a meter "decides" exposure is when the shooter opts for matrix metering, otherwise you are in control (or should be).
May 16, 2016 11:32:46 #
DJO wrote:
I am repeating myself. It's worth repeating. br... (show quote)
Unfortunately your advice is confusing at best and wrong at worst. An incident meter is not going to help with color balance one bit. An incident meter is essentially color blind. Reliable and accurate meters are not new - I still have a very accurate Sekonic incident meter I purchased in 1967. II memory serves me right I bought it used for about $40.
An incident meter is best for low to medium contrast lighting, or lighting that you are in total control of as you would find in a studio, studio, and when you can walk up to your subject and measure the light falling on it.
Also, unless you get one of the more advanced meters Tha allow you to create a camera-specific profile that takes into consideration the camera's dynamic range, there is a fair chance that blind reliance on the incident meter might result in blown highlights.
As Cat suggested, there is no substitute for using your knowledge of your camera's capabilites and limitations, and achieving a complete understanding of exposure and how to make the best use the tools at hand.
For the record, I own a hand held spot meter (Minolta), several incident meters (Gossen Luna Pro SBC and Sekonic L28) and I use the in-camera meter 95% of the time. In the studio, however, I use incident/flashmeter 100% of the time. It's a matter of selecting the best tool for the job.
May 16, 2016 11:45:51 #
Gene51 wrote:
Unfortunately your advice is confusing at best and... (show quote)
Exactly. An incident meter is measuring the intensity of the ambient light. It is NOT measuring the reflective intensity of the area of interest. A person at the beach will be a black shadow, and an indoor candle flame will be a featureless white blob using an incident meter. What we really want to do in most situations is to set the area of greatest interest in the middle of the dynamic range of the camera's sensor. The camera's spot meter is the handiest way to do this.
May 16, 2016 20:59:17 #
[quote=CatMarley]
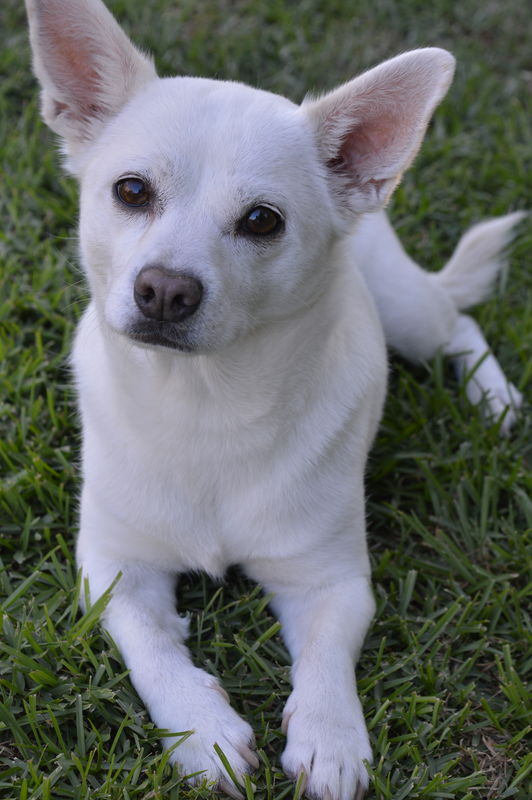
Hi, thanks for all the comments, although some of you totally lost me! I actually found this idea very helpful and set my camera to the suggested settings above, at least I hope I did. Here is a pic of the end result, my favorite so far. The hardest part seems to be getting my dog (Marley), to cooperate! Feed back welcome. Thanks again,
Gene51 wrote:
Try the following.
Set the meter mode to spot, aperture priority. Turn auto iso off.
If you are outside, set iso to 200, aperture to F8.
Dial in 1-1/3 stop plus compensation. Not doing this will result in a gray dog.
Actually you really want a gray dog, because underexposure is the only way you are going to show shading and detail in a white coat. (I do a lot of dog photography)
Hi, thanks for all the comments, although some of you totally lost me! I actually found this idea very helpful and set my camera to the suggested settings above, at least I hope I did. Here is a pic of the end result, my favorite so far. The hardest part seems to be getting my dog (Marley), to cooperate! Feed back welcome. Thanks again,
May 16, 2016 21:37:30 #

CharleneT wrote:
Hi, thanks for all the comments, although some of you totally lost me! I actually found this idea very helpful and set my camera to the suggested settings above, at least I hope I did. Here is a pic of the end result, my favorite so far. The hardest part seems to be getting my dog (Marley), to cooperate! Feed back welcome. Thanks again,
Terrific, engaging image. What a sweet pup!
You could actually lighten this pic a little, "to taste."
What I find difficult about Gene's suggestion regarding aperture and ISO is you are leaving the shutter speed to the camera. You have a moving subject and you want a shutter speed that "stops the action." 1/60 second isn't going to always work. But you are well on your way. Congrats!
May 17, 2016 12:11:05 #
Linda From Maine wrote:
Terrific, engaging image. What a sweet pup!
You could actually lighten this pic a little, "to taste."
What I find difficult about Gene's suggestion regarding aperture and ISO is you are leaving the shutter speed to the camera. You have a moving subject and you want a shutter speed that "stops the action." 1/60 second isn't going to always work. But you are well on your way. Congrats!
Agree. I would not "lighten" the image, because that would eliminate some detail. I would elevate the contrast just a bit.
May 18, 2016 11:01:10 #
CharleneT wrote:
Hi, thanks for all the comments, although some of you totally lost me! I actually found this idea very helpful and set my camera to the suggested settings above, at least I hope I did. Here is a pic of the end result, my favorite so far. The hardest part seems to be getting my dog (Marley), to cooperate! Feed back welcome. Thanks again,
Excellent! Looks like a white dog to me! And a cute one at that.
A little post processing help to add some microcontrast (clarity in Lightroom or Adobe Camera Raw) and a slight warming of the white balance, and brightening up the eyes a bit - and you've got a great shot!
Now you might want to try on a sunny day, which will be more challenging. I try to avoid that, but sometimes I have no choice, as in the shot below.
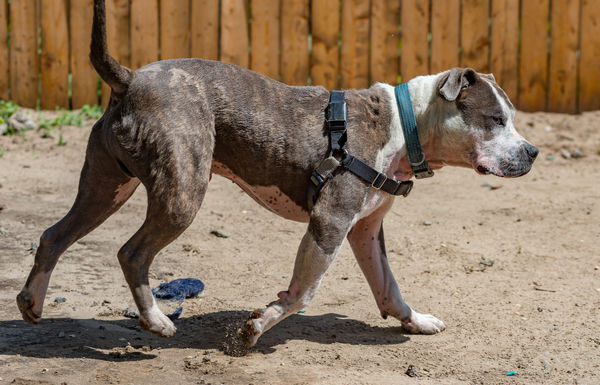
May 18, 2016 11:05:50 #
Linda From Maine wrote:
Terrific, engaging image. What a sweet pup!
You could actually lighten this pic a little, "to taste."
What I find difficult about Gene's suggestion regarding aperture and ISO is you are leaving the shutter speed to the camera. You have a moving subject and you want a shutter speed that "stops the action." 1/60 second isn't going to always work. But you are well on your way. Congrats!
You could actually lighten this pic a little, "to taste."
What I find difficult about Gene's suggestion regarding aperture and ISO is you are leaving the shutter speed to the camera. You have a moving subject and you want a shutter speed that "stops the action." 1/60 second isn't going to always work. But you are well on your way. Congrats!
There is nothing stopping you from using either a slightly larger fstop and and faster shutter speed, or instead of ISO 200 try 320 - or any combination that provides the correct exposure. In the picture, the highlight on the dog's right side (shoulder) is bright, but still retains some detail, but due to shallow depth of field it is slightly out of focus anyway. There is a bit of shadow on the dog's left side that lends some contour and gives a sense of dimensionality that would be lost if it were not there.
But Charlene nailed the exposure for sure.
If you want to reply, then register here. Registration is free and your account is created instantly, so you can post right away.