Photographing an Old Negative
Dec 31, 2015 09:23:32 #

Bunko.T wrote:
I guess you still have the negative image which needs reversing in pp.
Wouldn't it be easier to scan or have it scanned, in a proper scanner which does the reverting in house?
I bought a good scanner that does it all. No messing about.
Wouldn't it be easier to scan or have it scanned, in a proper scanner which does the reverting in house?
I bought a good scanner that does it all. No messing about.
I have to agree. You'll get much better quality.
Dec 31, 2015 10:33:27 #

DragonTom wrote:
I've set up a lightbox and macro lens on my Nikon ... (show quote)
1) Use a super-diffuse light source of high color rendering index, say 93CRI. I use 5000K CFL lamps bounced off optically white reflectors, diffused through two layers of milky Plexiglass.
2) Keep the neg perfectly flat. Use a proper carrier as you would in an enlarger.
3) You can have either side face the lens. The lens will capture light coming THROUGH the film, so put the side with the most damage --- most often the base --- away from the lens. Reverse the image in software as needed... This will use the depth of the film to throw the damage slightly out of focus, and the diffused light will wrap around it and hide it slightly.
4) Use the sweetest aperture on a flat field copy lens. A macro lens or enlarger lens stopped down 2-3 stops works best.
5) Work in subdued light. This avoids flare and reflections off the lens or film from reducing contrast.
6) Use a sturdy copy stand or tripod.
7) CLEAN the film properly!
This combination is far more important than the argument over which side of the negative faces the lens!
Dec 31, 2015 10:35:50 #

DragonTom wrote:
I've set up a lightbox and macro lens on my Nikon ... (show quote)
You haven't given any sense of the negative size. If 35mm you will need some method of keeping the negative flat if not in a slide mount. Larger negs will probably require something like a glass plate to flatten.
I recently had the opportunity to archive over 100 glass plates from the early 1900's found in a friends attic. The best way turned out to scan in at a high resolution on an high end Epson scanner with the transparency adjustment. Makes very large files, but my friend and I are having a good time trying to remove some of the artifacts in the originals and printing them up. We may even try some Platinum prints to get the "old fashioned" look.
Dec 31, 2015 13:29:56 #

Zone-System-Grandpa wrote:
Hopefully, you won't mind my asking what purpose i... (show quote)
You got it. I no longer have all the chemicals, darkroom, etc., etc. and don't care to go that route any longer but do have many negative strips from the 1960s that it would be nice to (1) archive in digital form and (2) perhaps edit a few of the images using all the digital methods available now. The first step however is converting the negatives to digital form and doing that in the best way possible (e.g., sharpest image, image with least amount of scratches, dust, etc.) which reduces the amount of later editing that must be done.
I could send these out to a service but, frankly, most are snapshot quality so paying for the service would be a waste of money when I can do it easily with a good camera on a sturdy mount over a lightbox and then edit the results as needed.
Dec 31, 2015 13:42:19 #
burkphoto wrote:
1) Use a super-diffuse light source of high color ... (show quote)
Thank you. I am using a 105mm macro lens at f5.6 on the Nikon D7100 with a large (sturdy) tripod and remote trigger. The lens has a long shade on it to kill reflections from the side. The work is being done in a darkened room for just the reason you mention as my initial testing showed light reflections. I will be shooting emulsion side up based on discussion here and the fact that I thought that was probably the right thing to do. The film is mostly 35mm TriX; sometimes pushed when I was shooting night football games and had to use a faster shutter than ASA 400 allowed. Air and fine brush will clean the negatives and they are being held in a holder similar to what I used to use in the darkroom so many decades ago. :-)
Dec 31, 2015 14:04:40 #
DragonTom wrote:
Thank you. I am using a 105mm macro lens at f5.6 o... (show quote)
DragonTom,
PM (private message) me. I may have an old and unused Nikon slide copy adapter in a box at home. I am currently on the road and will not be home until the 6th of January. If I can find it, you can have it for the price of the postage.
Your PM will be my memory jogger to check.
HTH
Dec 31, 2015 14:14:59 #
BobHartung wrote:
DragonTom,
PM (private message) me. I may have an old and unused Nikon slide copy adapter in a box at home. I am currently on the road and will not be home until the 6th of January. If I can find it, you can have it for the price of the postage.
Your PM will be my memory jogger to check.
HTH
PM (private message) me. I may have an old and unused Nikon slide copy adapter in a box at home. I am currently on the road and will not be home until the 6th of January. If I can find it, you can have it for the price of the postage.
Your PM will be my memory jogger to check.
HTH
Thank you. I have a Nikon copy adapter and bellows that I kept but, frankly, it was easier to use the lightbox method than to get all the adapters, etc. necessary to connect all that together with the newer lenses that do not use the Nikon 52mm standard of yore. Appreciate the offer however.
Dec 31, 2015 14:26:09 #
Any thoughts about the color mask inherent in negative stock such as Ektacolor, Kodacolor?
Dec 31, 2015 14:35:34 #
Greenebroke wrote:
Any thoughts about the color mask inherent in negative stock such as Ektacolor, Kodacolor?
Not yet. The negatives I'm interested in now are all B&W; mostly on TriX film. Color would be a subject for another thread that's probably already done to death. :-)
Dec 31, 2015 16:49:36 #

burkphoto wrote:
1) Use a super-diffuse light source of high color ... (show quote)
Does an enlarging lens usually include a manual aperture?
Dec 31, 2015 16:49:39 #
Dec 31, 2015 17:11:48 #

I haven't worked in a museum, but to me it should be clear that the sharpest image will be off the emulsion side and to use the PP controls to flip as necessary for all the reasons the others have posted.
Dec 31, 2015 17:49:11 #
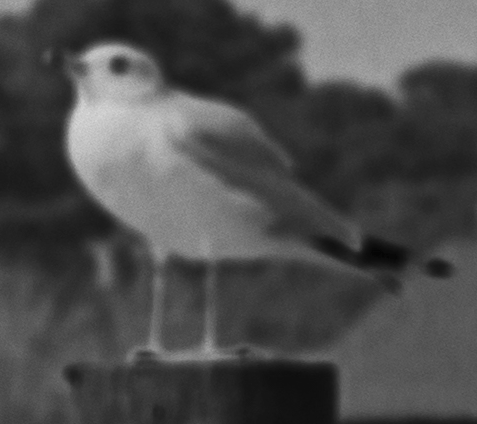
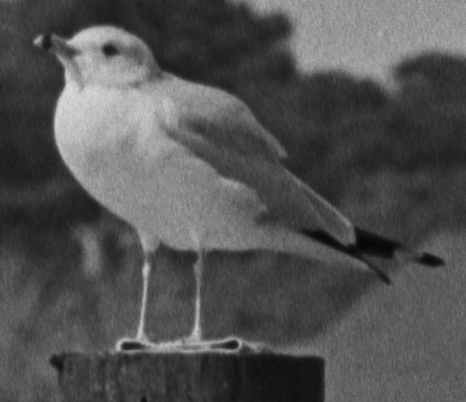
Emulsion side is better. Here are sections from a negative I just tested. Clip 1 is through the support media and Clip 2 is a photograph of the emulsion side. Actually, quite a difference.
Through the film.
Emulsion side
Dec 31, 2015 18:28:03 #
All of the enlarging lenses I have had over the years had a manual aperature setting
blackest wrote:
Does an enlarging lens usually include a manual aperture?
Dec 31, 2015 19:31:12 #
PixelStan77 wrote:
All of the enlarging lenses I have had over the years had a manual aperature setting
Thank you for the information, I honestly didn't have a clue.
If you want to reply, then register here. Registration is free and your account is created instantly, so you can post right away.