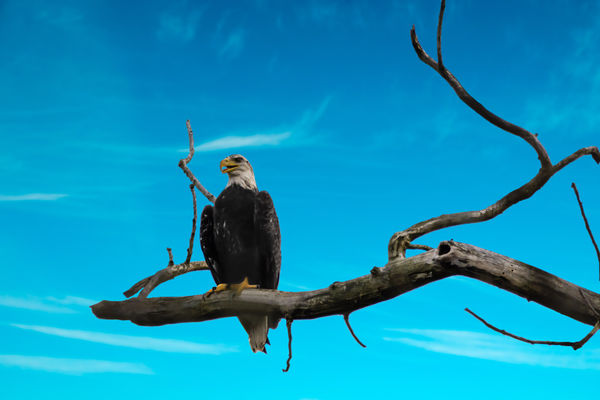
Advice on Post Processing for this Photo of an Eagle
Sep 16, 2015 11:25:32 #
Sep 16, 2015 11:27:01 #
R.G. wrote:
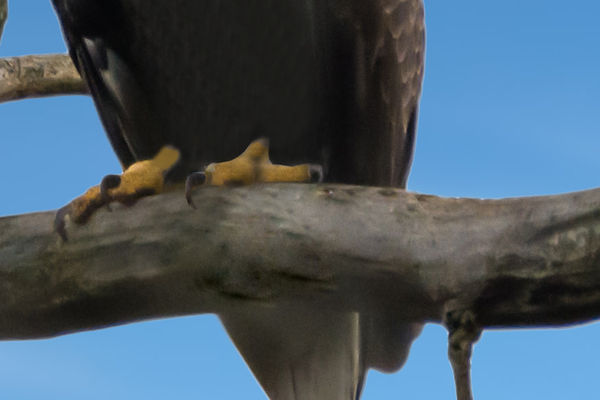
The bits where there were intervening branches look a bit soft - for example the eagle's left foot. I find that selecting bits like that and giving them a fair bit of Clarity and an extra touch of Contrast helps to get rid of the softness.
I also tried selecting the eagle and giving it an extra touch of clarity and contrast, and it helped to bring out a bit more detail.
I also tried selecting the eagle and giving it an extra touch of clarity and contrast, and it helped to bring out a bit more detail.
Thanks, I will try that out with the Eagle!
Sep 16, 2015 11:31:51 #
Bill Houghton wrote:
I think the glow, around the eagle and limbs is a chromatic abbreviation, I would also clean up his left foot.
The softness of the Eagle's lower body, the left foot, and the branch is due to a branch way in the foreground. I tired using all the healing tools to fix it (ie. Stamp tool, spot healing, healing, and patch tool). Anyone have any suggestions on which would work the best in this case?? I think I ended up using the Stamp tool mostly.
Sep 20, 2015 00:54:48 #
Just used a little selection and air brush.
On the breast feathers, selected and did a Hue Adjust to take the yellow out.
On the Claw, selected the Yellow area and air brushed.
Copied on claw and pasted. to new location.
Just a quick job.
On the breast feathers, selected and did a Hue Adjust to take the yellow out.
On the Claw, selected the Yellow area and air brushed.
Copied on claw and pasted. to new location.
Just a quick job.
Sep 20, 2015 07:46:01 #
Bill Houghton wrote:
Just used a little selection and air brush.
On the breast feathers, selected and did a Hue Adjust to take the yellow out.
On the Claw, selected the Yellow area and air brushed.
Copied on claw and pasted. to new location.
Just a quick job.
On the breast feathers, selected and did a Hue Adjust to take the yellow out.
On the Claw, selected the Yellow area and air brushed.
Copied on claw and pasted. to new location.
Just a quick job.
Very nice, thank you.!!
I get the first part with the Hue adjustment but notthe claw part. I assume you selected a color to airbrush from a part of the bad or good claw and then airbrushed yellow onto the bad claw. I don't get the pasted to a new location part.
To be honest I haven't used the brush or airbrush much so this would be a good time for me to learn. If possible could you do a 1,2,3 steps involved type of list. You can make it simple, I have enough photoshop experience to figure it out from there (I don't need pictures showing detailed steps, I hope!!!!) . If there is a good tutorial on what you did, that would work also.
Thanks!!!
Sep 20, 2015 09:20:05 #

I think that if you use a small feather at the end of the selection process it will minimize the halo effects. Great photo as seen from a distance.
Sep 20, 2015 09:56:24 #
Ok the only claw that looks any good is the talon on the the right foot. I made a selection of that talon with the Polygon Lasso tool. I enjoy using that that tool because your Alt Key will minus your selection and the the Shift Key to add to it. Bring your selection in pretty close to the shape you want. I cleaned up a little with the Air Brush tool, using the Alt Key to make my color selection from the area I liked and setting the Opacity to 60. This allows you to build up your color. Once that talon was to my liking I copied it with the selection.
Once copied to the clip board I pasted it, Then using the move tool to drag it over where I wanted it. I left the on it's own layer since this will allow painting the foot on the first layer easyier without any over-spray.
Select the Yellow foot with the Polygon Lasso and begin your coloring much the same way you did the talon.
Now invert the selection and clean up the feathers, this will reduce the smudging of the yellow.
You should be done, you might want to flatten the photo. or leave the layers and save as desire.
Sep 21, 2015 07:42:46 #
CajonPhotog wrote:
I think that if you use a small feather at the end of the selection process it will minimize the halo effects. Great photo as seen from a distance.
Thank you, I will give that a try
Sep 21, 2015 07:43:52 #
Bill Houghton wrote:
Ok the only claw that looks any good is the talon ... (show quote)
Great description. When I get some time I am going to try all of this and I will post the result. Thanks!!
Sep 23, 2015 23:10:41 #

Not bad for a first try. The trick for getting better ... Practice, Practice, Practice.
Nov 29, 2015 18:50:58 #
I finally got around to messing with this photo. I have done a bit of learning with photoshop and decided to give it another go.
If you want to reply, then register here. Registration is free and your account is created instantly, so you can post right away.