phototshop cc-how to use the brush tool
Jun 24, 2015 21:40:48 #
why cant i get my brush tool to work?
i have a picture i am trying to restore and i cant seem to get my brush to lighten or darken the areas i would like to.
if ive already made an adjustment layer for something else.
do i make another layer to use the brush?
what type of layer?
should i be working on the background layer?
in any case whatever layer i should be on-it should be on top of all the other layers. if this is too complicated to explain, perhaps you can recommend a link? i cant seem to find one.
thank you.
Jun 24, 2015 22:22:09 #

E wrote:
why cant i get my brush tool to work? br i have a ... (show quote)
There's a trick to dodging/burning on a layer that is not the image layer. http://www.outdoorphotographer.com/how-to/tip-of-the-week/dodge-and-burn-on-a-separate-layer.html#.VYtkeGC0HRU. There may be other methods but this one will work if you'd like to keep your adjustments on a separate layer till you get ready to flatten the layers.
I've also cheated by just duplicating the image layer and dodging/burning on it but the problem with that is, if you don't like it, you've gotta go backwards through the undo's or trash the layer and start over. The other way is better practice.
I don't think there is a way do the dodge/burn on the adjustment layer that you already made for some other purpose. It wouldn't seem like a good idea anyway.
Jun 25, 2015 06:14:08 #
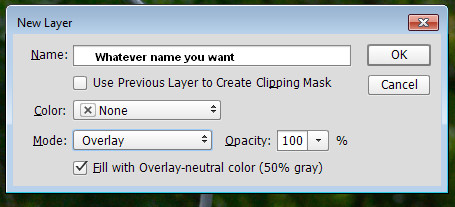
Much easier than dodge and burn is create a new layer on top of image you wish to adjust. Fill it with 50% grey via Edit>Fill>50% grey. Change blend mode of this grey layer to Overlay and you picture reappears.
With a soft brush set to 15% opacity paint on your Overlay layer. Black darkens white lightens. Do a little and when its right go Layer>Merge down and start again with another blank layer on top to do the next bit.
You will find this much simpler than the dodge and burn tools.
With a soft brush set to 15% opacity paint on your Overlay layer. Black darkens white lightens. Do a little and when its right go Layer>Merge down and start again with another blank layer on top to do the next bit.
You will find this much simpler than the dodge and burn tools.
Jun 25, 2015 07:23:24 #
Yes this is more of the response I was looking for. Is it an adjustment layer from the layers panel? Thank you
Jun 25, 2015 07:43:34 #
E wrote:
Yes this is more of the response I was looking for. Is it an adjustment layer from the layers panel? Thank you
No.
It's just a new layer. Right click and set contents to 50% gray.
Jun 25, 2015 07:48:21 #
Jun 25, 2015 07:54:06 #
E wrote:
Yes this is more of the response I was looking for. Is it an adjustment layer from the layers panel? Thank you
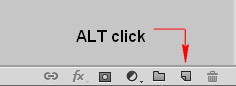
Do all your adjustments and then the dodge and burn technique I outlined. It starts with a new BLANK layer. Looks like a sheet of paper with corner turned down at bottom of layers panel
A adjustment layers such as Hue and Saturation are just for that one operation. Adjustment layers are selected with the circle thats half shaded at the bottom of the layers panel
Jun 25, 2015 09:28:46 #

E wrote:
I need very specific info:) . It's right click on the background layer?
You can add the layer, overlay, and 50% grey fill by
Jun 25, 2015 11:06:07 #

Billyspad wrote:
Much easier than dodge and burn is create a new la... (show quote)
:thumbup: :thumbup: :thumbup:
--Bob
Jun 25, 2015 11:38:42 #
TheDman
Loc: USA
Billyspad wrote:
Much easier than dodge and burn is create a new la... (show quote)
You actually don't even have to fill with 50% grey. Just create a new layer, set it to Soft Light and start painting away.
Jun 25, 2015 19:09:27 #
TheDman wrote:
You actually don't even have to fill with 50% grey. Just create a new layer, set it to Soft Light and start painting away.
Surely that soft light layer affects the outcome of the final product?
I use dodge and burn AFTER the image is as I want it and would possibly not wish to apply a soft light mode to it.
Jun 25, 2015 19:15:20 #
TheDman
Loc: USA
Billyspad wrote:
Surely that soft light layer affects the outcome of the final product?
I use dodge and burn AFTER the image is as I want it and would possibly not wish to apply a soft light mode to it.
I use dodge and burn AFTER the image is as I want it and would possibly not wish to apply a soft light mode to it.
Nope! Soft light and overlay are much the same. Overlay produces a bit stronger effect though. And if your layer is empty, you get zero effect no matter which blend mode you use.
Jun 25, 2015 19:26:17 #
TheDman wrote:
Nope! Soft light and overlay are much the same. Overlay produces a bit stronger effect though. And if your layer is empty, you get zero effect no matter which blend mode you use.
Thanks for that. Im sure the poster has enough info whichever method he uses to solve his problems.
If you want to reply, then register here. Registration is free and your account is created instantly, so you can post right away.