Help with Blah image
Feb 4, 2014 07:58:46 #

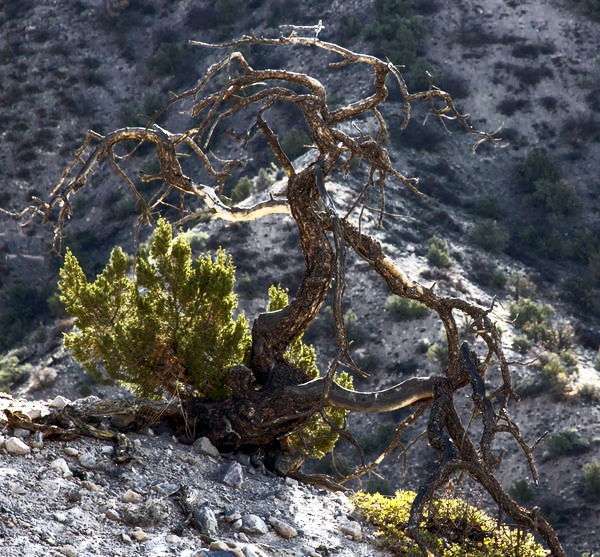
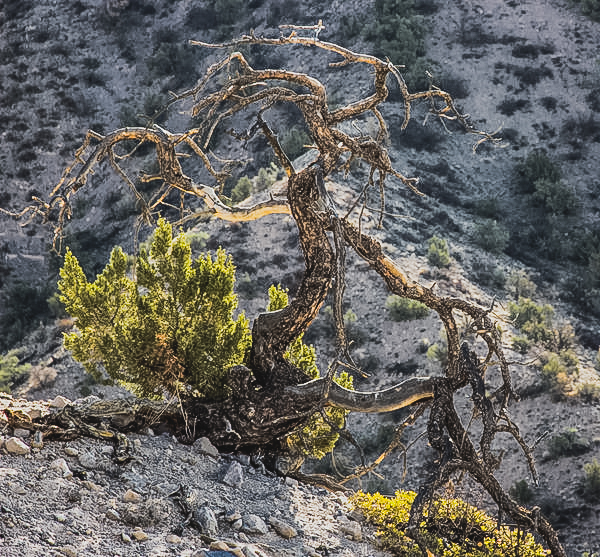
If I wanted a photograph of that tree (which is a pretty neat looking subject), I would have tried to get below it and have the sky as my background. Perhaps the location of the tree might have prohibited that, I do not know. This is a classic image in support of the concept that you cannot always post-process improve an image that was not well planned out prior to the taking of the photograph. Sort of like you cannot effectively sharpen a blurred image. I would like to think I would have tried to walk all the way around this tree looking at sight lines prior to shooting. Planning is everything.
I make this mistake frequently, but I am working to improve my "step back and look for a while before shooting" technique in the field. Sometimes the best thing we can learn from an image is how we could shoot it better next time. Just a suggestion for next time.
I make this mistake frequently, but I am working to improve my "step back and look for a while before shooting" technique in the field. Sometimes the best thing we can learn from an image is how we could shoot it better next time. Just a suggestion for next time.
Feb 4, 2014 14:29:59 #
amehta
Loc: Boston
PapaMike wrote:
It's why knowing depth of field is so important when shooting.
And why knowing that DoF is not "good" or "bad". There are times when you want it deep, other times when you want it shallow.
Feb 4, 2014 21:14:17 #
amehta wrote:
And why knowing that DoF is not "good" or "bad". There are times when you want it deep, other times when you want it shallow.
There are charts in the search of DOF that you can compute your DOF. Of course there are times when you want the background blurry. Most portraits do that. Sometimes you like everything to be sharp. That is why you practice DOF adjustments. David
Feb 9, 2014 17:30:00 #
Pov is key always look for contrast if subject is light look to get it against a darker background by moving about til you find something in the background which will set you foreground subject apart
Feb 10, 2014 09:56:29 #

Hi Psergel,
My first thought is to change the view from down the hill, to shooting uo the hill with the shy in the background.
I would like to share with you something that I learned from ( Griff Joe Smith ) of Texas Highways Magazine called Painted Light.
Set your camera on a tripod and compose your subject wait until the sun drops over the horizon this time until
total darkness is about a 15 to 30 min window where you can obtain a 2 to 10 sec exposure. You may want to
set your ISO to a lower number. Use a 500 or 1000 watt battery powered light you can obtain from Wall Mart or any sport store. When you start you exposure, turn on light and paint the subject with the light.
( You don't take a photograph, you make it. Ansel Adams ) With this technique there is a bit of a learning crave. However, the results are first class.
Hope this is helpful
JW Smith
www.CloseToTheFlame.com
Feb 10, 2014 10:05:36 #
Hi Psergel,
My first thought is to change the view from down the hill, to shooting uo the hill with the sky in the background.
I would like to share with you something that I learned from ( Griff Joe Smith ) of Texas Highways Magazine called Painted Light.
Set your camera on a tripod and compose your subject wait until the sun drops over the horizon this time until
total darkness is about a 15 to 30 min window where you can obtain a 2 to 10 sec exposure. You may want to
set your ISO to a lower number. Use a 500 or 1000 watt battery powered light you can obtain from Wall Mart or any sport store. When you start you exposure, turn on light and paint the subject with the light.
( You don't take a photograph, you make it. Ansel Adams ) With this technique there is a bit of a learning crave. However, the results are first class.
Hope this is helpful
JW Smith
www.CloseToTheFlame.com
Mar 12, 2014 14:48:42 #
bigmac115100
Loc: Florida
Getting lower, say where the rocks on the left are, with a wide angle lens and use the sky as the background. This would require you to be pretty close to the tree and everyone here has suggested post processing so if the sky is not good, put another one in. Hell have fun and get a nice photo to look at, all at the same time OR keep the same shot and cut out the background and add whatever you want
Mar 30, 2014 14:49:49 #
Los-Angeles-Shooter
Loc: Los Angeles
I would use as shallow an F-stop as possible to put the background out of focus.
I would try to intensify the colors, by setting the camera to "vivid" colors and by possibly using a polarizer filter.
There are also ways in PS to intensify colors.
All of these should make the photo pop a little more.
I would try to intensify the colors, by setting the camera to "vivid" colors and by possibly using a polarizer filter.
There are also ways in PS to intensify colors.
All of these should make the photo pop a little more.
Mar 31, 2014 22:06:33 #
Fred in Boise
Loc: Boise, Idaho
Little too bright on tree needles Diana--IMHO.
Think he just needs to fade the background a bit
.
Think he just needs to fade the background a bit
.
Apr 3, 2014 19:51:18 #

I used Paint.net and just used the curve. My first try, now I will try to see if Lightroom is better.
Apr 3, 2014 20:09:52 #
Apr 4, 2014 13:40:53 #

Psergel wrote:
Regardless of a what a blah image is no amount of post processing will make it better, especially most of those offered that do not address how to separate the tree from the background....
There is no point trying that on this image.
A few folks suggest toward the end to just go back and select a different point of view or lighting.
The key, in my opinion is lighting. When dealing with roots or branches or anything like it there is not many angle to capture the subject as you see it. What is left is lighting and a fill flash will help.
Personally instead of a fill light I would simply use the flash as main light and use the daylight as the fill for the background. The result is a properly exposed tree and underexposed (how much depends on you) background.
Whatever you select a re-shoot is needed if you care enough about this scene.
Apr 7, 2014 15:16:02 #
Apr 9, 2014 14:03:04 #

This may be an example of what Frank Ruggles calls the "Photographer's Circle." Frank (former official photographer for the National Park Service) says that whenever possible, a photographer should circle the subject, seeing it from a 360 degree perspective.
Of course, that's not always possible, but one of the things I noticed about your shot is that the background moves up the line of the tree, essentially disguising its very interesting shape. Combine that with the relative monotone background color, and the tree sort of fades into the shot rather than stand out from it.
Just opining aloud. FWIW.
Apr 10, 2014 12:19:40 #
If you want to reply, then register here. Registration is free and your account is created instantly, so you can post right away.