"Fake" HDR using just one image
Jan 31, 2012 23:32:43 #

KimParks wrote:
They are all awesome...How do you save to jpeg once the picture is created. I have photomatrix and have trouble saving it. Great idea thank you so much for sharing.
Kim - Thanks, glad you like the idea. Here are the basic steps that work for me..
1. Drag the 3 versions of the photo onto the Photomatix icon.
2. When it opens, click on Pre Process.
3. Do your Tonemapping and slider adjustments as desired.
4. Click on Process
5. Then your Save As menu option should work, and you can select JPEG
Hope that works for you.
Feb 1, 2012 00:44:59 #
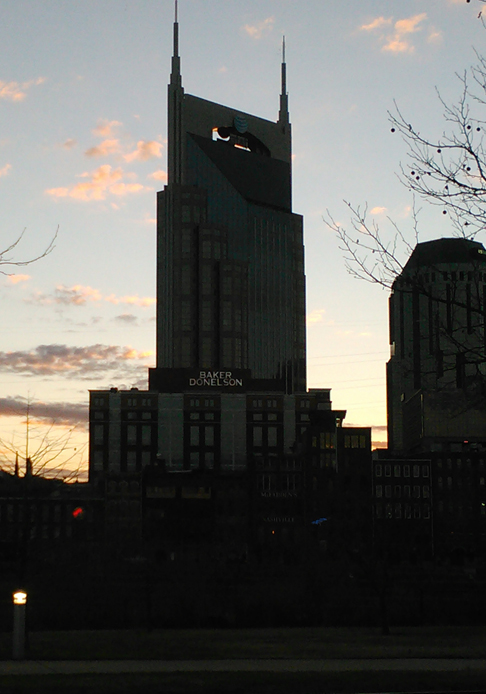
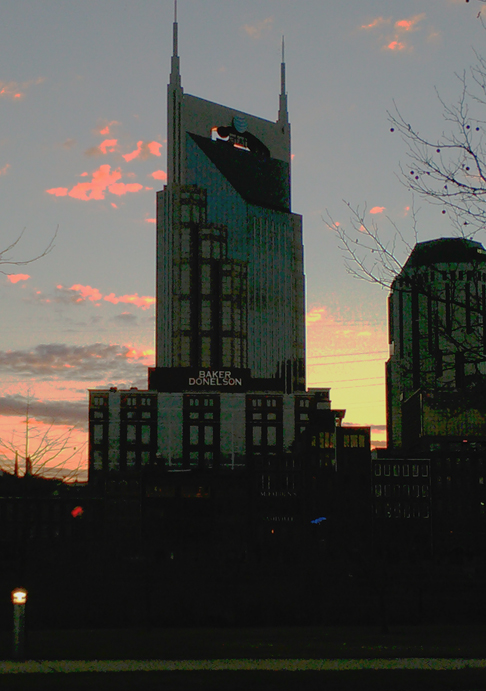
Went out just before dark looking for a silhouette to see what would happen with this technique from a point and shoot. Thanks for the fun!
Original
HDR
Feb 1, 2012 02:18:36 #
Virgil
Loc: The Hoosier State
Country's Mama wrote:
Ok you got me curious. I don't have an HDR program and my poor little elements 4 doesn't have it either. So I took the original made two duplicates bumped the exposure up 3 on one and down 3 on the other. Took them into photoshop and made three layers with the original being the background. Then I brought in the other two layers and blended them with soft light. Ran levels and bumped contrast a tad and this is what I got. Similar? Or not even close?
Too bad I wasn't home or I would have come out and stood in front of the house for you! LOL
Feb 1, 2012 02:29:56 #
Virgil
Loc: The Hoosier State
Timarron wrote:
quote=docrob quote=Timarron quote=docrob quote... (show quote)
Neither like or dislike HDR. BUT,,,, does anybody remember some of those pics from a 'century' ago that you are saving that could have been a little better if only.........! I see good possibilities here. Good thread. Virgil
Feb 1, 2012 02:51:34 #

I am really enjoying this thread. Thank you for starting it and all of you for sharing your photos.
Thank goodness, everyone doesn't like the same things! I just happen to love the real things AND playing with photos. Maybe the play is because I am an artist and take liberties with my paint and brushes, so I also think it's fun to take liberties with photos. I feel that there are some things that really need to stay real, but ALL of them are fun!
Thank goodness, everyone doesn't like the same things! I just happen to love the real things AND playing with photos. Maybe the play is because I am an artist and take liberties with my paint and brushes, so I also think it's fun to take liberties with photos. I feel that there are some things that really need to stay real, but ALL of them are fun!
Feb 1, 2012 06:52:32 #

Virgil wrote:
quote=Country's Mama Ok you got me curious. I don... (show quote)
I will call ahead next time. :lol:
Feb 1, 2012 20:19:19 #

I feel soooo dumb. I have tried and tried BUT still do not get it. I have GIMP, Photomatrix and sherif and Photoexplosion. I wish I had Photoelements. In Photomatrix I can only save in TIFF or something I can do nothing with. I really LOVE this HDR look but the only way I can come close is to do the highlights and it just dulls the image.
I am obviously doing something wrong.
Thank you for trying.
I am obviously doing something wrong.
Thank you for trying.
Feb 1, 2012 21:01:31 #
KimParks wrote:
I am obviously doing something wrong. Thank you for trying.
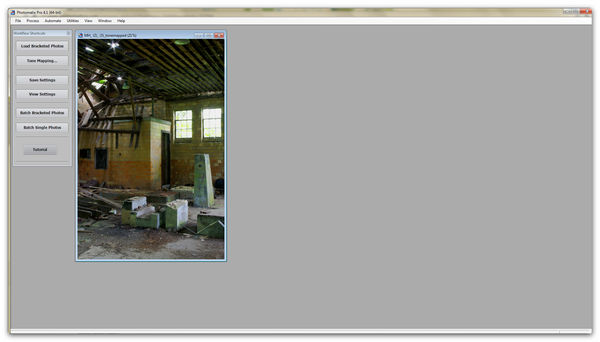
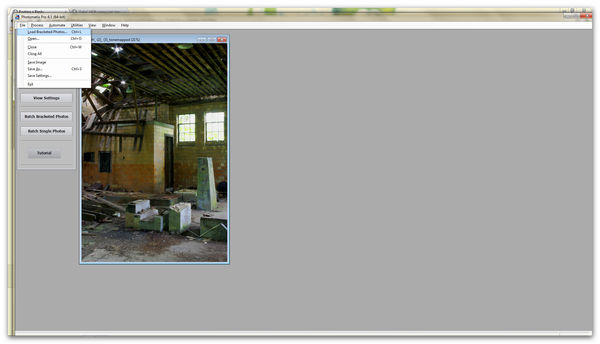
Don't give up. What are you doing exactly? I assume you are loading your bracketed photos (or opening a RAW image) and then after you adjust the settings you press the PROCESS button. Once that is done, choose File > Save As ... In the "Save as type" dropdown list there is the option for .jpg.
See my example.
Use the download feature in the post in order to see the detail of my explanation.
Processed Image
Save As 1

Feb 1, 2012 23:55:57 #
Thank you...I wasn't going to tone mapping. My pictures still are not coming out as awesome as everyone elses What exposure should I be setting it at? At least I can get to jpeg. It is a start.
Feb 2, 2012 00:41:59 #
KimParks wrote:
Thank you...I wasn't going to tone mapping. My pictures still are not coming out as awesome as everyone elses What exposure should I be setting it at? At least I can get to jpeg. It is a start.
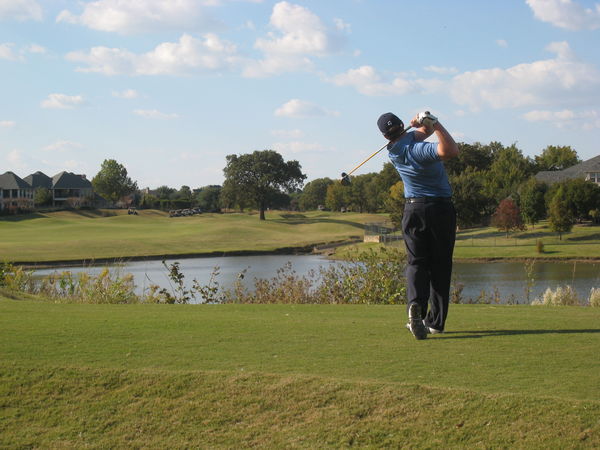
Kim - I am going up 2.00 on one copy and down 2.00 on the other using the Exposure slider. Then taking all 3 to Photomatix. On a couple of attempts, I have then taken the resultant image to Photoshop Elements (PSE), and done some dodging and burning to provide additional highlights and shadows.
The image below used that process (I guess you have to click on Download). I took a single picture of the golfer, did the duplicate exposure thing, then took the "Fake HDR" into PSE and played with a bit more. I was going after a kind of oil painting look. I know it will be a little much for some people, but I still think it is amazing where you can take a single image using these tricks. Good luck and keep trying.
Feb 2, 2012 06:06:33 #
Timarron wrote:
The image below used that process (I guess you have to click on Download). I took a single picture of the golfer, did the duplicate exposure thing, then took the "Fake HDR" into PSE and played with a bit more. I was going after a kind of oil painting look. I know it will be a little much for some people, but I still think it is amazing where you can take a single image using these tricks. Good luck and keep trying.
It may be my monitor at work making it look a little dark, otherwise I like the results of this Timarron.
Feb 2, 2012 06:12:04 #
KimParks wrote:
Thank you...I wasn't going to tone mapping. My pictures still are not coming out as awesome as everyone elses What exposure should I be setting it at? At least I can get to jpeg. It is a start.
Are you doing what others are by taking an original and then increasing and decreasing its exposure? I don't know the settings in your programs (from the onse you listed previously), but the exposure adjustments should be similar to what Timarron mentioned. Take your original, increase the exposure by +1 or +2, then save as (example: file name +1). Make sure the original is reverted back to its original state and decrease the exposure by -1 or -2, then save as (example: file name -1). Once you have your three exposures, you can now work them in Photomatix.
Have I done anything to clear this up?
Feb 2, 2012 07:00:27 #
yes very much I used exposures 3, 0, -3 what I didn't realize is to do more editing I really love this look. Is there a certain type of picture that works better.
Feb 2, 2012 08:23:56 #
KimParks wrote:
yes very much I used exposures 3, 0, -3 what I didn't realize is to do more editing I really love this look. Is there a certain type of picture that works better.
I think that landscapes are challenging due to minimal color contrast. Industrial and architectural subjects lend themselves to interesting results. Images with extreme dynamic range may take a little more time getting the desired results. For instance an image with a bright sky and darker foreground may prove challenging in order to get the sky right. I have taken one of the orignal images (usually the "0" exposure or darker) and masked the sky back in and adjust the exposure/levels/curves to match the foreground exposure.
Feb 3, 2012 15:29:20 #
arphot wrote:
quote=Timarron The image below used that process ... (show quote)
No, I think you're right. After looking at it again and again I think it is a little dark. I'm going to brighten it up a bit, but I really like the effect that is starting to show up using this process. Thanks for the feedback.
If you want to reply, then register here. Registration is free and your account is created instantly, so you can post right away.