lightroom issue-adjustment brush
Jan 28, 2013 19:32:14 #
after i use the adjustment brush it leaves a black/white circle unless i click on the adjustment brush again. is this the way its supposed to work?
also, when i try to sharpen the eyes, it colors the eyes!.
thank you
also, when i try to sharpen the eyes, it colors the eyes!.
thank you
Jan 28, 2013 19:42:03 #
E wrote:
after i use the adjustment brush it leaves a black/white circle unless i click on the adjustment brush again. is this the way its supposed to work?
also, when i try to sharpen the eyes, it colors the eyes!.
thank you
also, when i try to sharpen the eyes, it colors the eyes!.
thank you
As far as the color, make sure all your sliders are set to neutral, then adjust the sharpness slider. The dot you are referring to can be turned off at the bottom left, below the picture. It says show edit pins. Click on that and you have several choices.
Jan 28, 2013 19:51:13 #
thank you. this is all french to me. when you say sliders --you mean the brightness, exposure , etc sliders? they all are in the center not neg not positive. and i do not see anything under the picture about "pin" thank you for your patience....:)
Jan 28, 2013 20:03:22 #
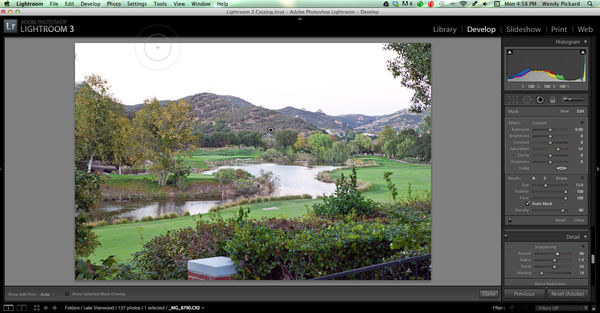
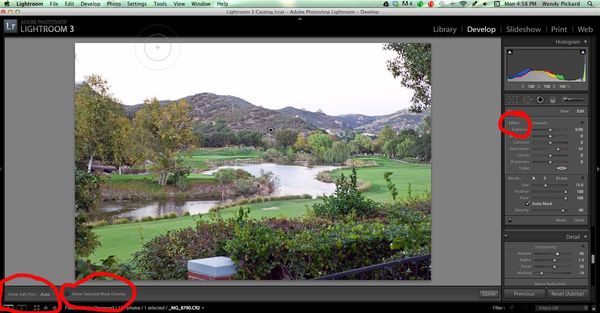
Here is a screen shot. Look in lower left corner you will see the "show edit pins".. Notice that I am in Develop. See the sliders that are for Exposure, Saturation, Brightness, etc. They should be set to the middle. You can do that by clicking on the word "Effect", top right of the same box those sliders are in. That will set them to neutral. Mine are not completely set to neutral because I made adjustments.
Jan 28, 2013 21:54:09 #
Jan 28, 2013 21:58:08 #
You have to click "New" as you do when you use the adjustment brush It will appear then.
Jan 28, 2013 23:27:24 #
Jan 28, 2013 23:30:51 #
Wendy2 wrote:
quote=E after i use the adjustment brush it leave... (show quote)
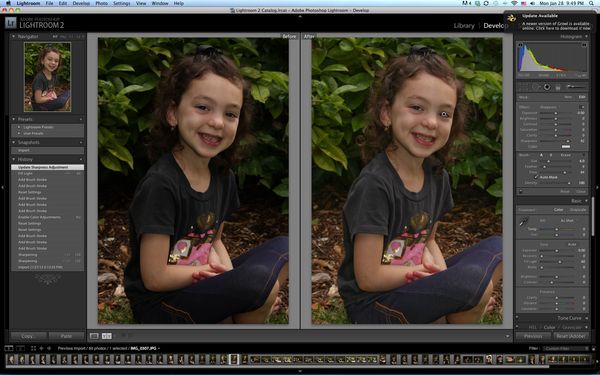
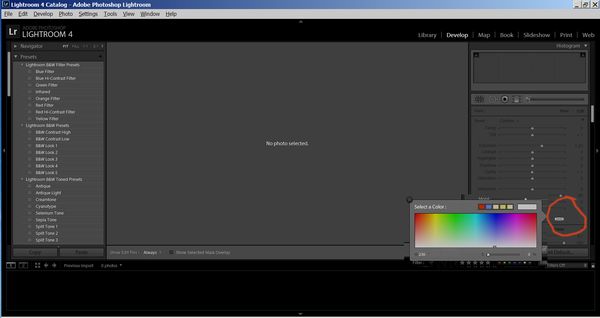
I would add a note to your answer, when the brush is active it will be biased to a colour unless the colour is switched off. On the attached image I have ringed the bias tool. Click on this until it the "Select Color" panel opens, reduce the saturation slider to zero. The little tool selector will then have an elongated X (black on white). When a colour is selected the X dissapears and the chosen colour is displayed.
Jan 29, 2013 07:24:05 #

E wrote:
after i use the adjustment brush it leaves a black/white circle unless i click on the adjustment brush again. is this the way its supposed to work?
also, when i try to sharpen the eyes, it colors the eyes!.
thank you
also, when i try to sharpen the eyes, it colors the eyes!.
thank you
Yes but you can change whether or not you want the edit pin to show
Jan 29, 2013 09:04:51 #
RichieC
Loc: Adirondacks
The circle shows up when you are using the brush tool, the one with the dark center is the active one, you can have more then one adjustment brush going in the same photo. The dot shows up about where you started to use it on each new brushed area.
You can also hit preview that will show the areas you have used for the selected "dot" in red. (lower left side as I recall.) These dots don't show up in the finished image.
You can also hit preview that will show the areas you have used for the selected "dot" in red. (lower left side as I recall.) These dots don't show up in the finished image.
Jan 29, 2013 12:04:55 #

Wendy2 wrote:
Here is a screen shot. Look in lower left corner you will see the "show edit pins".. Notice that I am in Develop. See the sliders that are for Exposure, Saturation, Brightness, etc. They should be set to the middle. You can do that by clicking on the word "Effect", top right of the same box those sliders are in. That will set them to neutral. Mine are not completely set to neutral because I made adjustments.
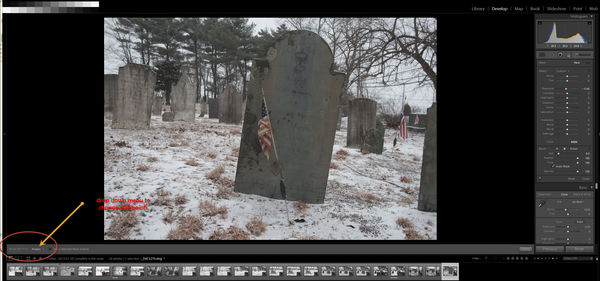
As Wendy says, look in lower left corner, (I've circled in red) for showing pin options. Next to the and just to the right I've circled the mask options. And up in the brush panel I've circeld the word Effect that you can double click on "to reset all" of your brush sliders and color picker to 0. Otherwise the brush settings are exactly the way you left them the last time you used the brush.
Jan 29, 2013 12:30:39 #
deskjet1uk
Loc: Yorkshire UK
The quickest way to remove the brush from your screen is simply to select it and hit delete.
regards
regards
Jan 29, 2013 12:32:47 #
deskjet1uk wrote:
The quickest way to remove the brush from your screen is simply to select it and hit delete.
regards
regards
But if you delete it, you are removing any adjustments you have made for that pin area.
Jan 29, 2013 20:13:24 #

When you brush on an area & it paints red, that is the "overlay" so you can see what area you selected to work on. To remove the color hit "o" (overlay), it will turn it off. It is useful when you want to select an area, make adjustments, then maybe remove them from some area, you can see where you are working & you can "erase" the part you don't want then turn the overlay off & on to see if you like the effect.
Just "close" the brush panel when you are finished & you won't see the circles until you open it again.
Just "close" the brush panel when you are finished & you won't see the circles until you open it again.
Jan 29, 2013 22:15:56 #
lhdiver wrote:
When you brush on an area & it paints red, tha... (show quote)
Thanks for the quick key shortcut. I am trying hard to remember them.
If you want to reply, then register here. Registration is free and your account is created instantly, so you can post right away.