color printing at CVS
Mar 11, 2023 13:41:24 #
kmielen
Loc: Eastern NC
DRM wrote:
To those suggestions I would add White House Custom Color, Minneapolis. Quality prints, reasonable pricing, two-day free shipping via FedEx. Minimum order is, I think, $16.
Thanks ever so much for this recommendation. I went on the WHCC website today to set up an account. Found the pricing to be very reasonable (less than half my local CVS). In addition, they will be sending me 5 sample prints so that I might compare their output to what I see on my monitor. Looks like a first-class operation. Once again shows the value of this forum.
Mar 11, 2023 15:28:31 #

Mar 11, 2023 16:32:10 #
JoSkalka
Loc: San Diego, CA
I've used CVS, but only for printing a 4x6 off my iphone. But since you're local, I would check out Georges Camera on Clairemont Mesa Blvd. Or for a really good quality print, look into Light Jet prints from John Watts. He's local as well and prints with light, not ink.
Watts Digital Imaging
https://wattsdigital.com/lightjet-prints
His prices are really quite good.
Watts Digital Imaging
https://wattsdigital.com/lightjet-prints
His prices are really quite good.
Mar 11, 2023 16:58:05 #

mmills79 wrote:
@burkphoto
Can you elaborate a little more what you mean and how you actually do this? What are the activities and steps involved? Is this a back and forth comparison or adjustment between the lab's equipment and the home monitor?
Can you elaborate a little more what you mean and how you actually do this? What are the activities and steps involved? Is this a back and forth comparison or adjustment between the lab's equipment and the home monitor?
1) Your computer operating system has an "ICC Color Management Engine." This is a software system that matches the color output capabilities of various devices together, using device profiles and "connection space" or "working space" profiles. In ICC color management, EVERYTHING has a numeric profile of its "color gamut" or "color space" — a 3-dimensional set of "color capability boundaries" described by numbers.
2) To make it all work, the entire system is based around a calibrated and custom-profiled MONITOR. Without this, you're just guessing.
> CALIBRATION makes the OUTPUT of a device produce a perfect gray at every brightness level from black to white. In other words, since monitors blend red, green, and blue light to make white light or any other colors, when you feed the monitor equal levels of red, green, and blue, you should get neutral gray at every combination of like RGB number sets. 0,0,0 is black. 255,255,255 is white. 255, 0, 0 is pure red. (In an 8-bit color model, 8 binary digits can describe 256 discrete values in each color channel, for 16.7 million total colors). 127,127,127 is middle gray. 40,40,40 is a dark gray.
> PROFILING measures the actual capability of a given calibrated device and creates a mathematical description of that capability. Profiles work, ONLY when each device is calibrated properly.
Calibrating and profiling monitors requires a hardware and software kit containing either a colorimeter or a spectrophotometer. This is a puck that you attach to the front of the monitor while running the software in the kit. After entering some parameters, you are guided through some physical "front panel" adjustments to the monitor. Then the software feeds ramps of red, green, blue, and gray values to the monitor, measures the actual color of these values, and creates a 3D lookup table used by the color engine. The software installs the monitor profile in your operating system for you.
OTHER device profiles:
Your camera generates raw files. When a raw file is processed *on your computer,* the software applies a camera profile for the specific brand and model of camera you use. This could be a default profile provided by the camera manufacturer, as in Canon Digital Photo Professional, or a default profile generated by a third party such as Apple, Microsoft, or Adobe (for use in Adobe Camera Raw, found in Bridge, Photoshop, Lightroom, and Lightroom Classic), or it can be a custom profile you create using an X-Rite ColorChecker Passport, or similar, and software such as Lightroom Classic.
Your camera also generates JPEG files. When it does, the camera processor converts the camera data directly into one of two "distribution" or "connection color spaces" — usually sRGB, and sometimes (for VERY special cases) Adobe RGB.
PRINTERS use ICC profiles to match standard distribution or connection color spaces such as ProPhoto RGB, Adobe RGB, and sRGB to the characteristics of the EXACT paper surface, printer model, and ink or process chemistry in use. Paper manufacturers usually supply generic profiles for various combinations of printers and inks with the paper surfaces they sell. Canon and Epson install their paper profiles when you install their printer drivers. You have to manually install third party profiles yourself, using instructions provided by the paper manufacturer for your operating system. Third party paper profiles are downloaded from the manufacturer and/or dealer web sites. Kits are available to make your own profiles, but they tend to be very expensive.
In practice, when you open a JPEG file:
The application and either the operating system or the application's color engine converts the color characteristics of sRGB to the particular CONNECTION color space you choose, if it has a wider color gamut (space or range) than sRGB.
Then, the image is converted from the connection space to the monitor color space, using the monitor profile, so you can see an accurate rendition of the file on your monitor. If you adjust and save the file, the data output is converted from the connection or working color space back to sRGB before the file is saved.
When you PRINT a JPEG file, the printing application color engine or your operating system converts the connection color space to the printer/paper/ink color space in use, and sends the data to the printer.
If the system is set up correctly, the color you print should be VERY SIMILAR to the color on your monitor. Some colors will probably look different, however, because cameras, monitors, and printers all describe (render) color differently, and have varying degrees of capability to do so. If the print is objectionably off color, or light, or dark, then you probably failed to set something correctly. It is a process you have to think through and practice methodically.
The exact specifics of how to set your system vary from Mac to Windows, from monitor to monitor, from calibration kit to calibration kit, and from software application to software application. Your abilities to read and comprehend manuals — and to follow procedures with precision — is crucial to your success.
From 2000 to 2005, I helped guide and manage the transition from film to digital technology at the portrait lab where I worked. Film scanning, color correction, and printing areas were all under my management responsibility.
Although primarily a project manager, I took a hands-on approach in guiding my five teams to learn how to use the tools. Implementing full ICC color management was extremely important to us! It saved hundreds of thousands of dollars in photo paper, chemistry, labor, water, power, and opportunity cost, by giving us the luxury of "What I see on the reference monitor is going to look (mostly) that way, on paper, plastic, or canvas, coming out of the printer."
We had a blend of Noritsu mini-lab printers (two different models with two different technologies), plus Epson inkjet printers, Eltron, Pebble, and Polaroid brands of dye-sublimation plastic I.D. card printers, Konica-Minolta electrostatic laser printers (color copiers with raster image processors attached), and a NexPress. All used ICC profiles! If the color looked good on any of our nine color correction department reference monitors, it looked reasonably good when we saw the finished products. If it didn't, we usually had a device calibration issue, or someone in color correction had a "bio issue" (illness, excess caffeine or allergy medicine consumption, working too soon after being out in sunlight, pregnancy, not enough sleep, etc.).
If you adjust color of your images, do so in a dimly-lit room with diffused light bounced off the ceiling. Keep the surrounding area, including your operating system monitor desktop, as close to neutral gray as possible. Allow your eyes to adapt to the ambient room light for five minutes or more before adjusting color. Your monitor should be warmed up for 15 to 30 minutes before use (and any calibration/profiling session).
FAR MORE information can be had from X-Rite, Calibrite, or Datacolor, makers of calibration and profiling and color management solutions. They have white papers you can download, and videos on YouTube you can watch to learn more. It is NOT rocket science, but it does take a bit of discipline and patience... Good luck!
Mar 11, 2023 19:47:20 #
terrys1943
Loc: Illinois
I highly recommend MPIX.com for prints of all sizes. Superior quality and speedy service along with very reasonable prices. I have been using them for over 10 years with no problems. I started using them when the custom lab where I worked closed. I was the main printer there for over 5 years and the quality from MPIX easily matched the work I did as a custom printer.
Mar 11, 2023 20:44:12 #
Sidwalkastronomy
Loc: New Jersey Shore
terrys1943 wrote:
I highly recommend MPIX.com for prints of all sizes. Superior quality and speedy service along with very reasonable prices. I have been using them for over 10 years with no problems. I started using them when the custom lab where I worked closed. I was the main printer there for over 5 years and the quality from MPIX easily matched the work I did as a custom printer.
I've been using metallic paper and love the results and wondering if it's a popular option?
I use Merridanpro and have excellent results. I just hate how you have to upload your prints through there software
Mar 12, 2023 03:26:47 #
RodeoMan
Loc: St Joseph, Missouri
epd1947 wrote:
I don’t understand the logic in using the kind of high end gear that cost many thousands of dollars and then having cheap machine prints done at a drugstore - totally illogical- CVS is ok for 4x6 prints to give away to family of friends but for serious work you need to work with a professionally staffed lab.
Maybe some folks aren't in your position of having thousands of dollars invested in high end gear and most of their prints are, as you say, 4 x 6 to give away to family or friends, or even more likely to be kept in photo albums to be enjoyed over the years.
Mar 12, 2023 12:14:49 #
RodeoMan wrote:
Maybe some folks aren't in your position of having thousands of dollars invested in high end gear and most of their prints are, as you say, 4 x 6 to give away to family or friends, or even more likely to be kept in photo albums to be enjoyed over the years.
In the age of FaceTwit, InstaBook, YouSpace, and MyTube, “What’s a photo album, Daddy?”
Mar 12, 2023 14:38:17 #
delder
Loc: Maryland
burkphoto wrote:
In the age of FaceTwit, InstaBook, YouSpace, and MyTube, “What’s a photo album, Daddy?”
Yes! The media our images are now viewed on IS primarily digital.
My sort of nightmare is SOOC from a Film Camera, scan the negative and print out the scan output.
Mar 12, 2023 15:55:45 #
delder wrote:
Yes! The media our images are now viewed on IS primarily digital.
My sort of nightmare is SOOC from a Film Camera, scan the negative and print out the scan output.
My sort of nightmare is SOOC from a Film Camera, scan the negative and print out the scan output.
I've been on a quest for some time to digitize my old film negatives from the 1960s, '70s, and '80s. I use a camera, not a scanner.
Many of the images look great on their own, and some make interesting special effects, as well.
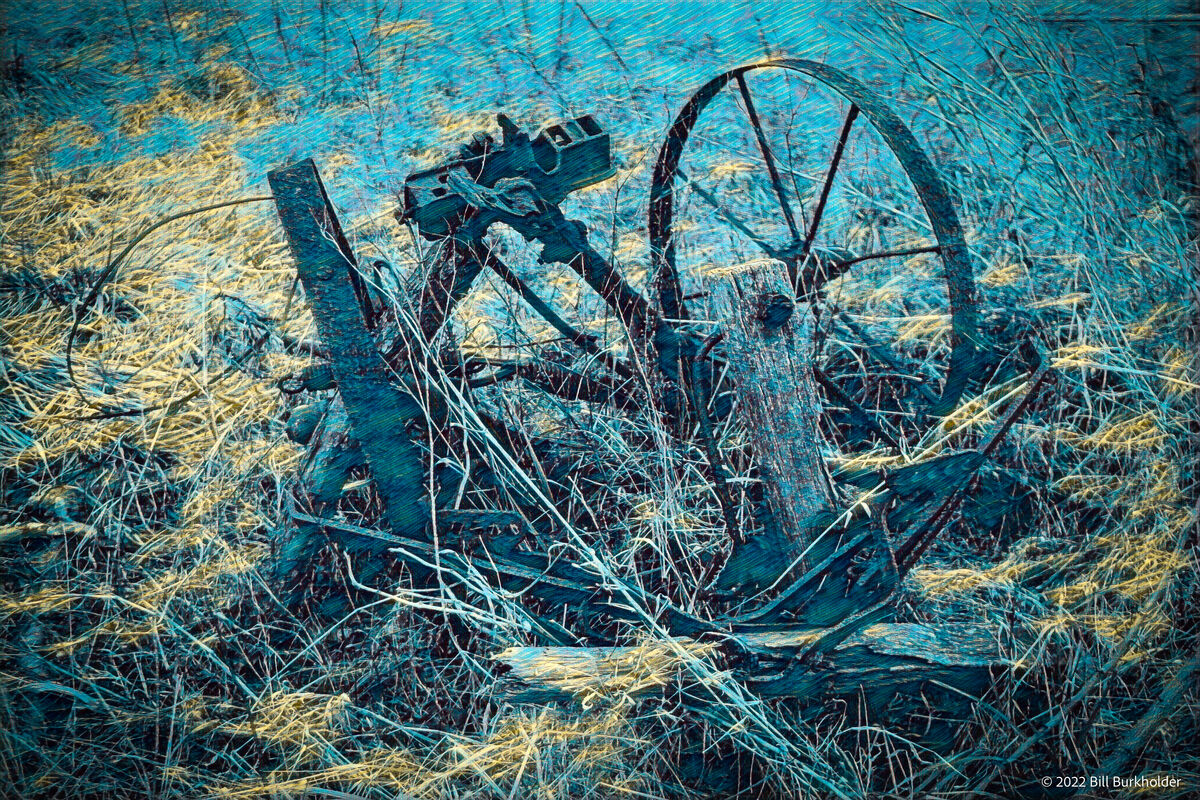
Moonlight Fantasy on the Old Farm, 1976. Tri-X negative digitized to raw, processed in Negative Lab Pro, Lightroom Classic, and Photoshop Neural Filters.
(Download)
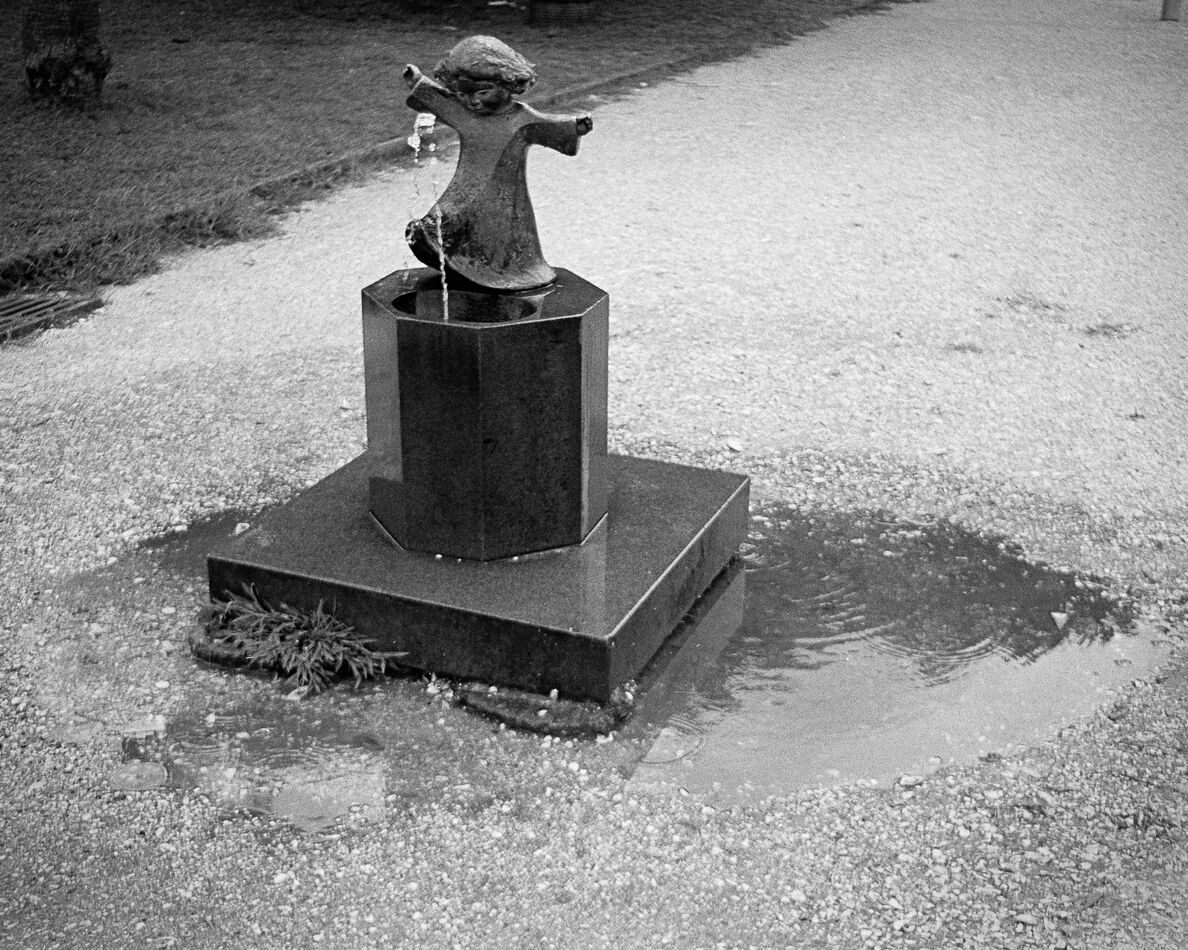
Random Fountain, Charleston, SC, 1976. Tri-X negative digitized to raw, processed in Negative Lab Pro and Lightroom Classic.
(Download)
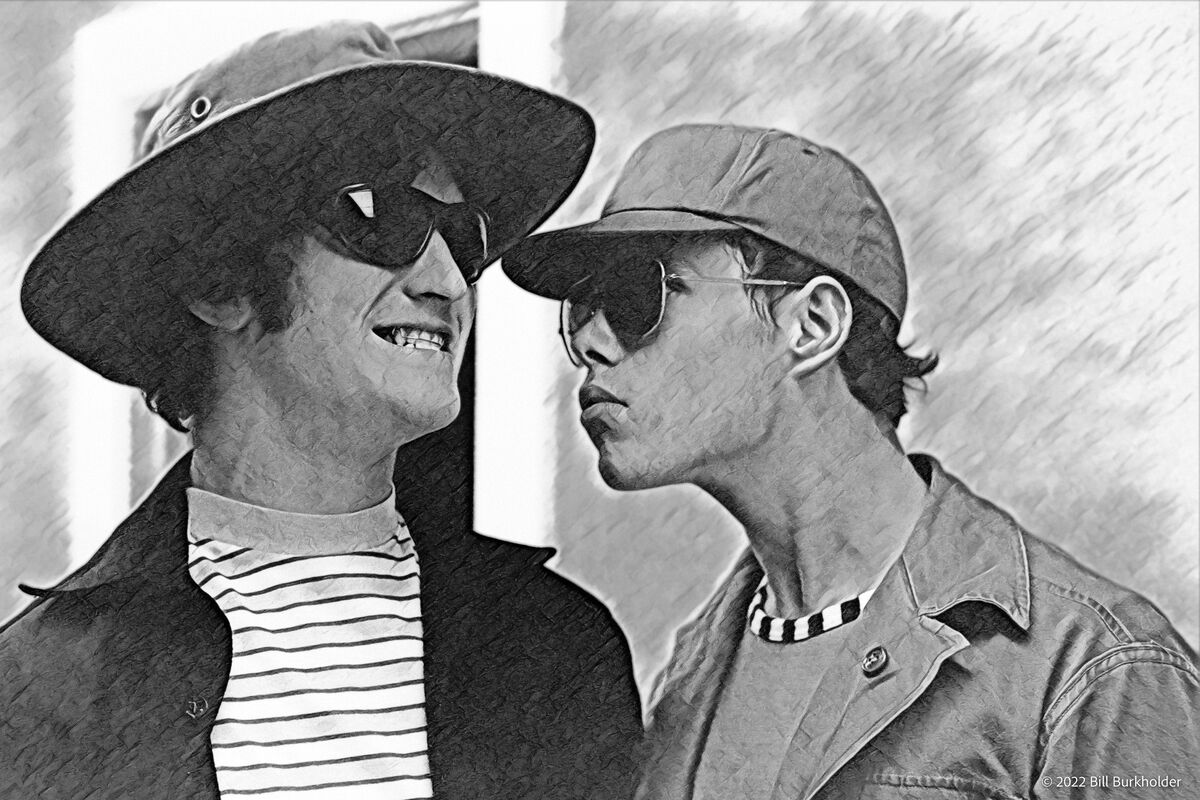
Freshmen Tomfoolery, 1973. Tri-X negative digitized to raw, processed in Negative Lab Pro, Lightroom Classic, and Photoshop Neural Filters.
(Download)
Mar 12, 2023 17:29:10 #
delder
Loc: Maryland
burkphoto wrote:
I've been on a quest for some time to digitize my old film negatives from the 1960s, '70s, and '80s. I use a camera, not a scanner.
Many of the images look great on their own, and some make interesting special effects, as well.
Many of the images look great on their own, and some make interesting special effects, as well.
You have given me some hope
to start that process. I have many of my old drugstore prints, negatives and some 3.5 Floppys 💾 of my film work. Unfortunately, the Floppys have minimal resolution, so I will have to get serious with the prints or negatives! I do have a legacy T mount slide/negative adapter but need a good light source.
Ideas?
Mar 12, 2023 18:56:53 #
delder wrote:
You have given me some hope
to start that process. I have many of my old drugstore prints, negatives and some 3.5 Floppys 💾 of my film work. Unfortunately, the Floppys have minimal resolution, so I will have to get serious with the prints or negatives! I do have a legacy T mount slide/negative adapter but need a good light source.
Ideas?
Yes, read my white paper:
Mar 12, 2023 21:50:25 #
Mar 12, 2023 22:08:25 #
RodeoMan
Loc: St Joseph, Missouri
delder wrote:
Yes! The media our images are now viewed on IS primarily digital.
My sort of nightmare is SOOC from a Film Camera, scan the negative and print out the scan output.
My sort of nightmare is SOOC from a Film Camera, scan the negative and print out the scan output.
Please ignore my "yes" reply that was a mistake. At least when you had a printed copy of an image, there was a possibility of that image lasting into the future. I wonder how available your digitized images will be 50 or a 100 years from now. Good luck on your great grandchildren, who very well might be interested in learning their family history, being able to access them. Then there is the matter of more than just family members being recorded, there are buildings, street scences, all sorts of things depicting life in our times. These will all be lost for the most part. I collect examples of photographs by commercial photographers from St Joseph, Missouri. I have never gone into antique store or thrift shop and found an envelope of SD cards or CD's or any other digital storage choices labeled "family photographs" or anything else. If you have no interest in having your photographic endeavor with all that you have captured being carried into the future, then you are taking the exactly correct approach.
If you want to reply, then register here. Registration is free and your account is created instantly, so you can post right away.