Optimal Image Light Adjustment
Feb 15, 2023 17:51:12 #
mostsports
Loc: Mid Atlantic
Processing Basketball photos frequently (in my experience) requires lightening the image. The techniques available to me are in-camera ISO settings and/or post-processing the raw image. Sharpness and noise reduction become an issue. So attaining the "best" from my calibrated monitor takes some time. "Best" is a relative term.
Analyzing the issues includes assessing whether in-camera ISO produces better image-quality than post-processing. And the answer may be dependent on the in-camera algorithms. So the questions i ask: Are there any creditable trade-off studies or guidelines to recommend?
Have UHH photographers found in-camera and post-processing combinations that work for them?
My current cameras are Nikon D500 and D750.
Thank you.
Feb 16, 2023 08:46:17 #
spraguead
Loc: Boston, MA
I used to shoot with the D750, and found it to be an excellent low light camera. The challenge shooting indoor sports will always be lack of light. I used to shoot hockey and found that underexposing be 1/3 of a stop would produce a file that could be processed to a nice final image. I only shoot raw, and edit in LRC. I've learned over the years that getting the best tone, while also getting the least amount of noise, requires a bit of finesse in adjusting shadows, blackpoint, and highlights, not just the exposure slider. There are a lot of youtube videos on different takes on the subject.
Feb 16, 2023 10:37:58 #

There is such a thing as iso variance...it varies by camera. Meaning the noise level on my camera is the same at 100 as it is at 320.
Every camera is different.
If you invest in a noise reduction third party software...go ahead and push that ISO...play with it at home...spare time.
You will quickly figure out (well not that quickly) when your images become unacceptable. There is your ceiling.
Every camera is different.
If you invest in a noise reduction third party software...go ahead and push that ISO...play with it at home...spare time.
You will quickly figure out (well not that quickly) when your images become unacceptable. There is your ceiling.
Feb 16, 2023 11:15:54 #

mostsports wrote:
Processing Basketball photos frequently (in my exp... (show quote)
You can compare test charts of those cameras' performance here: https://www.dpreview.com/reviews/nikon-d500/7
Use the configurator to switch camera models and ISOs and in-camera JPEG vs RAW with no processing. You'll see that the D750 is about a stop less noisy at high ISO than is the D500.
In raw, you can expose "beyond" the right side of the histogram. How far depends on the camera. Run tests to see what you like. The preview image, a JPEG embedded in the raw file, will appear overexposed. But if you are careful, you can recover highlights from the raw file that the JPEG in-camera processor threw away, effectively giving you another stop or so of usable dynamic range. Again, you must test to determine the limits for each camera model.
Feb 16, 2023 11:29:30 #

mostsports wrote:
Processing Basketball photos frequently (in my exp... (show quote)
You are better off with low light photography getting a good exposure out of the camera, even if it means raising the ISO, than you are underexposing and trying to lighten the photo in post. Underexposing can result in more noise.
Feb 16, 2023 11:30:35 #

Theory suggests that there will be an optimum mixture of ISO and PP brightening to get the resulting image to the required level of brightness with the minimum amount of noise. The down side to raising ISO is that the dynamic range suffers, so if all other considerations were equal you would want to limit the use of high ISOs for that reason. If I had to make a guess as to what the optimum balance was I would try ISO 400 and let the camera underexpose.
You probably have a preferred shutter speed for basketball and you probably shoot at the widest aperture that your lens allows, which I suspect means that ISO 400 is going to result in underexposure. Do the brightening in PP and use one of the AI methods of noise reduction to deal with the noise which will inevitably appear when you do the brightening. Limiting the ISO to 400 means that you're affecting the dynamic range only marginally and you can probably assume that brightening in PP is not going to produce more noise than brightening using higher ISO values.
There will be an optimum mixture of ISO/PP brightening but I suspect that it's not critical. The dynamic range is probably a more significant factor. Some cameras have more than one native ISO but I don't think the D750 is one of them.
Feb 16, 2023 11:35:18 #

burkphoto wrote:
You can compare test charts of those cameras' perf... (show quote)
Good advice. For best low noise performance in a low light/high ISO situation, you want to use all the dynamic range possible by pushing the exposure up as far as you can without blowing highlights (expose to the right) and shoot raw. The worst thing you can do is to underexpose and then push the brightness up in post processing. Use the D750, the fastest lens you have that will provide the FL you need, use just enough shutter speed to freeze the action (like 1/500), set the aperture as wide as you can to get the required DOF and isolate the subject, and let the ISO go as high as you need, even up to 12,800, for the max exposure without blowing the highlights (I use auto ISO). Fix the noise in post with a noise reduction tool such as Topaz Denoise. If you have to lighten the image in post, you’re underexposing, which is the kiss of death. Open that aperture and push up the ISO - the D750 is a very competent high ISO camera and a stop better than the D500 cor this type of shooting.
Feb 16, 2023 12:57:14 #
TriX wrote:
Good advice. For best low noise performance in a l... (show quote)
The dirty little secret of the histogram display on cameras is that it only displays the histogram of the 8-bit JPEG preview image. Doubters should do an experiment.
> Meter a gray card for correct exposure in full auto mode. WRITE DOWN the ISO, shutter speed, and aperture suggested for the lighting on the scene. Be sure the ISO is high enough to allow at least a one stop adjustment of the aperture in the overexposure direction. (i.e.; if your lens is f/2.8, and the ISO is 6400, the shutter is 1/500, and the lens is at f/5.6 for the gray card autoexposure, you still have room to open the lens by a stop or more.
> Now, set the camera to full manual and enter the ISO, shutter speed, and aperture you tested as correct for the illumination on the scene.
> Set EXPOSURE COMPENSATION for +1 stop. Leave the camera on manual ISO, manual shutter speed, but set auto aperture (this is called shutter-priority auto, the S setting in PASM). This will tend to overexpose the JPEG by a full stop, but IGNORE that fact. Make a few dozen test exposures, saving only raw files. Again, the previews will be blown out, but you aren't interested in the previews.
> Import the images into your computer. If you use Lightroom Classic, select all the imported images and drag the exposure slider one stop to the left. The result should make most of the images look fairly normal. The highlights should return, mid-tones should be correct, and you should still see shadow details.
> Now you can select and tweak individual images one at a time, adjusting exposure, black level, shadows, highlights, white level, and contrast (and all the other parameters you see fit to modify). Of course, you can copy those settings and apply them to other exposures, either individually, in groups, or all at once. The result is less noise and better range.
> If this isn't perfect, try again, with either a higher or lower exposure compensation value. Adjust in 1/3 stop increments.
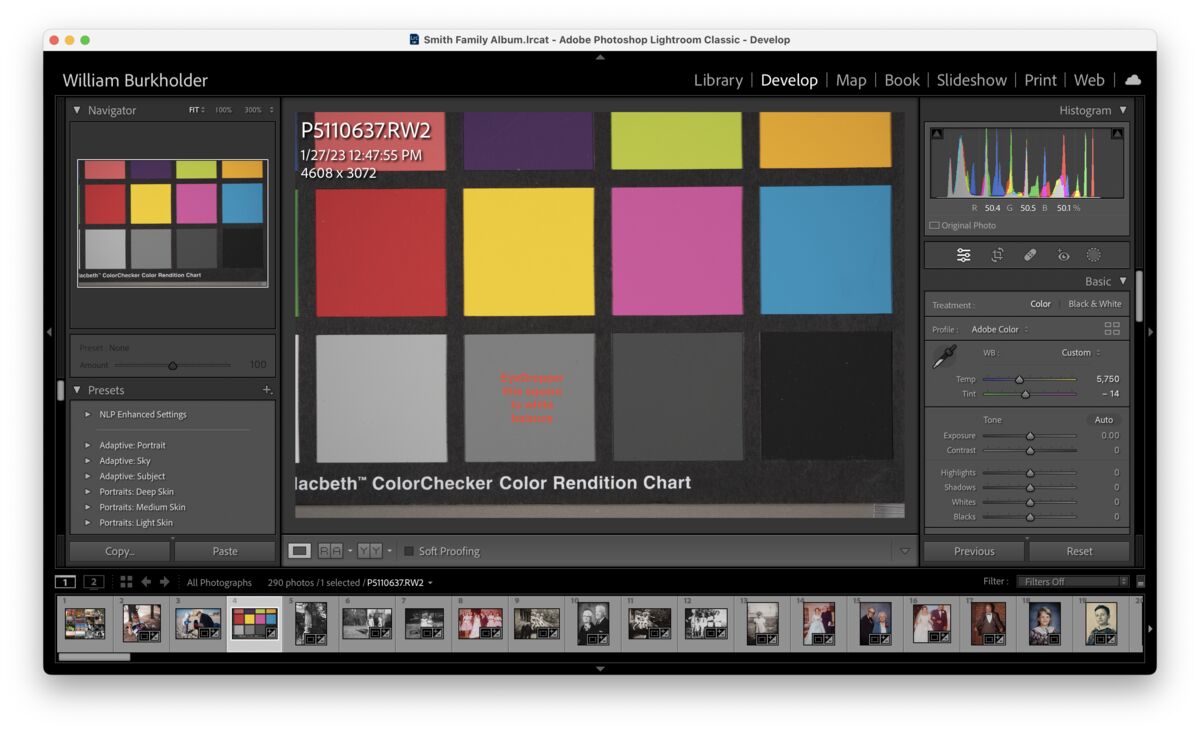
HINT: For best white balance opportunity in a gym, expose a ColorChecker chart at the start of the game. Gym lighting, especially in older high schools, is awful. You will probably never get rid of all the color cast, or render all the colors on the chart correctly, but you can get "pleasingly close to neutral" color if you have a reference. After initial exposure adjustment, as explained above, use the eye dropper tool on the middle gray patch of the chart to adjust both color temperature and tint automatically. See below. The RGB values should be close to 50% when exposure is correct. See sample below.
View the Download to see colors with ICC profile applied. UHH strips profiles from thumbnail previews!
(Download)
Feb 16, 2023 14:09:50 #

mostsports wrote:
Processing Basketball photos frequently (in my exp... (show quote)
You have to play with the cards your dealt - I have found that Topaz AI works very well
Feb 16, 2023 14:23:22 #
If you want to see quickly and accurately how far you can push the exposure to the right, spending $19.95 for a copy of Raw Digger and taking a few shots and then comparing the camera histogram to the raw histogram from Raw Digger will tell you instantly how far you can go past the in-camera histogram (or “blinkies”)
Feb 16, 2023 14:45:25 #
mmills79
Loc: NJ
JohnSwanda wrote:
You are better off with low light photography getting a good exposure out of the camera, even if it means raising the ISO, than you are underexposing and trying to lighten the photo in post. Underexposing can result in more noise.
I don't disagree fundamentally with the premise: you can get more noise from underexposing and trying to recover exposure in post processing.
Practicality though, you need fast shutter speed for sports and other indoor events like concerts. Given that there are limited "knobs" you can tweak in low light situations (i.e. increase ISO, open up aperture - use a fast lens, use stabilization, you can also increase shutter speed by under exposing), sometimes under exposing has to be in the mix or you can't get the shutter speed you need with a specific camera. If your shutter speed is too low to begin with, then post processing can't help (if part of the interest is a sharp picture). If you try to increase shutter speed by increasing ISO you also run into limitations that you cannot solve for in post processing. I find that I really start to lose good detail when I up the ISO beyond 3200. At 6400 the detail is notta so hotta on a D500 or a D7200. I don't think (but I could be doing something wrong here) that you can recover that detail or remove the noise with an app like Topaz at ISOs >3200. So I typically max at 3200, as wide open as allowed, stabilization on, and I often have to under expose to get high enough shutter speed (1/800 or better - agreed can go a little lower sometimes situationally dependent but, I usually want >800 in most cases).
I don't know everything so, in the interest of learning - teaching an old dog new tricks...
.....are there other knobs to twist or what I am missing or doing wrong?
Feb 16, 2023 14:59:38 #
mmills79 wrote:
I don't disagree fundamentally with the premise: y... (show quote)
You’ve described exactly the reason to use FF (and relatively fast lenses) under these circumstances. That difference between ISO 6400 for APS-C vs 12,800 with the FF for equivalent noise is the difference between 1/250 and 1/500. Shooting indoor low light sports is exactly what caused me to move to FF, and it was a very noticeable positive difference. Now, I just leave the ISO on auto, and if it gets to 10,000 to 12,800, I don’t worry - I can fix it in post. I find that 1/500 at f2.8 works well for basketball and usually 1/250 at f2.8 works OK for wrestling where the gyms are really dark. My default for wrestling is a 70-200 f2.8L, but recently I’ve been trying my 135 f2L and keeping a 1.4x matched extender in my pocket. Not as versatile, but SO much lighter for holding up all day/night.
Feb 16, 2023 15:09:19 #
mmills79 wrote:
I don't disagree fundamentally with the premise: y... (show quote)
There is no substitute for a camera with 14-15 stops of dynamic range. Those old Nikons — D500 from 2016, D7200 from 2015 — are a full two or three generations behind in sensor design. Both are APS-C, which, sadly, is usually about a stop noisier in low light than a full frame sensor of the same generation and pixel count.
I know of sports photographers whose ISO settings START at 3200 and go as high as 25,600. But they're using the latest full frame mirrorless models from Sony, Nikon, and Canon. They (or their employers) paid a BIG premium for that performance!
The rest of us mere mortals make do with technique and finesse and software...
In choosing an ISO, there has to be some sort of consideration for end use of the images. If they're for 24" by 36" posters, that's a different story from a two-column by six inch photo in a newspaper, or an image on a site people read on their phones and tablets. The smaller it is, and the lower the resolution of the display or print process, the higher you can push that ISO or the lower the shutter speed can be before anyone other than the photographer will care about it.
Feb 16, 2023 17:09:55 #
mmills79
Loc: NJ
TriX wrote:
You’ve described exactly the reason to use FF (and... (show quote)
This is a useful discussion. I play & photograph volleyball - not just recreational but at a competitive level. I also like to photograph concerts. In either case, I have really had to push the cameras and I believe I should be able to do better with FF, as you pointed out.
From this discussion, I think you have given me some great personal feedback and direction that drives me further towards finding an upgrade camera. If I can get to (and possibly even over) that 6400 ISO limitation, I think I can get the shutter speeds I need for those events. So now the quest begins for the appropriate mirrorless and/or FF. I had been hoping Nikon would come out with a better APSC Z but it doesn't look like it will, any time soon so I could use my existing lens'. Maybe the new Cannon R50 will turn out to be that camera with good IQ at higher ISOs - but I haven't seen any reputable reviews that discuss image quality yet......
Feb 16, 2023 17:12:06 #
mmills79
Loc: NJ
burkphoto wrote:
There is no substitute for a camera with 14-15 sto... (show quote)
Thank you for your insight! If you have any recommendations, I be interested to hear. Been looking at the new Canon R50 but I may have to bite the bullet and get off APSC.
If you want to reply, then register here. Registration is free and your account is created instantly, so you can post right away.